Last summer, we were obsessed with shibori indigo tie dying. No, really . . . we just about dyed anything white in sight. So when Free People asked us to include a DIY in their guest blogger series, we knew a new tie dye project was absolutely in order. And as the weather is beginning to warm up, what better time than now to start experimenting with reverse tie dye using bleach! Black tees and tops: watch out!

– a 100% cotton black shirt (we used this Free People tee)
– a few cups of bleach
– a bucket
– a pair of gloves
– a few rubber bands
– 2 flat shaped objects used for binding

To make a grid-like pattern, fold the shirt like an accordion and bind it between two pieces of wood or other flat shaped objects. Hold the shirt in place by wrapping a series of rubber bands around the bind. Anything used to bind the clothing will prevent the bleach from penetrating, and the rest of the exposed fabric will bleach and turn color. Click here for more binding alternatives.

Before you start bleaching, make sure you are wearing gloves and working outdoors or in a well ventilated area. Dilute approximately 4 cups of bleach with 1 cup of water. Submerge the shirt into the bleach for only a couple of seconds. Watch it very carefully because depending on the thread count of the clothing, the color can turn very quickly and the bleach may start to erode the fabric. As soon as the black transforms into a rusty brown color, immediately remove it from the bleach. Give it a quick rinse, unbind it, and then hang it. (Click images to enlarge)

The rusty brown color will slowly fade into a beautiful lighter shade as it begins to set. Once its dry, wash the shirt in a washing machine.

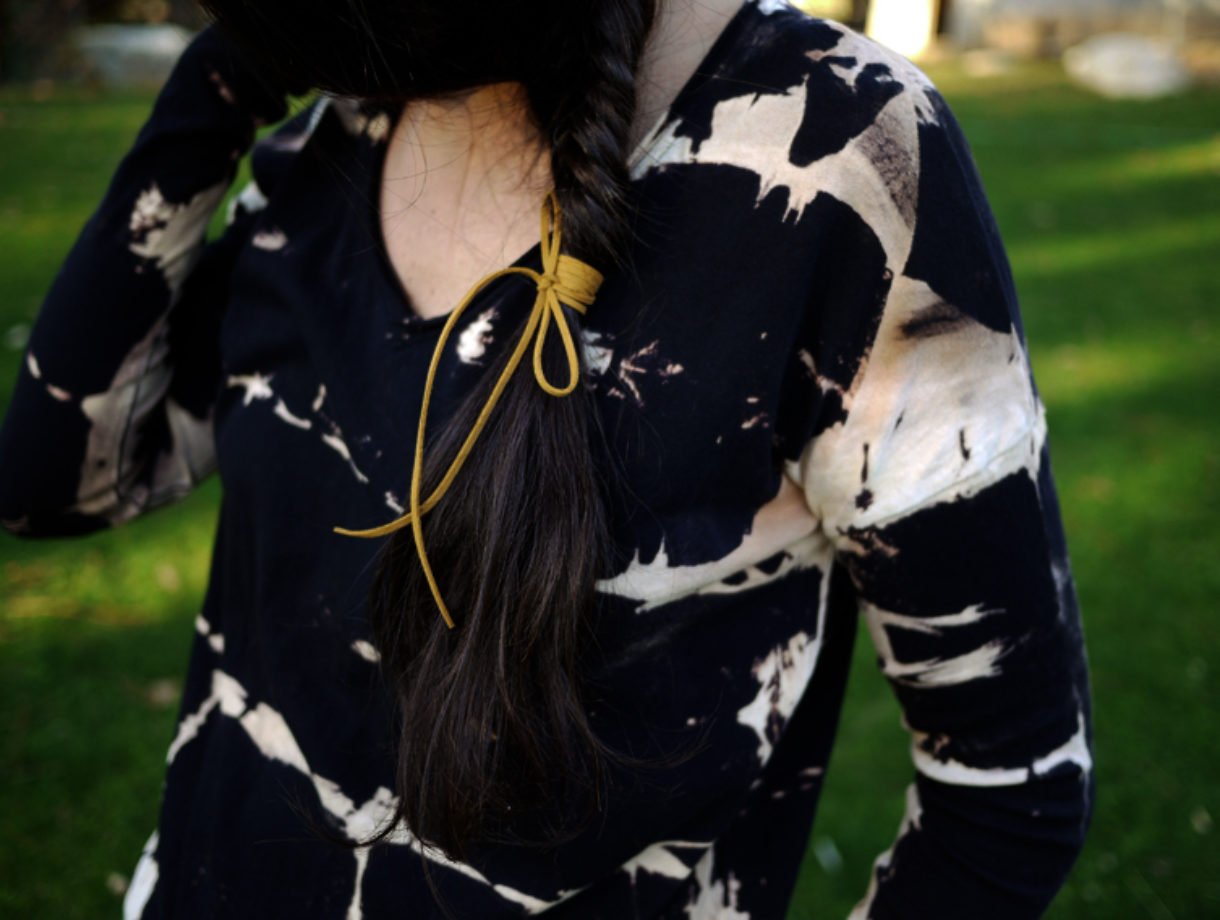
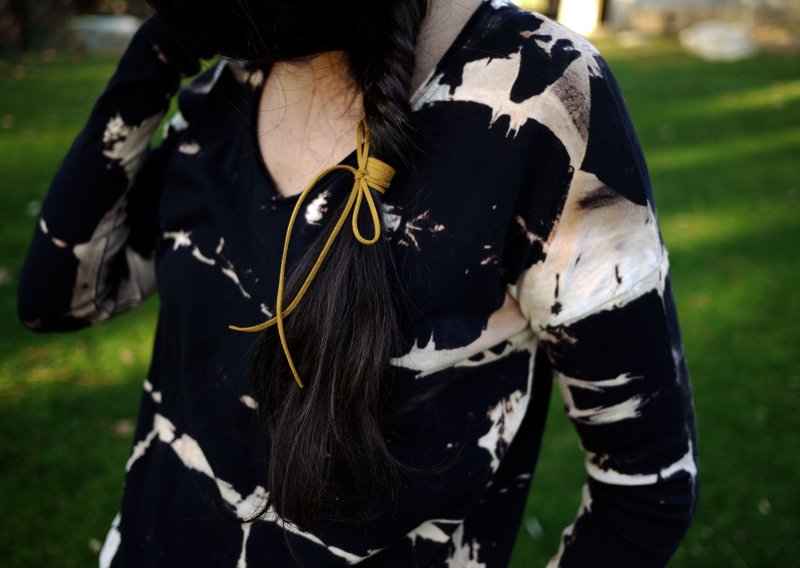
Your reverse bleach tie dye shirt is ready to wear!

(top image from here, rest of images by HonestlyWTF)
Awesome!!!
Hey! Do you think bleach tie dye will work on light colored clothing? I’m looking to bleach tie dye a light beige sweat suit. Thank you!
Hmmm, hard to say. Depends on how “dark” your beige sweatsuit is! The darker the fabric the better as the contrast will pop more!
ohhhh! must try this 😉 came out looking lovely!
Amazing tutorial, love how that shirt looks!
xoxo
http://fashionagony.blogspot.com/
The result is amazing!
I just reversed tie dyed brown heavyweight curtain panels, 8 of them. And they are SO perfect, im honestly really impressed, better than I could’ve imagined.
Have wanted to try this for a long time! I did once use bleach to paint a design on a dark shirt. It looked good but the shirt developed holes where it had been bleached after a few months.
So I would highly recommend not leaving the bleach on too long and treating the bleached garment very delicately. On the other hand, its so easy to do, if the first one falls apart, you can always make another!
ooooh! fun project. that tie die comes out great as well. thank you for sharing this.
http://wordbyjessie.com
Oh wow I LOVE this! And I’m not a huge tie-dye fan, but the reverse action is awesome. Thanks so much for posting this! I can’t wait to try it out.
http://nomadic-d.blogspot.com/
OBSESSED! Will definitely have to do this one. I feel like it would be fun to do with a group of girls. In a backyard. This Spring. xoxo
Love this DIY and will definitely be trying it soon. Thanks for sharing!
Wow I really like it! Normally not the biggest fan of tie-dye but clearly I have been thinking of the wrong kind:)
xx
Emy
http://sweetpromises.tumblr.com/
i love that grid pattern but i can’t seem to figure out how you folded it. it looks like a lot of shirt got bleached but it turned out that only bits of it was. how did you do it??
I totally tackled a similar DIY recently, not tie dye, but bleach spattering a black garment. I love the results of bleach on a colored garment! If anyone wants to see how I did my bleach treatment you can follow this link. http://huntgatherfashion.com/diy/
great DIY thanks, i definitly do it this weed-end!
xx
Can’t wait to try this! Thanks for sharing. <3
I find the best DIYs on this site. They’re always so amazing!
wow love it its amazing!!
http://www.ohmydior.org/
Augh I can’t keep up with you both!! Another one on my docket of Honestly wtf DIYs…
I dip dyed a plain black tank top dress that I had bought second hand, and it turned out amazing. The hem stayed black but the fabric turned into a lovely rose/creme/brown array of colors. I splattered a little bit of bleach around too for effect. It reminds me of gypsies and looks great with other tops layered over it. Bleaching is so easy and cheap!
This is incredibly amazing! I cannot WAIT to do this! Killer ideas as always ladies!
xoxo
Lia
love this DIY! cannot wait to try!!
always giving great inspiration, thanks!!
http://prettylittlethingsbymelissa.blogspot.com/
ohhh! i love this. you gals are BRILLIANT!
love your DIY!!!
http://lovelyfringe.blogspot.com/
I absolutely love this! Can’t wait to try it 🙂
xoxo maria
Can’t wait to try this!
http://rebellefleur713.blogspot.com/
Oh my gosh, thank you!! I have had a plain boring black kaftan and it needed spicing up. So, with your powers combined, I am going to shibori bleach tie-dye it!
YAY!!! thanks for refreshing my wardrobe. 🙂
This is a great post! I love tie dye this season and this is a great DYI tutorial!
Brooke, http://www.snowingLove-bd.blogspot.com
Great diy. Definitely need to do that to one of my shirts.
http://www.fashionablecollections.blogspot.com
Ahh! OMFG! All your DIYs are so friggin cheap and easy. Its eating up all my spare time. But frankly, I LOVE IT!!! 😀
Aaaaa! Now my shopping list includes black t-shirts, rubber bands and hex nuts to make that bracelet DIY. I will be visiting your site daily now! Thanks!
Adding this to the list of DIY projects I need to do over spring break. Love you guys!!
omg im making this now. that shirt is gorgeous!
GAH!! I love love love this!! I have been looking for the perfect top top tie dye but I wasnt exactly going to do it this way. I LOVE how yours came out though so I am totally stealing the stick method!!
http://www.glamlatte.com
Really adore this. I bought a black shirt for another project the other day, then realized that I couldn’t use it. So now I know what I’ll be doing with it instead. Thanks so much for the DIY. 😀
I tried it! check it out here:
http://nomadic-d.blogspot.com/2011/03/reverse-tie-dye-surprise.html
I’ve been wanting to try Shibori for the longest time. Thanks for the tutorial. This is great!
Love Love Love
http://www.MaycieAfterFive.com
oooh! really think i may try this!
january, x
jessicajanuary.com
Oh So Pretty. And I love your one Nomadic D – it turned out beautiful, even if unexpected 🙂
Wow!! Love it!!
Loved this tutorial- I tried it the first warm weekend of spring! My tops came out well 🙂 http://dontmisit.blogspot.com/2011/04/diy-bleach-tie-dye.html
Great! I should try this one!
http://www.pburch.net/dyeing/FAQ/neutralizingdischarge.shtml
This is a great project and to make it even better, read the info at the link above. Be sure to read the part about using Hydrogen peroxide (readily available at your local drug store) to neutralize the bleach so you fabric will not be weakened. If you read Paula Birch’s site you can learn all kinds of things about dye and discharge. (she is a chemist)
I have been working with bleach dye ever since I saw this tutorial– the results are fantastic and I can’t thank you enough! However, I do have a couple of questions…
Q1: How long does it take for the bleach to usually fade to a white?
Q2: Is there anyway (other than bleaching again) to aid in the fading process?
Q3: Is there any way to stop the fading?
Thanks!
do the shibori techniques also work for bleach tie dying? For example the one with stones?
Decided to give this a try and it turned out great! What an easy project for something so cool. I linked back to this tutorial as well because it’s so cool. 🙂
http://entertainingmadness.typepad.com/entertaining-madness/2011/07/crafts-and-inspiration.html
Can you give more step by step instructions on folding please? I made two shirts and did the accordion style, but they both did not come out with the grid pattern as the example above. the first time I did not bind the boards together tightly enough and the second shirt came out with only vertical stripes. Love this idea, but I need a bit more help. Thanks!
@Elaine, make sure you’re not doing a straight fold but an accordion/zig zag fold. once you’ve folded the shirt from top to bottom, fold the shirt left to right (accordion once again). be sure to bind tightly and you should be good! hope that helps!!
To stop the caustic effects of bleach on fabric, you have to use something to neutralize the bleach. The easiest thing to use is hydrogen peroxide. Rinse your fabric after bleaching and just pour the peroxide right on, enough to saturate all the bleached areas. This won’t do a whole lot to stop the degradation of synthetic fibers, pure cellulose fabrics work best (cotton, for example) but it will slow it down a little.
Don’t use vinegar! It can combine with the bleach to make a toxic gas. If you really get into bleaching, there is a product called Anti-Chlor that is excellent.
Excellent tutorial, by the way. Love the look.
I’ve wanted to attempt Shibori for the best time. Gratitude for the tutorial. This is great Post
Ventilation is key. I became obsessed with this process a few years back when we lived in a tiny studio in Seattle with no windows in the bathroom. I apparently did it for too long and ended up loosing my sense of smell for a few hours. Really freaked me out!!!
this turned out amazing, i did an american apparel dress and its so cute! thanks
such a fantastic diy
woooooooooooow this is awesome!! i’ll definitely try this one i love you guys for sharing such amazing stuff 🙂
This is a great idea for a colored shirt you accidentally got a bleech spot on. You can revitalize your closet! Perfect
How do I get the pattern to come out as white as the shirt in the picture? Every time I try it comes out very red instead.
Would this work on brown? I have a cute brown summer dress that has a bleach spot on it and I’d love to recreate the same effect as the black top. Would I need to do anything differenty?
I love the effect. 🙂
would it be okay to use a different colored shirt to bleach?
love it!! tried it myself today, so easy and a great effect!! thx
I have used this to revive old pillow cases. Wear gloves and something you don’t care about. String works well as a resist instead of rubber bands. Also…folding paper the way you will fold the fabric, and then mark the fold lines on the paper to test possible fold techniques, will help you with the design…makes for fewer disappointing surprises.
How cool. I can’t wait to try this.
I love this tutorial, and it opened my eyes to a whole world of fun things to do with bleach!
Painting designs onto t-shirts is my favourite so far though:
http://generationartisan.blogspot.co.uk/2012/06/how-to-henna-peacock.html
Thank you for this great tutorial! I really want to recreate the shirt in your inspiration photo. I can’t figure out though how to get the bottom part of the shirt to be darker than the top. Also, it’s shocking how few tutorials there are online on the shibori technique! I’ve only found a couple and not nearly as detailed and illustrative as yours. Thanks Honestly…WTF! 🙂
I tried this out and wrote about it on my blog! I did a blazer instead of a shirt and it came out pretty nifty….
http://radmagiclove.com/2012/07/18/attempt-3-honestly-wtfs-diy-bleach-tie-dye/
I’m baffled! I’m stunned! I’m flummoxed! I tried this technique with a $2.99 T-shirt from Walgreen’s, a Foot Locker irregular. It was deep purple and I thought pale lavender with a deep purple pattern would be cool. I tied it up to make dark circles, pinching up bits here are there and binding them tightly with stout button thread. I filled the sink with the right ratio of bleach to water and popped it in. I watched. I poked. I swirled. I waited. After a few minutes I took it out, grouchy that nothing seemed to be happening to the purple, but knowing I better not leave it in any longer. I started clipping the threads I had tied it with and my eyeballs almost came out of my head! The places where it had been tied had turned bright fuschia!! I continued clipping and unwrapping threads and more and more fuschia irregularly shaped circles emerged on a field of the same deep purple. I have no idea what it will look like when I machine wash it, but I can’t understand this at all. It looks like something you see under a microscope! Should be a lot of fun in microbiology class this fall.
I can’t be certain, but I think my unexpected result might have something to do with the fact that the button thread I used was left over from when my great grandfather closed up his tailor shop in the 1940s. I can’t imagine how, but it’s the only thing I can think of.
This turned out gorgeous! I made a tie die shirt once, but it was the circle kind. This one is so cute!!
Excellent!! It’s really cool:)
http://www.ccchinachic.com/
Nice T-shirt 😉
I really like this but I don’t undertand how they show a picture of the whole shirt changing to the brown color and then in the end its black again??? I really want to do hthis so someone please help !
Beautiful and Amazing 🙂
can you use dark blue to do this? As i really want to do my shorts, but i dont want to do them if it will ruin them
@jennie, if you want to reverse the method and use blue dye, I’d recommend using indigo dye for shibori. link to the supplies and tutorial here.
Great DIY!!Thanks.
wow its amazing.
omg so many comments
love this hope to do it soon but at my rate im going to get to this in a year
(doing every single DIY)
(what does DIY mean)
hye 🙂 i wanna give some question.
i’ve try to bleach a darkgrey shirt but i just a bit awkward why the shirt its not turn to solid white as what you have done
teach me some technique please
OMG, and what are you supposed to do with all that leftover bleach water!? Just pour down the drain, I guess…it’s only some of the most toxic stuff on the planet, folks, come on…is cool really worth destoying the planet?
Thank you for sharing – I’ve been looking for another creative avenue to go down & I’m going to jazz up some old shirts <3
Hi can you do this with any colour garment or does it have to black? Thanks 🙂
This paragraph will help the internet viewers for setting up new webpage or even a blog from start to end.
Post writing is also a excitement, if you be
familiar with then you can write or else it is complicated to write.
Thank you for the tuto!!! gonna make it today.
Thank’s again 😉
great idea even better effect !
loves it!! thanks for sharing.
this idea is very good…….
To get all those colors is easier said than done. ; P
I like to visit your website. You really give me a lot of interesting things to share. First time to see the Bleach Tie Dye. That’s looks fun and interesting. Everyone can create their own arts by following this guide.
I may try it.
Waiting for more interesting things.
great tip to do DIY clothes dye
so excited,real like it because it is my dream to have a great priject on batiki making
I tried this and for some reason the bleach did not go through! I used a sheet instead of a teeshirt and it never changed color! Ahh!
I did this with a light purple color shirt and it turned out so pretty, I love this!
In regards to present day fashion, the fitness world has created a craze of certain items such as gym tank tops and yoga pants that are worn as casual wear by many people on a daily basis, whether they attend a gym or not.
tank tops for men
What a fun project I will definitely put this on my to- do list.
I just dyed a piece of cotton and nothing changed it was the same color , and it was cotton I use for quilting
thanks for the tutorial, eager to try with my new dye
Make consumers sure that things go smoothly. This room offers the best acupressure in Eugene, Oregon are experienced & skilled Contractors in general and specialized service on a project is detailed.
my blog – web page (Christel)
Tie dying was such a thing back in the days. I think it’s awesome that they brought it back, but then again – fashion does recycle itself.
Great information. Lucky me I found your blog by chance (stumbleupon).
I have saved it for later!
my web blog – google
Nice idea and you used bleaching at the right place. Thanks
This is such a great idea! Such a fun way to give some variety to a plain black shirt. I’m not really a person who wears a lot of color so tye-dye has never been my favorite but this puts a whole new spin on the tye-dye look! I will definitely be trying out this idea. The result is so cute and it seems like a fun project.
Was Just looking close by . I prefer your stuff. Do delegate a bit more of this concern ok. Thanks so much
Was excited to try this! Just got done doing this, it did not work for me. I went from a black shirt to an almost all rusty orange shirt with a few brown spots. I believe you should not add water to the bleach. It also took way to long to see a color change. By the time the black started changing color, the whole entire shirt was absorbed with the bleach/water mixture. So the grid did not turn out. I’m going to try it again using a spray bottle, instead of immersing the cloth in the bleach/water mixture.
I will let you know how the spray bottle version of this turns out.
Thanks for the idea
I like the simplicity of this method compared to the white/ blue (indigo?) thing. I have not a clue where can I but a proper dye in the town I live. I was thinking about using white cloths and green/ red paints to create something Hippie – Christmassy sort of thing, but will let you know if I succeeded 🙂 DIY rlz 😉
After you rinse the shirt with water, rinse again in vinegar. Bleach will linger in the fabric and will deteriorate it, the vinegar rinse should neutralize the bleach 🙂
If you wish for to improve your experience simply keep visiting this web page and
be updated with the hottest news posted here.
I take pleasure in, lead to I discovered exactly what I used to be taking a look
for. You’ve ended my four day long hunt! God Bless you man. Have
a nice day. Bye
Oh this is perfect DIY… i will also try this on my white T-Shirt…… Thns for sharing
very nice post
I tried this with crumble black shirt stylle but every time I dip it in the bleach it seems to bleach the hole shirt not really leaving any black spots. Am i crumbling it up wrong? How long do I leave it in there to? sec wise?
I was suggested this blog via my cousin. I am now not sure whether this submit is written by means of him as nobody else realize such unique about my problem. You are wonderful! Thank you!
What’s up, I log on to your new stuff daily. Your story-telling style is witty, keep doing what you’re doing!
WOW….couldn’t guess at beginning that the final look will be so beautiful. Thanks for the demo
Absolutely love this!…..
hey guys! loved this! my gross brown linen dress i had turned into a lovely peach and rust with the grid pattern. in looooove <3
@Katie yay!! sounds lovely 😉
I have been exploring for a little bit for any high-quality articles or weblog posts in this kind of area . Exploring in Yahoo I at last stumbled upon this site. Studying this info So i’m glad to exhibit that I have an incredibly excellent uncanny feeling I came upon just what I needed. I such a lot indubitably will make certain to do not forget this site and provides it a glance regularly.
Good day! I want to offer you a great big thumbs
up for aussgezeichnete information you have here to dieem contribution.
I were always wiedr to your website for more soon.
my page http://Movietube
Hi,
Could you pls let me know if i can dye a black satin dress this same way?
Thank you!
Great idea! Thank you for sharing.
DID NOT WORK!!!! DO NOT ATTEMPT!!
The directions are very unclear and do not give much details, so you basically end up with a shirt with ONLY horizontal lines. tried two times.
The photo is extremely deceptive, do not expect your shirt to change color instantly because it DOES NOT WORK!!!
The barely-there directions do not actually tell you how many times to accordion the shirt, which way to fold the sleeves. The end result is a tie-dye looking shirt, so basically you have messed up multiple times if you try it more than once like I did…. Spend the money and go buy a shirt that looks like this one. Don’t be cheap like me and think you can make this.
I think this concept could potentially be great if the creator actually put CLEAR DIRECTIONS!!!!
By the way, I used a black shirt that was 100% cotton, the first time, I was waiting for the rusty color change on the whole shirt like the photo, and ended up leaving the shirt in the bleach mix for about 3 minutes, after washing it, there is nothing white on the shirt. the shirt is about 9 different shades of red, but not white at all, so do not expect this creation to actually look like the photo. the one in the photo MUST NOT be an accurate reflection of the end result.
AGAIN DO NOT ATTEMPT – WASTE OF BLEACH!!!
OMG LOVE IT PLEA MORE
Magnificent beat ! I would like to apprentice while you amend your website, how can i subscribe for a blog site? The account aided me a acceptable deal. I had been a little bit acquainted of this your broadcast provided bright clear idea
Love your Bleach Tie Dye Threds. Momma collecting items to recycle into awesome…..
WOW….couldn’t guess at beginning that the final look will be so beautiful. Thanks for the demo
THANK YOU FOR SHOWING YOUR REAL NICE WORK AND SHARING.