I’ve had instructions on how-to-sew-rope-bowls saved to my Pinterest “to do” board for awhile now. A few weekends ago, I finally got around to making a few delightful baskets that were surprisingly easy to make. However, they sat on my craft table for over a week, just waiting for me to do something with them. You should know that I have one too many little bowls around the house, each hoarding way too many chotskies and trinkets. Ask my husband. It drives him crazy. So what would be more useful to me? Something that I can productively use? A tote bag, of course! Why make something if you can’t wear it! Don’t be intimated. If you can sew a straight line on a sewing machine, I promise you can skillfully master this project.

You’ll need:
- 200-300 feet of 7/32″ or 1/4″ cotton clothesline rope
- 5-6 spools of thread of varying colors
- sewing machine
- scissors
- measuring tape
- pins
- tassels (optional)

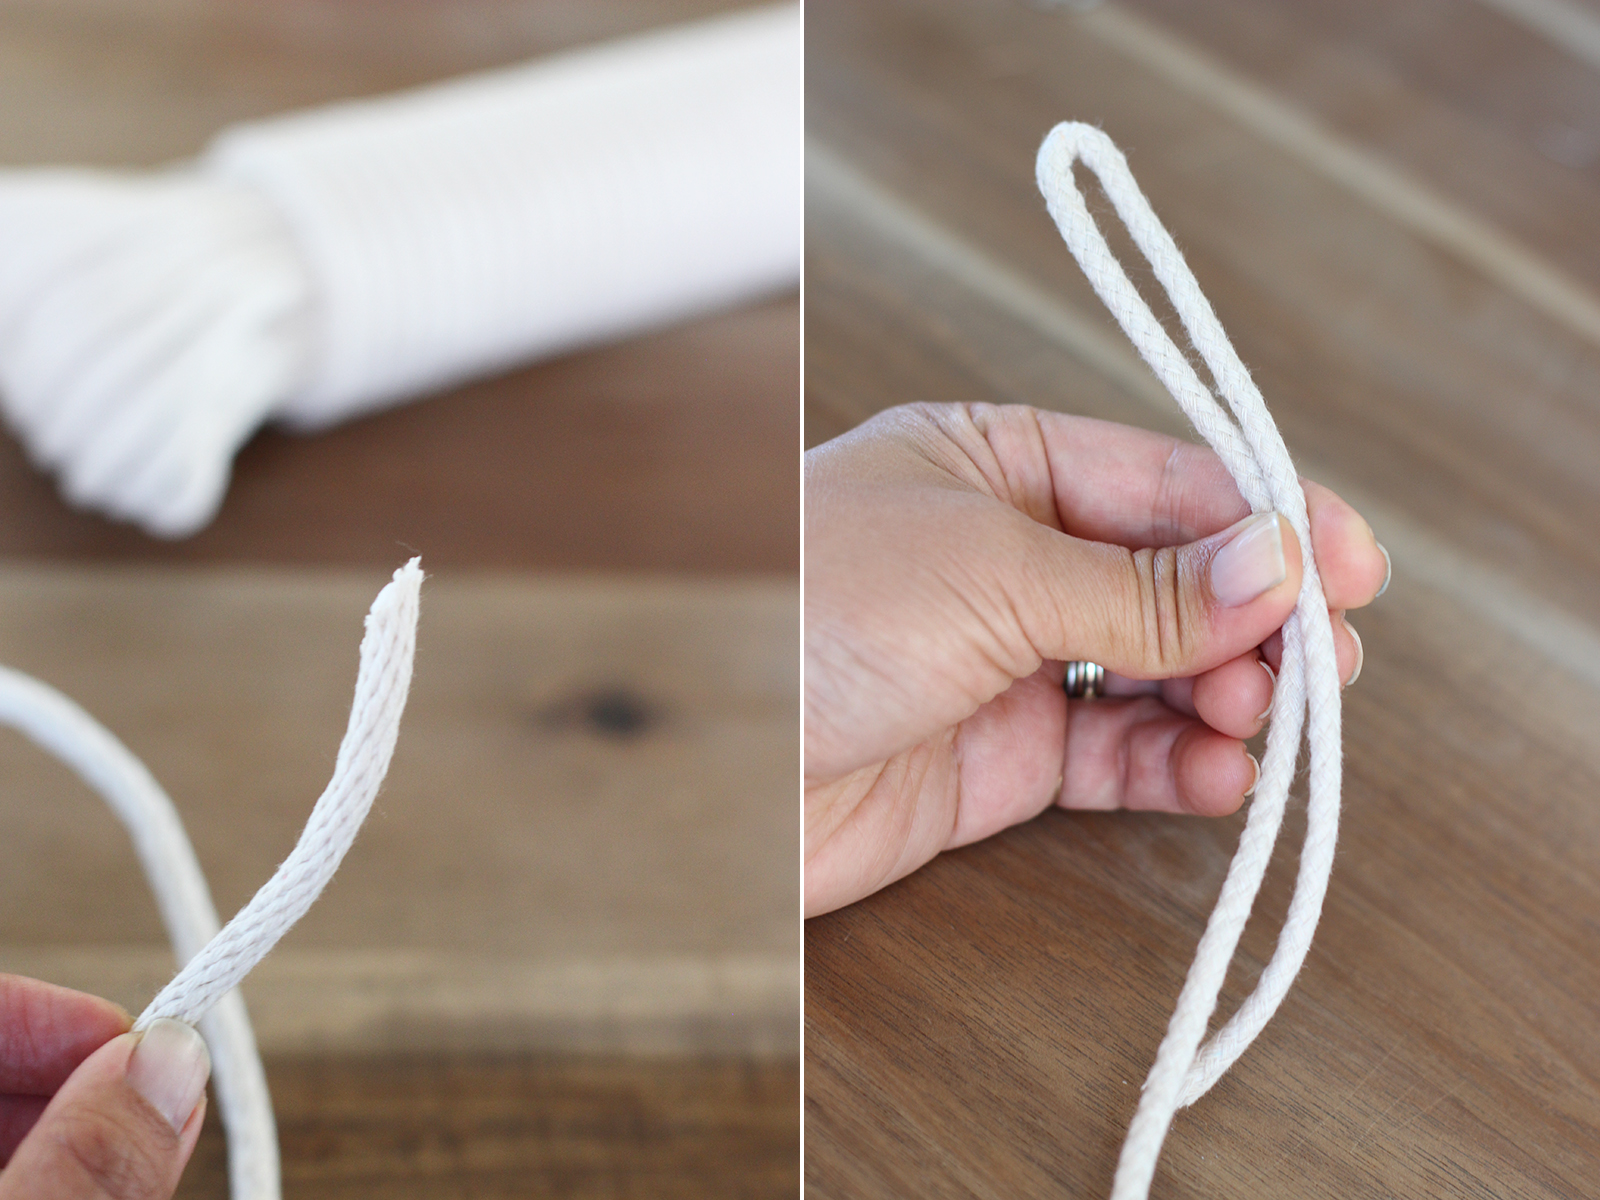
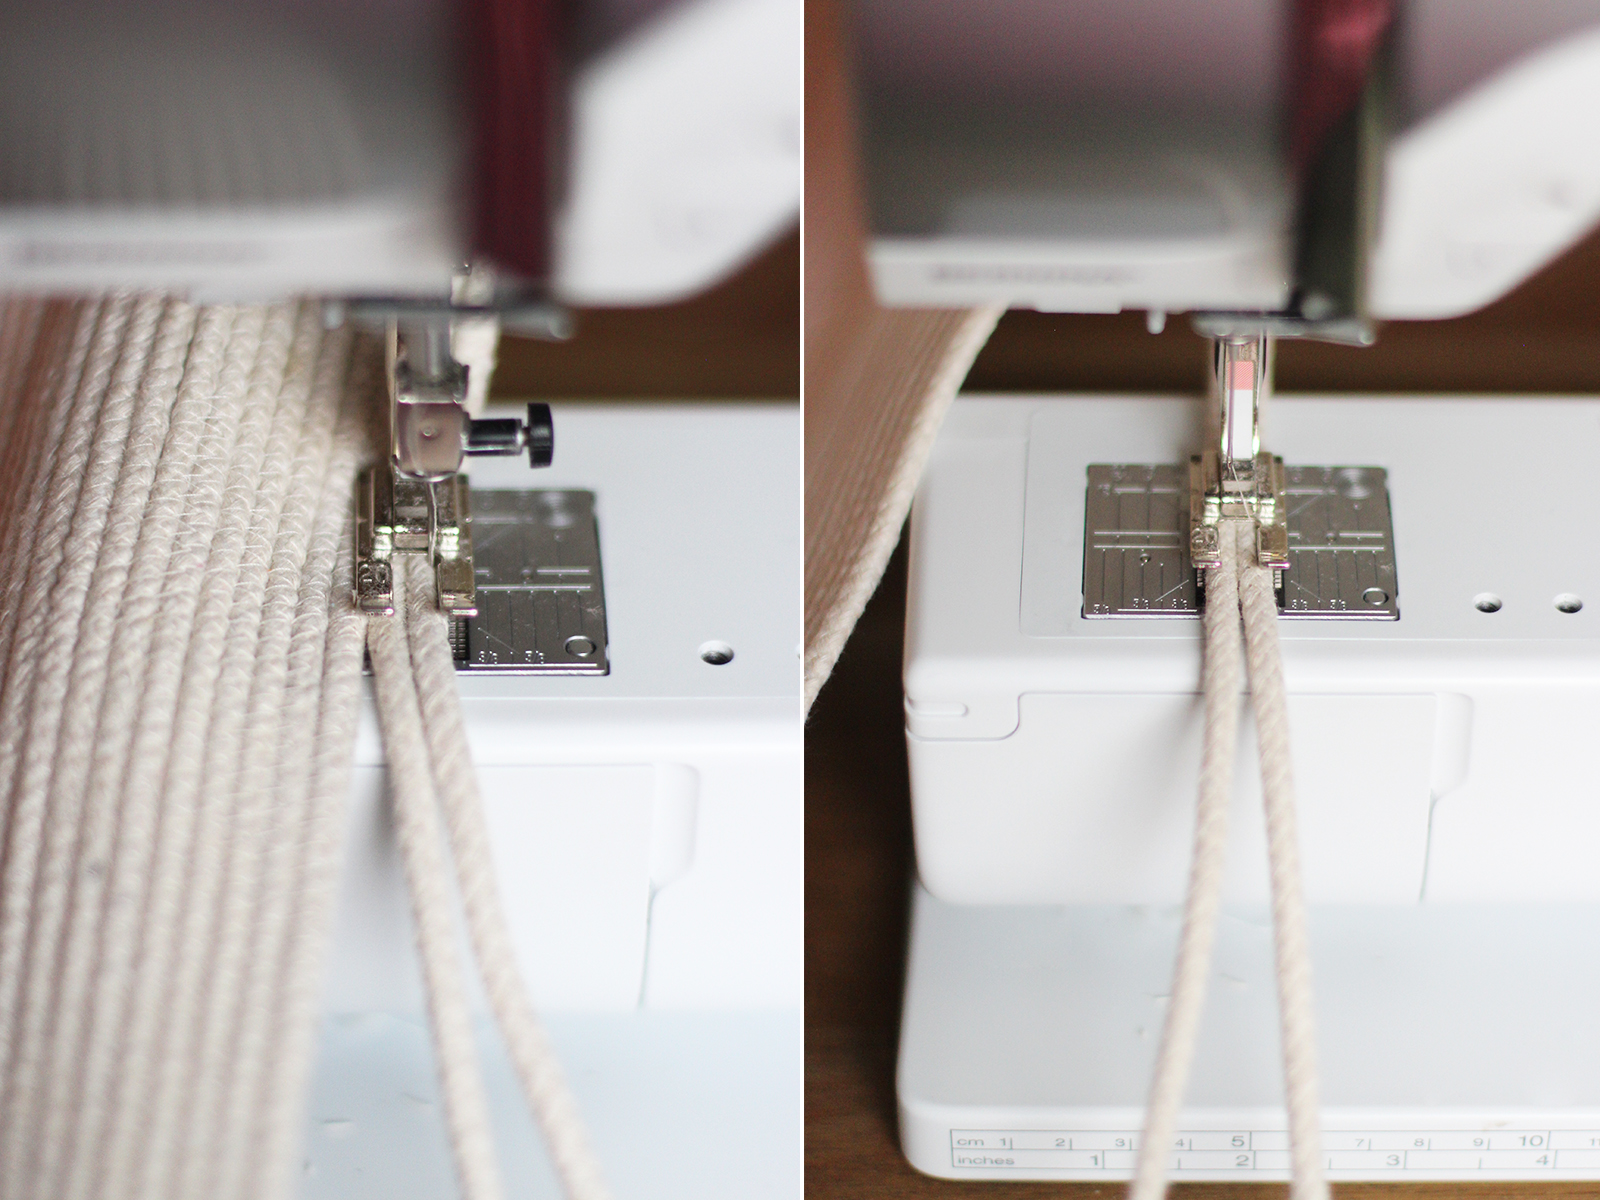
The first step is prepping your colors and cotton cord. Select the colors you want to use on your bag and wind a bobbin for each color so that when you’re sewing, everything is in order and you can just pop those bobbins in and out. I like to use a neutral thread, similar to the rope, for the base and top of the bag – you’ll need a large spool of that. As far as the clothesline is concerned, 1/4″ rope is probably the thickest you want to work with – only because even the heaviest duty needles might break with a thicker needle. And a thicker rope might not fit under the sewing machine foot. Also, use a heavy duty needle for this project – I like to use either a denim or leather sewing needle. Take the end of the rope and cut the end at a diagonal. Measure 12″ and fold it in half into a 6″ piece.
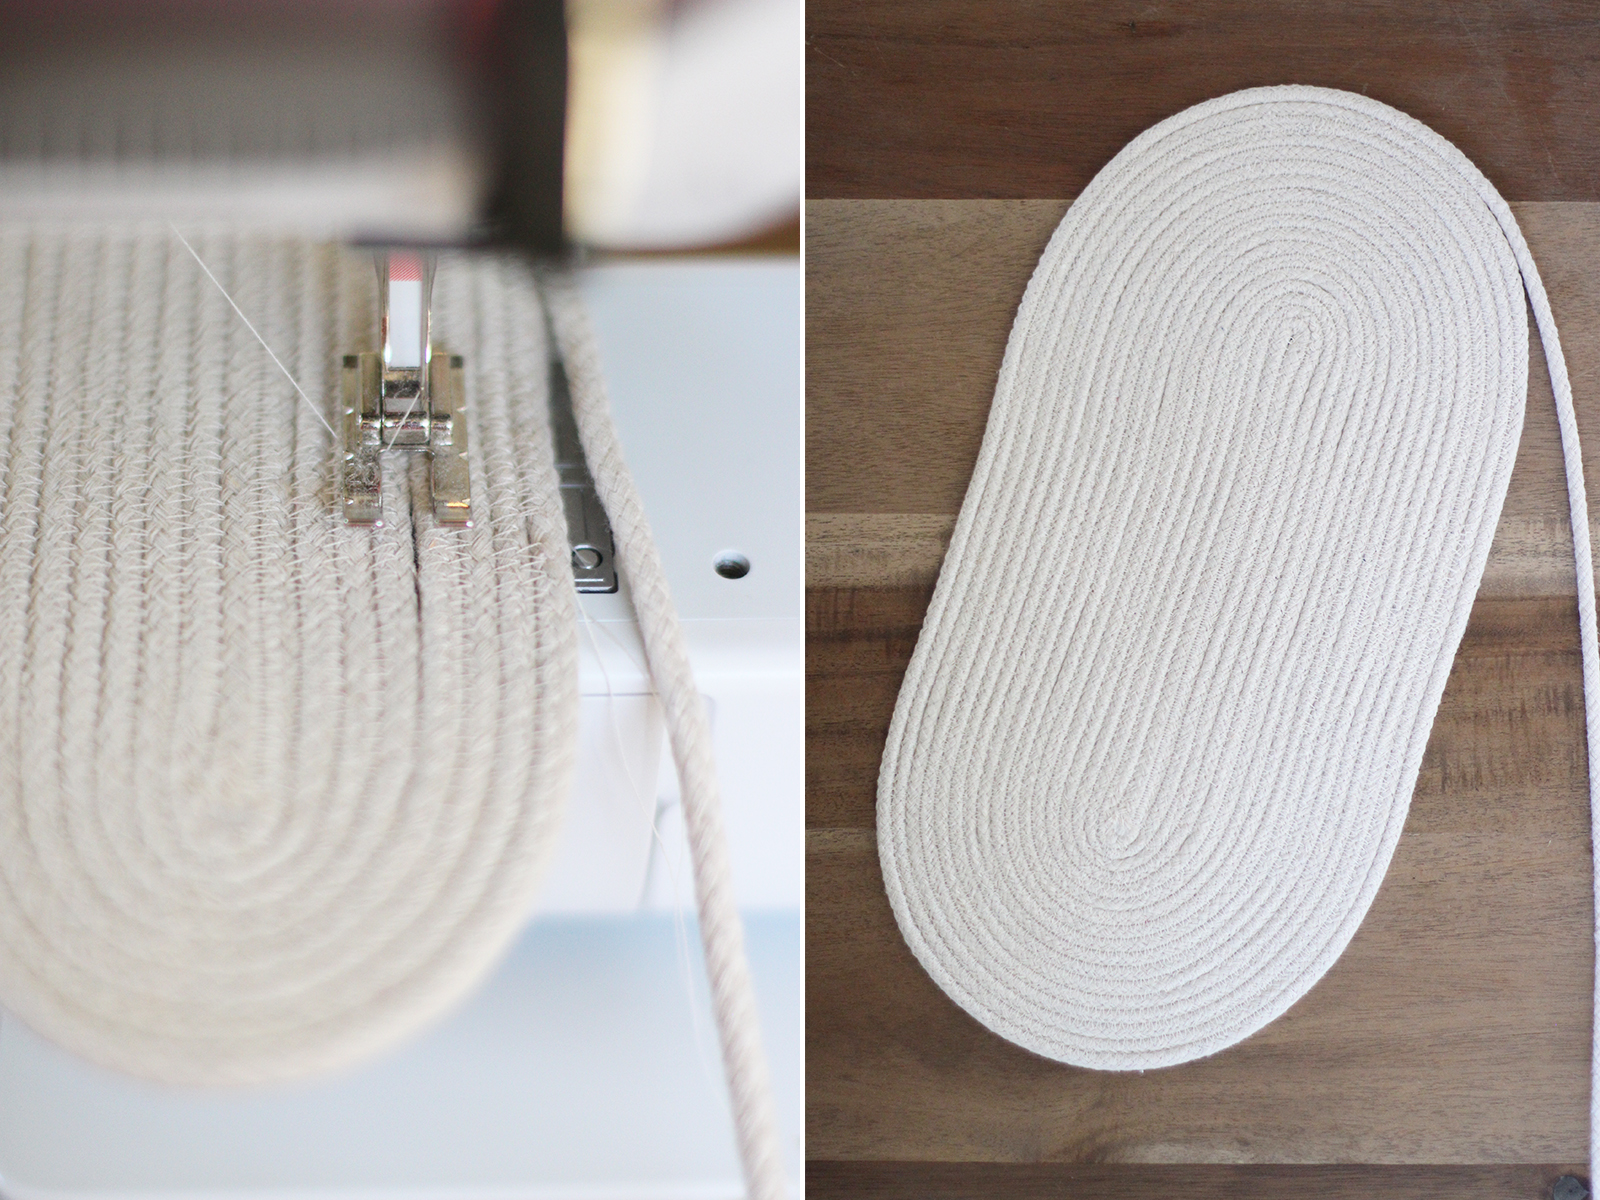
Place the fold under the presser foot of your machine. Set the machine to a zig zag stitch that is wide enough to reach both ropes. And keep the needle in the down position. Remember to keep both pieces of rope as close together as possible and keep them centered under the needle. Sew down towards the cut end and stop. With the needle in the down position, slowly rotate the sewed strip counter clockwise – meanwhile, using the zig zag stitch to stitch together the curve.
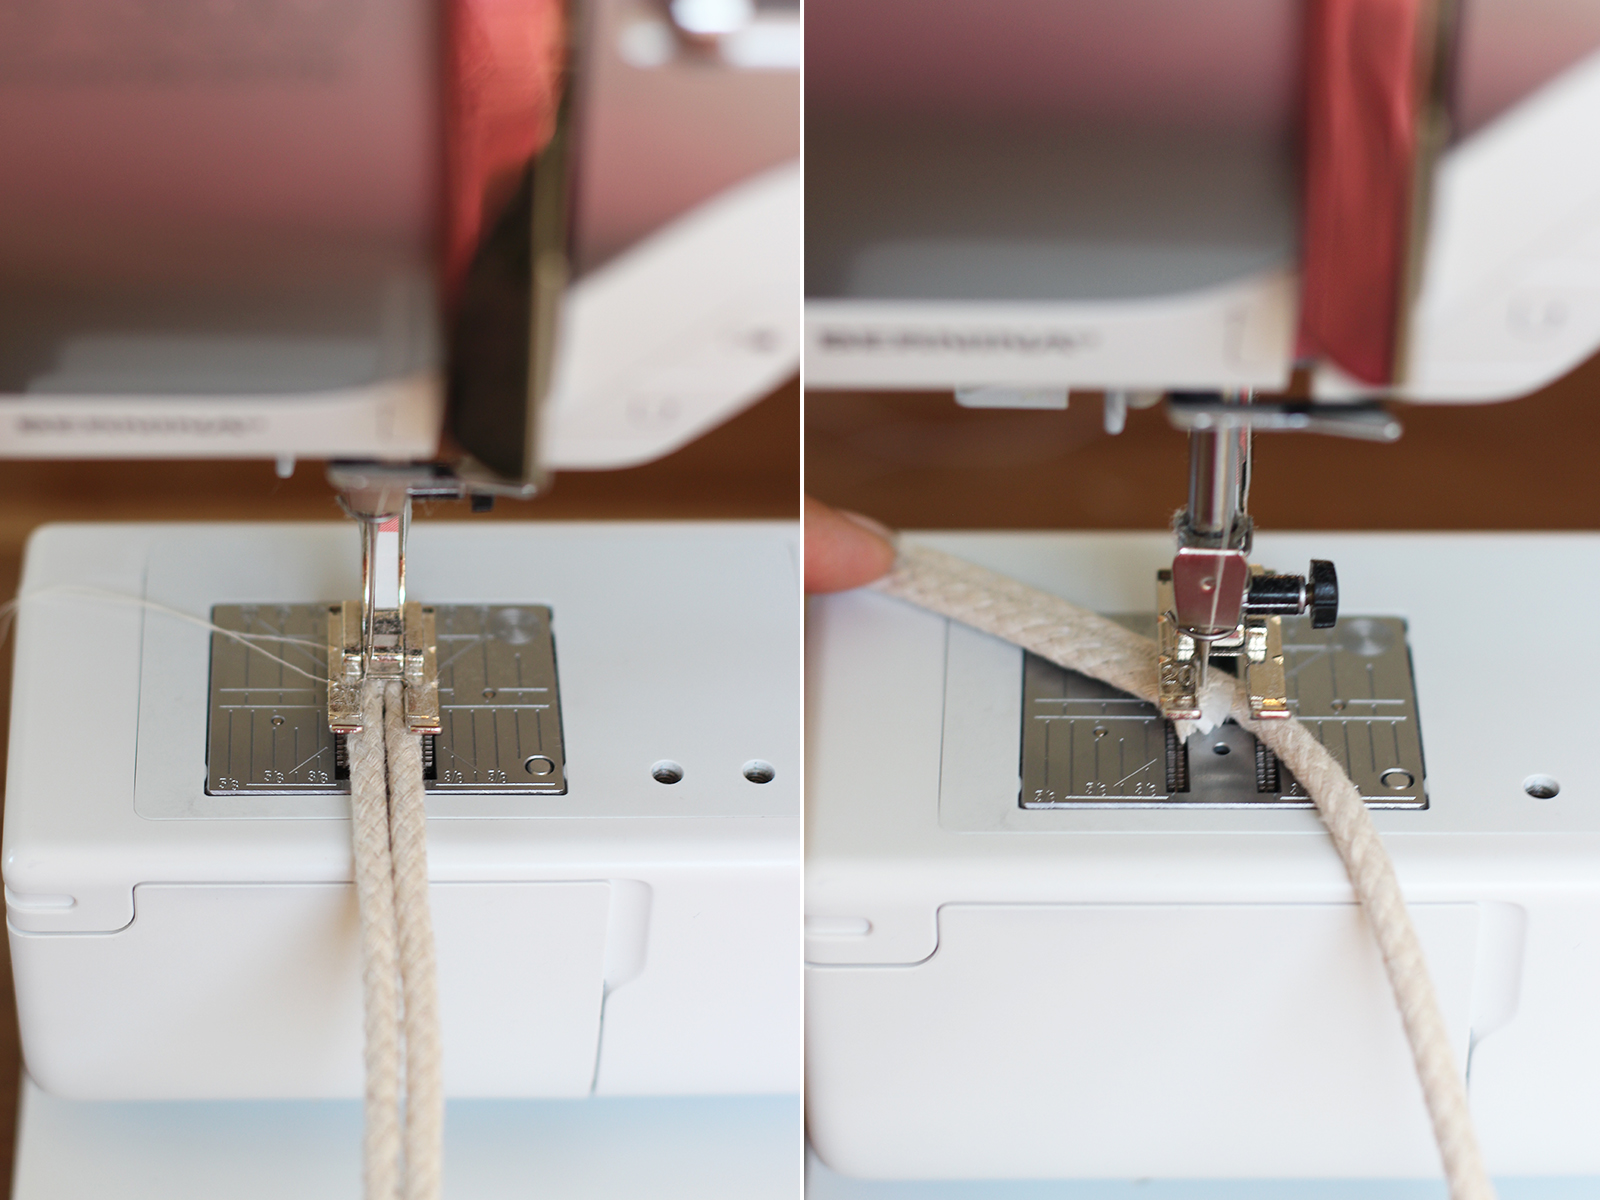
Keep rotating and sewing to the 6 o’clock position. Now sew down again.

When you’ve reached the end, rotate the strip counter clockwise until it’s parallel to the working rope – all while you’re continuing to sew.
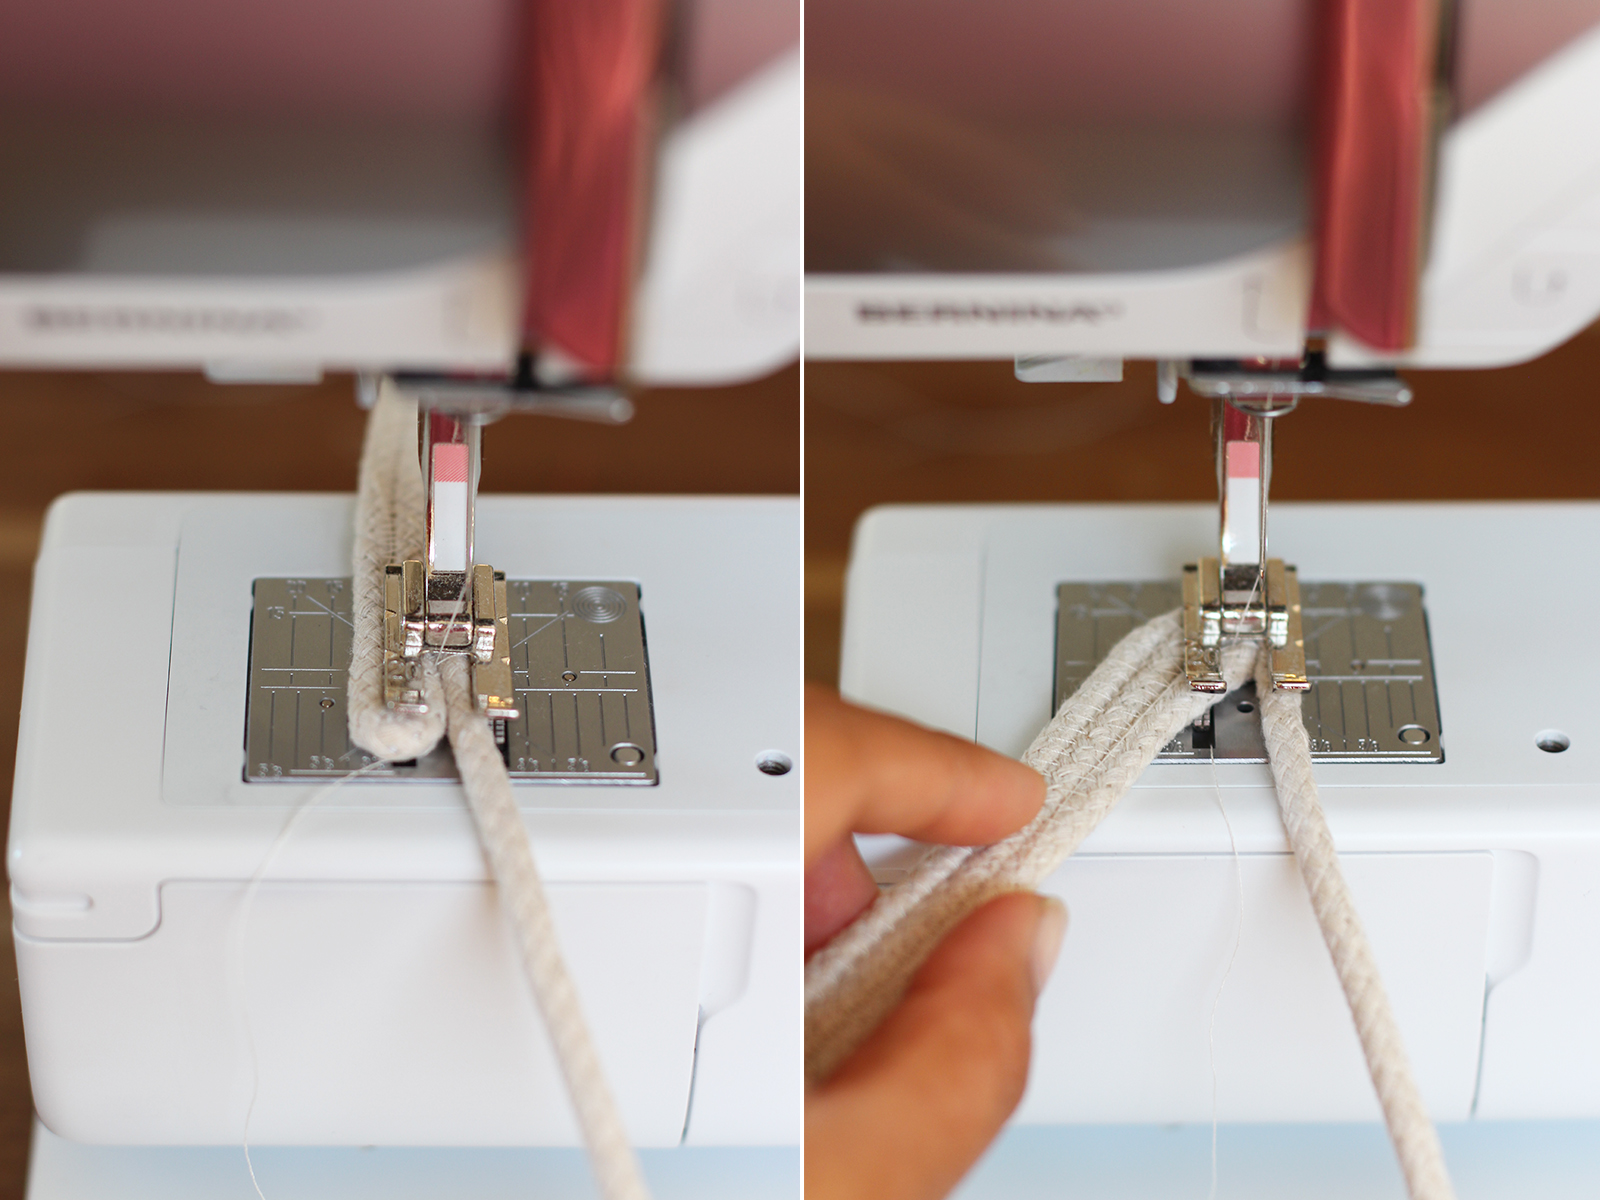
Keep going and you’ll notice you’re slowly creating an oval! This is the base of your bag. Remember, the working rope is always straight and under the presser foot. The bag (or oval piece) will always be on the left and be the moving, rotating piece. You might miss some sections – that’s okay.

You’ll end up with gaps so when you notice them, just stop, cut your thread and patch up the sections. Then, pick up where you left off. After about 20-25 rounds, or when you feel like your base is big enough, stop but leave the rope in tact. Remember, the bag will only get bigger so imagine that the top of the bag will be nearly double your base.
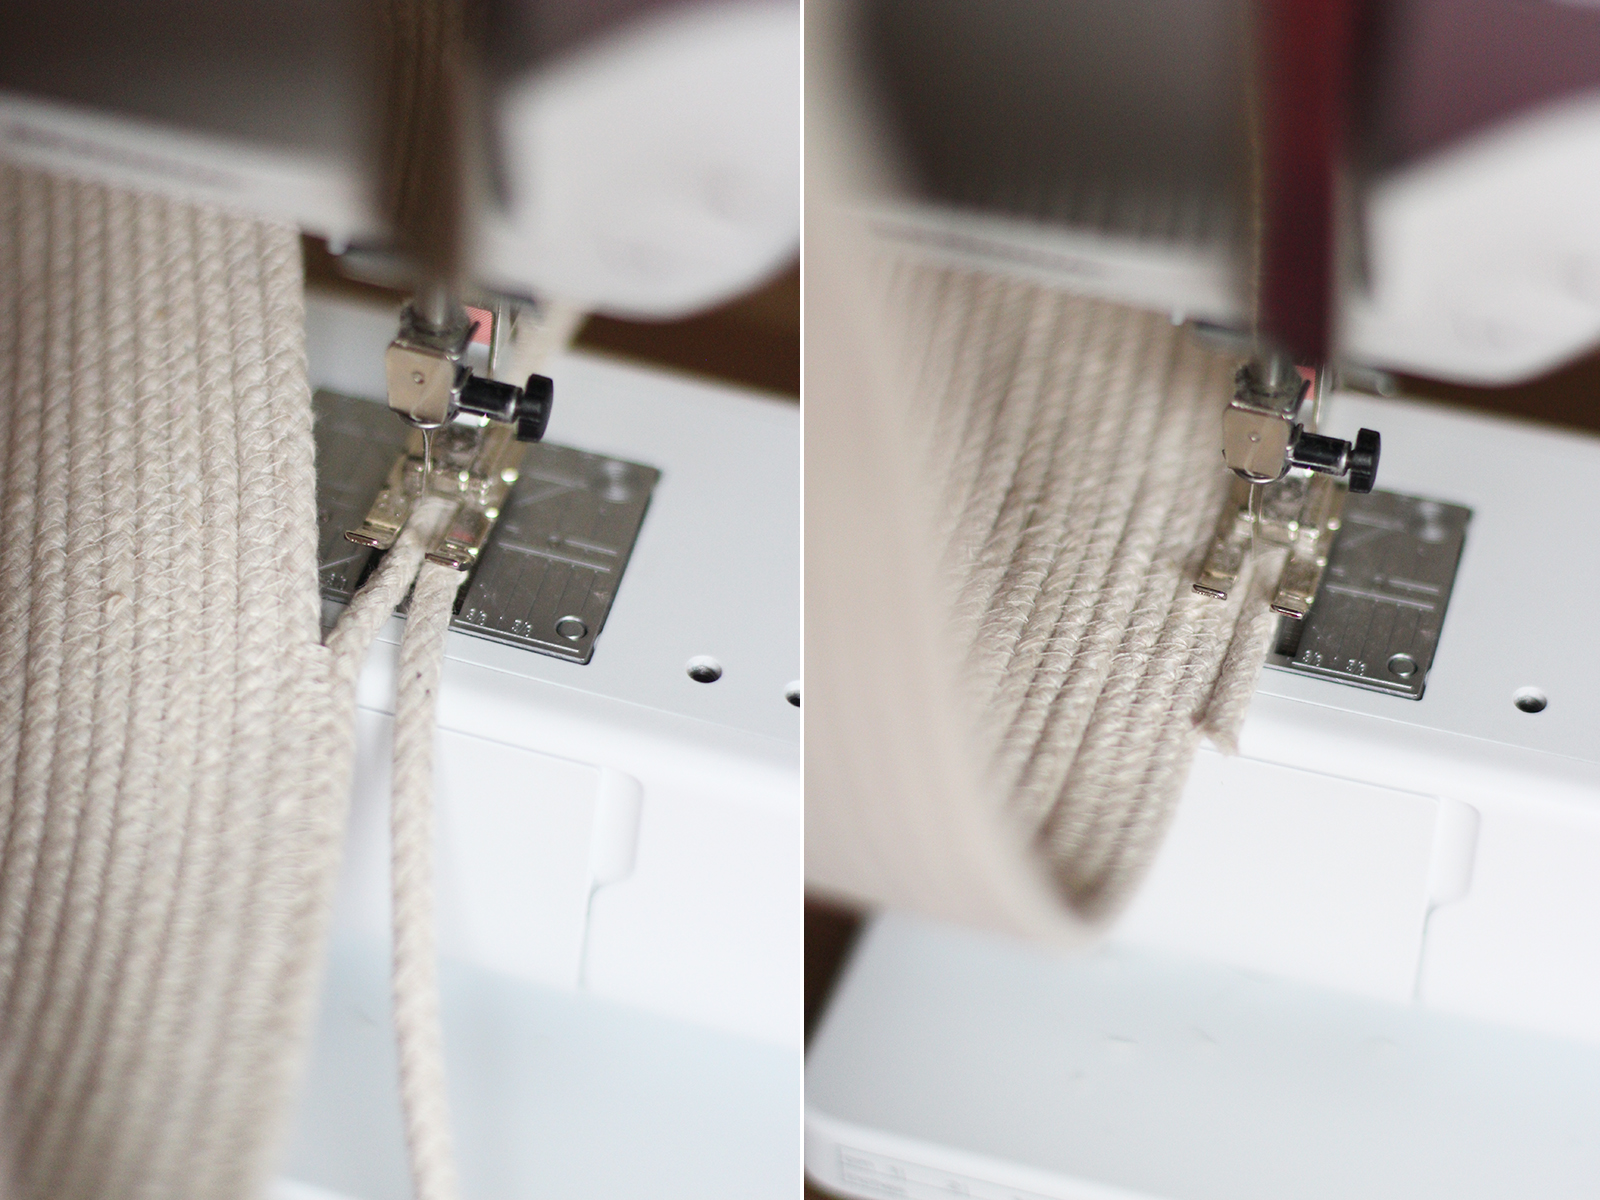
Now you’re ready to start building up the sides of the bag. This is where I like to change the color of the thread. Start with a few zig zag stitches and then immediately bring the bottom section upwards, hugging the side of the sewing machine. The rope will start attaching at an deep angle. The more perpendicular you hold the bottom of the bag to the sewing machine, the deeper the angle will be.
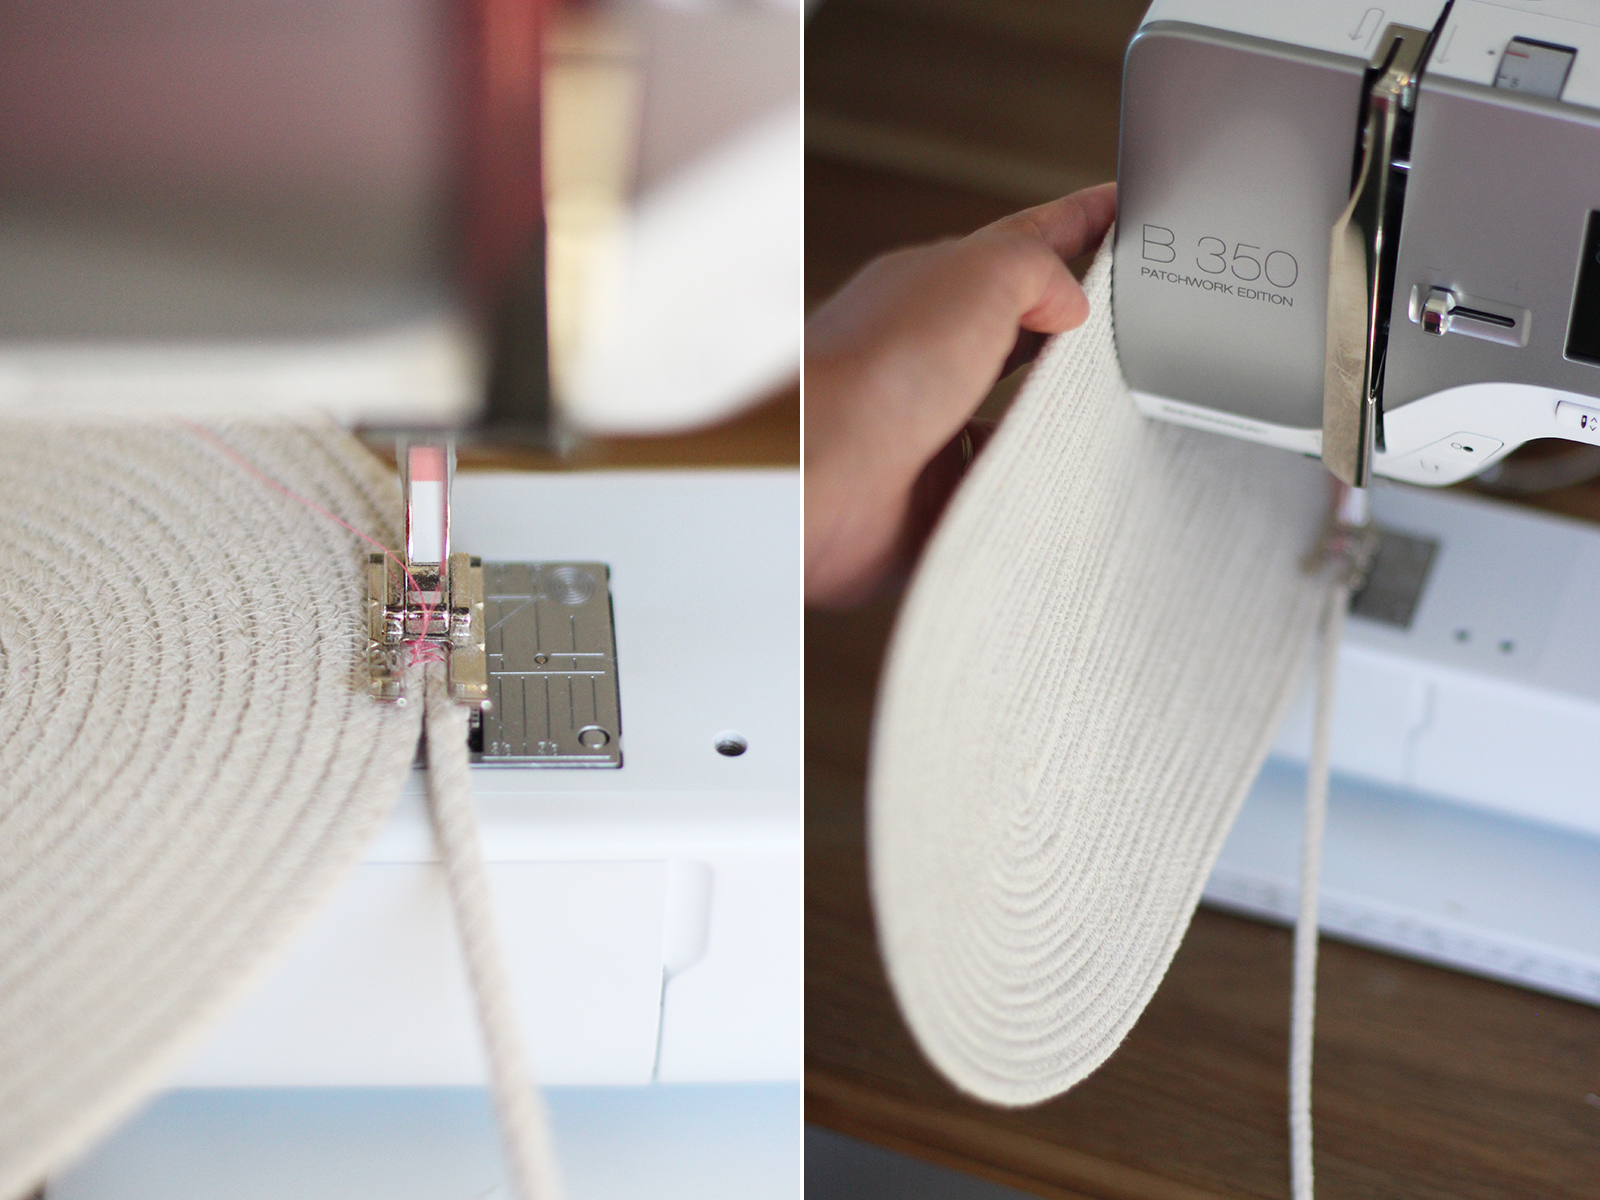
Keep the bottom of the bag at a 90 degree angle while rotating and sewing.

Keep going until you’re ready to change color. If you want the bag to graduate wider, start holding it at a slighter angle. You’ll notice the bag getting wider.

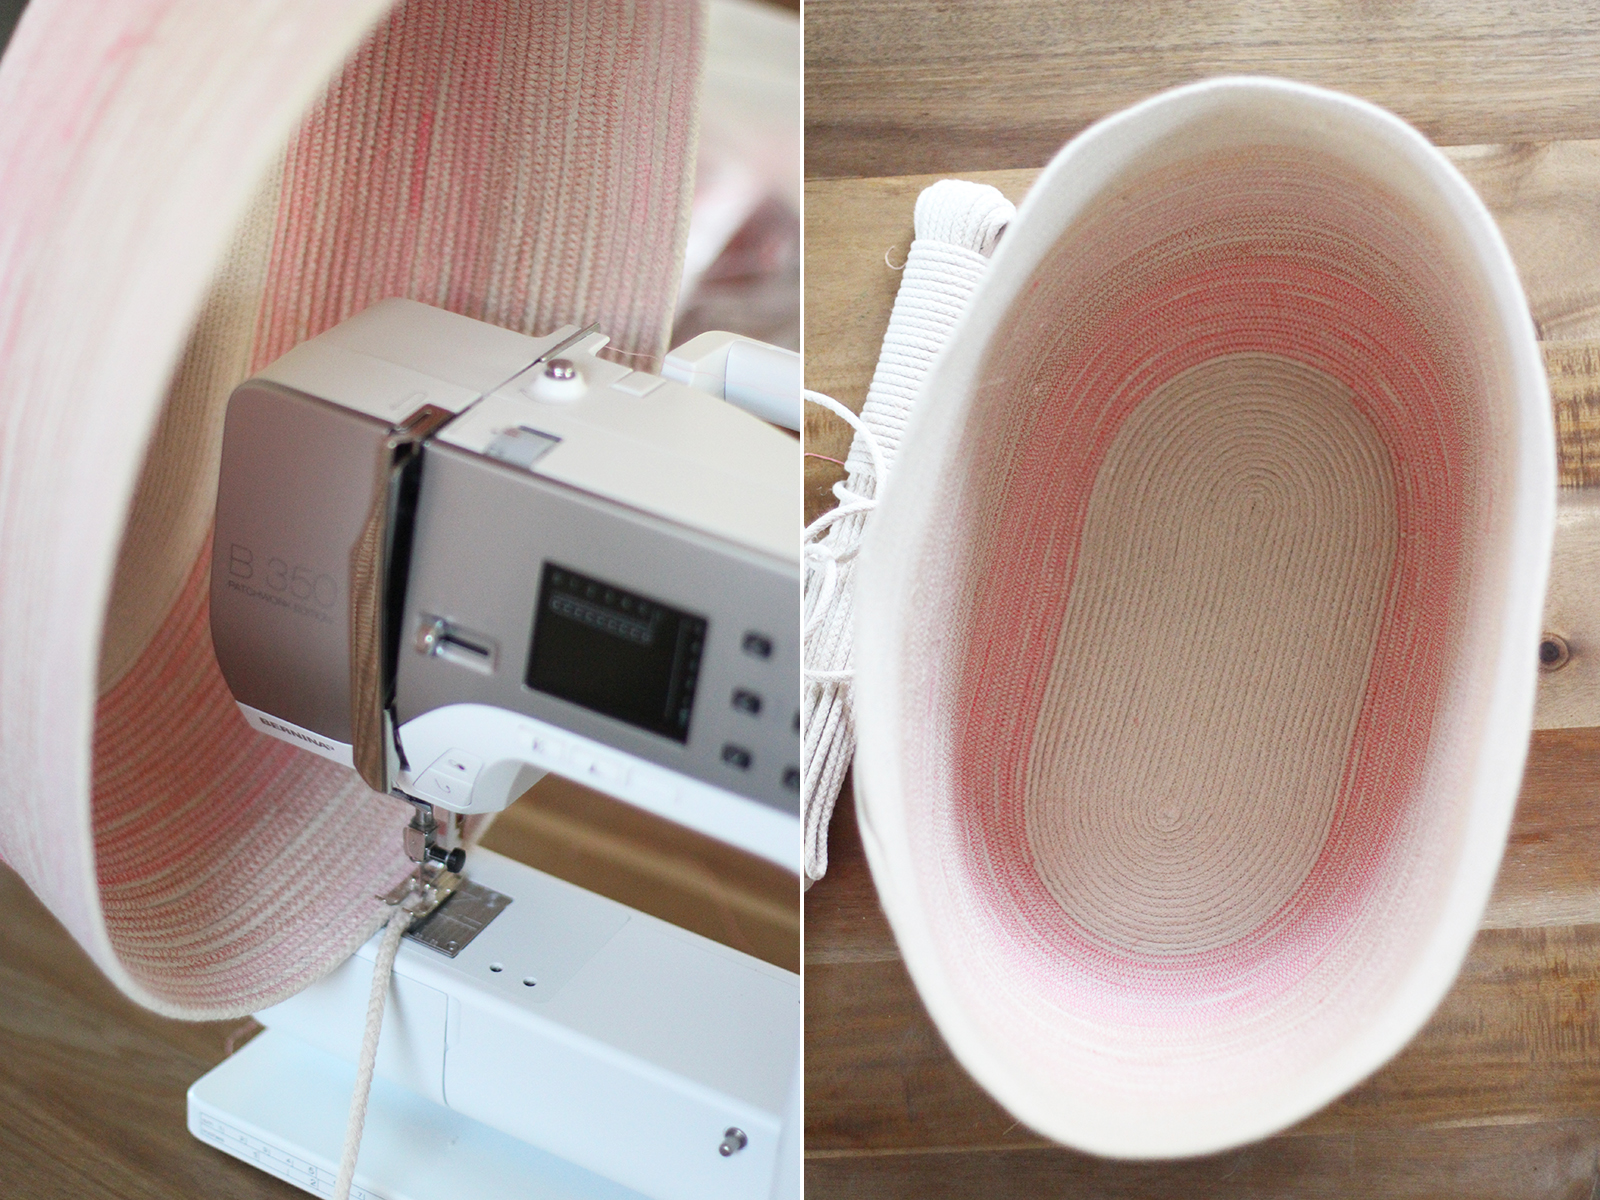
Continue rotating and sewing. Remember to keep the bag at a consistent angle for each rotation.
You can always bring your bag back up to 90 degrees to make straighten up the sides. Of if you want it even wider, hold the bag at say 30-40 degrees. Continue sewing until you’ve reached your desired height. When you’re ready to stop, stop sewing at the curved section and keep the rope attached!
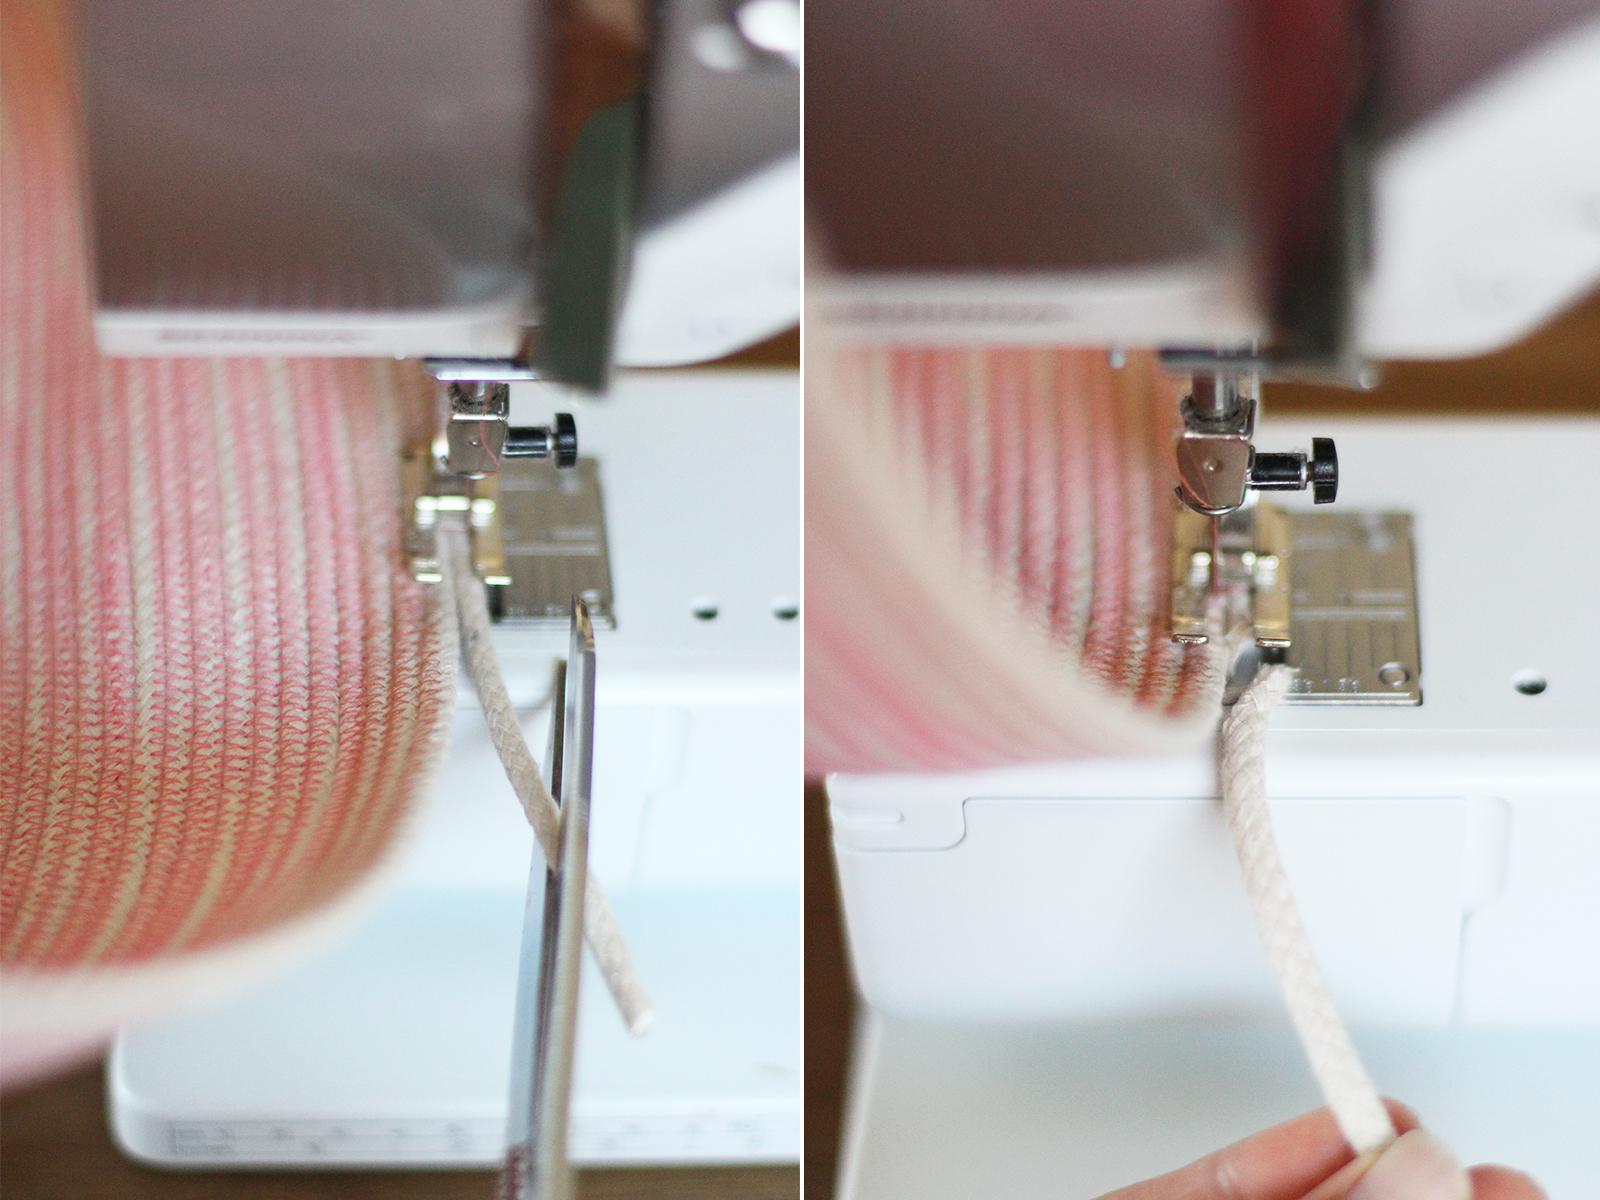
Pinch the bag in half, lengthwise. Measure about 5 inches in from each end and mark those points with 4 pins. This is where your handles will start and end.
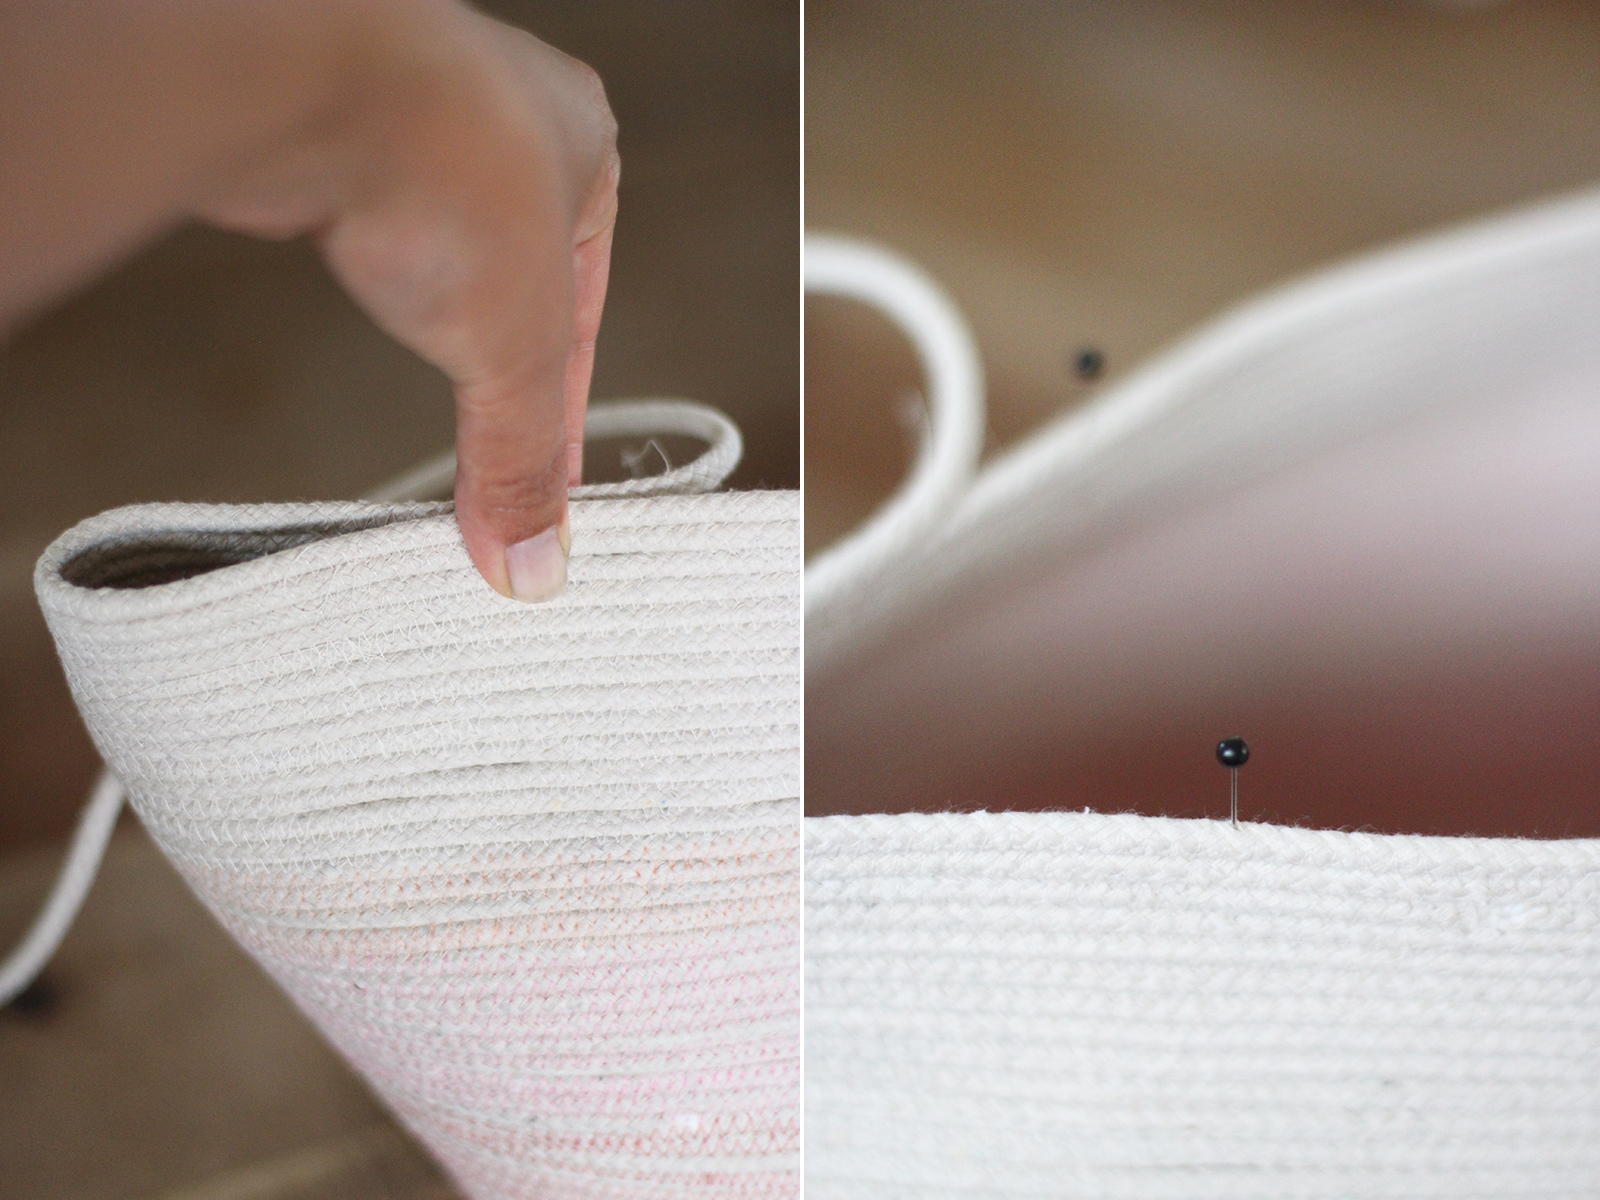
Put the bag back into the sewing machine and continue the zig zag stitch until you’ve reached the pin. Give it a few backwards and forward stitches to reinforce the handles. Cut the thread, remove the bag and measure about 28-30″ of rope. Attach the end of the handle to the existing pin and continue sewing until you reach the other side. Repeat the step, measuring the same amount of inches on the opposing handle.

Once you’ve made a full rotation and back at the first handle, keep sewing along the handle.
Repeat the steps until the handles are at least 3 rows thick. After sewing the last row on the handle, sew for another few inches, reverse and forward stitch a few times and trim the rope.
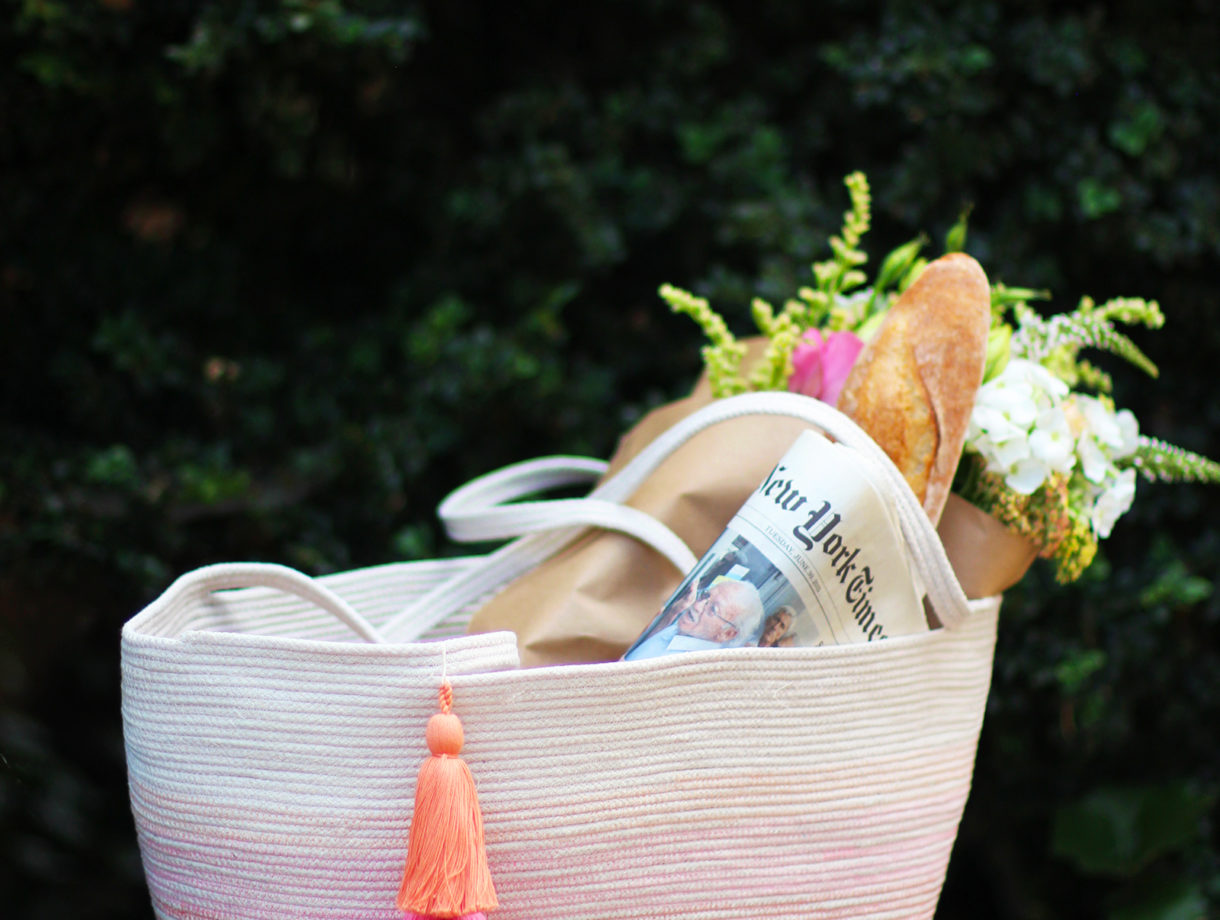
Add a couple of tassels or pompoms for good measure . . .
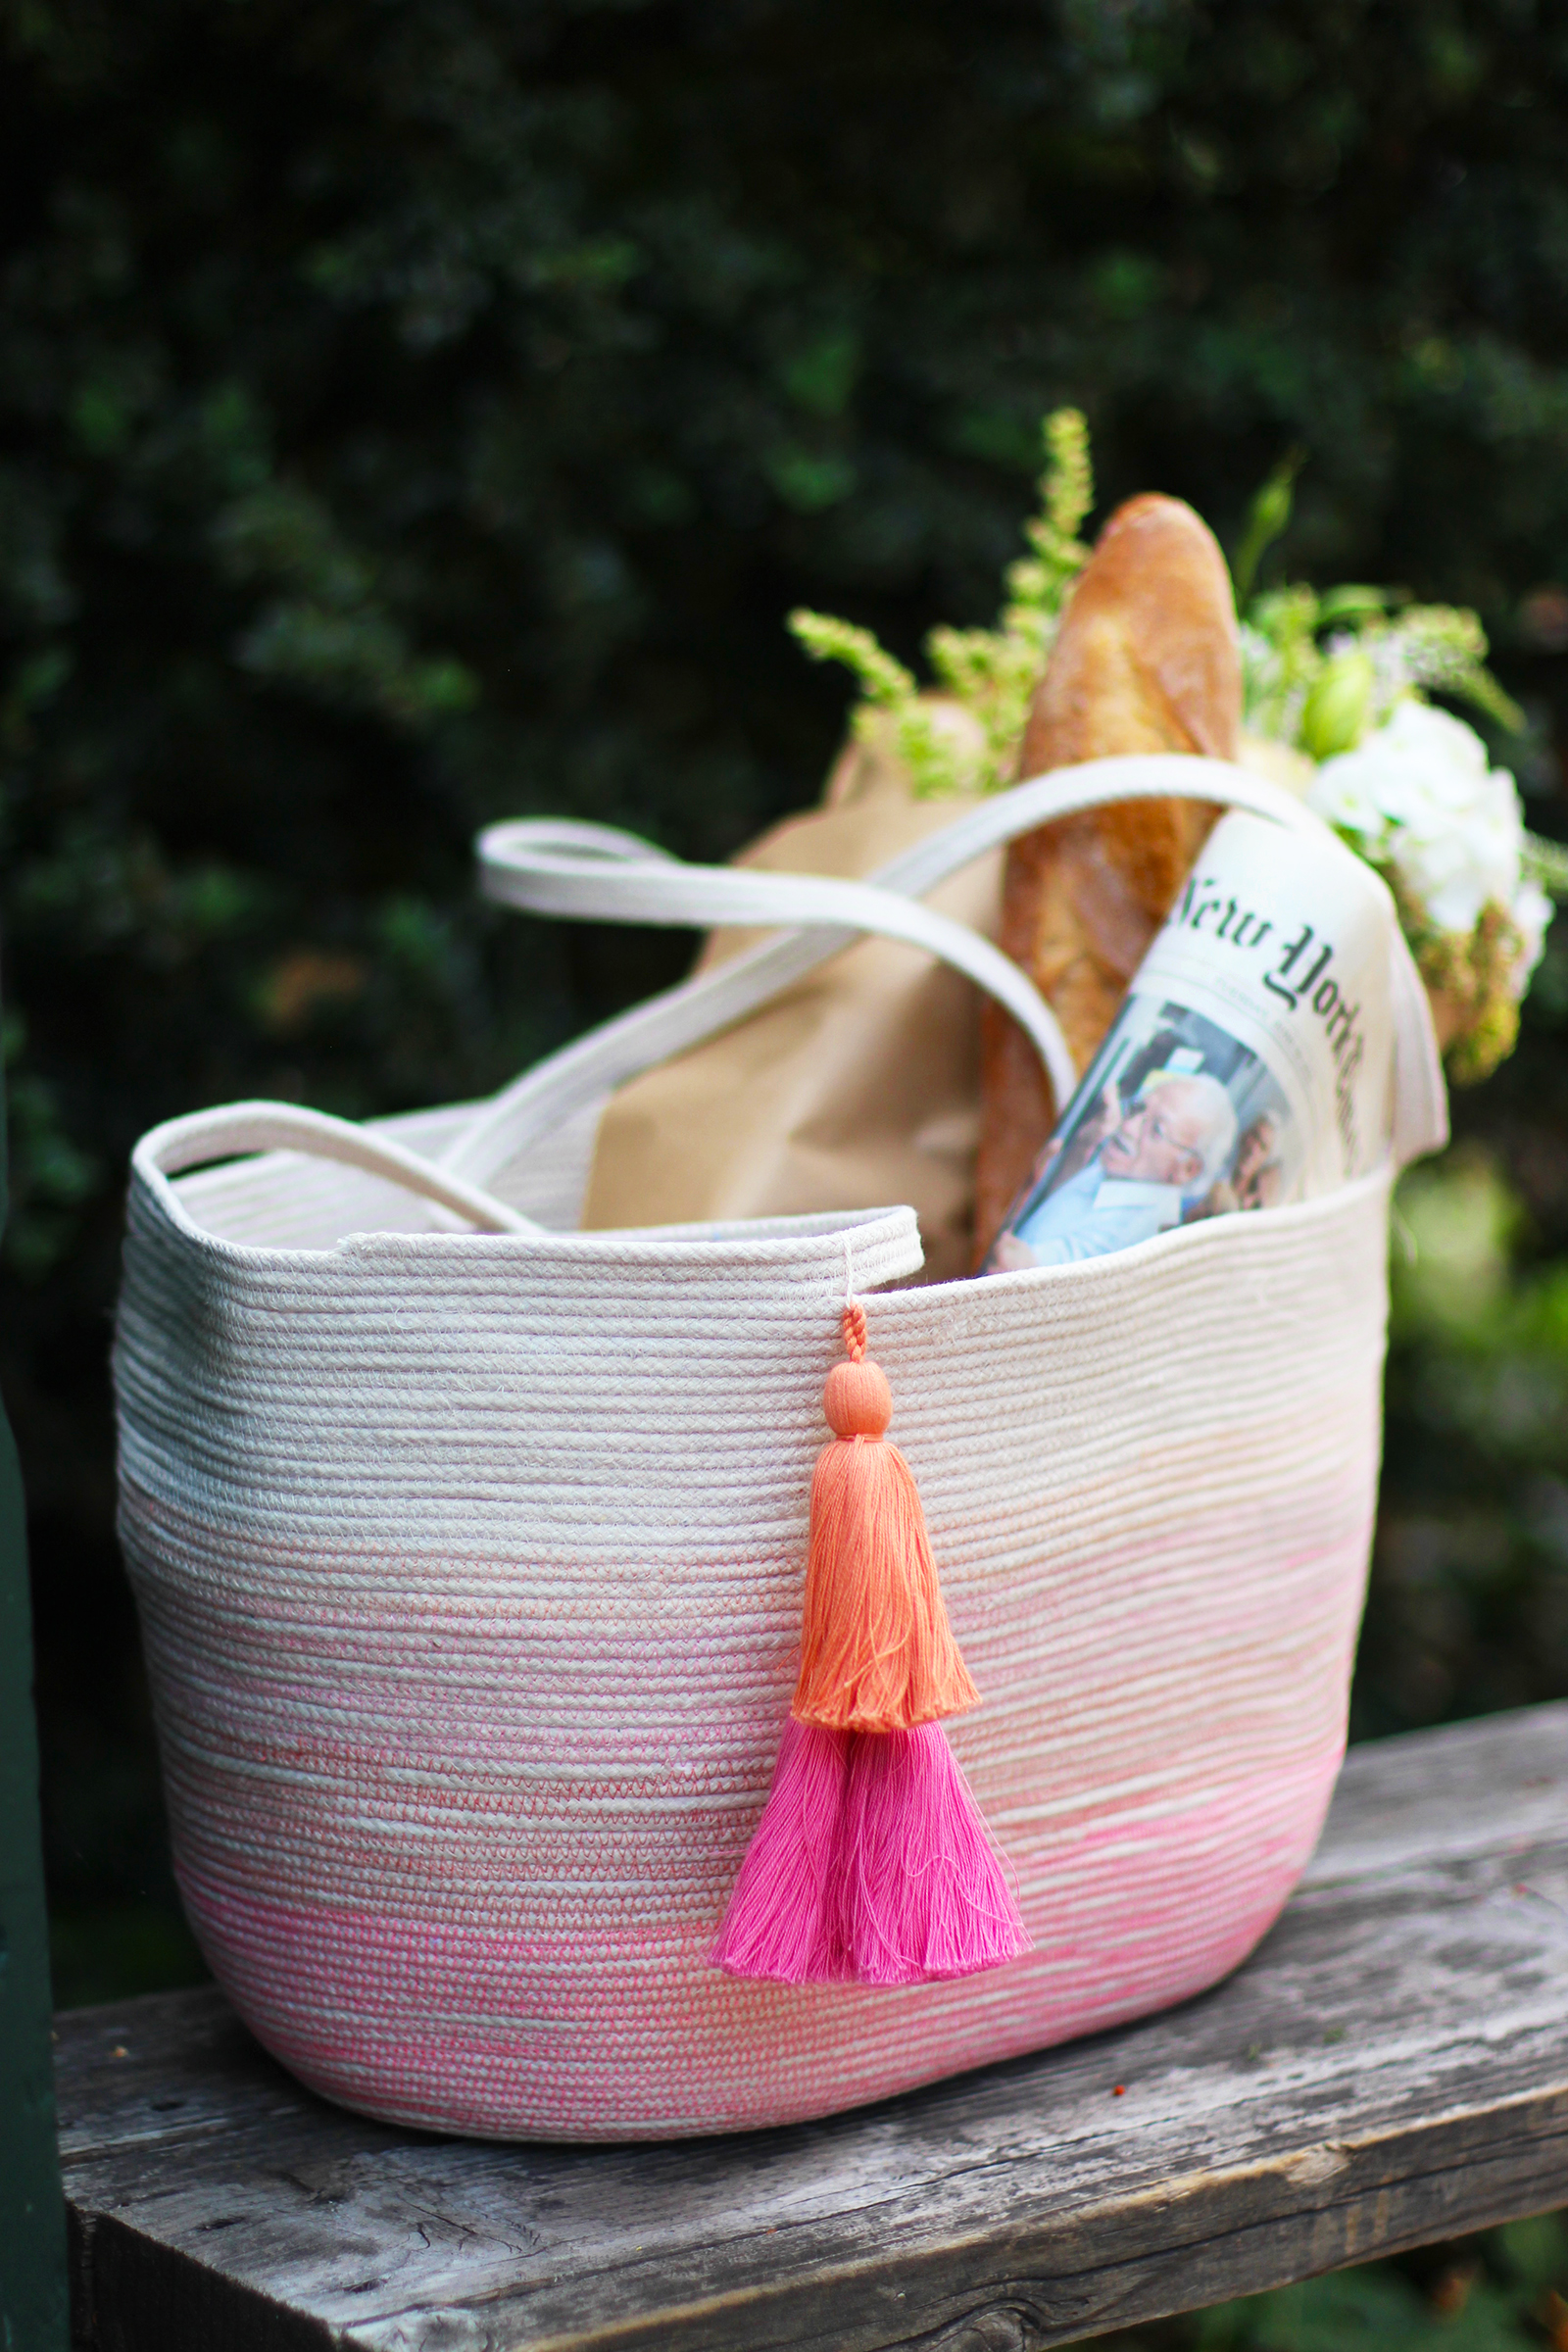
And enjoy your new rope tote!

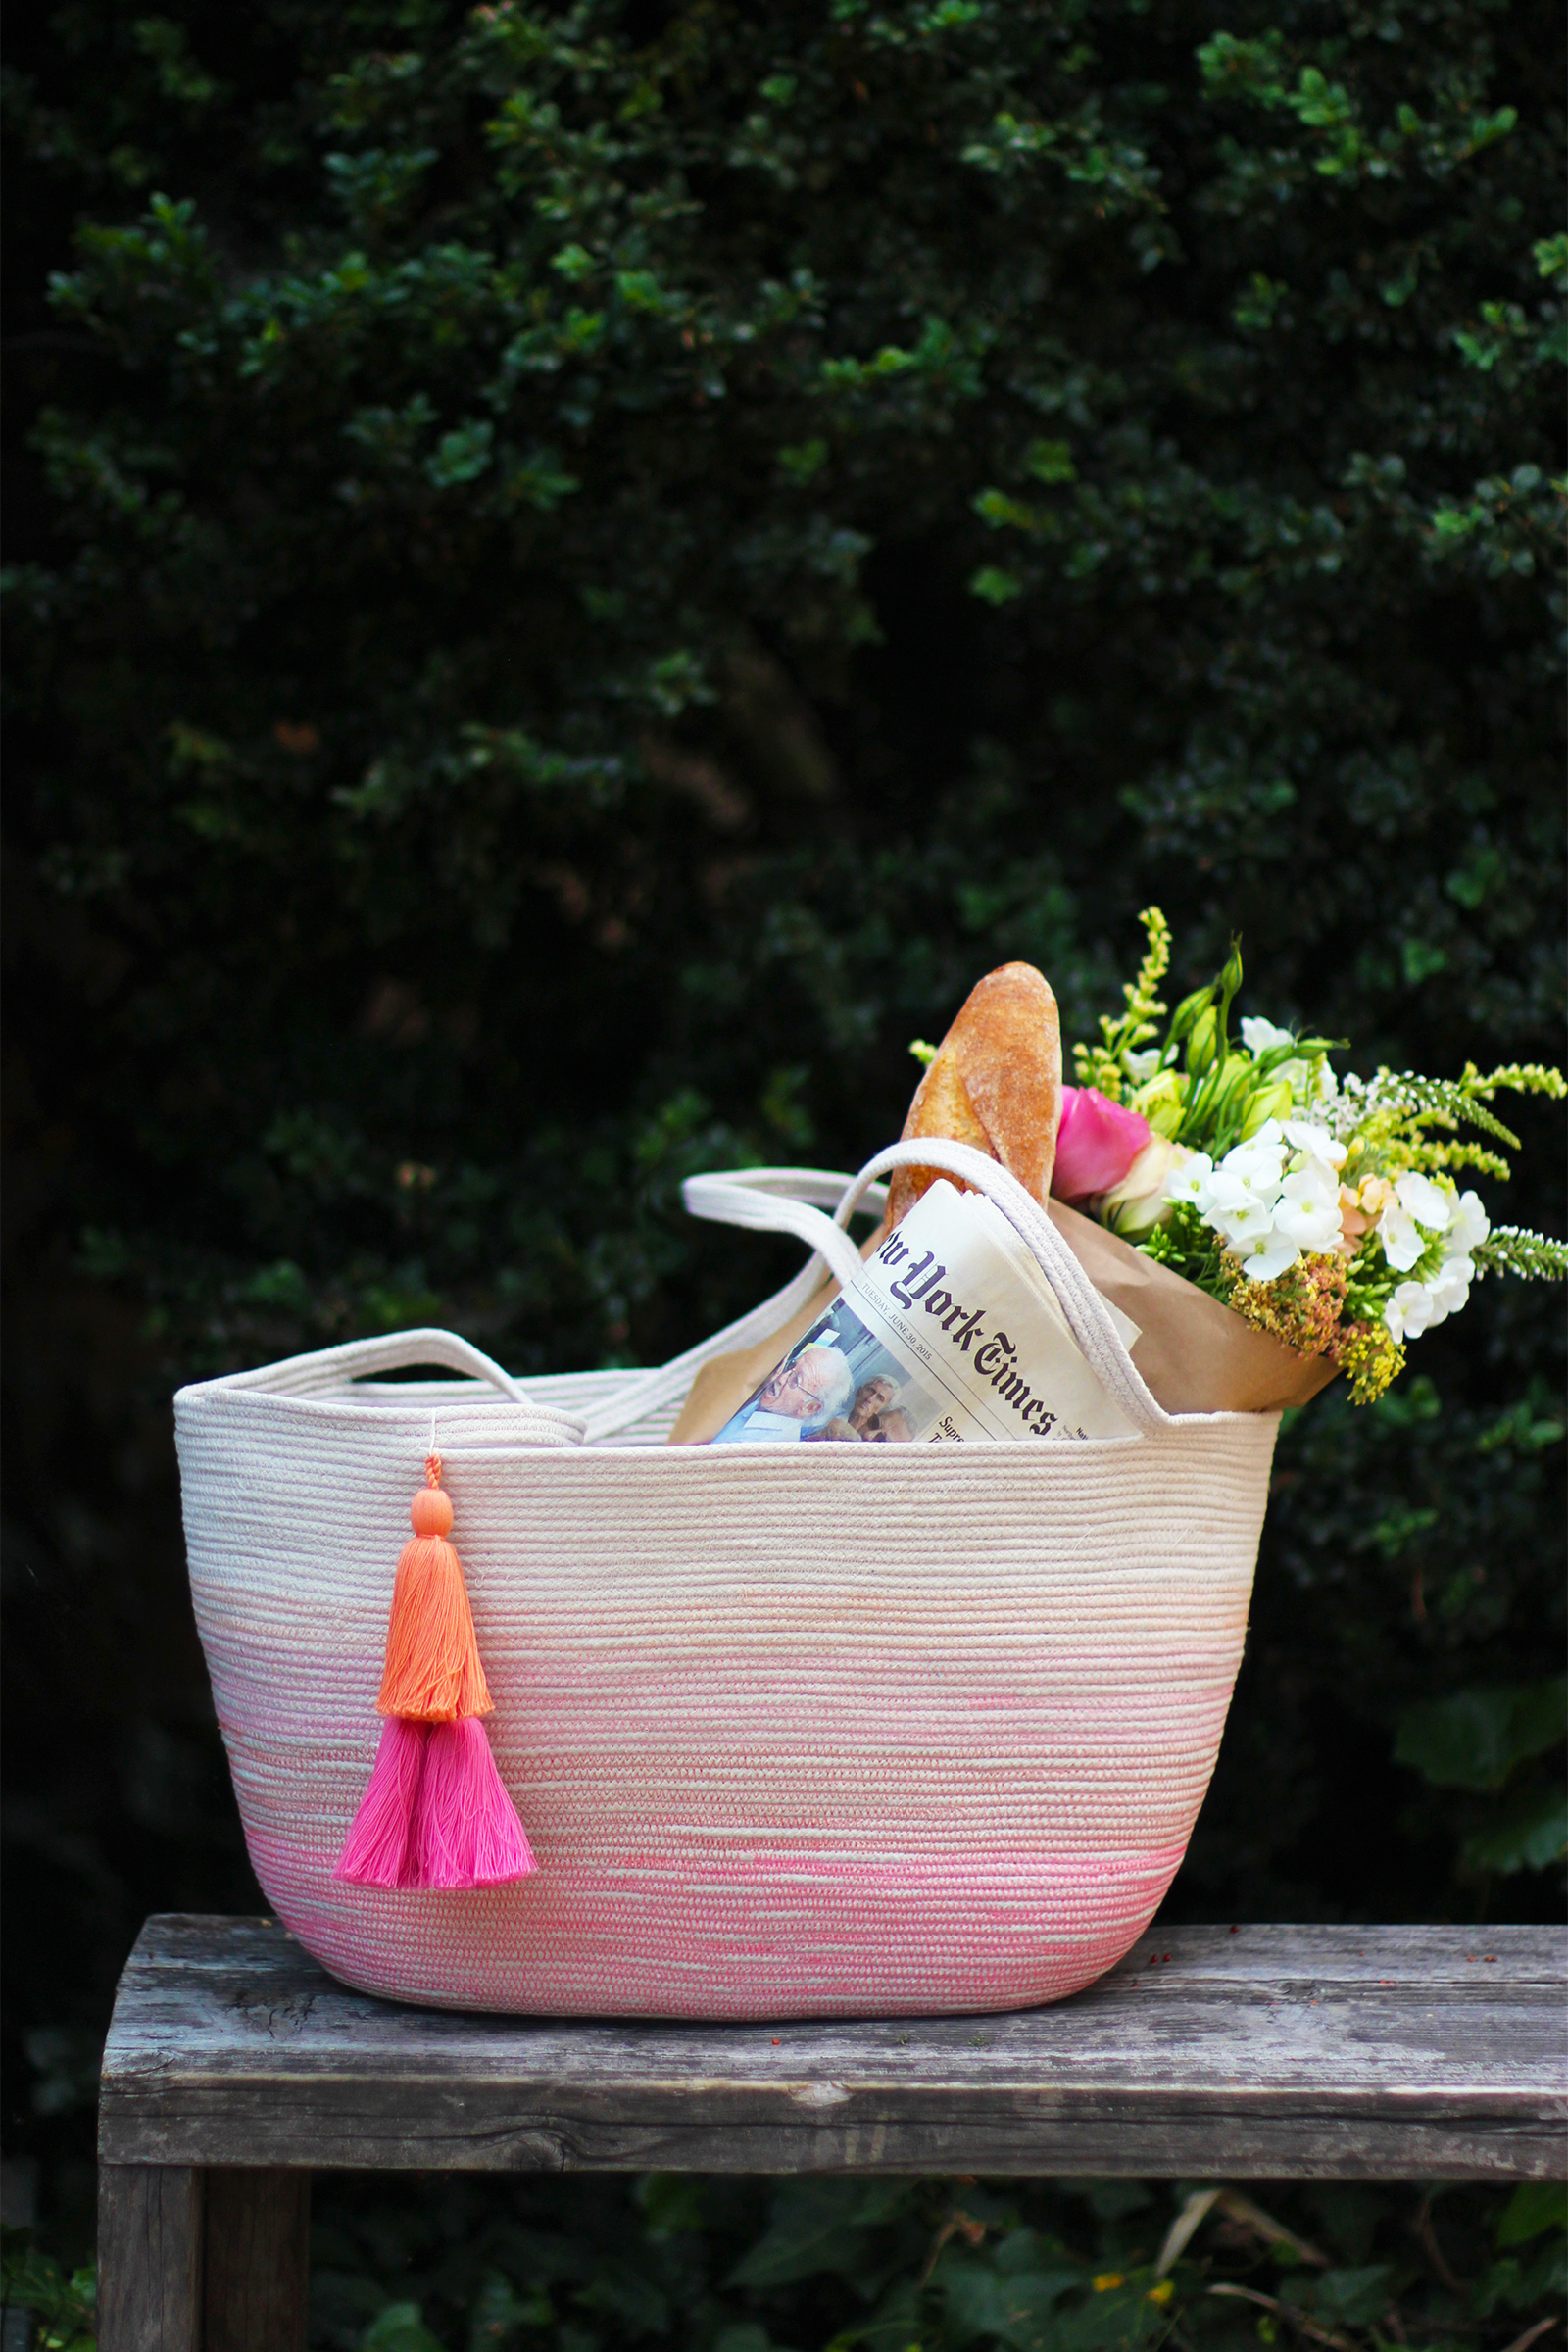
(images by HonestlyWTF)
OMG!
It’s amazing!!!
great DIY!
Best regards
MY WHITE IDEA DIY
Muy lindo bricolaje!!! Gracias!!! Marcy
I’ve seen these before in smaller versions but the big one is a really good idea! But how long did it take to make?
@Alice, it took me about 4-5 hours but that also included the time it took me to figure out the proper instructions for the tutorial and a few decision changes with color 🙂
Wow I’m seriously impressed! It’s so pretty!
http://www.milkandvelvet.com
Such a great post, really clever tutorial. Thank you so much for sharing!! x
Now this is awesome. Never thought of making an entire bag! Looking for a present for my mother’s birthday stops right here, this is just perfect!
When I saw that bag, I had no clue that you had made it! Looks like something I could easily find in a store. Love the idea.
I’m a fashion blogger in NYC. Check out sustenanceandstyle.com to see the best of the NYC’s fashion and food. Check out my most recent post to learn where to eat the best Moroccan brunch in the city and the perfect outfit to pair with it! See you there xx
– Stephanie
Wow it looks fantastic! I’ve had rope bowls on my ‘crafts to try’ list for so long but a bag could be much more useful! Absolutely beautiful x
http://crafternooncabaretclub.com
ERICA! This is so amazing! Totally want to make one asap 🙂
Wow, this is so impressive! You girls are SO talented!
LOVE THIS!!
The links to the rope are for 200 feet- how did you deal with using multiple pieces of rope to get to 200 yards?
@Trisha, sorry – that’s a typo!! It’s 200 feet, no 200 yards. Yards would be pretty outrageous!!
Totally amazing DIY once again! Would love it if you would use some of our natural gemstones for your jewelry tutorials! x bex
http://www.gempalace.etsy.com
Hi,
This is so wonderful and doable, thank you so much! I was just wondering how much this weight bag can hold, I wonder if it’s not a little delicate?
Thanks again!
@Dragana, I just used it today to buy groceries and had a bag full of apples, peaches, yogurt, wine. I would say I was carrying at least 10lbs? The bag was fine. I was just make sure you don’t have any gaps – or at least mend them along the way – and make sure you reinforce the handles by stitching forward and backwards.
*how much weight this bag can hold
What are the dimensions of the bottom of the bag before you start doing the zigzag stitch to make the sides of the bog?
This is absolutely stunning! And something that someone with woeful sewing skills (me!) could probably make! Thanks for adding this.
www,emmabyers.com
@Erica WHEW! I was getting nervous! Can’t wait to try this myself!
MUST try this, I love extra large bags like this.
This is a great, innovative way to use rope! I never would have thought to sew it into a tote. I like how the thread creates the color instead of dyes, it’s still effective and beautiful!
Wow!!! I love it!!! I have to try this one ! I like your colours selection and how you ve changed the thread colour to get this nice effect on the bag!
I follow you for a while now ! You have so nice and interesting DIY I always love them.
Greets.
Mili
http://www.milicaandrejic.com
The bag is absolutely beautiful, amazing DIY project! Thanks for sharing!
Prudence
http://www.prudencepetitestyle.com
Wow this is just impressive <3
Beautiful!
Erica, that is one amazing bag!!! I will definately try this!
This is remarkable! But as usual, you make it seem waaaaaay easier than it actually would be!
Namrata
http://seasoncheck.blogspot.com
Would you sell these yourself? I’m not even going to attempt to make it but would pay someone to, thoughts?
love it ^^
Um beijo,
myredkiss.blogspot.com
Great post! Thanks for sharing!
xx
Mademoiselle Coconath
http://mllecoconath.com
so great ! i thot at first u only wanna show the how-to-do-Tassel project hahah
great sgaring. thanks again.
my only question is…. can we just use any normal sewing machine ? or a specific sewing machine ?(cz it involve that rope?
let me know. 🙂
TQ
love frm Malaysia,
shaz
So smart idea ♥
Wao This is neat! really amazing! Good job, I wish I can get to do this myself
could you tell me what sort of needle you used in your machine? Thanks.
I’m going to try this for making a door mat
At the very beginning she said she uses a needle used for sewing denim or leather. Hope this helps.
Oh so pretty!! great work!
Wow very nice
What a brilliant idea!!
I just love your RopeBag made from a washing line and at a washing line bargain price too
❁❥•✯•❁•❥•✯
CatchaDragonfly x x x
Please make a video! I love your DIY bag, it’s so cute! 😀
I love this bag and you picked great colors for the threads. http://www.diyordie.club
This is so pretty!!! I’m a jewelry designer, and this makes me want to pull out my sewing machine again!!! How long did it take to get the angles right for the sides of the tote? Thanks for posting!!! #thefashionistador #quambydesigns. https://www.etsy.com/shop/quambydesigns
Looks totally professionally done! 🙂 Too sweet! I need to work on some bag DIYs for my blog hapinesswherever.wordpress.com 🙂
I would love to be able to do this but I have no sewing machine. And something tells me that I would make such a mess of trying to do this lol
It is really beautiful and I would buy it.
Oh my gosh, that is gorgeous! I love the idea of changing thread color to create that ombre effect! And it looks so easy to make. Thanks so much for this tute! 🙂 Lisa
i enjoyed making this I dyed my rope with food color ,the colors were nice….
Love it! have bought the materials to make some for my granddaughters for Christmas. Thank you for solving 2 ‘what will I get them for Christmas’ dilemmas 🙂
Fantastic work.
WOW – THANK YOU FOR SHARING – YOUR STEP BY STEP PICS AND INSTRUCTIONS ARE THE BEST! ;}
I have made this bag and they are beautiful. One thing though, I have a Babylock sewing machine and it won’t allow me to hold the basket at a 90 degree angle because the part where the needle goes is to thick. I had to use my Janome. Also, my friend braided a handle for her bag and it was just perfect. We wrapped our clothes line rope with material and then sewed it. They turned out really pretty. I made mine with Christmas fabric. The braided handle really added to the beauty of the bag.
This is by far the BEST tutorial I’ve seen for these bags. I can’t wait to make one for myself. I love how the different colored thread adds an almost ombre effect.
Great Idea! I’m lovin it ♥ Thanks u for sharing :*
Hi! The are really beautiful bags. Do you use one long piece of rope or two or more shorter pieces? Since the only large piece of rope I can find is 1,200 ft and around $150. If you do use more than one piece of rope how do you splice/connect them so it’s not ugly spot where one rope stops answer one rope starts. Thanks for any assistance! Keep coming up with awsome ideas – I really love them!
@Emily I’ve never had to use two pieces of rope since a 200ft length rope has always been enough, even when making a large bag. But if you need to connect two pieces, I would tuck the last inch of the end of the first piece of rope inside the bag and tuck the first inch of the second piece of rope to meet that first piece. Just make sure you get the piece pieces as close together as possible. Hope that helps!
Hi Emily!
I buy my rope at Walmart. Go into the hardware section and you’ll find cotton clothes line rope. It comes wrapped on a plastic thing and there are 100 feet for $6 or $7.00. I’ve done A LOT of research on rope, have bought different brands but always come back to this. It works really well. If you’re just starting out try making a small jewelry bowl or something similar. WARNING…. This is so addictive!!
If I can make these, anyone can!! Good luck!
This is realy amazing and easy to make! I use this bag as sewing and knitting transporter
Oh my goodness! it is amazing! on will try it! thanks you very much for the tutorial
Thank you for your good directions. I made a cloth covered bag some years ago but did not know how to make a handle. Now I do.
Hi,
I’ve started to make this twice and have had to unpick. When I try machine sewing the base of the bag it won’t stay flat and keeps sewing into a bowl shape. Does anyone have any tips on how I stop this from happening?
Thanks
Laura
This is just AMAZING! I hope my sewing machine can handle this! Hopefully it can tell itself “I think I can, I think I can!” So neat! Your bag looks beautiful!
I love your bag! Thank you for an great tutorial!!! It’s perfect.
Would you sell these yourself? I’m not even going to attempt to make it but would pay someone to, thoughts?
I love your bags. I tried making one but couldn’t get the sides nice and straight, they are quite rounded. How did you manage to get such a nice shape?
@TM do you mean the edge along the base of the bag? to get a defined edge, you have to make sure the base is at as much of an 90 degree angle as possible when sewing the body of the bag. And just let the machine move the bag along – don’t try to force the bag through the machine. You should end up with an even and consistent shape and stitch. Hope that helps!!
I want to make this as a Christmas present , my sister goes to their NH lake house a lot in the summer. I have a question how do you join another piece of rope when you run out and do I need to use a strong thread. It’s a beautiful rope bag I just hope I can do it justice when I begin making one.
Desperately trying to recreate….but my first attempt ended up with narrowing as I went up….so I ripped out where things went wrong and am trying again!!!
Do you have instructions about how to make a flower pot? Also, would it be possible to hot glue or gorilla glue the
coils of the basket together? I just want to use the painted ones for decoration around the house.
Very pretty bag. Thank you for sharing.
Question: Do I need a heavy-duty sewing machine?
Simply wonderful!!
Awesomely…. Thank you DIY …. So beautiful!!!!
I’m like you have looked and saved lots of tutorials on Pinterest and you tube about rope bowls and now bags. Love the thread color and I was wondering if that would show and it dos beautifully.
Thank you for this great
Cathy
This is the best tutorial that I have seen. I can’t wait to have a go at making my own.
Hello,
I have been making a similar IKEA bag for years! Same rugs, similar design.
Great minds…
What are the dimensions of the bottom of the bag before you start doing the zigzag stitch to make the sides of the bog?
I didn’t expect this rope bag can be done with sewing machine 😮 and adding color by colorful threads must be really interesting. Thank you for the detailed instructions, I will definitely give this DIY a try.
http://email-login.email
Love this….thank you for sharing!
Love the colour coming from the thread – great idea!
This is wonderful
But what if you don’t have a sewing machine and want to use free hand to make the handle.
LOVE this basket! Slightly worried my machine won’t cope with it but will have a go. Thank you for a great idea!
thank you so mach
What sewing machine do you have? I’m in the market for a new one.
Thank you in advance!
With oval baskets, how do you keep it from looking like a canoe? My long sides always dip down in the middle.
How do you keep the sides straight? My oval baskets always look like canoes with the straight sides dipping in the center.
resultat SUPER