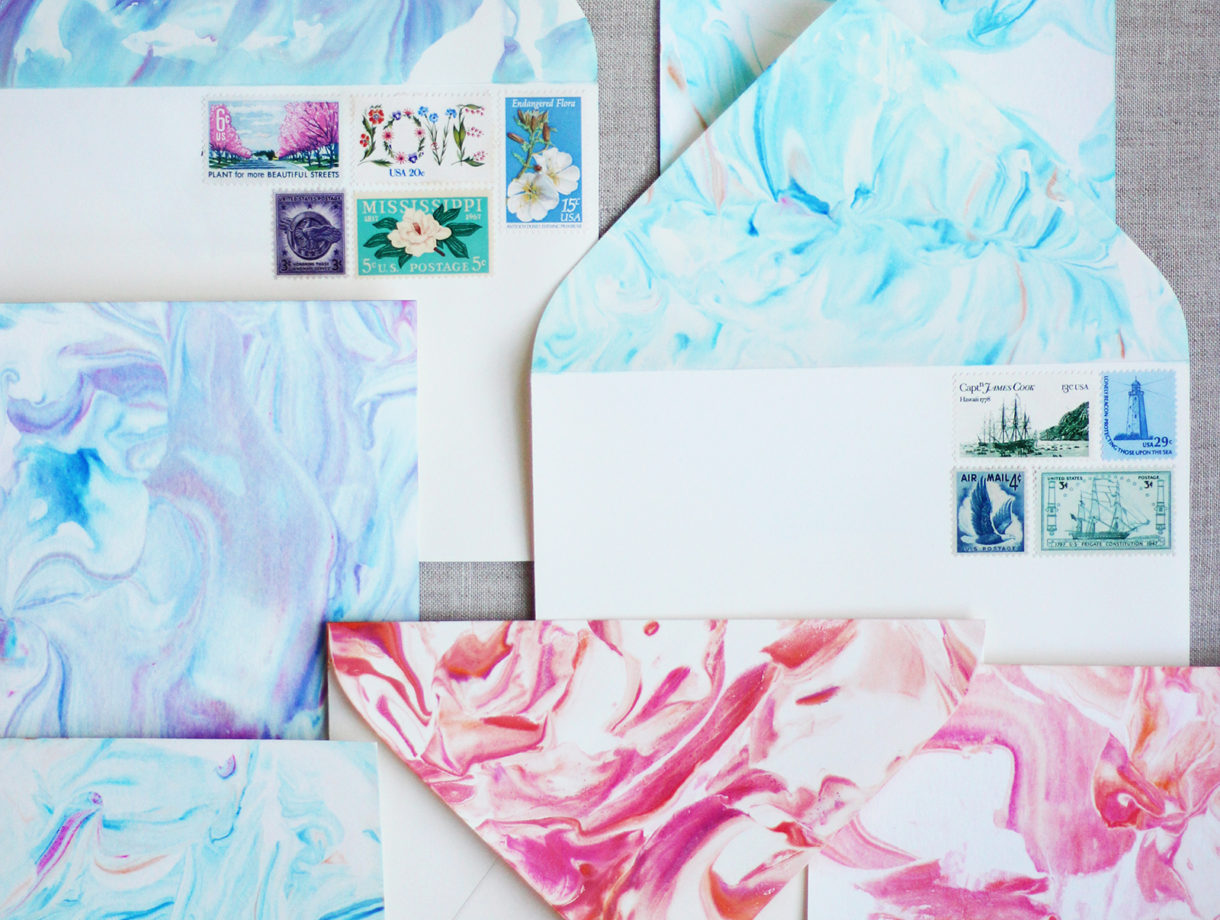
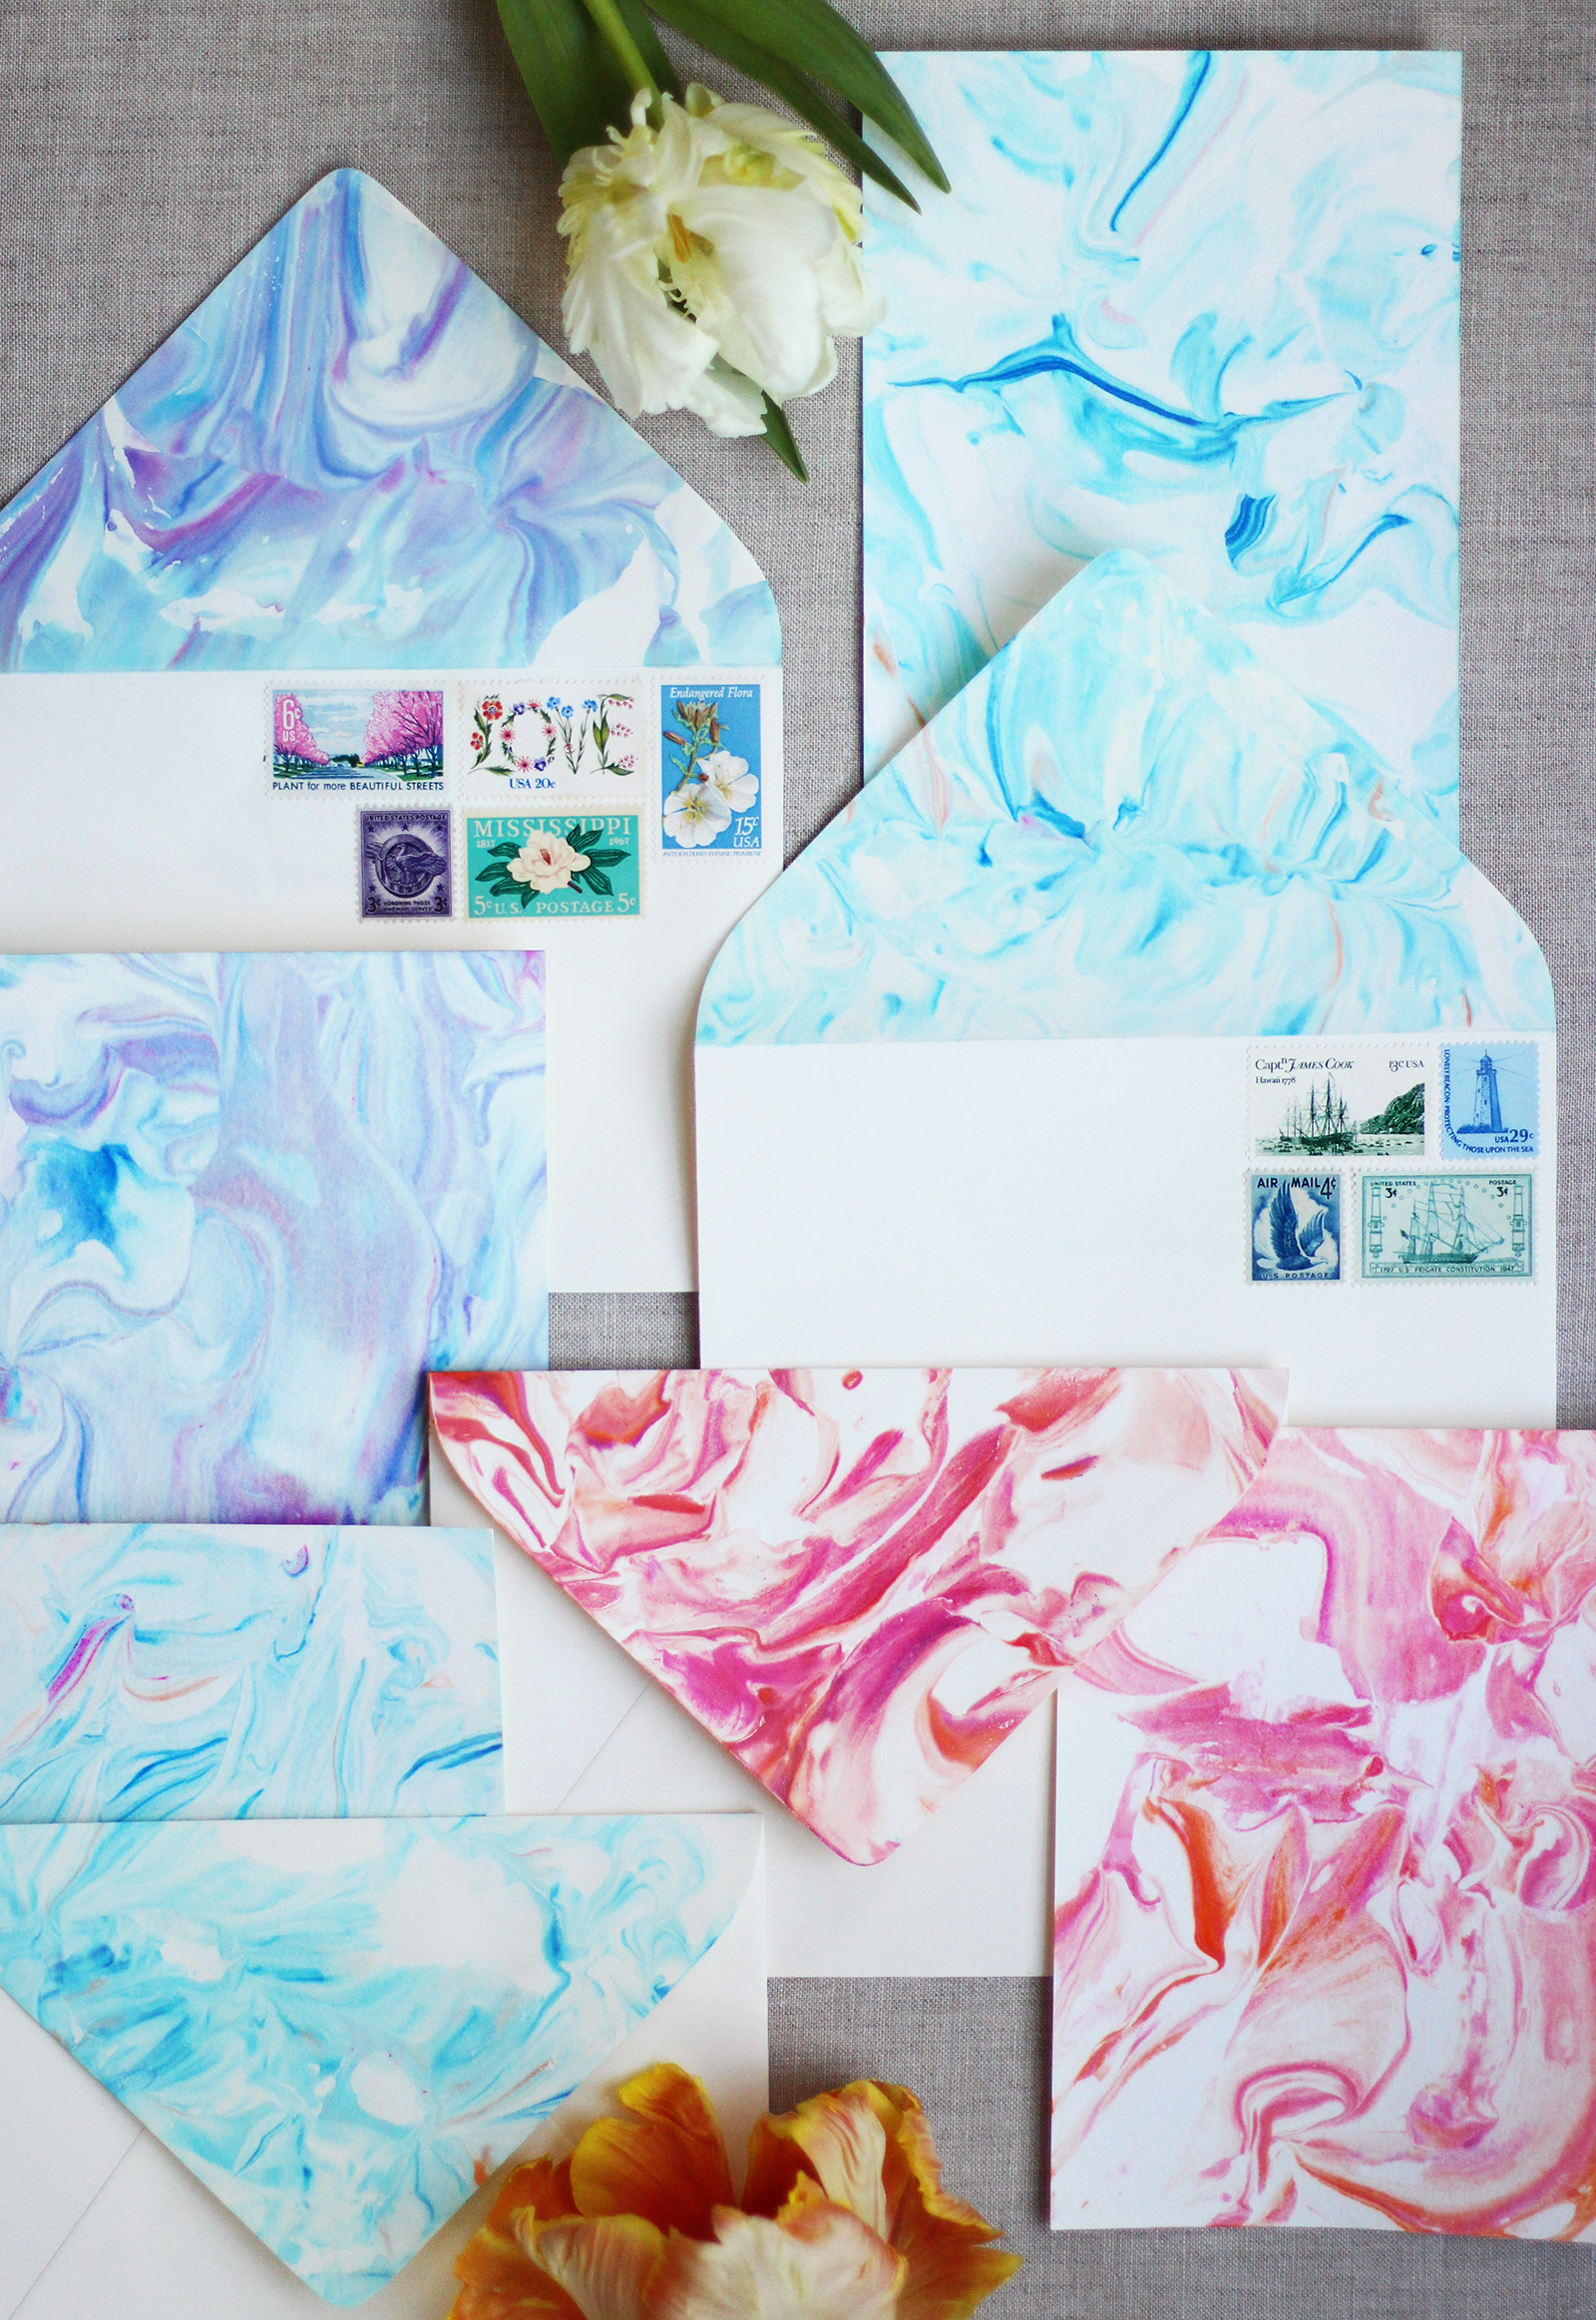
I was skeptical when Lauren told me about marbling paper with food coloring and shaving cream. How can you possibly get those gorgeous swirly patterns with just pantry and bathroom items?! It seemed either too complicated to try or too good to be true. But I’m always up for a challenge or to debunk a myth. But I’m happy to report that marbling paper with shaving cream is, indeed, too good to be true and beyond easy. In fact, I went through 3 cans of shaving cream after my first attempt – it’s addicting. Beware.
You’ll need:
- foam shaving cream
- food coloring
- heavy weight paper
- painters tape or washi tape
- paper towels
- plastic or metal ruler
- plastic spatula
- rectangular baking dish
- toothpick (optional)

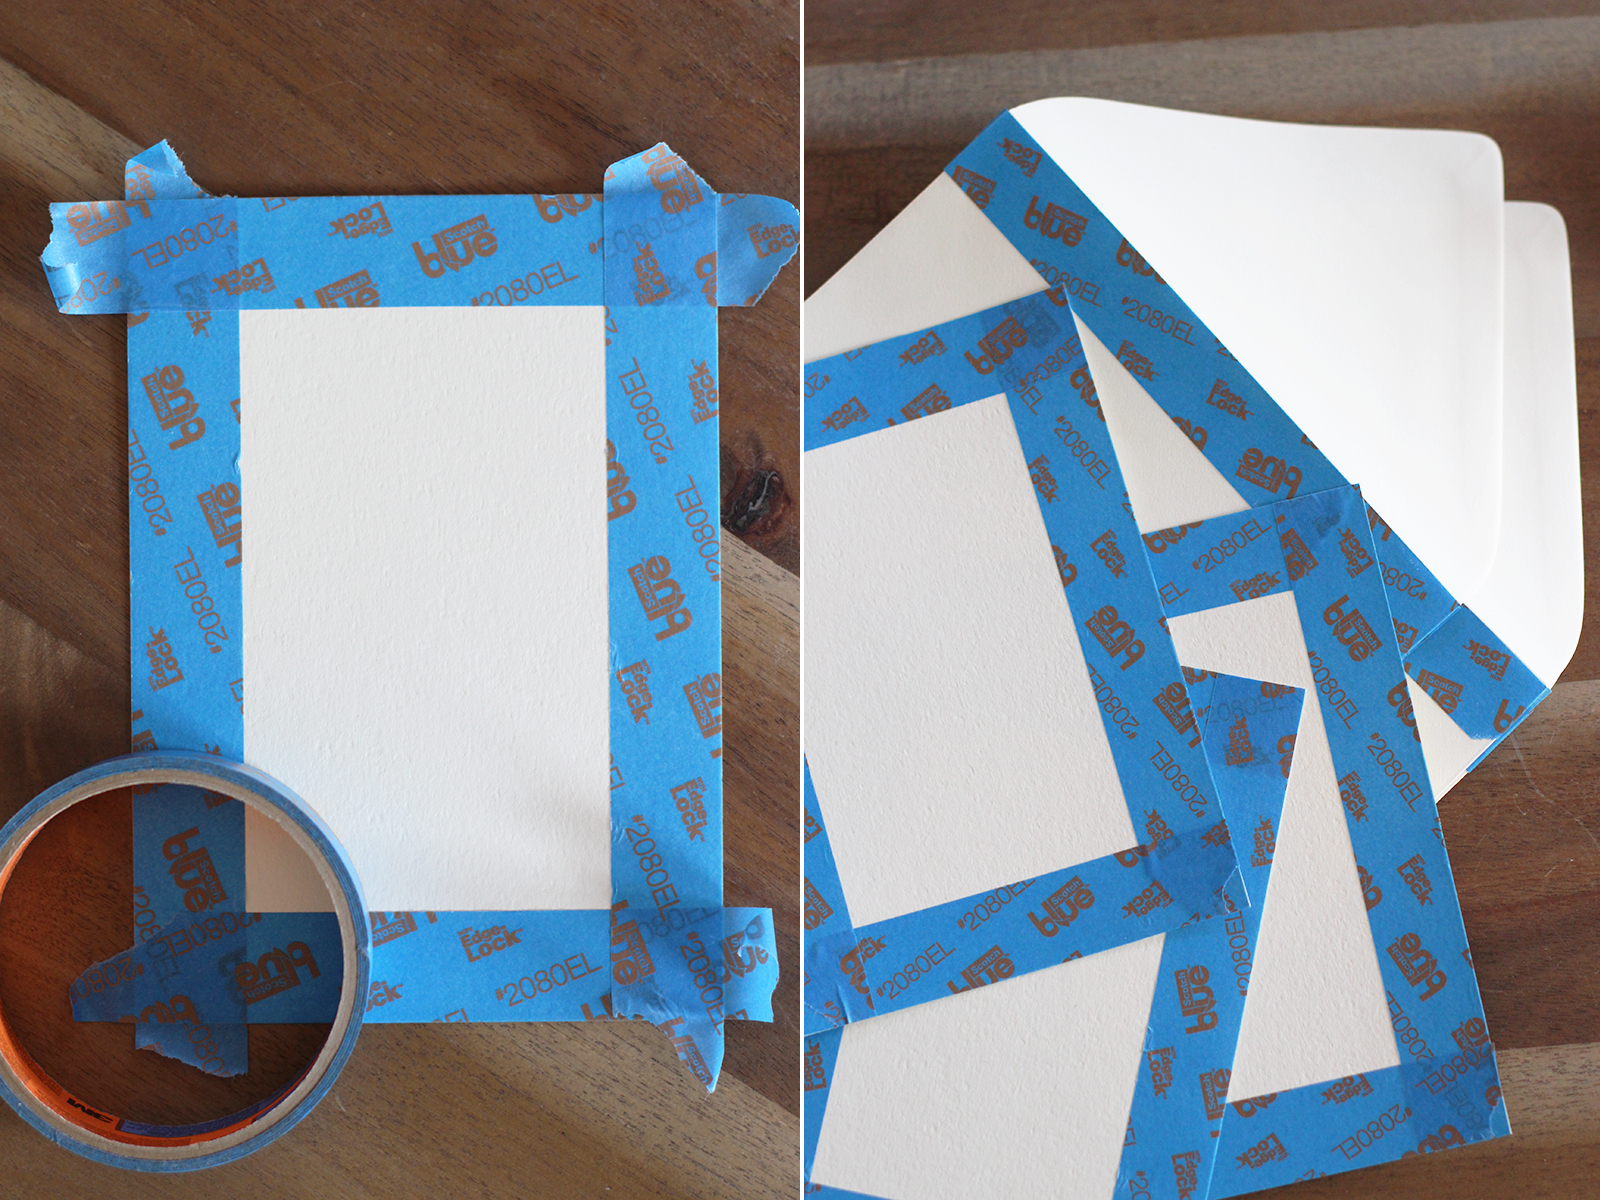
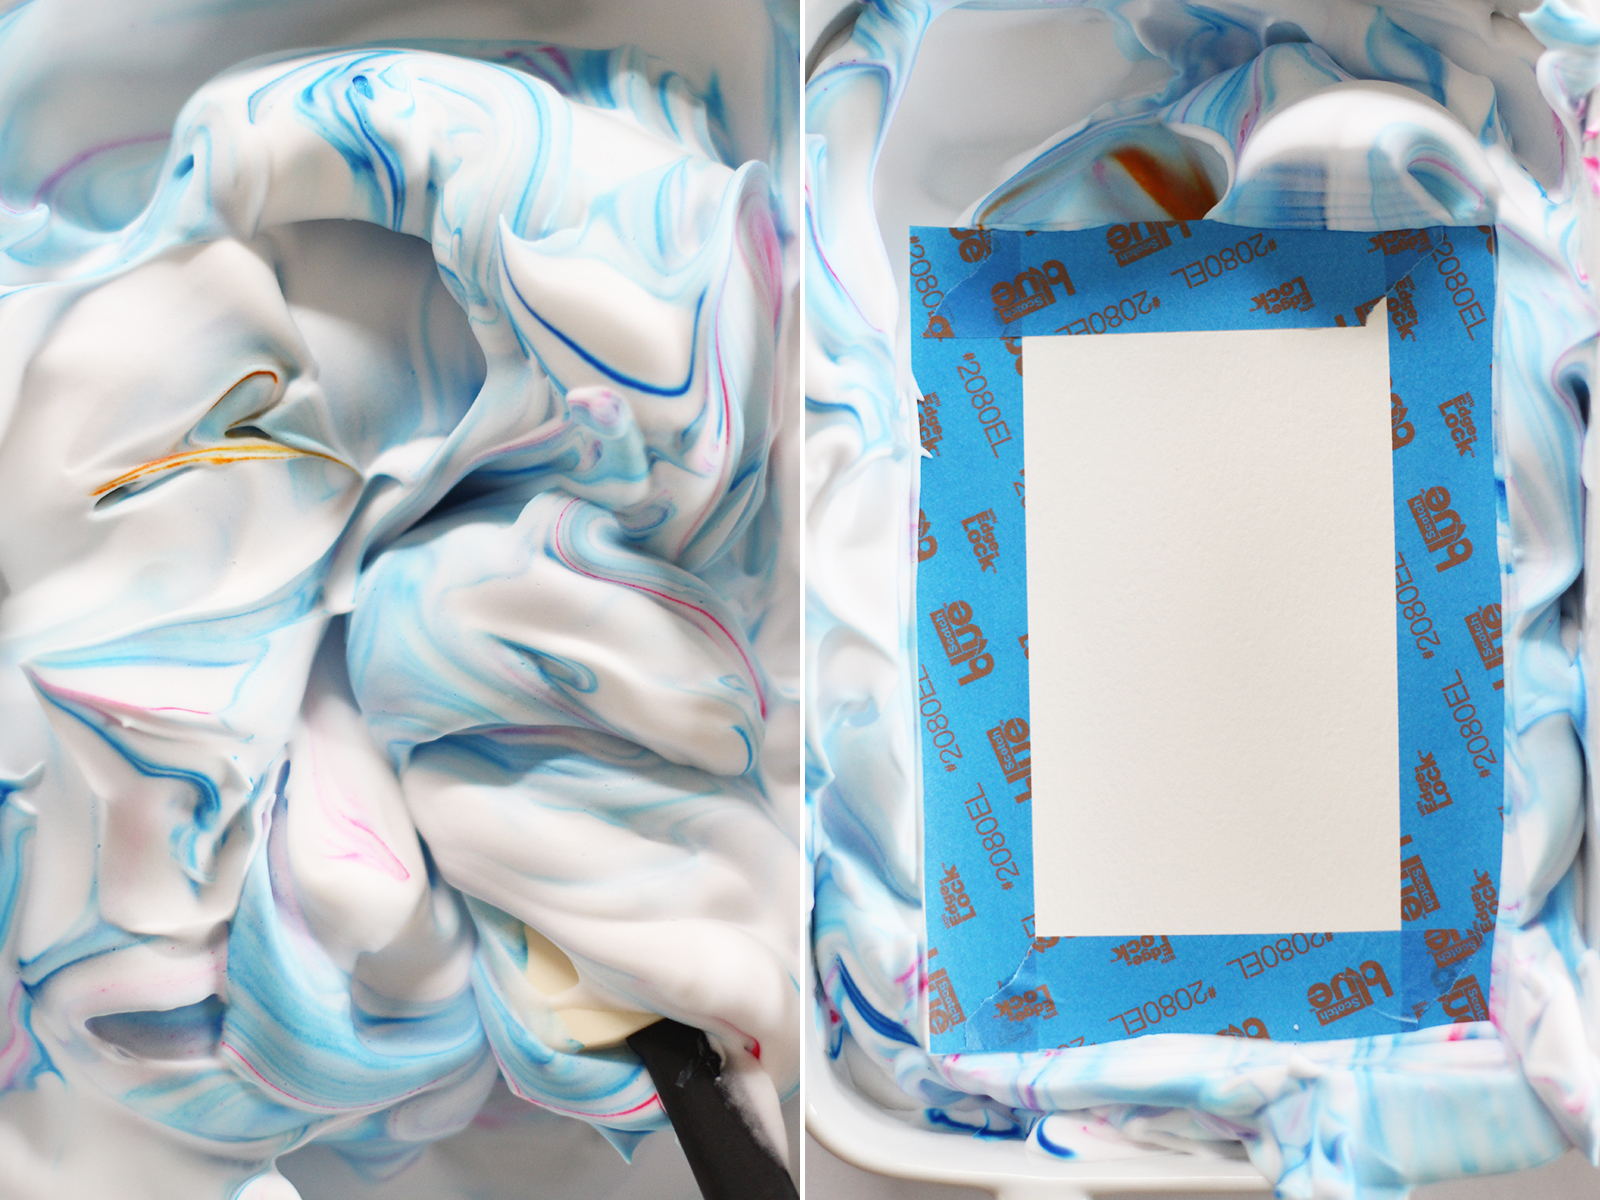
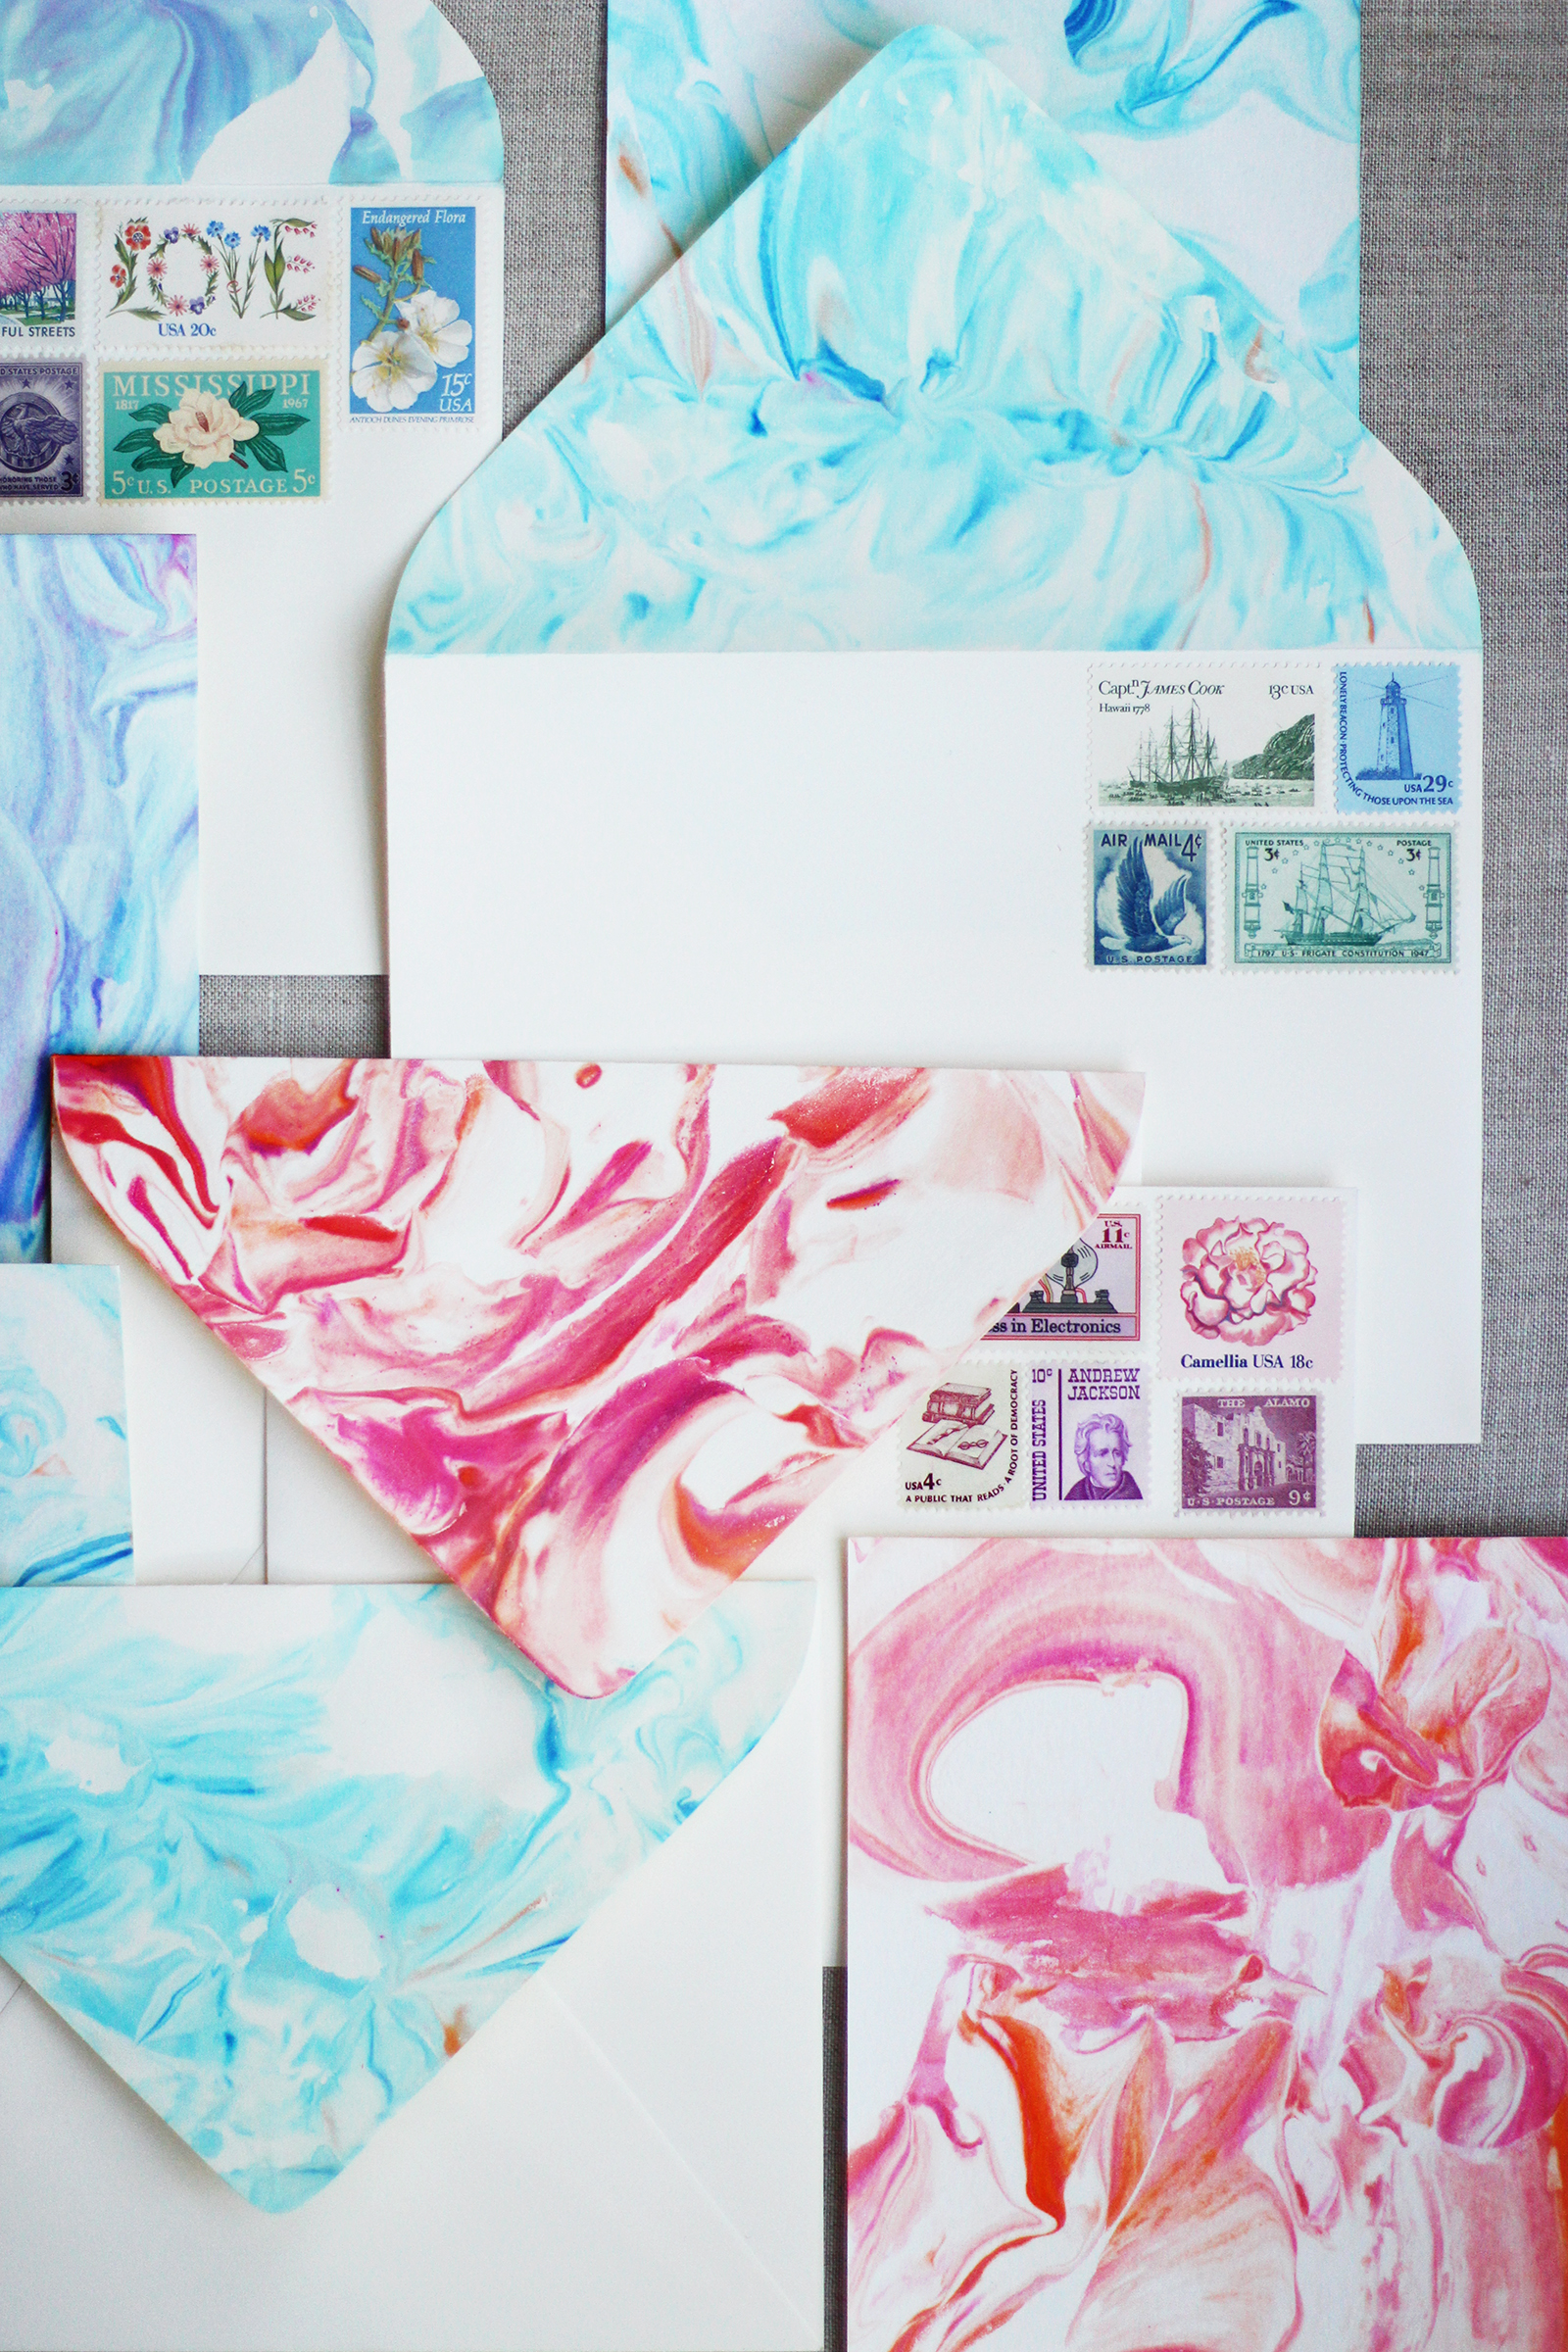
Start by masking off the backside of your paper. It’s important to use heavier weight paper with texture. We personally love Paper Source’s Lux White 5×7 notecards and envelopes.
Now the fun part begins. Spray a nice, thick layer of shaving cream into a rectangular baking dish – one that is large enough to easily fit your paper inside. Put just a few drops of food coloring into the shaving cream. I used gel food coloring here which worked fine. You can also use liquid.

With a rubber spatula, start folding the shaving cream to incorporate the color. Don’t over mix as you’ll want to keep that nice swirly pattern.

Once your base color is swirled, you can add additional colors with a toothpick or wooden skewer. Simply dap the skewer into the food coloring and swirl is around in different areas. If you don’t want the colors to mix or muddle, do not over mix or blend.
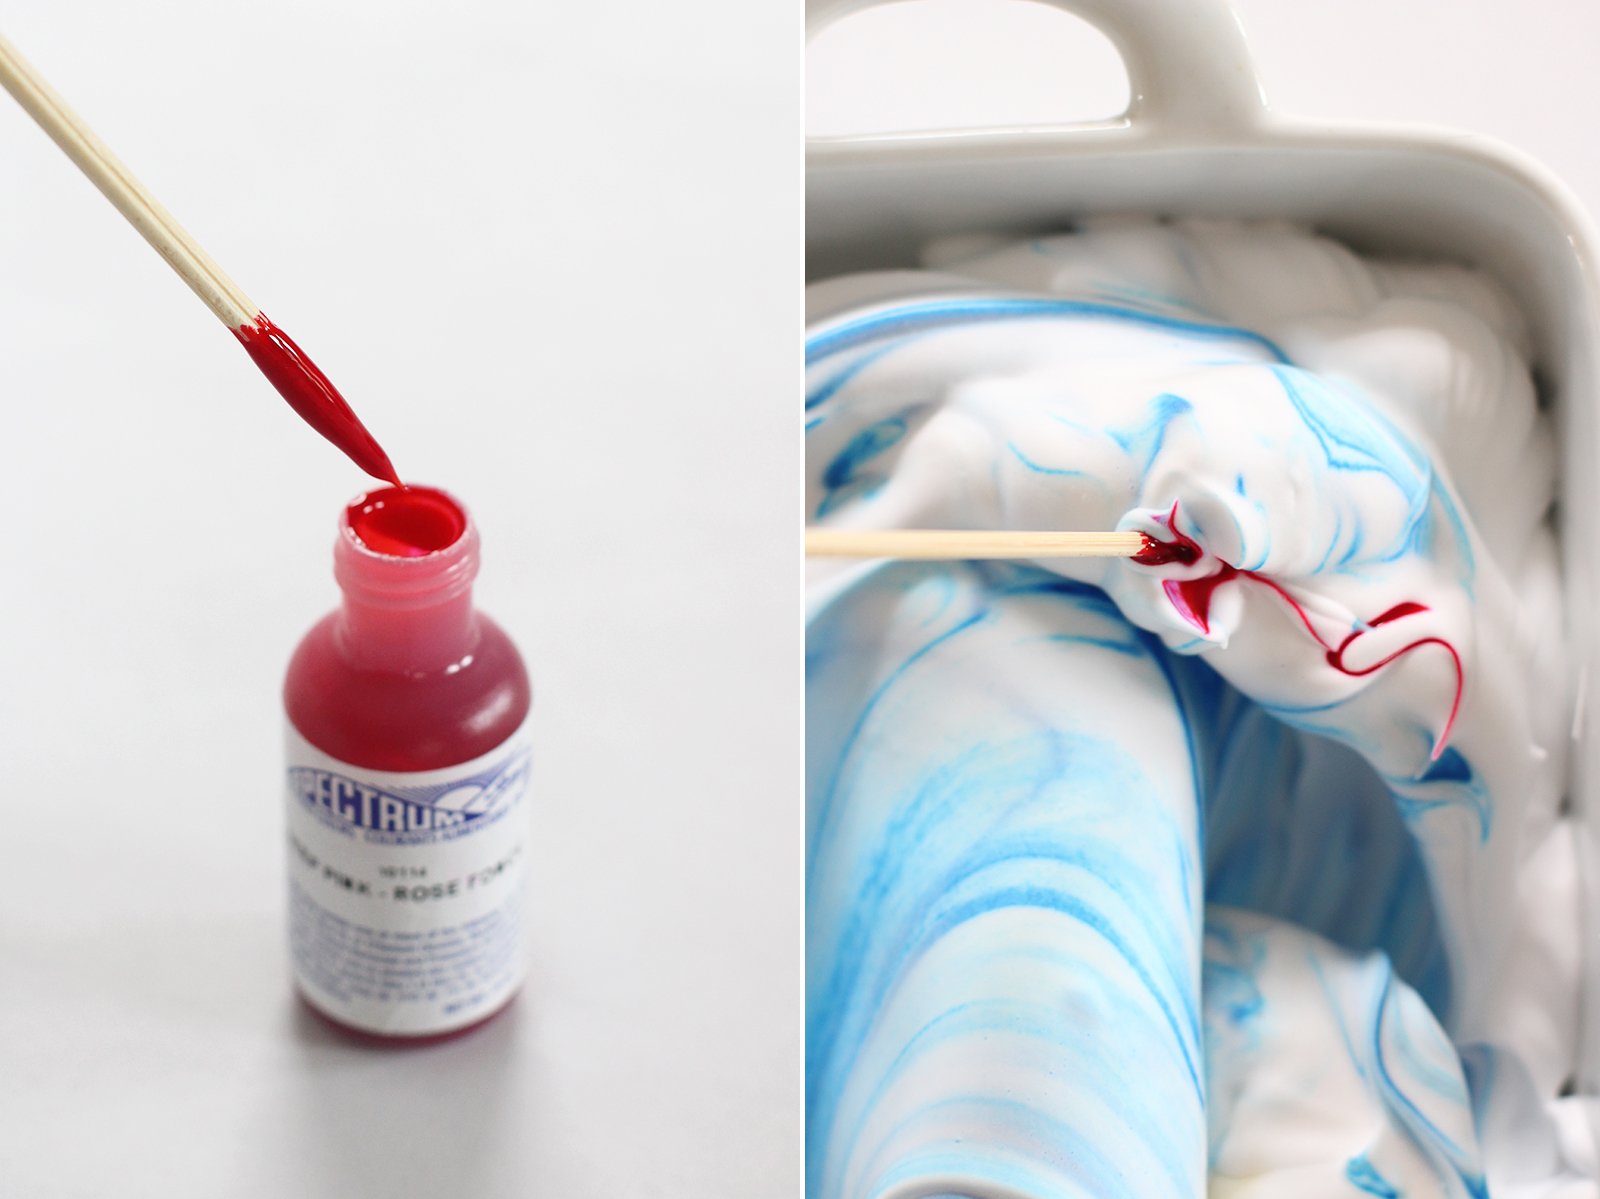
Your pattern doesn’t have to be perfect – don’t worry about “marbling” the shaving cream too much. It will do all it’s marbling magic on its own. Place the paper, tape side up, onto the shaving cream.
Use your fingers to gently press down the paper so that as much of it makes contact with the shaving cream as possible. You don’t want the paper to sit for too long as it will start to get too wet. Gently lift the paper off the shaving cream from one corner.
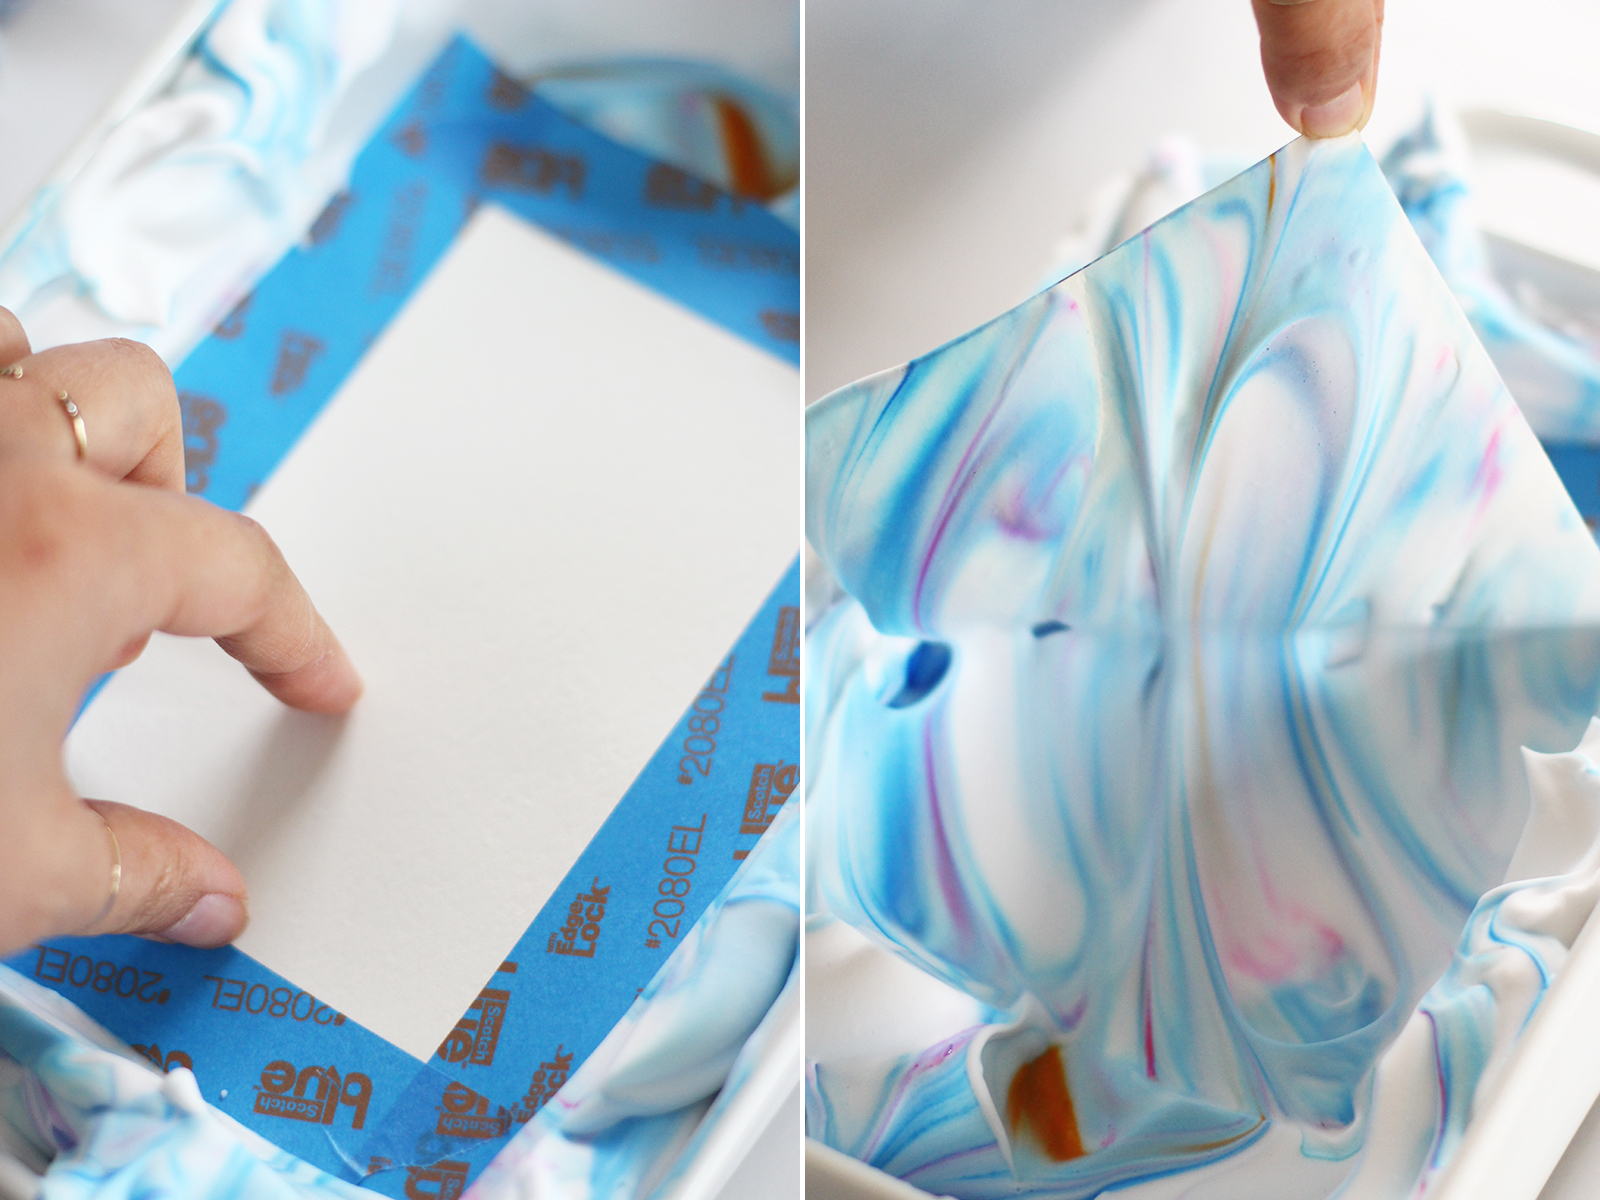
Place it onto a paper towel. Take your ruler and from one corner, scrape the shaving cream off in one sweeping motion.
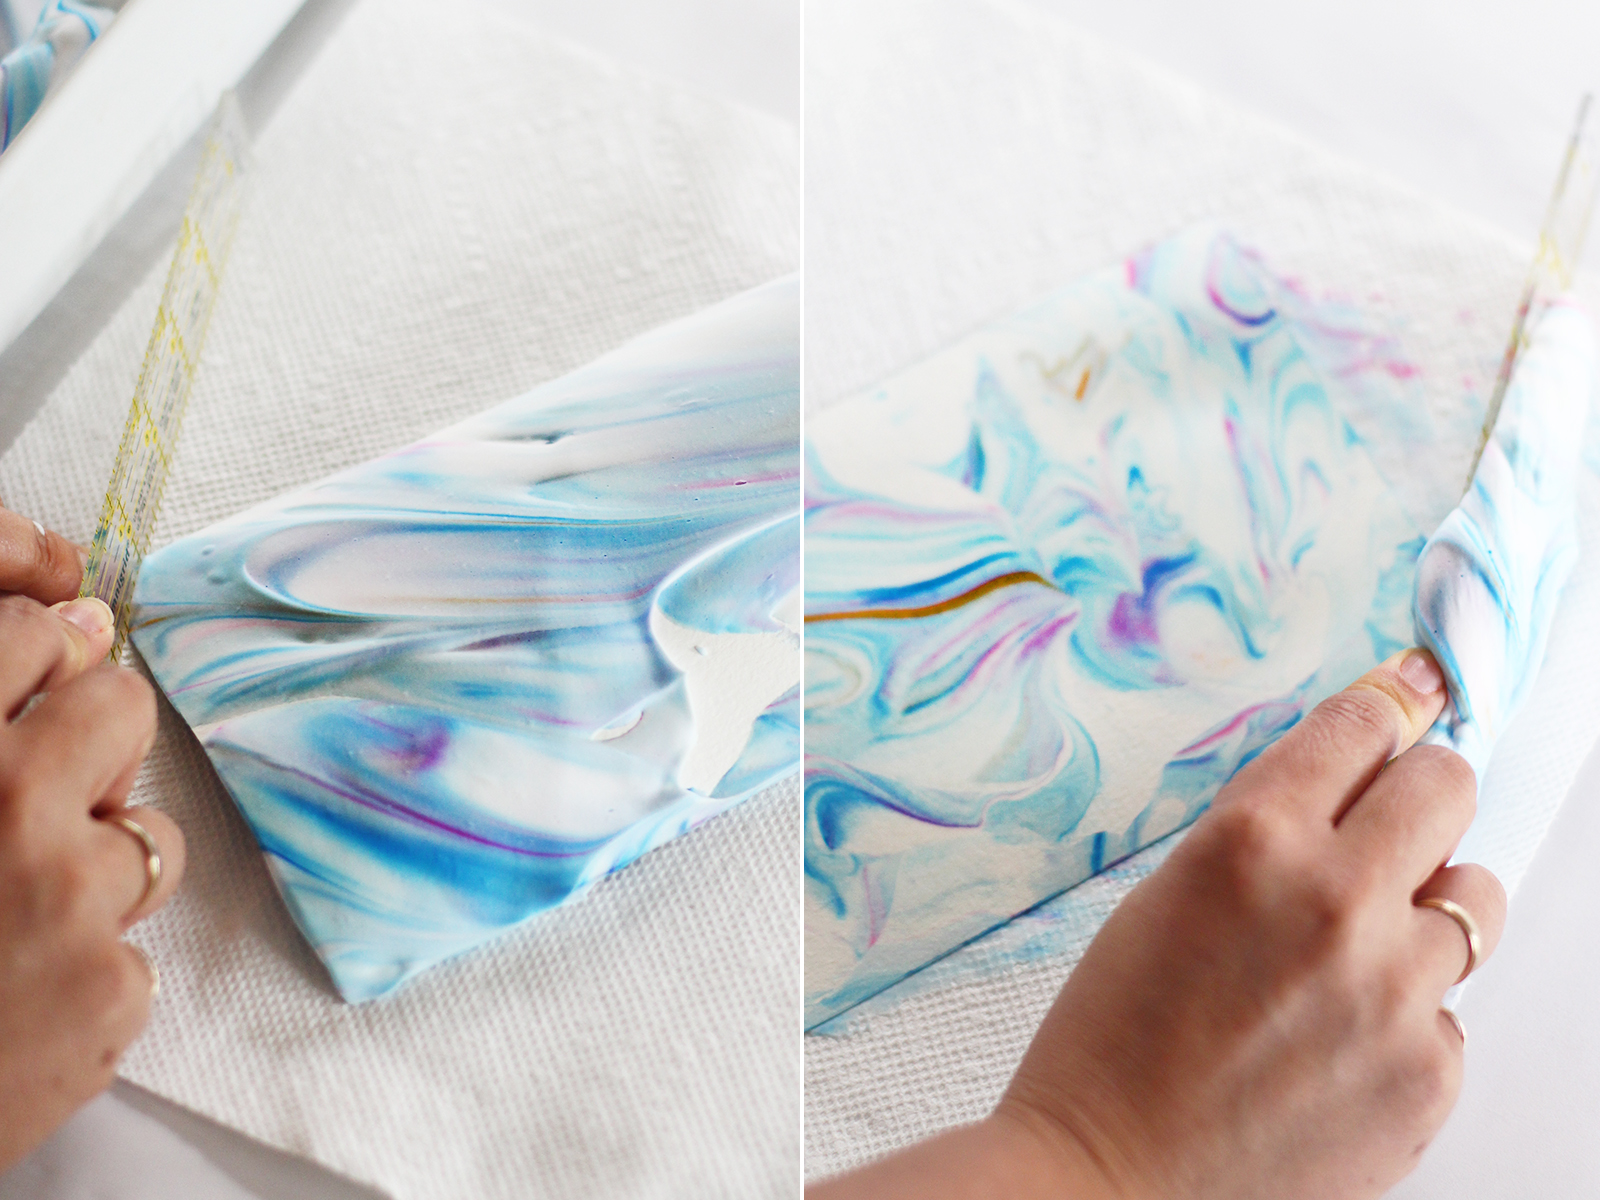
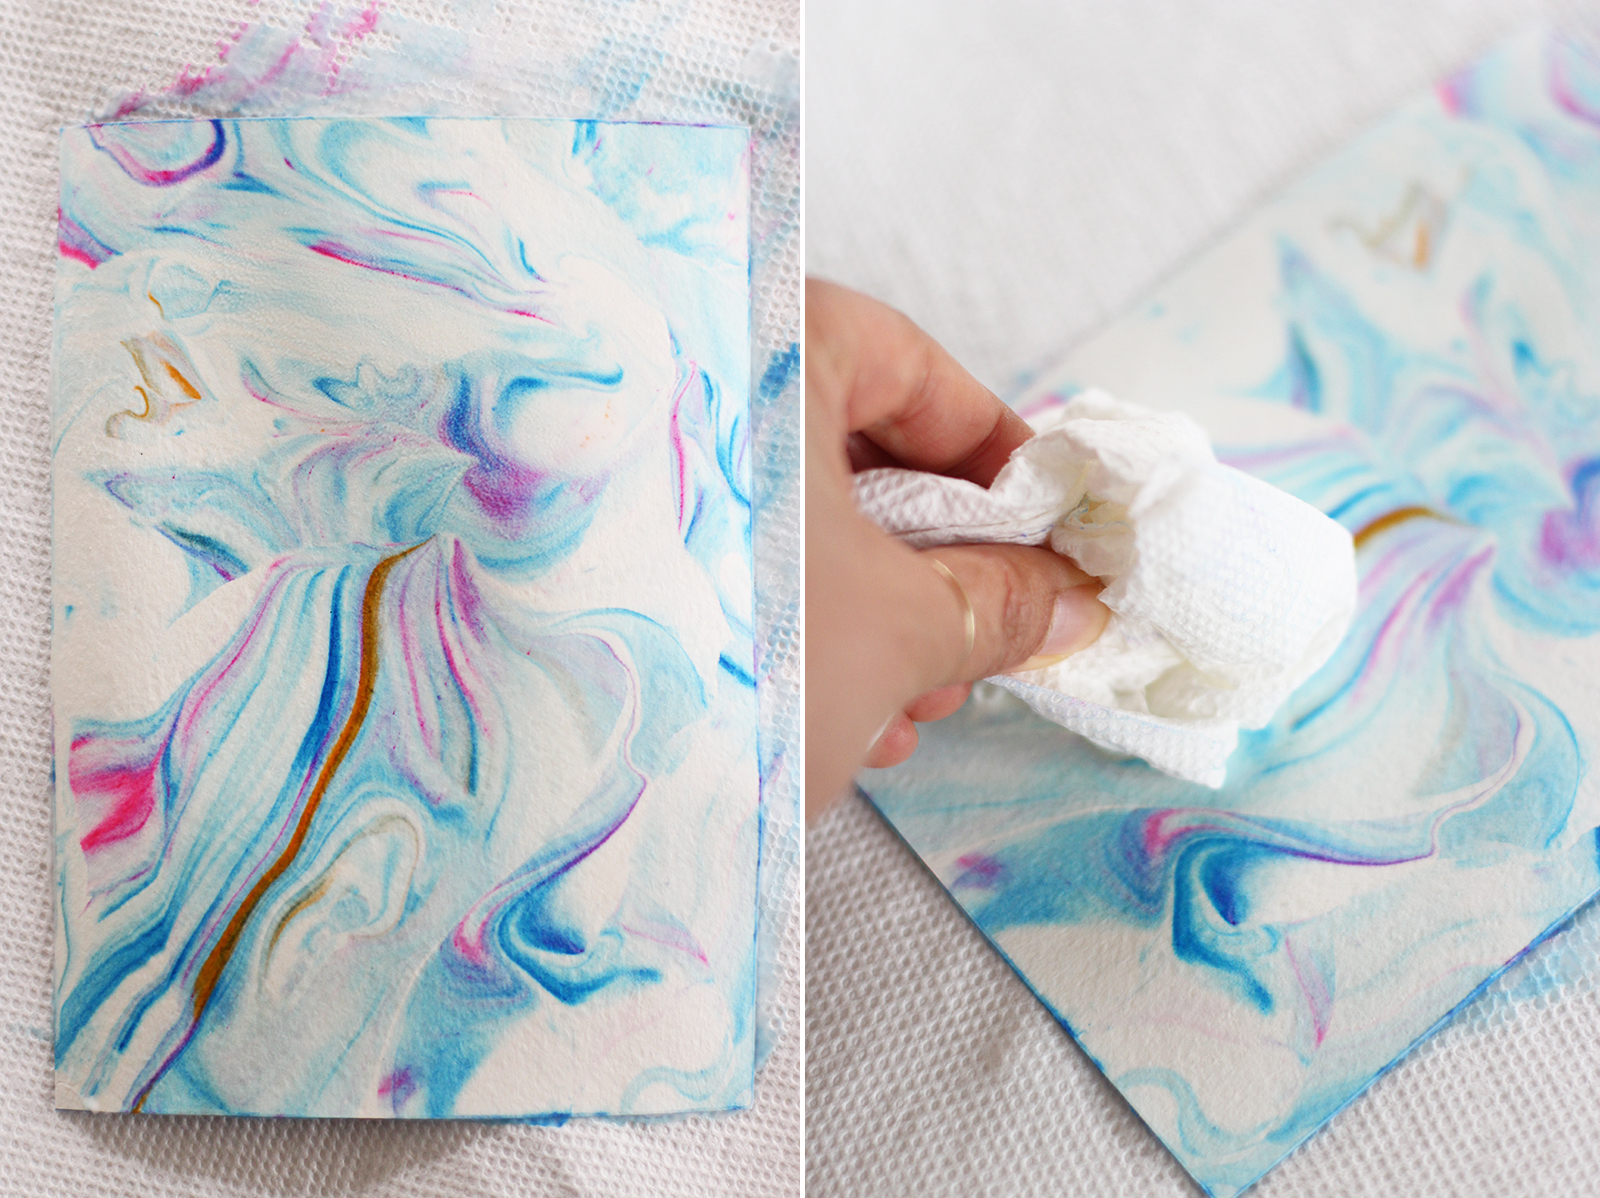
Viola! Amazing, no?? Take a fresh paper towel and wipe away any excess shaving cream. Set the paper aside to dry.
Go back into the shaving cream and give it another couple folds. Put in another piece of paper, remove and scrape. You can keep repeating this process until the colors get too muddled. If there is too much dye, you can always add more shaving cream. Or if there is too much white space, you can always fold in more colors.

Once all the notecards have dried, place them under a pile of heavy books to flatten out.
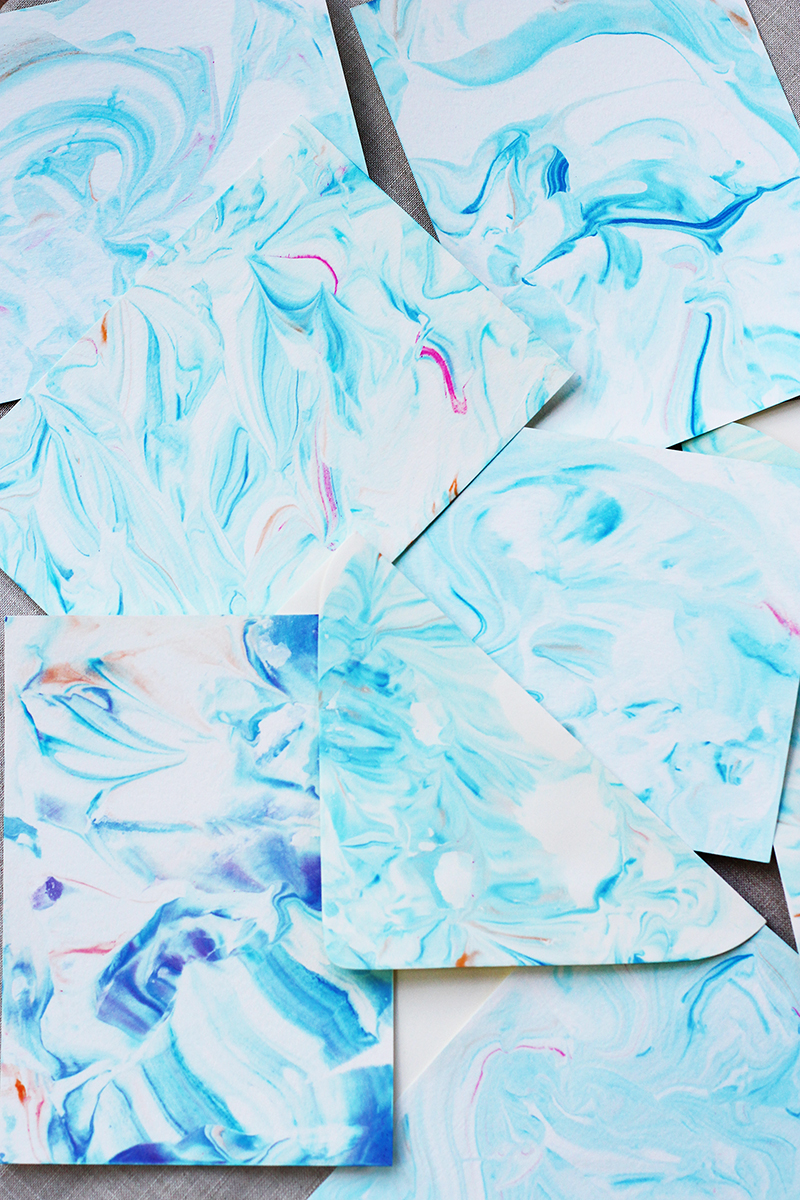
The beauty is making mistakes. I have found the most beautiful patterns and colors happened by accident. Have fun with this!
(images by HonestlyWTF)
Wow this looks so amazing! I can’t believe you used foam shaving cream for this. Love it 😀
xx Mira
http://www.glamdevils.com
I have no words. It’s simple but incredibly beautiful. Absolutely love it.
This is one of the best DIY I have ever seen!
Congratulations Erica!
What a cool idea! i’m excited to try this, thanks! 🙂
So neat!
http://www.FashionSnag.com
This is so awesome!!! Can’t wait to try <3
personallybasic.blogspot.com
I can’t believe you did this with shaving cream! This looks like such a fun project. I really can’t wait to try it!
-Helen
http://www.sweethelengrace.com
Wow that’s really cool! Didn’t think it would be that easy, def a DIY project I’d love to try. Thanks for sharing.
Amazing and so easy!!!
I can’t wait to try it ♥
Thanks for sharing 😉
Que buena idea, es precioso! Gracias por compartirlo, lo pondré en práctica! KSS
When I was in elementary school we marbled paper and it was a lot of work. This way looks so easy! I will need to try it!
xx,
Kayla
Eat Play Dress
Never seen this done with shaving cream. What a great idea, looks like it’s a lot less messy than methods I’ve tried before!
SHOP SAUL
So so smart!
Amazing ..love the process love the results..
xoxo
Yael Guetta
http://www.ftwwl.com
They are absolutely beautiful! I love this idea, so simple and just gorgeous. My daughter would love to help me with this, thanks for sharing!
Good job Erica! We really like this DIY-tutorial. The result is gorgeous! Are you a Paris lover? Come and meet us at http://habitatparisien.blogspot.fr
The marble prints are absolutely gorgeous and the colors are really pretty! Such a charming DIY project, thanks for sharing!
Prudence
http://www.prudencepetitestyle.wordpress.com
This looks incredible! Two marbling posts have popped up on my Bloglovin’ feed today, this one and one from A Beautiful Mess – your DIY is so much nicer, far cheaper and much simpler to do! Really love it…definitely going to be giving it a go asap!
Thank you for sharing 🙂 x
http://www.ceejayell.blogspot.co.uk
Definitely have to try this! Looks amazing!
http://thelittletreasures.blogspot.com
The final effect is gorgeous!! And this actually feels like a manageable technique. I can’t wait to give it a go.
Thanks for sharing – I’ve wanted to try marbling paper for ages
X
http://crafternooncabaretclub.com
I gave this a go, no pictures sorry, but it was fun, easy and turned out great.
The unexpected, the card stock I used became smooth and soft and smelt good.
I even thought after I next time I will add a little scent !!
The best & easiest marbling diy ever! I used acrylic paint instead of food coloring and it worked great too.
I just tried this and it worked great! I’m obsessed!
Great job , a great effect and so easy …. Greetings from Germany Stefanie
Great idea!! Love all the gorgeous colors ….
http://www.gempalace.etsy.com
How gorgeous this is, and with such an unusual ingredient (shaving cream) as well!
thank you so much for sharing this amazing tutorial!
i saw this last night and i can’t help but try it right away. definitely buying more food coloring soon :3
the results are amazing! <3 a little bit messy but still fun to do (:
This project looks really cool! Do you think this could work on canvas? I was thinking of doing this for wall art.
Such a fun idea!
https://thegildedlifestyle.blogspot.com
I’m so gonna be a marbling fiend tomorrow!
I would never have thought of this, this looks amazing!
myvainpaintpot.com
Amazing!! Can’t wait to try it
Why is the painter’s tape used? When do you remove it?
Thx
Wow this was an ablsolute blast! I love how the envelopes turned out! Can’t wait to send some letters!
it worked out so well and i made bows for a party and it looks amazing
I have to ask the same as Ro, why the painter’s tape? What is its purpose and yes, when do you remove it? I love the affect.
@Connie I only used the painter’s tape to mask off the opposite side of the paper to use as stationary. no matter how hard you try, it tends to get coloring on the backside – but if you’re okay with that, then you don’t need painter’s tape. If you do decide to use it, remove it after the paper has dried.
love it!
Do you know if this possibly works on a material on something other them paper (such as a canvas or water color paper)
This looks awesome! I’m going to fold over some tape and add a tab to help lift the envelope from the shaving cream and rags instead of paper towels. Can’t wait to try this!
To Kaitlyn: I bet this would work really well on watercolor paper since it’s such a heavy weight – that’s where I’m going to start. You could also just make a small batch and try it out so you don’t waste a lot of product. I’m also going to play around with the watercolors I have instead of food coloring; it’s a nice, thick consistency that I think might be nice – similar to acrylic paint as someone else mentioned. I bet it will be super fun to just play around with different things and see what happens.
This i sso gorgeous, looks like you bought it in a shop! I am def doing this 🙂 Thank you for sharing 🙂
I did this. I love it. It was a mess, but a beautiful mess. They look awesome. I’m sending some out today. These are amazing!
Where did she get those pretty postal stamp from?
@Caroline you can get unused vintage postal stamps at Etsy
why tape
@Scarlett tape just prevents the dye from getting on the backside. But if you aren’t interested in using it as stationary or care that the back side might get some dye smudges, then you can omit the tape!
how do you get yours to be so marbly
Is it ok if I use water color instead of food color?
It is a beautiful idea. It not for someone who is a clutz. I got everything right till I put the card in. It is messier than I thought, though the first sheet came out great. Next I had colored shaving cream on my hands, desk, ruler, and anything else near by. I paid such close attention to what I was doing I almost put my finger into my mouth to “lick off the Cool Whip” which is shaving cream. I will recommend it to friends that are not as spastic as myself.
Great for writing to pen pals! (Yes I still have some :P)
This..is..flipping Amazeballs!!
Any idea if a similar idea could work on fabrics if you used fabric dyes instead of food coloring? Just wondering, either way this post was so insightful, thank you!
I tried this using acrylic paint instead of food coloring and it worked perfectly. It gave me a very subtle marble in the beginning and then I added more and it got the perfect intensity. used gold acrylic paint to give some added shine. awesome method overall, just figure out a clean spot and lay out materials and all far apart so it doesn’t get too messy. Will use this for my wedding stationery with gold letter writing 🙂 this is the easiest way to marble paper, for sure! thanks a lot for the tutorial.
Why is there no PIN button! This is perfect for my Pinterest crafting board!
Wow, so pretty! I’m definitely going to try this!
https://www.etsy.com/shop/EarthChildArt?ref=listing-shop-header-item-count
Thank you for this tutorial! I can’t wait to make these for my envelope liners for my Save the Dates! Question – do you reuse the shaving cream that you brush off with the ruler, or will it no longer be usable? Thank you!
@Melissa Yes, you can reuse the shaving cream that is brushed off with the ruler. Just note that you might want to refresh the batch after several “inkings” since you’ll notice the colors will start to mix and you’ll miss out on all those beautiful streaks. Let us know how they turned out!
came out beautiful!! thank you!!
This looks amazing!Thank you so much!
Love it! I did it with Sumi ink which worked well too. I am doing this next. http://rabbitrabbitco.com/sumi-ink-paper-marbling/
This is a beautiful idea!! Thank you so much, I need to try this for my holiday cards! http://www.lovesthefind.com/
This is so beautiful I’m curious would it work on fabric???
Joyce – this particular method won’t work very well on fabric. to be honest, water marbling on fabric does not make a very practical hobby for most people – it is just too much work, and can be rather expensive. However, if you’re ever in Southern California, come and visit Mayu Silk Art and you can make your own water marbled silk scarf.
What a perfect design!!! Very easy to make but very fashion to look at!
PandoraFlora
https://www.pandoraflora.com
Wow, that looks pretty amazing!
xx
ALINA ERMILOVA | BLOG
I’ve never seen marbling done quite like this. Brilliant! This is a must do.
Fantastic – BUT you never explain about the tape. WHAT is the purpose for the tape? WHY are we using it? Are we just using plain flat paper? Or envelopes too? How do you fold them?
Can’t wait to try this, BUT …
These turn out so nice and beautiful, a simple way to add a personal touch. I am confused though, what happens to the tape on the back?
I tried water marbling some years ago and failed miserably. 😀 I seriously have to try this, I’m a sucker for marble patterns.
Mother’s Day craft, here I come!
Can i use sakura poster colour to make this ?
Do u think this will work on a notebook??
This is just super original and gorgeous!
Is there any substitute for shaving cream?
I tried and they were beautiful, as soon as I tried to remove to tape it just tore I’ve tried several types of painters tape and card stock and so far every single one had a tear.
Erica this is absolutely gorgeous, I was thinking about trying this on canvas do you think it would work?
@Brenda, yes I do!! What a great idea!
What’s up all, here every one is sharing these know-how,
therefore it’s pleasant to read this web site, and I used to pay a visit this
webpage all the time.
So amaizing, bravo Erika, good Idea and it looks same you bay it . I like it so much .
Thank you .
Do you ever notice streaks when you remove the shaving cream with the ruler? I’m starting to get streak marks and I can’t figure out why!
I was thinking of doing it in a canvas for a wall art. Does it work?
I have done this when I was teaching a tye dye fun camp to 5th and 6th graders. They loved it and it all turned out great! Some paper even reminded me of my Grammie’s golden wallpaper design (when the colors got really muddled).
This was the same method I used. Love it — super cheap and super easy!! Kid approved.
I just tried the marbling and it’s beautiful, but the paper keeps coming up under the blue painters’ tape. I have relatively heavy note cards, but they are smooth not textured. Have you tried, and failed with this kind of paper? I am having some friends to craft and need a successful project.
@Karen, you might want to try Washi tape. It’s more suited for paper!
Very addicting!
Beautiful work done by a great artists I really enjoyed I will definitely trying making it
Can’t wait to try. Thanks!
I think it can be better if we add some golden color to this but its beautiful anyway.
Wow, I love this! I’m usually drawn to creating my own art, but this is one I might want to try sometime! It’s beautiful, and you’re right — everyone loves marble
Just tried this, this past weekend, with two teenagers and they LOVED it! Such fun results. We had hours of fun creating. Thanks for sharing this!