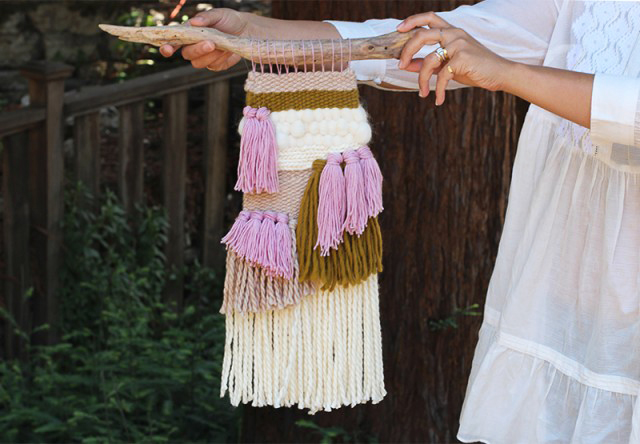
We’ve been a long time admirers of woven wall hangings and have loved seeing how these vintage flat weave textiles have come back in style thanks to such talented artists like Mimi Jung, Janelle Pietrzak, Maryanne Moodie and Meghan Bogden Shimek. I never imagined, however, that I could actually make my own – in fact, I was very close to commissioning a textile artist to weave a piece for our new home! But after hearing that Meghan, of Native Textile, was teaching a local workshop, I jumped at the opportunity to learn the ins and outs of weaving. I instantly became obsessed. And keep in mind, me and yarn don’t mix well. I’m a horrible knitter. Anyway, I loved the ease and tangibility of Meghan’s method so much, I was inspired to share some of her amazing tips with you. The entire process may seem intimidating at first but I encourage you to just give it try and follow the tutorial, step by step. Welcome to Weaving 101! You’ll be hooked, I promise.
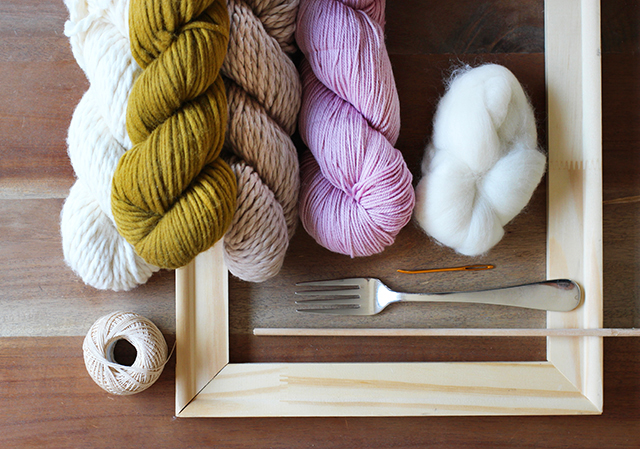
You’ll need:
- an assortment of yarn
- cotton warp twine or yarn
- wool roving (optional)
- a tapestry needle
- an open back frame or a canvas stretcher frame (for a custom size frame. tutorial found here)
- a thin wooden dowel (measuring at least the length of the width of the frame)
- a metal tube or wooden stick
- scissors
- a fork
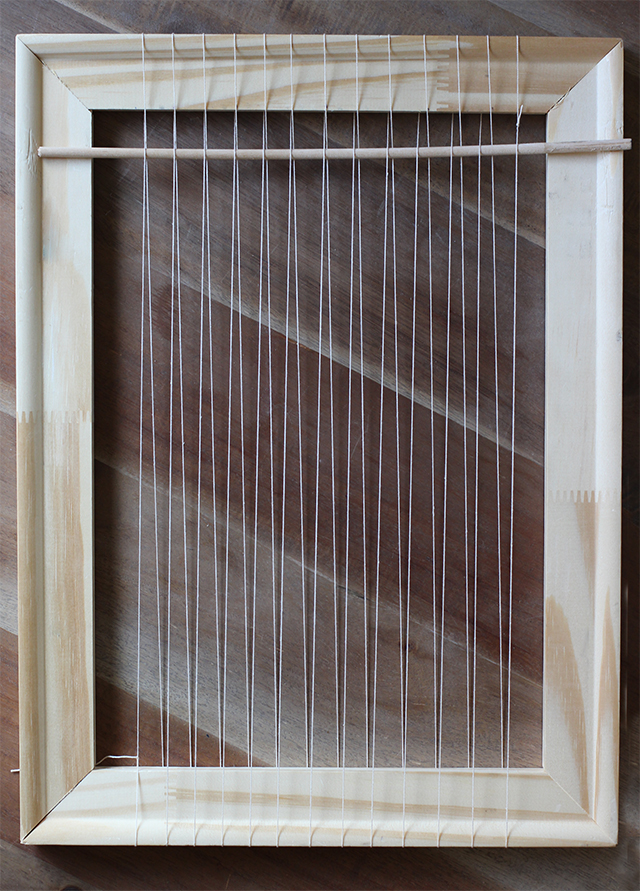
To make your loom, start by adding the warp to the wooden frame. The warp is a set of lengthwise strings that are held, in tension, on a frame. This is what you’ll be weaving onto. Because the warp is wound tightly around the frame, the yarn or string should be strong and not too thick or too thin. Cotton or nylon string is fine. Tie the end of your string into a double knot onto the bottom left of the frame. Loop the string under and over the top of the frame . . .
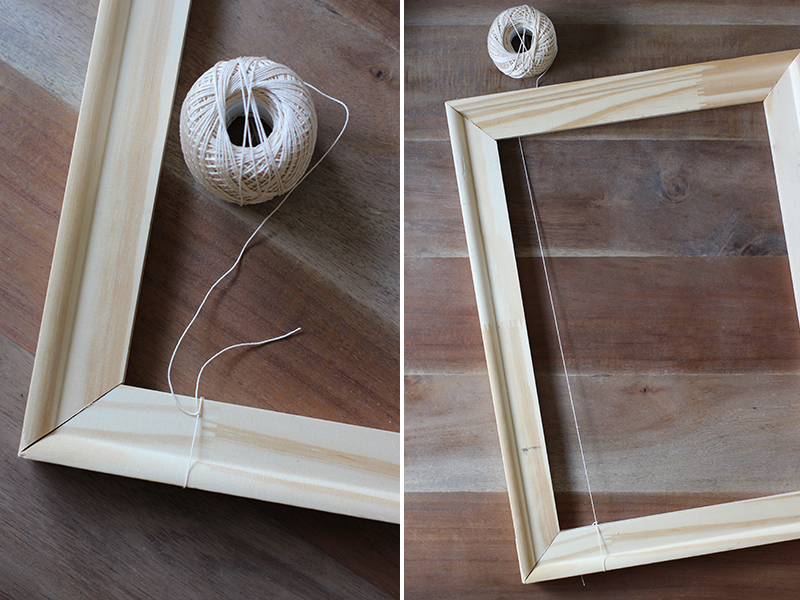
and back down under and over the bottom of the frame. Continue doing that, making a figure eight pattern each time.
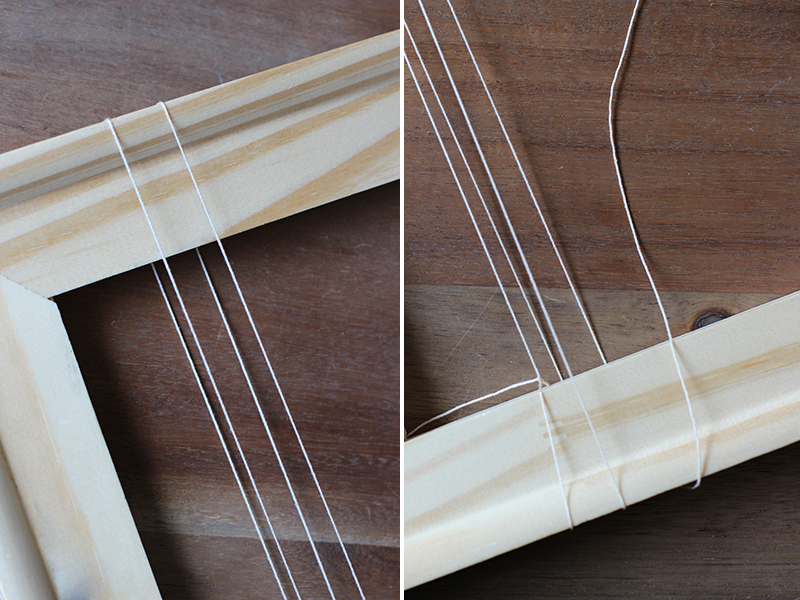
Depending on how wide you want your piece to be and how big your frame is, you can make as few as 10 loops and as much as 25. Separate the strings about a 1/4″ apart from each other and make sure the tension is even and tight, but not too tight, before tying a knot at the top of the frame.

Double check your loom from the side. The strings should be criss crossed around the middle of the loom. Take the thin wooden dowel, which will serve as your shed rod, and slide it through the strings – under where the strings are crossed. Then push it to the top of the frame. You’ll immediately notice that the tension is tighter. The shed rod helps separate the upper and lower warp strings, making it easier to weave!

This is what your loom should look like. Notice how the warps criss cross above the shed rod. The strings are evenly separated. And there is clear separation of a top layer of strings (top warp) and a bottom layer of strings (bottom warp). You are ready to weave!
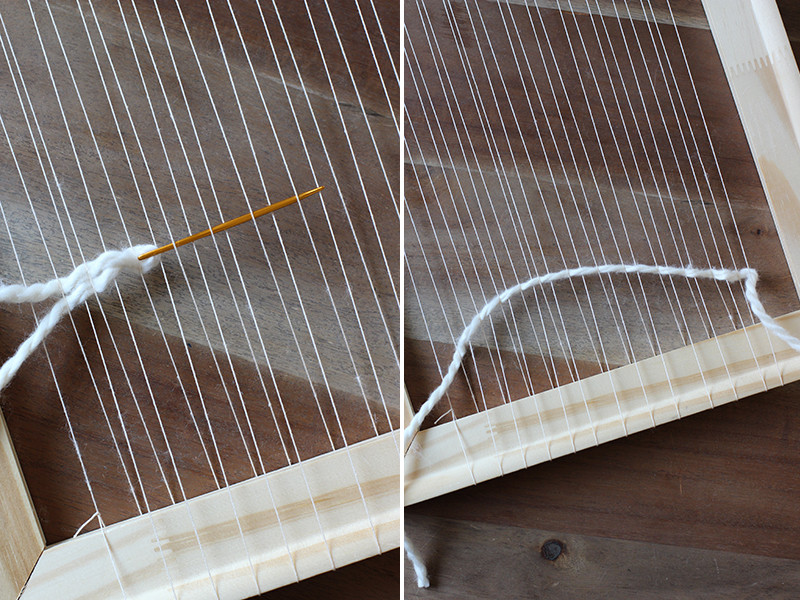
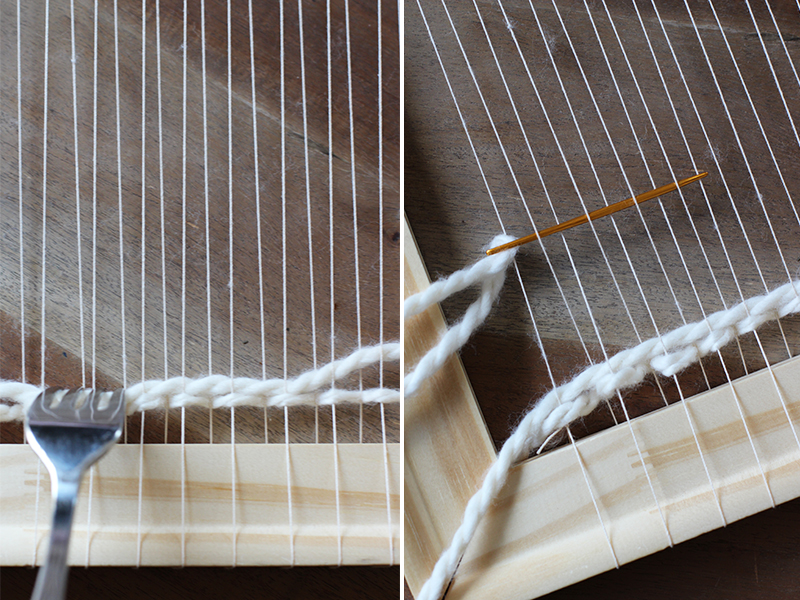
The weft is the term for the yarn which is drawn horizontally through the warp to create a weaving. For this, I like to use a variety of natural fiber yarns – some thick, some thin, some with interesting textures. It’s all about mixing it up! Cut the yarn to about 20-24 feet. Thread the end of the yarn through needle. Starting a few inches from the bottom of the loom, pass the needle under the bottom warps. That means under every other warp: over the first warp, under the second warp, over the third warp, under the fourth warp and so on.

Pull the yarn straight through, leaving a 4-5 inch tail. Pull the right side of yarn down towards the bottom of the loom, creating a small arc in the yarn.
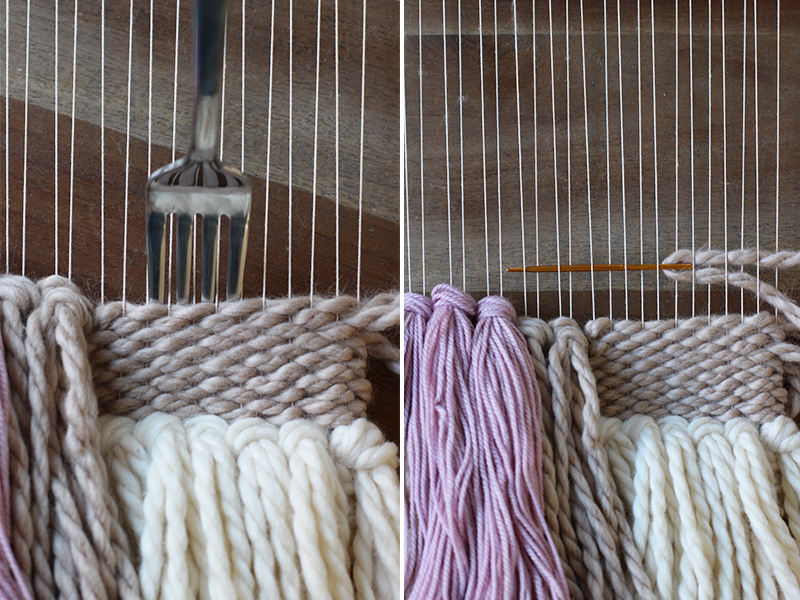
Use a fork to comb down the middle of the arc. Then the left and ride sides, pressing the rest of the weft into a straight line.
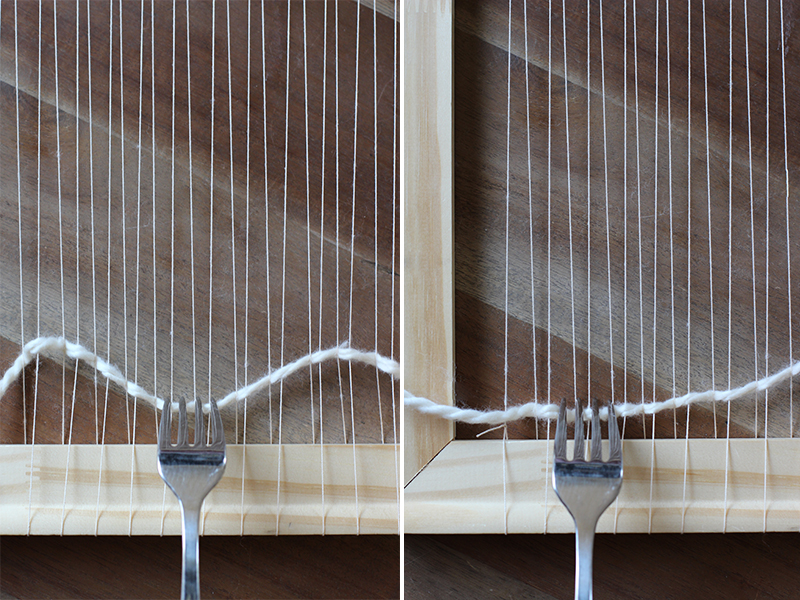
Giving the weft extra slack with an arc allows it to be packed into place with even tension. Doing this will give your piece an overall consistency to it. It’s an important step and shouldn’t be skipped after each weft is passed through! Now wrap the yarn around and under the last string.
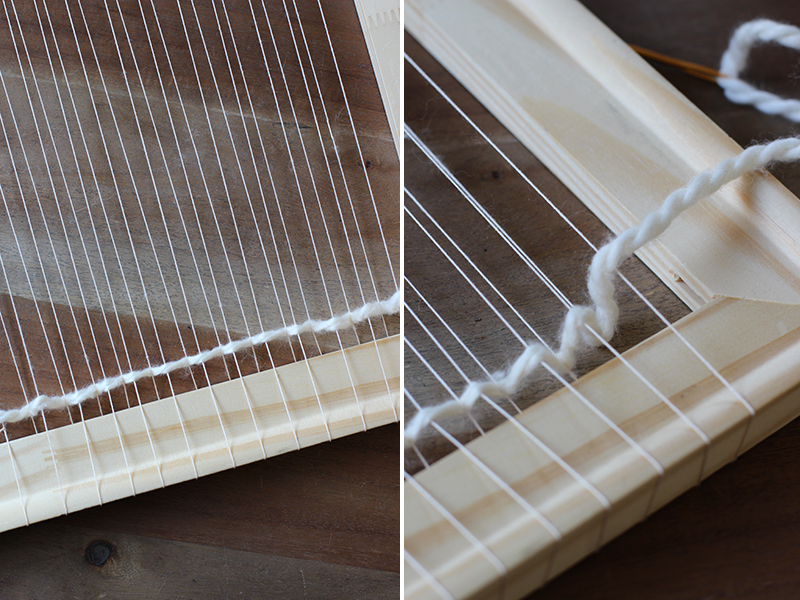
And bring it back through – this time through the top warps. Under the first, over the second, under the third and so on. Passing the yarn through the top warps should be easier than passing it through the bottom. This is because you’re not working with tension when weaving through the top warps.

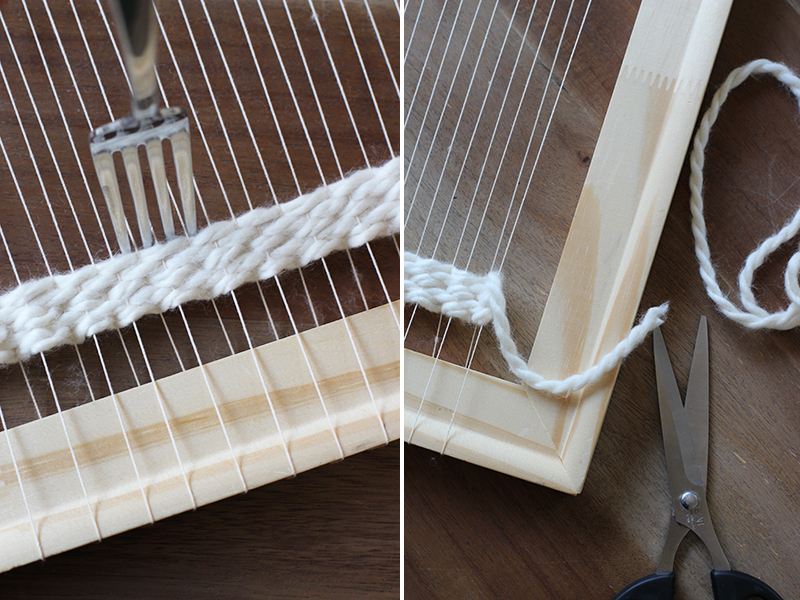
Use the fork to press down the second row to that it is snug against the first. Repeat by going back through the bottom warps.
After a few rows, you can cut the yarn to leave a 4-5 inch tail. Or just continue weaving. If you run out of yarn, I’ll explain how to add more yarn later in the tutorial. I’ll also be showing you how to finish those loose tails at the very end.
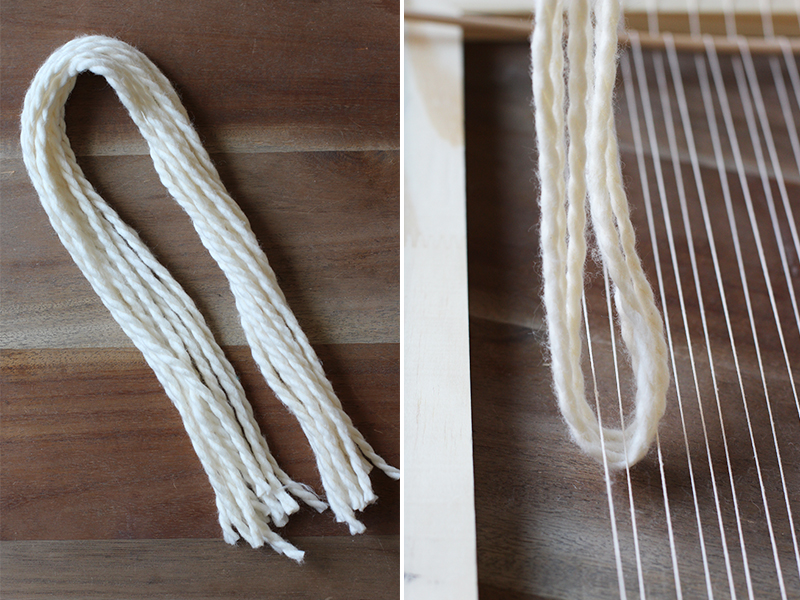
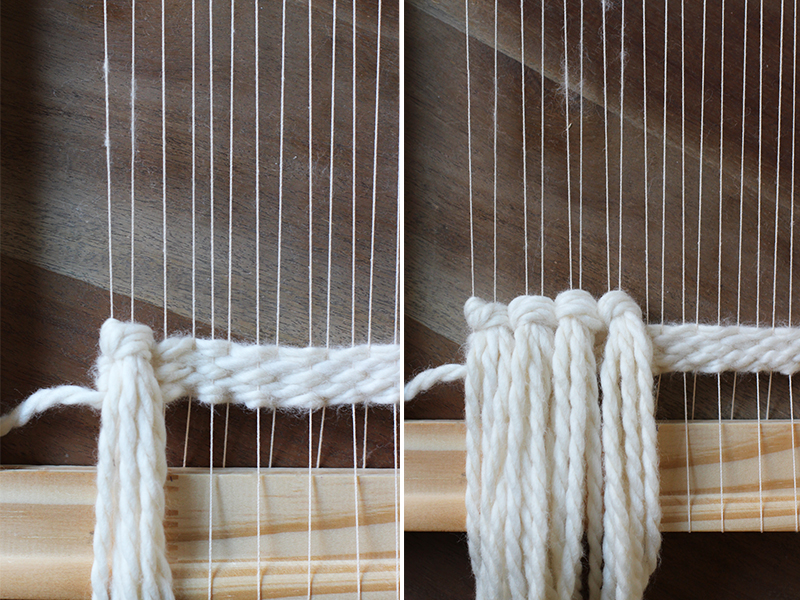
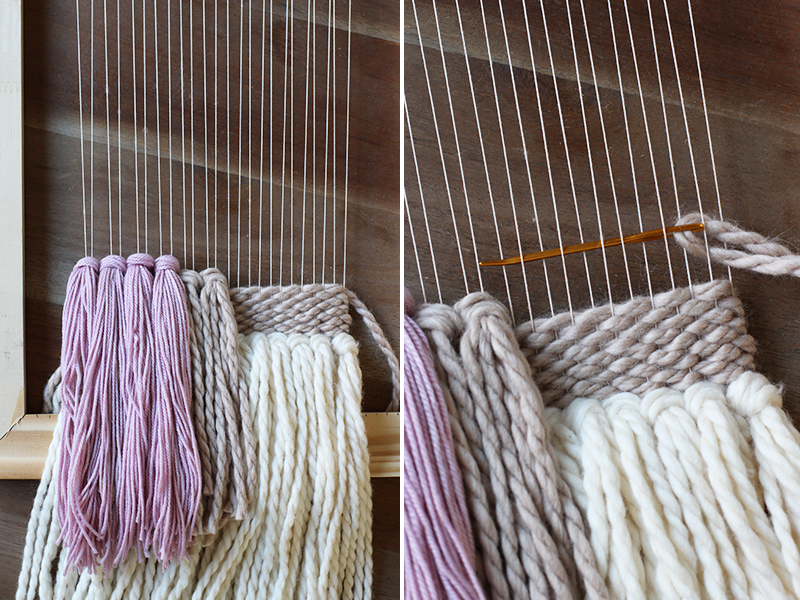
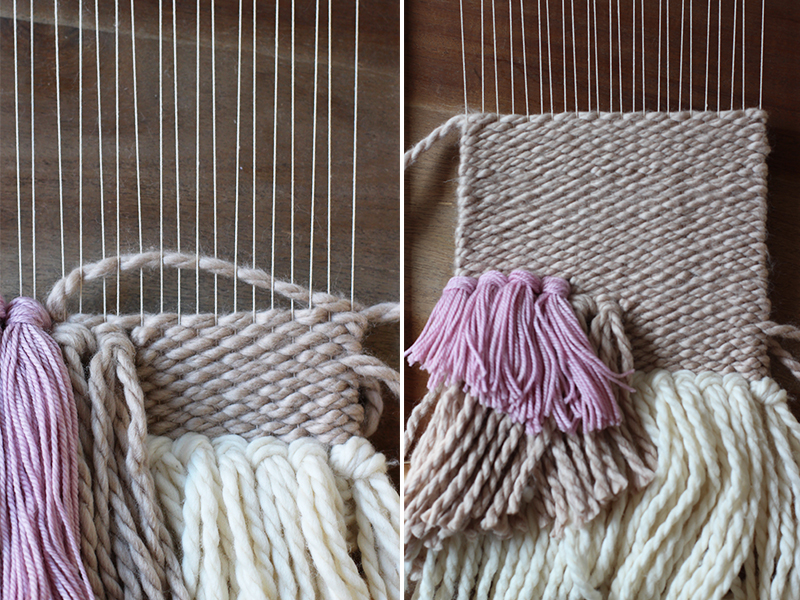
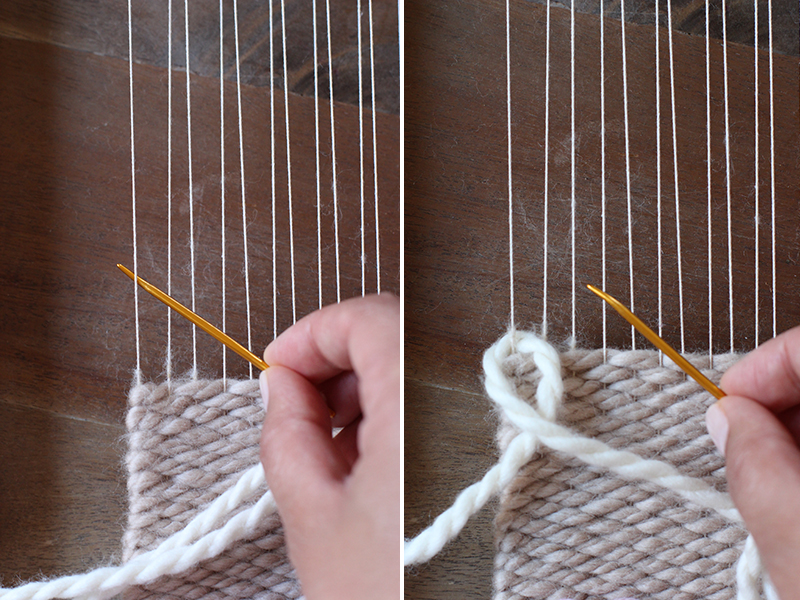
To add tassels, cut a bunch of yarn double the length of the desired tassel length. Take a group of 3-5 strands, depending on the thickness of the yarn, and center it under the first set of top and bottom warps.
Slide a finger under the middle of the yarns, between the two wefts. Pull the center up, creating a loop.
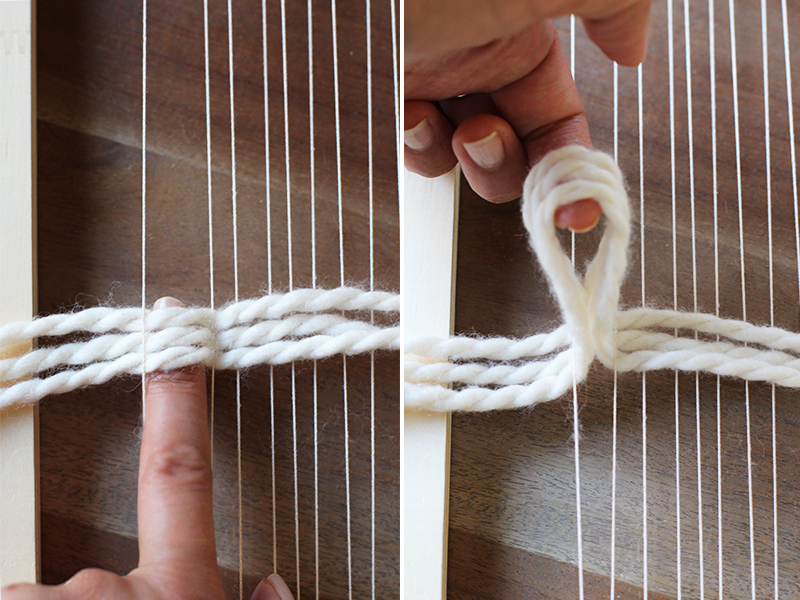
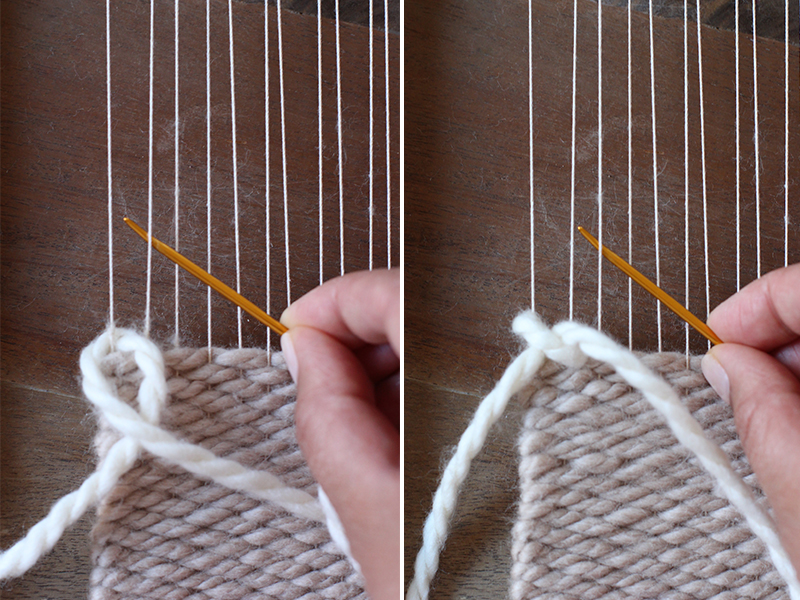
Grab the ends from under the loop and pull tight.
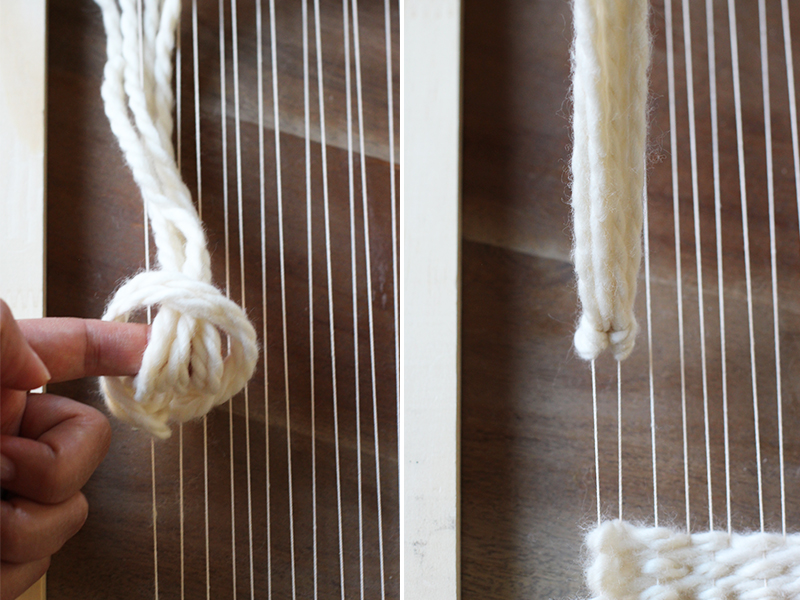
Slide the tassel down and repeat.
If the yarn runs out while plain weaving, just drop the yarn behind the loom. Be sure to drop it with at least a few of inches of slack. Bring up a new piece of yarn, as if to continue the weft.
Create the arc as normal and press down with your fork. I’ll show you how to take care of the loose ends on the backside towards the end of the tutorial.
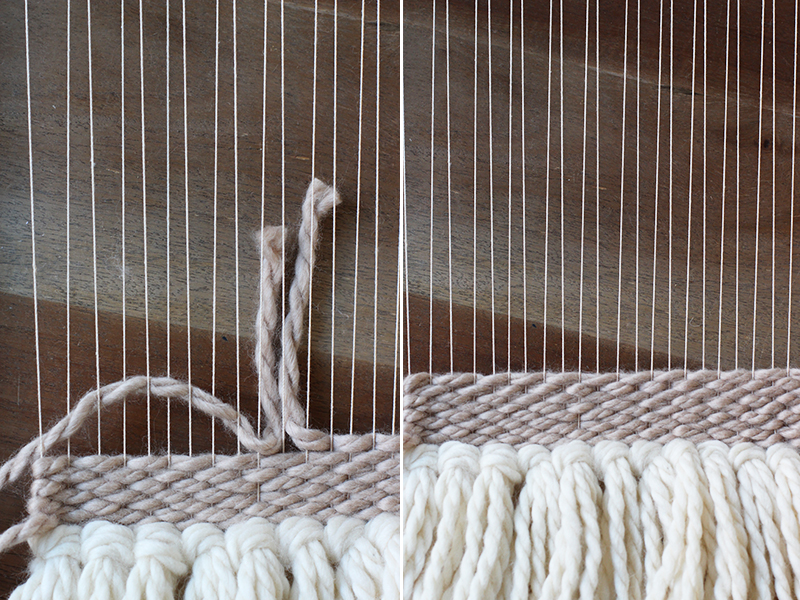
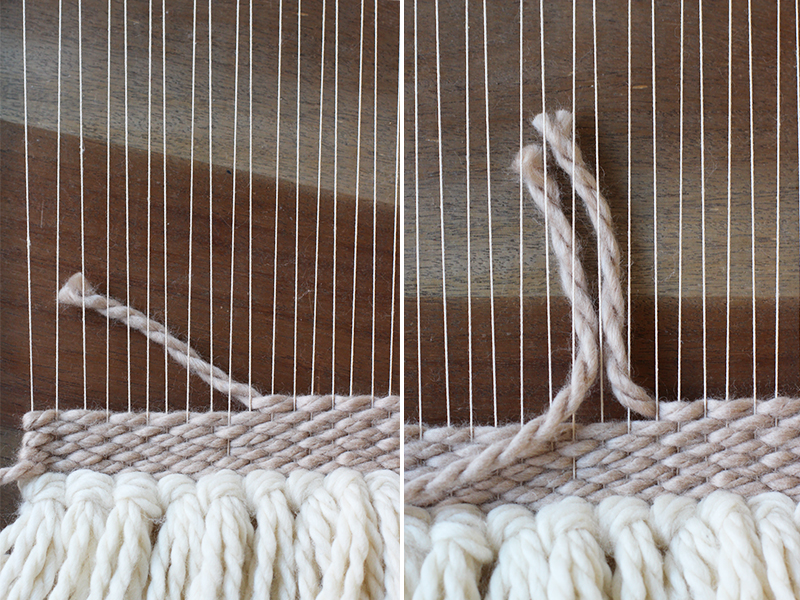
There might be a place where you decide to break up your weaving with tassels or sections of varying yarns. To plain weave just a small section, simply continue to weave as normal.
When you want to turn back simply wrap the yarn around the last warp and weave through the opposite set of warps. It doesn’t matter if it wraps around a bottom or top warp – as long as you return the yarn back the other direction through the opposite set of warps.Create a small arc.
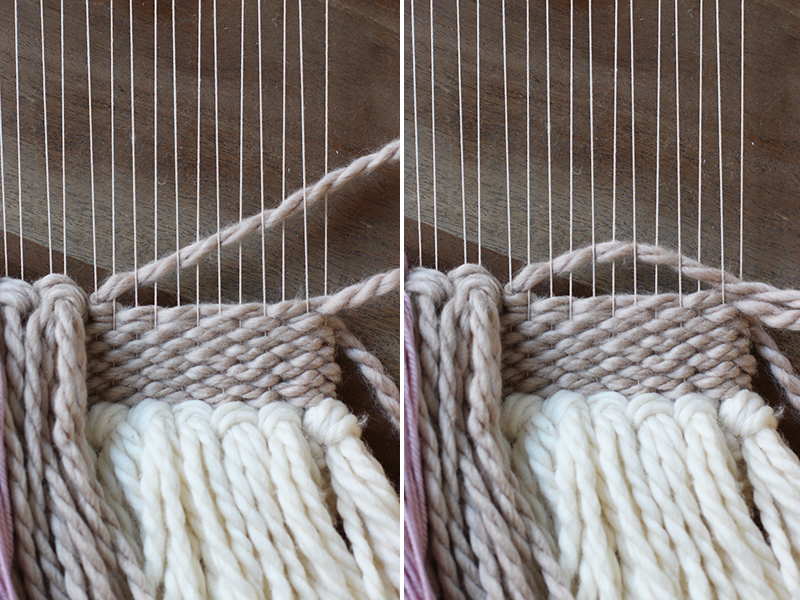
And press down with the fork. Go back through and take it a few warps further if need be.
Make an arc and press down. Easy peasy. Continue weaving!
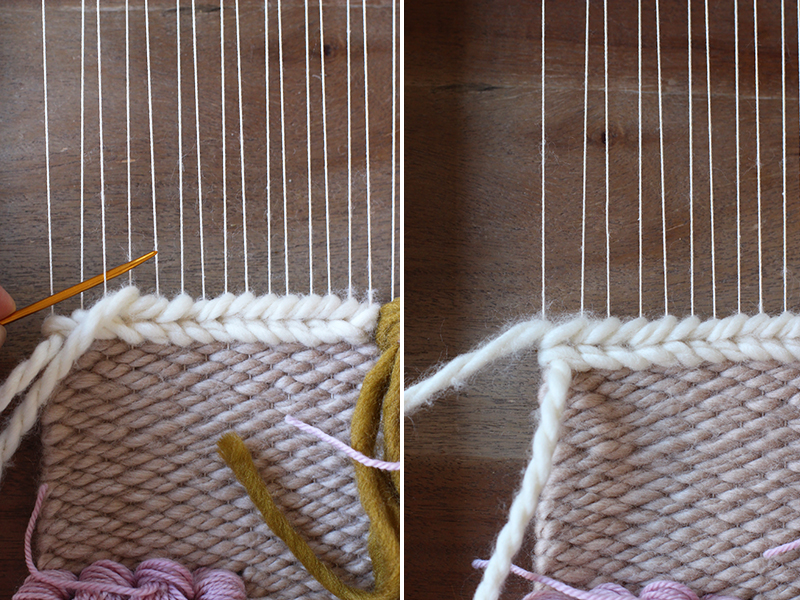
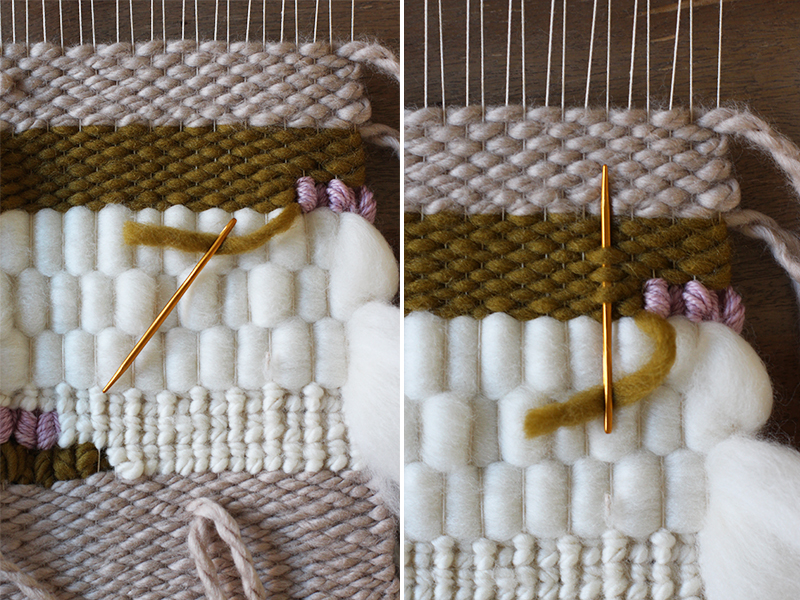
One weaving technique I love is the soumak, which looks similar to a fishtail braid. To do this, you wrap the yarn around each warp from the right side. And then back through around the left side of each warp. Place the needle under the first warp from the right side of the warp. Wrap the yarn around it and pull until you have a few inches of slack.
Then wrap the yarn around the second warp – again, from the right side. Pull. Then wrap around the third warp and so on . . .
Once you reach the end, mirror the technique – this time, wrapping yarn around each warp from the left side. Cut the yarn, leaving slack.
Wool roving is super soft wool that has not yet been spun into yarn. It usually comes in long, thick bundles that easy to pull apart and manipulate. Incorporating roving into your weaving is super easy – just treat it as yarn and pass it through like a plain weave. Under the top warps first.
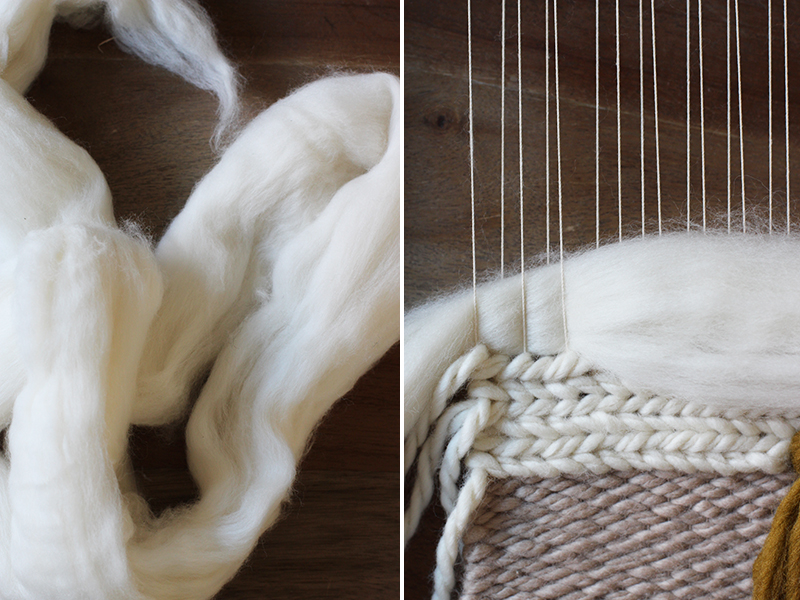
And back under through the bottom warps. When you’re finished, simply give the roving a hard pull on each side and it will naturally separate. Again, be sure to leave some slack!

Continue weaving until you’ve reached the top.

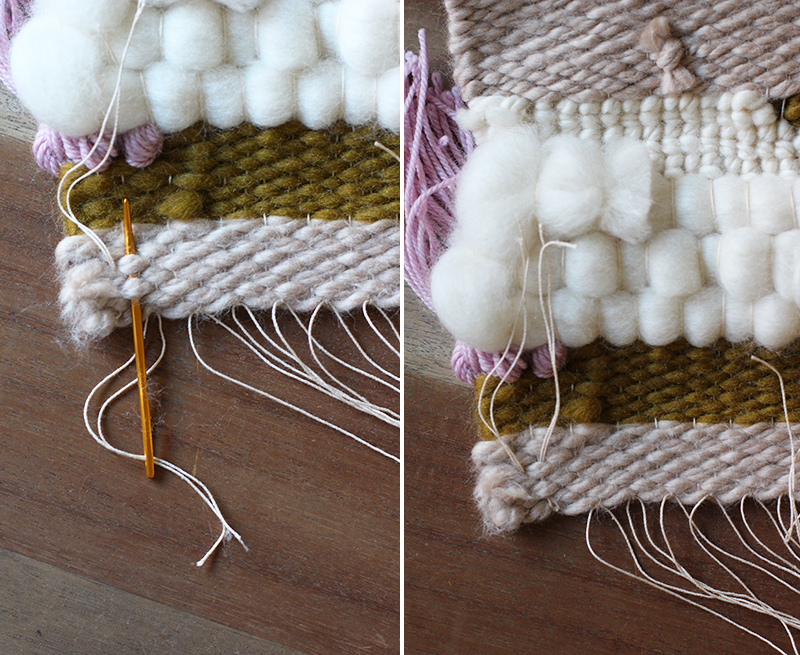
To finish all the yarns dropped off the back and the ends, turn the loom around. Thread the extra slack through the needle and tuck it under a series of 3 wefts, lengthwise.
Trim with a pair scissors.

To hide the ends, thread the slack through the needle and tuck the thread through a series of 3 wefts, lengthwise, down the edge of your weaving. Trim.
With roving, simple weave the ends through the warps on the backside, tucking it under every other warp.

To take the weaving off the loom, carefully snip the warps that are wrapped around the top of the loom – one at time. Tie each set of warps into a square knot. Continue snipping and knotting until the entire piece has been removed from the top of the loom. Repeat the process at the bottom of the loom.
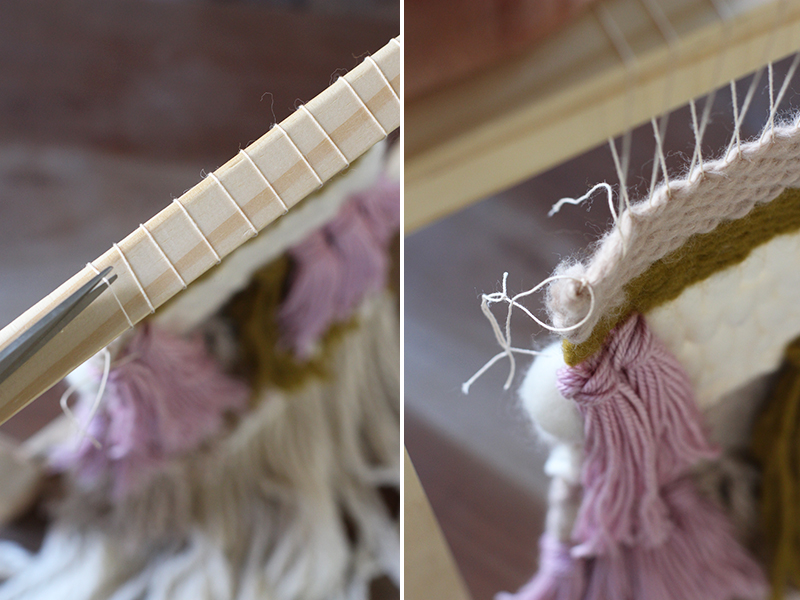
Hide the warp strings the same way you did with the yarn. Thread each section through the needle and pass it through a series of wefts. Trim and repeat the steps on the bottom.
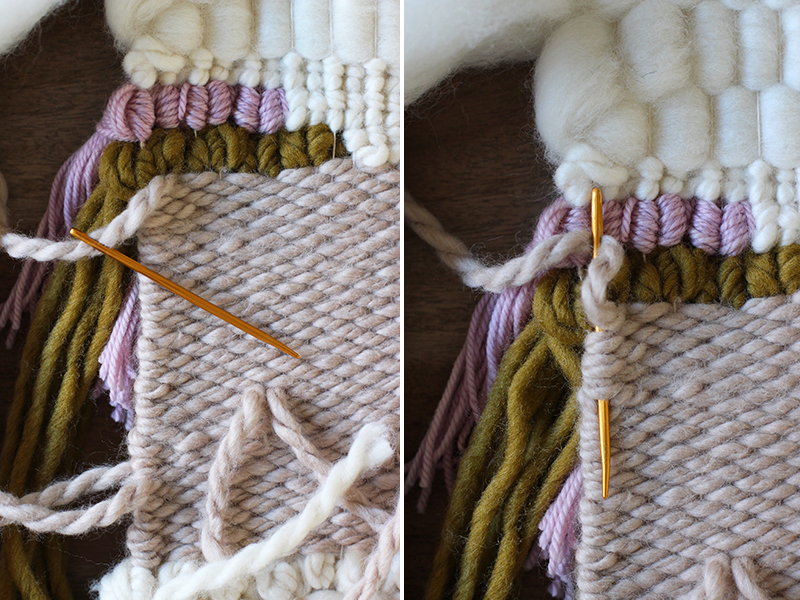
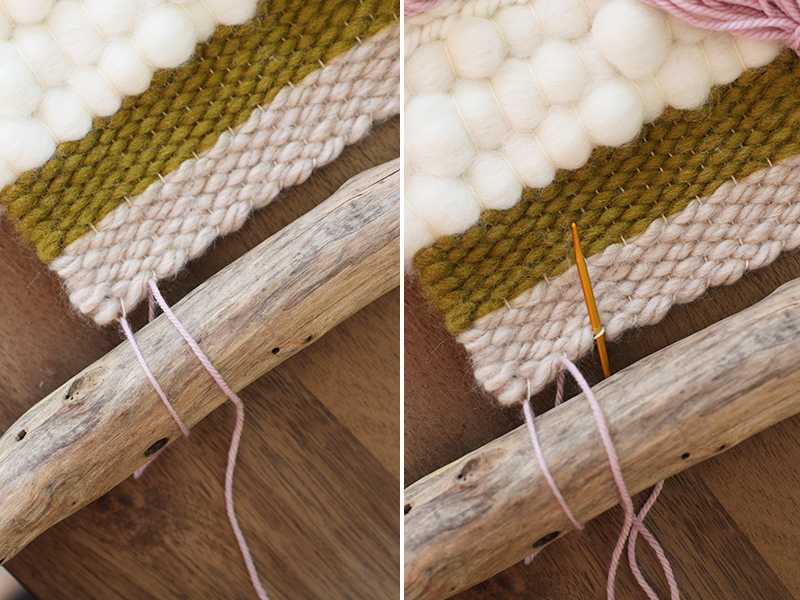
To hang the weaving, pick out either a metal rod or wooden stick that measures a few inches wider than your piece. Here I used a piece of driftwood. Thread a 24 inch piece of yarn through the warp and over the mount. Tie into a double knot.

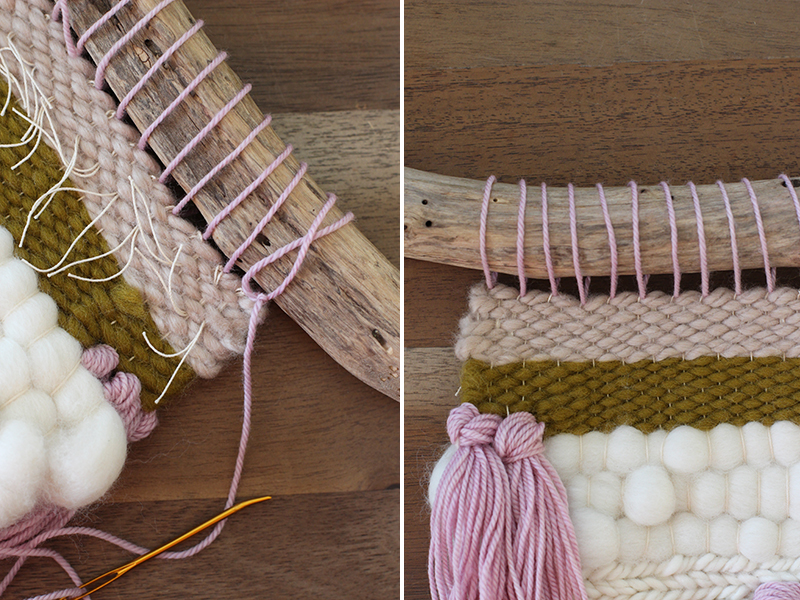
And back through the second set of warps, around the mount and back through the third set of warps.
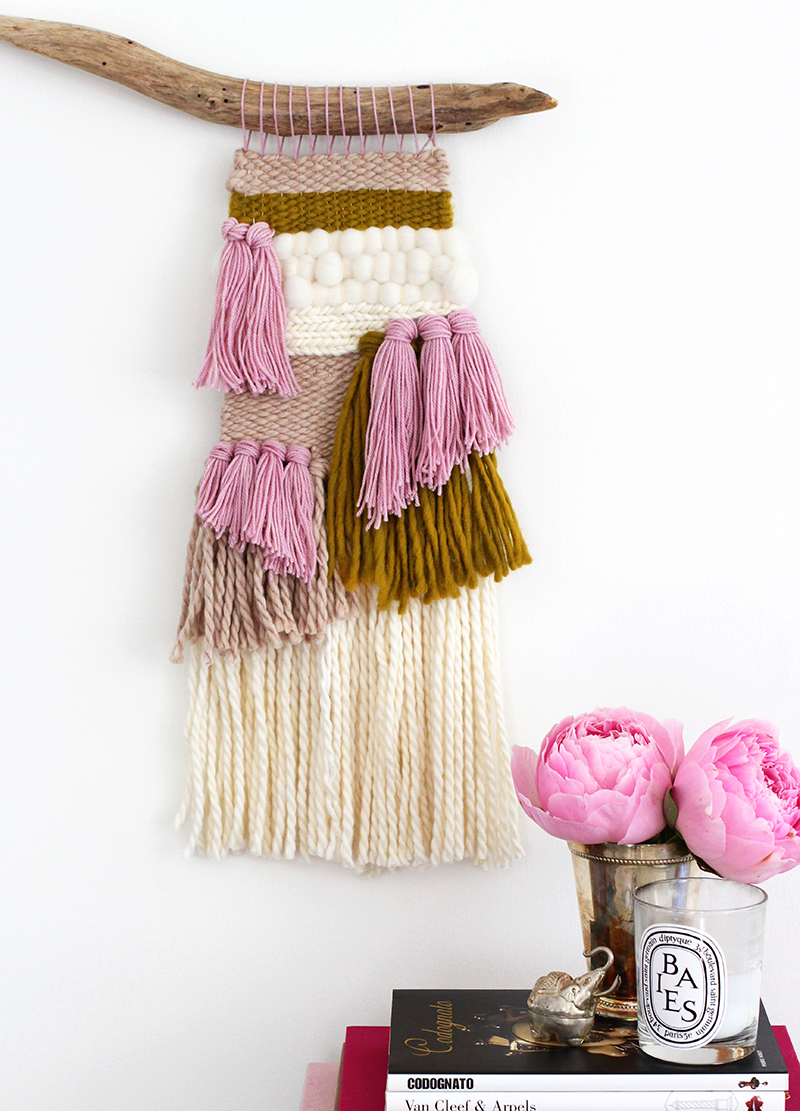
Continue until you’ve reached the end. Tie into a knot knot and snip away any excess. Adjust with your fingers so the weaving lays evenly across the bottom of your mount.
And that’s all folks! Remember, this is just a basic tutorial. There are many more weaving techniques out there. Take a class, experiment . . . it’s all about having fun!
(images by HonestlyWTF; tutorial adapted from Native Textile)
Awesome diy idea. Omg it looks totally marvelous 😀
xx Mira
http://www.glamdevils.com
this is so cool but I doubt I can do it.
xo
PinkSole
Really cool!! Thanks for sharing this <3
http://www.MyFantabulousWorld.com
That’s far simpler than I though it’d be, still not sure mine would look as good as that though
Lauren
livinginaboxx
This really makes for a stunning piece of art.
I love this!
XO CHAMAFASHION
http://www.chamafashion.com/
Great tutorial, thanks for sharing. Will give it a go.
This is very pretty and original. Great tutorial overall 🙂
Beautiful and great tutorial!
Now this is AMAZING! So beautifully done; can’t wait to try this myself!
Ashley
electriceelfashion.com
This looks BEYOND beautiful!! Thanks so much for showing us how to do this. I’ve wondered for so long now and this tutorial makes it so easy.
xoxo,
Vanessa
http://crafturday.com/
I’m more interested in the shirt/dress you’re wearing!
@colleen it’s from Anthropologie!
This might be my favourite tutorial so far!!!
Thanks. pity I live in SA and they don’t ship here….
This looks great! Love it.
Amazing DIY! xx
http://marysreturn.blogspot.com.ar/
http://marysreturn.blogspot.com.ar/
Great tutorial! I bought a lap look awhile back and was so intimidated to break it out. Your steps and photos are awesome. Thanks so much for sharing.
i might stop everything right now and go do this! the possibilities…
This is so good.
Best DIY as of late!
Thanks a bunch.
I’m gonna bust one out this w/e.
Yaaay!
Wow this is really cool! Really great tutorial!
Really beautiful tutorial. Love it!
Beautiful!
XO
Jeanne
http://fashionmusingsdiary.blogspot.fr
Love DIY’s and using what you have!
https://www.etsy.com/shop/EarthChildArt?ref=shopsection_shophome_leftnav
This looks like so much fun
I love this!!
It’s definitely on my Summer to-do list!
Amiee
http://www.24hourfindings.blogspot.com
This is so awesome. I have been wanting to do something like this after seeing the “ran ran designs”
Your tutorial rocks!
Excelente tutorial para tejer a telar.
Espero puedas seguir mi blog
telarespeulla.blogspot.com
Such a thorough and clear tutorial – I really appreciate and understand the time that went into it. Thank you! And your weaving is simply beautiful!
I’ve always marvelled at wall hangings like this, and I’m a knitter. I’m feeling inspired and I can’t wait to make one 🙂 Thanks for posting.
So glad to have found this tutorial–I can’t wait to make my own weaving. This will be a great weekend project!
Thanks for the AWESOME tutorial Erica! So easy to follow. Here is a link to the one I made…
http://www.queenoftheplushies.com/2014/07/diy-woven-wall-hanging.html
Thanks again x
Hi Erica! I absolutely love your woven wall hanging- it’s so chic! I recently published a blog post about DIY wall art and included a link to your lovely project. Go check it out! http://stitchandunwind.com/diy-wall-art/
where oh where did you find that beautiful green yarn?!
@Taylor, all the yarn is from A Verb For Keeping Warm
I’m starting to make my own this weekend! Just read trough your tutorial and it’s super clear. I’m just wondering…Did you first draw the design or did you just started and let you creativity do the rest? I’m not sure what to do?
Thanks!
This piece is beyond beautiful! I love the mix of textures and thicknesses. Gorgeous.
I’m obsessed with these yarn wall hangings that have circulating around. GORGEOUS! http://www.handmadebykelly.com
Great way to use up all that wool I have lying around!
Awesome !
Thanks for this beautiful tutorial! I would love to try and make this but what are the measurements of the frame?
Thanks so much! This is very helpful and can’t wait to try wool roving!
Thank you very much for posting this tutorial. I’ve been longing to by one but they’re so expensive. One question: what kind of needle did you use? It’s not mentioned in the materials list.
@Michelle, oops – sorry about that. It’s been added. A large tapestry needle works great – yarn threads through it easily and the bend tip helps weaving through warps.
Hi there,
I’m using this to make my very first weave, and it’s coming along great, however my only frustration is having to pull about 20ft of yarn through from one side of the warp to the other each time I start a new colour. Is there a way to avoid this, or have I missed something? Or is that just par the course with weaving?
Otherwise awesome tutorial 🙂
Thank you!
Olivia
so beautiful. wanna see backside.
This tutorial makes me less afraid of getting near any type of needle (I cannot even see a button on my shirt)! Thank you. For clearly laying out each step. This is a DIY I can do while recovering in bed, so I feel productive
Found this post on Pinterest and I am SO glad I did. You’ve done a great job of very simply describing each type of weave, backing it up with really clear photographs. Plus, your finished piece looks amazing! Thanks so much for sharing this great DIY! You’ve made it possible for me to add this popular design piece to my home.
hello,
Your tapestries are excellent!! We have some wall tapestry too.
Please visit: http://www.esculturasdearte.com
And esculturas de arte
Thank you
Victor
Coucou
Bravo, c’est magnifique !
I love it !
merci pour le tuto.
Bye bye
Valerie
We have created yarn kits for this type of weaving. We are having SO much fun making these kits with all of our backstock art yarn. Silks, roving, sparkles, naturals, etc. Check em out here: http://shop.knitterly.net/collections/products/products/weaving-kits
What’s up to every body, it’s my first visit of this blog;
this blog includes amazing and actually excellent material designed for visitors.
Waoh, the finishing result is so great, i love it!
Thanks a lot for this complete tutorial, i’m impatient to make my first weaving!
This is SUCH a good tutorial. Hard to find such detailed instructions anywhere. Thank you!
Absolutely stunning wall art! I am working on my first weaving and was looking for ideas on weaving techniques when I came across your blog. I am so happy I did. The tutorial is so easy to follow and i am less intimidated now. Thank you for posting it.
Marilyn
What a fantastic tutorial demonstrating so many techniques. Thanks you for sharing.
Nice Post !…. Tapestry wall hangings are a form of textile art. Wall hanging tapestries are an beautiful piece of art that you can use as a home decor. Looking for wall hanging tapestry with unique design so, check out: http://www.handicrunch.com/en/textile-handicraft/wall-hangings-and-tapestry.html
Beautiful! Thanks for sharing!
Dear Erica,
I can not express enough how grateful I’m for your kindness and skills and for sharing this with us.
Thank you so much.
I’m going to try to make one or more.
God bless you, your family and all artists that takes the time to demonstrating what they’ve learned, with others.
Cris 🙂
I love your way of decor you’re home with Tapestry.These tapestries are lovely and unique in design. I really enjoy your blog.
Thank you so much for sharing your tutorial in such clear a understandable way.
Well done, I will definitely be doing this, I have been using my rigid heddle loom but can’t do this
kind of thing.
Thanks again,
Linda
nice blog .thnks for sharing with us. I also want to share some wall tapestry with you . visit here http://www.handicrunch.com/en/textile-handicraft/wall-hangings-and-tapestry.html
This is awesome…I think I am ready to give this a try
https://teespring.com/stores/best-shirts-2
Hi,I check your new stuff named “DIY Woven Wall Hanging” daily.Your writing style is witty, keep doing what you’re doing! And you can look our website about proxy server list.
Amazing!! I’ll be tackling this one today, thanks for sharing!
Hermoso y muy facil aparentemente, voy a tratar de aserlo
This has answered so many doubts and questions I had and has given me hope and made me SO EXCITED!! I’m catching a flight to the states in a few hours… And I can’t wait to get to hobby lobby and pick up some supplies! A MILLION THANKS for this awesome tutorial.
Hmm it appears like your blog ate my first comment (it
was super long) so I guess I’ll just sum it up what I wrote and say,
I’m thoroughly enjoying your blog. I as well am an aspiring blog blogger but I’m still new to the whole thing.
Do you have any recommendations for beginner blog writers?
I’d definitely appreciate it.
We have some awesome tapestries at our shop. Visit our shop & grab a 20% discount now
http://shoppingbrains.com
Wow! I have to be honest. I almost gave up at, “Items You’ll Need”, lol! But your wall hanging is just so beautiful that I had to find out how to do it! Your instructions are so clear & easy (<–we'll see, ha!) that I'm kind of thinking I can do this. I have just about everything I need, so why not try, right? Right!
Thank you for sharing such a great DIY project.
I can hardly wait to try this. It looks sooo cool! I was looking for a new craft to try my hand at….now I’m inspired. If this works for me guess what my family will receive for their Christmas gifts?
So helpful. Thanks!!
Awesome! I wish I were able to make it
thanks for creating a comprehensive guide on woven wall hanging.. how do you keep the yarn from fraying?
Thanku so much for great tutorial. Boy have I got it wrong hahaha. I made a loom with nails top and bottom and warped it ( hope that’s the right terminology…threaded the cotton string around the nails )
I didn’t know you wove a figure eight! so mine are just straight up and down.
First one I’ve ever done and chose to use material cut into strips instead of wool or cotton thread. What a nightmare haha trying to pull some..not all..reasonably thick material thru the lil gaps hahaha
Oh god what have I started and why is it so hard
It sadly put me off for about a day but I thought I’m not gonna let u beat me u bloody thing! so I’ve persevered and I’m about half way thru a landscape. Couldn’t do just some simple lines no I had to go for a pic hahaha
Anyway I’ll keep going and see how it ends up but thanku again for such a thorough tutorial..the pics are invaluable
Cheers Kaz from Oz
Wow you made this look so easy & inviting to try
Thank you looks like I will start another craft today
Good way to use up macrame scraps
Never too old to learn (67)
It’s ugly but great tutorial
beautiful vlog
Just beautiful.