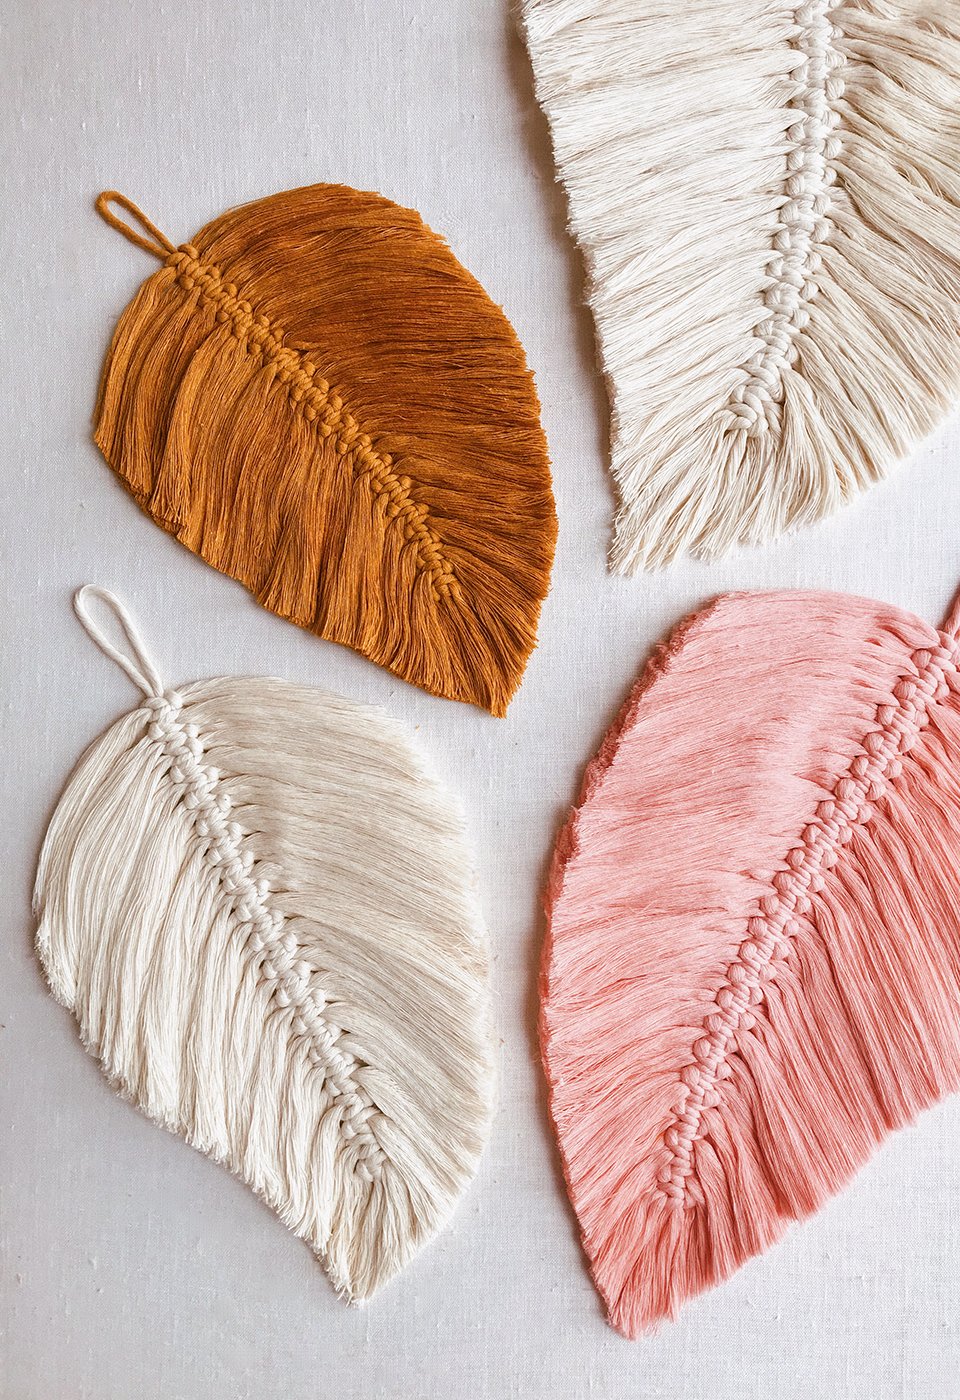
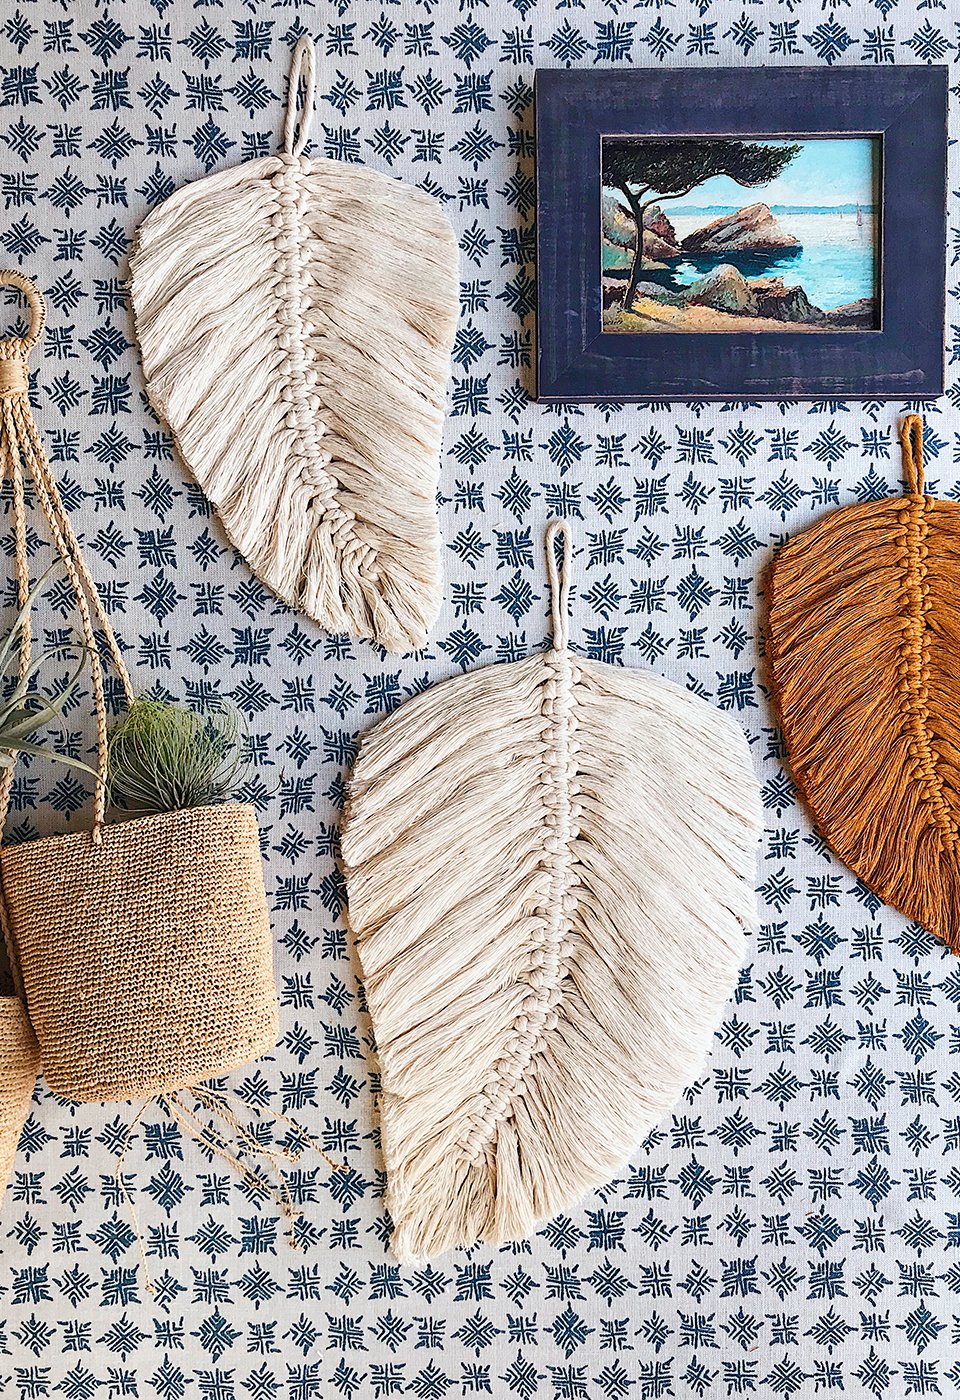
Beautiful, wispy macrame feathers have been clogging up my social media feeds as of late - but I'm not mad about it. They're incredibly beautiful and I've definitely found myself bookmarking them to purchase later, to hang in the kids' room. But of course, I was also curious to know how they were made. How in the world do you achieve that perfectly soft fringe?! Well, thanks to Damaris Kovach's amazing tutorial, I finally got all the answers. And it involves a cat brush. Enough said. Honestly though, the possibilities are endless here and I can't wait to play around with this technique more. But in the meantime, I hope I'll inspire you to make these at home.
You'll Need:
- 5mm single twist cotton string
- fabric stiffener
- sharp fabric shears
- cat brush
- ruler


For a medium sized feather, cut:
- 1 32" strand for the sprine
- 10-12 14" strands for the top
- 8-10 12" strands for the middle
- 6-8 10" strands for the bottom
Fold the 32" strand in half. Take one of the 14" strands, fold it in half and tuck it under the spine.


Take another 14" strand, fold it in half and insert it into the loop of the top horizontal strand. Pull it through and lay it horizontally, on top of the opposing strand.


Now pull the bottom strands all the way through the top loop. This is your knot!


Pull both sides tightly. On the next row, you'll alternate the starting side. So if you laid the horizontal strand from left to right the first time, you'll lay the horizontal strand from right to left next.


Lay the first folded strand under the spine, thread another folded strand into its loop. Pull the lower strands through the top loop. And tighten.


Keep going and work gradually down in size.


Be sure to push the strands up to tighten - grab the bottom of the middle (spine) strand with one hand and with another, push the strands up. Once you're done, drag the fringe downwards to meet the bottom of the middle strand.


Then, give it a rough trim. This not only helps guide the shape but also helps with brushing the strands out. The shorter the strands, the easier, to be honest. It also helps to have a very sharp pair of fabric shears!


After a rough trim, place the feather on a durable surface as you'll be using an animal brush to brush out the cording. The brush will damage any delicate or wood surface so I suggest using a self healing cutting mat or even a flattened cardboard box.


When brushing, start at the spine and push hard into the cording when brushing. It'll take several hard strokes to get that beautiful, soft fringe.


Work your way down. When you're at the bottom, hold the bottom of the spine while brushing - you don't want the brush to yank any strands off!


Next, you'll want to stiffen the feather. The cording is so soft that it'll just flop if you pick it up and try to hang it. Give it spray, or two, and allow to try for at least a couple of hours.


Once your feather has stiffened up a bit, you can now go back and give it a final trim. This, I would say, is the most challenging part. Take it easy. It's better to trim less than more! And you might need to adjust your trim depending on how often you're moving the piece. Once you're done trimming, you can even give it another stray of fabric stiffener for good measure. And then, you'll be ready to hang your piece!


these are one of the prettiest DIYs you’ve ever featured (and I pretty much love them all!)
Cannot wait to get started on the Macrame Feathers they are so beautiful
Ameiii
Your article shed light on a complex topic and made it easy to understand. Well done!
Me encantó , gracias por compartir
Very helpful tutorial. I have just done my first macrame leaf. Thank you! Keep it up, and more power.
this is so beautiful! xo
Hi! This is Xana. I love your creativity and style. Thanks for sharing it!
Greatings!
Xana
You are so creative!
My daughters and I love feathers and yours are so beautiful! I can hardly wait to make some following your tutorial. Thank you!!!❤
I really love this tutorial, but the string you use is so expensive. Do you have an less expensive suggestions?
@Jenny, if you look on Etsy, you can find sellers that sell smaller quantities. You won’t need 1000ft, which makes the cord so expensive! Try this seller.
Thank you so much!!
It’s worth it! Use the 2 strand if you can. I used a 4 strand and it was difficult to comb through and didn’t turn out as flowing and soft. I used a comb and wish I would of used the cat brush. Enjoy
I liked the DIY shared by you. Honestly speaking there are so many video to make macrame feathers. I made a wall hanging but your video really helped and guided me to how to make the feather stay stiff. This tip is not shared. Thank you so much.
What colors did you use for the dye? So pretty!
I didn’t dye them. I bought them already dyed. But you can definitely dye them yourself!! That would probably have been the most cost efficient way to go 🙂
For the yellow, turmeric would be perfect and it’s one of the easiest natural dyes to make since it doesn’t require a mordant. I like to use my food processor to grind fresh roots but any powdered type would work fine. Just boil a big pot of water, add the turmeric (4 tbsp would be good to start but use your eye) and reduce to a simmer. Add your pre-washed (I use Dawn dish detergent but you can buy Synthrapol on Amazon) & wetted material for at least 20 minutes, the longer the better. Rinse with cool water and that’s it!
¡Que cosas tan bonitas !. Que padre que compartan sus técnicas !
Beautiful
http://lingayasuniversity.edu.in/
lindo e maravilhoso, quero fazer esse trabalho, como eu faço para adquirir esse spray
So Amazing and beautiful.
http://lingayasuniversity.edu.in/
Excellent feathers in macrame technique, there are beautiful and lovely to decorate our beach summer baga, tippically to do keychains or for the corner or to decorate a pillow case or to sew in bed sheets or to make dream Catchers, well, there are for a lot of things and there are easier than other designs. Congrats for the teacher that explain so good. Im very happy ‘cause I looking for those feathers long time ago and never found the rules to does it.
Thank you
Best regards
Sincerely
Maria
What inch length to cut would you recommend for the alternative size feathers, small and large?
Me gusta y es natural
Again, a great DIY tutorial. Maybe I’ll frame mine and add to my collage wall.
This is a reeeeeally good idea! I’ve never really been into the whole macrame trend, but I could get on board with these leaves! They’d look so good in autumnal oranges and browns, then hung up as a seasonal garland. 🙂
– Mike, http://www.thecraftygentleman.net
Great tutorial! Completely understand exactly how to make this craft. Thank you.
Amazing Post.
http://www.swarnprastha.com/
Did you thin out the fabric stiffener liquid?
Hola!!! qué clase se spray se usa?
These are gorgeous, what are the measurements of the finished piece?
Did you find out the measurements of the finished piece? I’d love to know 🙂
quiero saber dónde comprar el endurecedor para las plumas.Vivo en Murcia y no se dónde comprarlo; gracias por su atención
Good
I love your feather. They are remarkable and look relatively easy to make. Thank you for sharing your ideas. I would never have been able to do it without your instructions. ☘
I love this DIY so much. So easy to do. I have practiced mine.Thanks a lot for this piece.
Soooo Pretty!! Where did you get the hanging basket in the picture, I like those too.
These are really clear instructions to make the Jute feathers.. I thank you generously as I am really excited about making these !!! when my inspiration comes it’s intense. !!
If you use the numbers and lengths of strands,the size of the leaf is rather small. Now I used very soft cording….it just caught me . I will try adding one more smaller set at the bottom?? I would not use it as a singular wall hanging…too small so….make more. The knotting is easy….love it.
TY for sharing. Instructions well done!
I found this too, if you count the rows on the pics there are 25-30 plus but the instructions give details for 15 – like you I’ve just added another smaller set at the bottom!!
Other than that it’s a really good tutorial, thank you x
Love this tutorial, reblogging this if it is ok?
Thank you for sharing this diy. I just got the cord in the mail today!
Am working on my first one. Gotta say, cutting \shaping them is like cutting ones own bangs! *Giggle*
haha, very true!
kool
I really love the macrame feathers idea it’s a lovely modern way to macrame I’m sending the idea to my daughter in Sydney Aus where I taught her to macrame when over there earlier this year. It’s made a revival over there so she will love it. Thank you so much for sharing your ideas.
muy buena la explicacion del tutorial¡¡¡¡¡¡¡¡lo fui haciendo mientas leia me quedo de diezzzzzzzzzzz muchas gracias que se repitan los trabajos
muy buena la explicacion del tutorial¡¡¡¡¡¡¡¡lo fui haciendo mientas leia me quedo de diezzzzzzzzzzz muchas gracias que se repitan los trabajos soy de ARGENTINA
Pretty thank you so much
This is so pretty! I definitely want to try make some! Great tutorial!
Cassidy x
http://www.theglamgreengirl.com
OMG. This is so simple, and I have been wondering how to make a macrame feather for my next set of dreamcatchers.
Thanks for the visually pleasing DIY tutorial, btw!
I like this very much! I wanna make some but I won’t cut them like you did. It’s just i want them to be ‚‚wild”
Hi! Is there a trick to getting the curvature effect? Mine seem to go straight down. Please explain! ❤️
To get the curve, you place it on a flat surface, shape it and spray the heck out of it with the stiffening spray! Let it dry throughly before adding another layer. Hope that helps!
Es hermoso todo lo que enseñan. gracias a todos aquellos que se despojan de egoísmo para enseñarle a los que estamos tan lejos, sin acceso para pagar cursos en taller o como yo que cuido de mi hija con discapacidad cognitiva. Un abrazo a todos
These are gorgeous!!
I clicked on your Pinterest picture because yours were the best looking feathers of the ones I’ve seen. I wanted to find out how you achieved it and it’s explained very well. I’ll definitely be checking out your website!
Thank you!!
I LOVE YOU SO MUCH. IN A WORLD FULL OF SELFISH PEOPLE,YOU CHOOSE TO BE GENEROUS. THANK YOU SO MUCH. GOD BLESS YOU
So self explanatory. Best tutorial on feathers i have seen. Thank you.
Thanks, Christine!
All I keep thinking is WTF why haven’t I found this site before there’s not a thing I don’t like or completely love and the macrame feathers are the first thing on my “To Do” list (but don’t tell hubby he thinks that’s painting the bathroom!!!) Thank you and keep it up X
Hi! This is Xana. I love your creativity and style. Thanks for sharing it!
Greatings!
Xana
Las plumas espectaculares
When I spray mine with the stiffening spray, all the pieces of cord curl up really bad. Is there a trick to it?
Hmmm, I’ve never heard of that happening. Wondering if you need to give it a good brush after it’s been sprayed? Maybe also try laying a heavy book on top? Let me know if either of those work!
Why I spray mine the same thing happens, they curl up, and I’m using the same brand of spay. Did you find a solution?
Ugh. Same! I was so excited for this to work too 🙁
Try regular hairspray instead of fabric stiffener spray. I didn’t have any fabric stiffener, so I just used my L’Oréal Elnett hairspray. Worked very well.
Where do you find 5 mm for macramae?
wat mooi ! zal er een paar maken hoor. mooie DIY !
Where to get 5 mg cord
You can find it at Niroma or on Etsy.
Thank you for the information.this well add the finishing touches to my feathers.
This information is truly valuable. I appreciate the practical tips you’ve shared.
excelente
Tudo lindo!!!!
Parabéns !!!!!
Hi! I absolutely love these. Would you ever consider selling a few? I’d love to buy!
Hi, great instructions, but just a warning about the cat brush when brushing out the yarn! Depending on what you are using – I was using rather a soft cotton yarn, and the cat brush just ripped it to shreds! Luckily it only ruined a few pieces, which were easily replaced. I then used tweezers to separate threads and a plastic comb to finish.
Me encantó el método para hacer hojas maravillosas.
Just love it!…..I know how to do them, but I need to buy that kind of cord. Thank you for sharing this special project..
For the yellow, turmeric would be perfect and it’s one of the easiest natural dyes to make since it doesn’t require a mordant. I like to use my food processor to grind fresh roots but any powdered type would work fine. Just boil a big pot of water, add the turmeric (4 tbsp would be good to start but use your eye) and reduce to a simmer. Add your pre-washed (I use Dawn dish detergent but you can buy Synthrapol on Amazon) & wetted material for at least 20 minutes, the longer the better. Rinse with cool water and that’s it!
Merci pour ce très beau tuto, très bien expliqué et un grand merci pour ce partage
I love your site. Thank you.
Cathryn
Simplesmente adoreii ,eu vou fazer ,, maravilhosooo
Hello
How are you?
this looks amazing.
I have a question.
Is there any replacement for the fabric stiffener?
thanks a lot
Try hair spray 🙂
Curious. Would this be okay? I see a lot that says single strand like this , https://www.amazon.com/4mm-Macrame-Cord-Single-Hanging/dp/B07RQMF1CS and then many that say 3 strand twisted on Amazon. It is quite confusing their are so many types of rope, cord, string, oh my!
If the above mention items are not okay, what do you think the difference would be in the outcome with using the other products?
Finally, one last question. What would I use if I wanted to make small earrings the same way?
Thanks
Very pretty! Do you think hairspray would work as a stiffener? 🙂
waarmee kan i, de veer verstijven
I have just found your tutorial – it is great and so simple to follow!
Are there any alternative cords that can be used for the feathers – other than the single twist cotton string?
Hi Jude, I haven’t tried any alternative cords. The single twist cotton string is the easiest if you want to be able to brush it out and get that really soft fringe. Hope that helps!
I love experimenting with all different types of yarn, I have used string, twine, even embroidery thread, of course you would have to use a lot more. I like the embroidery thread and make earrings.
Hi my name is Isobel . I absolutely love your features, I appreciate the way yo have explained each step, and how spraying them with stiffener is important , I have looked at a few different instructions You’re instructions are the best Thank you so much
Kind regards Isobel
Wow, thanks so much Isobel. What a compliment!! xx
Just went to make this and realized that there is an error in your instructions.
If we cut the number of strands you suggest we only end up with 15 sets of cross strands (12+10+8 equals 30 and each cross strand takes 2 pieces)
All your photos of med feathers show approx 30 cross strands. Therefore we need 60 pieces
Hope that helps others
Please note this is not a complaint, just a correction.
I love the tutorial otherwise.
….of to cut 30 more strands
WHAT A FINE LESSON! Will get the supplies and get started.
Thank you for sharing.
Great tutorial. I too wondered how they made those beautiful feathers – amazing thank you
Very straight forward instructions! First tutorial that actually mentions the fabric stiffener!
Fantastic. I have always wanted to learn macrame, and the new materials with new patterns is so much fun as well as beautiful. Thank you for sharing this experience with us, it is much appreciated.
Thank you for sharing this project!
Going to purchase my string and brush
tomorrow! I have a piece of drift wood
Arhat will be used to hang the feathers!
Excited to ge started!!!
Happy crafting❣️
This is really cool and I loved it!
Absolutely gorgeous. Where can I purchase this cotton thread .
It’s linked in the supply list.
Hi There! These are gorgeous and will now become my new quarantine project 🙂 Can you confirm the 3 colors you used in your post? Was it the white, warm blush, and rust?
They look beautiful together.
Thank you!
Brooke
Are the measurements for the strands in Centimeters or Inches? I look forward to making these!
inches
Hello Erica!
These macrame feathers are so beautiful. Will try them out!
Where can you get this cord?
Spotlight sell this cord
Wow! These looks amazing!
Do you have any tricks for using the stiffening spray? I’m using the same one you have and I find it’s making the cotton cord fringe curl and twist onto itself like like it’s trying to go back to it’s original twisted form…
Hmmm, interesting. And this is after you’ve brushed it out? Try placing some wax paper or foil and then a really heavy book over it once it’s been sprayed?
What are the measurements to cut/trim the rope to look like a feather? I’m having problem with that step.
I used this tutorial to create a large leaf, and it’s beautiful. But when I lift it to hang it, the edges don’t stay flat and it creates this twirled type shape. I’ve sprayed it twice with the fabric stiffener. Any tips for getting it to hang pretty?
Hi Brittney, if you’ve sprayed it enough and the edges still fall, it could be because the length of the leaves is too long and it’s too heavy. Maybe try trimming it a bit and then try hanging? Let me know if that works!
Hi! I really like your tutorial, and you won’t believe where I found it! I borrowed a book on K.U. called “MACRAME’ The Easy Book for Beginners” by Cindy Torres. And tight there in black & white, is your project, along with 2 entire articles from Wikipedia and a whole bunch of stolen art. She even published your pics!
Now, if you gave permission and she just “forgot” to credit anyone, then I apologize for bothering you. But if it was me, I’d demand money from Amazon. Just sayin…
Anyway, I like your website & will return. Thanks for putting out cool content.
Michelle
Hi Michelle!
Thanks for letting me know! Do you mind emailing me photos of the pages you’re talking about? Thanks so much!
erica@honestlywtf.com
When I spray the leaves the ends all curl up. I can’t seem to get the final look of yours. Any Suggestions? Carol
Thank you for chairing your beautiful work is amazing, I love it.
So beautiful!!! thanks for sharing it!!
When I spray the leaf with stiffer, the rope curls up. How do I stop that from happening?
When I sprayed mine with the same brand of stiffener, the same thing happened ! Did you find a solution?
Beautifully explained
Thank you for helping me learn how to create a macrame feather. I really enjoyed the process.
Macrame yarn works beautifully as long as it’s not a thick yarn.
Wow! Thank you so much .. your detailed illustration helped me a lot
I do agree, I’m seeing these feathers every where, but when you make one and actually hang it, it droops, rolls and looks awful. I see you used a fabric stifner but then your picture shows the feathers still laying flat, not hung. So my question is, did they stay put after you hung them? I’m getting ready to buy some spray, but not sure if it will be worth it. Thanks, Diana
Thank you for showing us how to make these macrame feathers I’m now going to get the necessary to make.
bonsoir, oui j ai fait des plumes,mais le probleme est de donner de la rigiditee a ces plumes, beaucoup de problemes merci oui j ai le produit en spray mais si bon que ca, peut etre spray net merci en attente de votre reponse
I bought 5mm single twist and the knots (pulled tight) are much larger than the leaves in the photo. Are you sure thread is 5mm and not 3 or 4? All other patterns I have seen use 3-4 mm. I spent a lot of money for 5mm and it doesn’t look good with the thicker thread.
Macrame feather: do you knot the two vertical strands to stop the horizontal ones slipping off? If so, what type of knot do you do to avoid having the strands change the angle at which they hang?
Thanks
Wondering what happens when you use smaller mm cording? Having the hardest time finding cord this thick. 2mm -3mm is all I can find! Do you just have to use double the amount of stands ? Or do you make them smaller ? Worried if it’s a waste of money . But I want to do this so bad!!!
Onde eu encontro o endurecedor de tecido ou pode usar outro produto que deixe duro
Super explicado, muchas gracias, felicidades.
Excellent!
beautiful ! but what do you do if the brushed cord twists and won’t stay in place??? can’t even brush one side, cause the other is twisting back.
Thanks
In case there is someone with a brain like mine—
single twist yarn and single twist string are very different things. Lol. Help. I’ve ordered the wrong string/yarn twice. I just want to make a baby mobile
I love these. Is there a printed copy of this pattern? I tried to copy and paste into my documents but it tells me it is taken too long to copy, I am thinking it is the pictures that I need as reference. Thank you for any help you can give me. Sylvia
I loved the feather tutorial except your instructions did not tell you that you needed another set of shorter cords to finish the bottom of the feather. It was easy enough to figure out. Thanks for sharing!
Thank you so much for the instructions! SO helpful! I can’t wait to try this?-)
Best way to make a macrame Feather I.ve seen yet. Beautiful feathers. Others I.ve tried I could not get that smooth perfectly tapered shape. Many thanks
Nao.poderia.ser mais lindo
Thanks for sharing its very important for us
Great resource and tutorial! Thank you!
How big is this feather when you are finished? Thanks 🙂
why is this not printing?
I’m a VERY green DIY’er!! VERRY!! I almost purchased these from hobby lobby the other day. Before I delve into something like this, how long do you think it could take me to create one? Lol. I don’t want to get started and I’m frustrated and have wasted money!. Thank you for any insight.
Nikki
i am a VERY inexperienced d-i-ere myself, the leaf itself didn’t take long, maybe an hour with watching a movie, but that was mostly the measuring and cutting of the lengths and counting them out etc
How do I stop the top of the feather folding over once hung?
It’s just the top part as if it’s too heavy?
I’m guessing as I haven’t done it. But, stiffer. Probably close to “stiff as a board!”
These are amazing! Thank you for sharing!
Thanks..it was very generous of you
Aww those are so adorable!! I would love to try to make some
I love this idea and want to try it
I wish all Macrame knots were explained and given same excellent visual assist as you gave for this one. thank you.
Love this! Thanks for sharing!
They’re lovely! They also work with yarn and it’s kind of like brushing a pet!
Thank you so much nice easy to understand instructions can’t wait to have a go!
I fell in love with the orange one! It would be nice to make some earrings!
Spotlight sell this cord multi colour & it looks great
Hey, I want to make a DIY package, could I use your photos for that? I can of course mention your name / website…
Si no consigo ese endurecedor de telas me puefe recomendar algo que se pueda hacer en casa
Thank you for the instructions
between the trimming and brushing stages, i found it MUCH easier to individually un-twist eachpeice of cord and then brush
Heel erg goed uitgelegd en leuk om te doen.
Clarísimo!!! Fácil de entender… Gracias por su generosidad en compartir. Que Dios le bendiga
So so pretty. I would love to make one with my daughter for our home. Is there any other product that I could use to stiffen the cord ? Thank you
Love your feather idea, mine turned out great thanks.
Good evening,
Is there absolutely any chance you have leaf templates?
My poor dyslexic brain is boogled by the cutting of lead. I think if I could use a template to start until the comprehension kicks in, would be amazing!
Especially how you do that gorgeous little flick at the bottom! Complete envy!
Thank you xJ
Me encanto la publicación de las hojas de macrame, aprendí a hacerlas y me quedaron muy bonitas, muy importantes todas sus recomendaciones, mil gracias
no consigo endurecer las hojas como muestras en tus fotos, me podrias ayudar?
muchas gracias, te sigo desde hace mucho tiempo, me parecen preciosos los trabajos q muestras.
How do you keep the cords once tied, from falling off the main cord?
I love these feathers, but I am afraid they will fall apart. There isn’t enough stiffening spray to hold them together indefinitely.
welke spray spuit je er op is het lijm¿?
c’est vraiment formidable je vais le faire j espère réussir comme vous merci pour l explication qui est très Claire ta
Thank you so much for sharing this blog on macrame feathers.
Such an amazing fashion blog, thanks for sharing.
Hallo this macrame is great for my job
Thank jou
This post is a must-read for everyone. It’s thought-provoking and inspiring.
I’ve been searching for answers on this subject, and your article provided them all. Thank you!
The examples you provided made the concepts crystal clear. I feel more informed now.
Thank you for these clear instructions on this beautiful macrame leaf!
Sincerely,
Lise
I’m grateful for the well-researched information and practical tips you’ve shared in this article. It’s an excellent guide for anyone interested in this subject.
I’m impressed by the level of detail you’ve provided in this article. It’s evident that you’re an expert on this topic.
waarmee kan ik de veer verstijven ??
waarmee kan i, de veer verstijven
I found this post to be incredibly inspiring. Your words have motivated me to take action and make positive changes in my life. Thank you for the encouragement and motivation.
The comprehensive coverage and the diverse range of articles you publish make it an invaluable source of information. Keep up the fantastic work!
Your commitment to providing well-researched content that is backed by credible sources is evident. It’s refreshing to read articles that are grounded in facts and evidence.
The actionable steps outlined in this article make it easy to apply the concepts discussed. Thank you for the practical advice.
Hi! Is there something else you could use in place of the cat brush? Would a normal hairbrush work?
Very helpful tutorial. I have just done my first macrame leaf. Thank you! Keep it up, and more power.
Your article shed light on a complicated point and made it straightforward. Great job!
Love
love it but I did not try it yet
I lost my job and I see this as a way to make money they are beautiful
i like what you have made. speciaal how the content changed after the blushing comb.
very delicates. and thanks for the sharing.
Natural sea salt (hair) spray works as a fabric stiffener