Did you know that the earliest evidence of blanket stitch dates back to the 4th century? Excavations in Kellis, Egypt uncovered a child’s tunic featuring multicolored blanket stitching along the hood’s edge. Over time, this stitch has become a simple yet versatile technique, commonly used to finish fabric edges - or, in this case, a coat.
The moment I saw designer Erin Robertson’s boldly hand-stitched coats made from vintage wool blankets, I was determined to learn how to make my own. She's generously created a downloadable pattern and here, I'll walk you through how to assemble it with the ever versatile blanket stitch. I admit, the process can be overwhelming and seemingly tedious at first, but the outcome is worth it!! It'll be an absolute masterpiece if you're patient. And I can pretty much guarantee you'll want to make another after you finish your first!
You'll need:
- blanket coat pattern (printed)
- wool blanket, min of 50" x 75" (here and here)
- yarn
- embroidery needle with sharp tip
- sewing pins
- fabric shears
- scotch tape


Start by printing the first page of the pattern. Take you ruler and measure the 1x1 box with a ruler. If the measurement is correct, you're okay to print the rest of the pattern. The key on the front page will be your guide to cutting the pattern out and taping the pieces together. Follow the guidelines when cutting the pattern out.


Use scotch tape to tape the pattern pieces together according to the key.


Lay your blanket down on a large flat surface like the floor. Lay the pattern on the blanket. Remember that for the most part, you'll be cutting 2 of each piece ("Cut 2") so think about mirroring the pattern from one side of the blanket to the other. I personally like to align the back of the jacket on the center of the blanket or centered on a large motif like a flower.
Pieces like the collar and the backside will require you to "Cut on Fold" - this means you fold the fabric in half, align the edge of the pattern piece with the fold, and cut around the pattern, leaving the folded edge uncut, resulting in a full piece when unfolded. Instead of folding the fabric, you can also draw or cut out the one side of the pattern (do not cut on the "cut on fold" side and then flip the pattern over along the "cut on fold" side and finish cutting or tracing the pattern out.
Make sure all the pattern pieces will fit on your blanket before cutting.
Either trace them with a fabric market or pin the pattern down with pins.


Use fabric shears and carefully cut each pattern out.

If you want a really clean look, make sure to use a long enough piece of yarn so you won't have to stop and restart along a single length. Cut a piece of yarn at about 10 times the length of the piece you're stitching. Thread the yarn, double it up and tie a double knot at the end.
You'll start stitching the (1) back and (2) front pieces first, joining the shoulders. Lay the top of one of the front panels over the conjoining top side of the back piece. You should overlap 1/2" - 3/4".
(Note the camera is now turned around 180 degrees with the front piece on top and the back piece on bottom)
Pin the pieces together with a few straight pins.
Start by sending your needle up from the back of the top layer. Do not stitch through both layers as this is the way to conceal your knot. This should be done about 1/2" in from the edge, or at whatever length you want your stitches to be.
Push the needle through the bottom layer, right along the edge.
Don't pull the yarn all the way - instead leave a little loop. Stick your needle up from the back again, so that the needle comes out the top at the same spot where you started.
Send your needle under the loop stitch you just made. To do this, poke the needle under the stitch going along the edge and against the stitch direction.
Pull tight. This is how you will always get your thread anchored, but it is not a true first stitch.
To start your first true blanket stitch, stick your needle down from top of the double layer. Be sure to keep the same distance as your anchor stitch so to keep the stitch lengths consistent. Don't pull the thread all the way - leave a small loop.
To complete your first stitch, bring your needle up from the back (through the bottom layer), and through the loop of thread.
This should create a straight vertical stitch with a horizontal stitch along the edge of the seam. That is your first blanket stitch!
Continue stitching until you reach the end. Tie a double knot on the backside. Repeat the same steps on the other front panel. After this, you'll have the back and the 2 front connected by the shoulders.
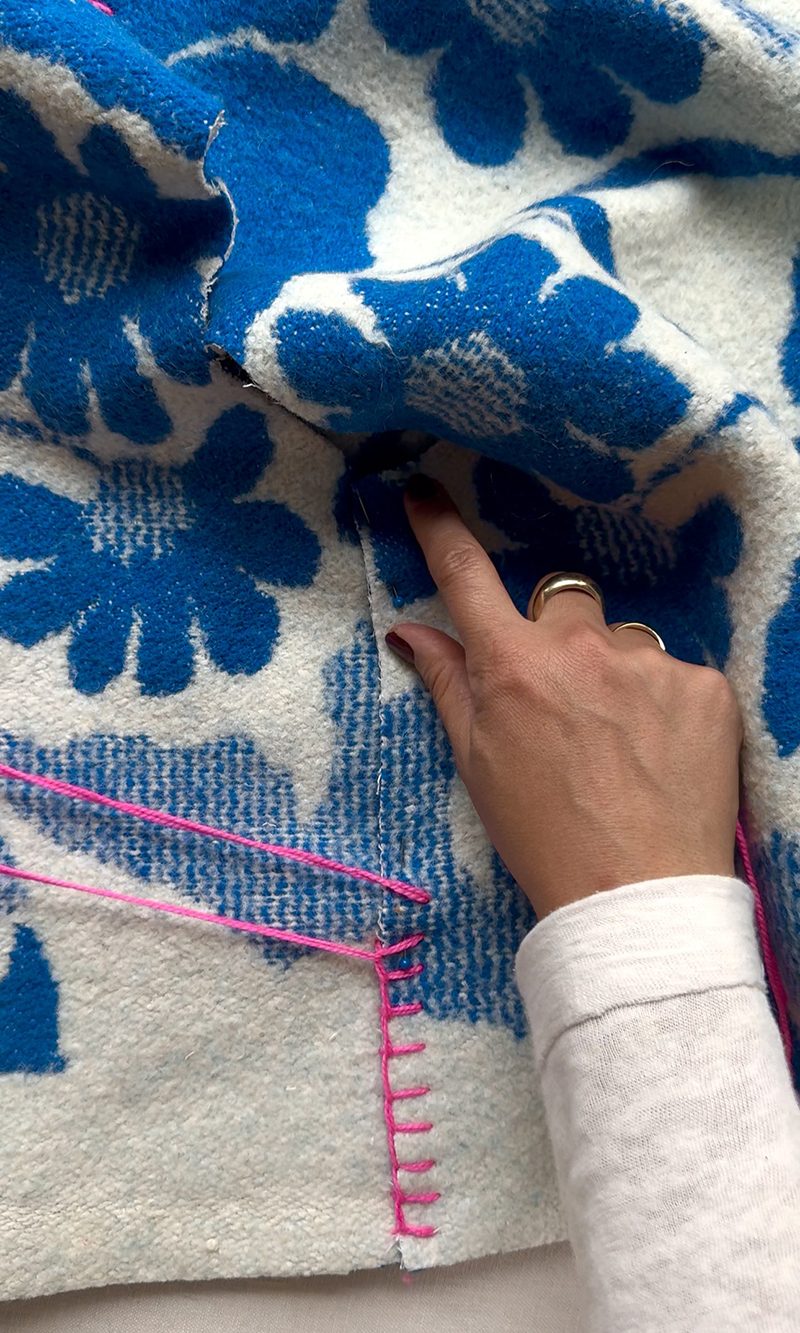
Next you'll stitch the sides together. Remember to layer the front section over the back. Pin the sections together and start at the bottom and work your way to the top (armpit). Repeat on the other side. You should have what resembles a sleeveless vest at this point!
Next, you'll sew on the pockets. Align your pockets along the bottom edge and about 3 inches from the opening of the coat. Pin the pockets down.

Cut enough yarn to go along the top edge and down one side of the pocket. You'll sew a blanket stitch along the top of the pocket but not through the coat as you'll need to be able to put your hands in the pocket! This stitch will be a little different than stitching through 2 layers of fabric. Start by sending your needle up from the back, about 1/4" - 1/2" from the edge. Stick your needle down from the top layer so that the needle comes out the bottom at the same spot where you started, making a loop. Send your needle under the loop stitch you just made. And send the needle back down, next to our anchor stitch and continue on.
You'll wrap around the corner by stitching through both layers of fabric. Doing corners is pretty easy. To go around a corner, just poke your needle down through the same hole as the last stitch and back up through the corner.
Remember to have the needle come up through the loop.

Now insert the needle through the same hole again, this time bringing the needle around the corner along the vertical edge of the pocket.

This is a corner stitch!
Keep stitching until you hit the bottom of the pocket. Don't worry about the bottom edge of the pocket as the edges of the coat will get stitched later. Cut another piece of yarn long enough to stitch the opposite side of the pocket.


Next, stitch around the pocket flap, avoiding the top edge. Pin the pocket to the coat, about an 1.5" from the top edge of the pocket.

Stitch the flap onto the coat along the top. Repeat this entire process on the other side of the coat.
Next you'll work on the sleeves. Lay the two pieces together, facing each other, with the widest parts on top. The piece with the concave curve is the top of the sleeve, the convex is the bottom. Overlap the top sleeve over the bottom sleeve and pin together.
Stitch together and repeat on the other side of the sleeve. Repeat all steps on the other sleeve.
Next you'll attach the sleeves, which is the trickiest part. Insert the widest part of the sleeve under the shoulder, pinning the edges together. This takes some patience and maneuvering inside the sleeve and you get to the end.
Now you'll attach the sleeve to the body with yet another blanket stitch.

Repeat on the other sleeve.
At this point, you can go around and stitch all along the edges of the coat - along the bottom, the middle, around the collar and at the cuff of the sleeves.
Once you're done, you can attach the collar. The collar also needs to be outlined with the blanket stitch except against the long, straight part. Once you're done, place a pin on the center of the back of the collar.
Fold the collar in half.
Pin the center of the collar to the center of the necklace of the coat. The exposed part of the collar will be facing upwards. Continue pinning the collar as far as it will go to the left and right of your center.
Stitch the collar to the neckline. And voila!! You are done!!! You can add some snap buttons to the coat but it's totally optional.

Tutorial adapted from Erin Robertson. If you want to BUY and DIY, coats are available here.
Oh my gosh, a sewing project I can do! Can’t wait to try this.
This DIY Blanket Coat tutorial is such a clever and stylish way to upcycle cozy materials into a trendy statement piece! The step-by-step instructions are clear and approachable, making it feel achievable even for beginners. I love the idea of customizing the design with different fabrics or trims for a personal touch. The finished product looks effortlessly chic – perfect for layering in cooler weather. A small tip: adding reinforced stitching could enhance durability. Overall, a fantastic project for sustainable fashion lovers who enjoy handmade, one-of-a-kind creations!
hello
Yay! Can’t wait to try this. Ty!!!
Getting ready to tackle this. Just curious as to total time involved from start (from cutting pattern) to finish?