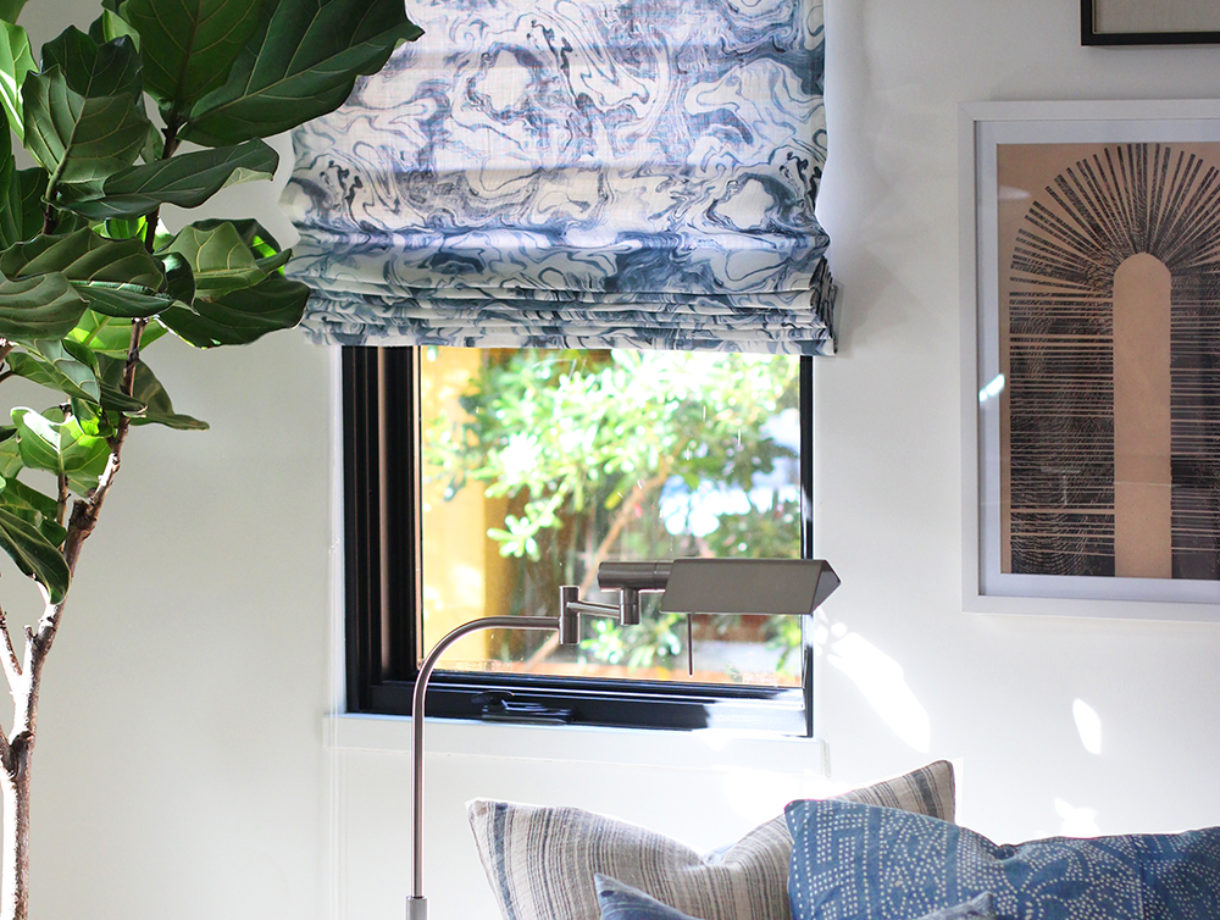
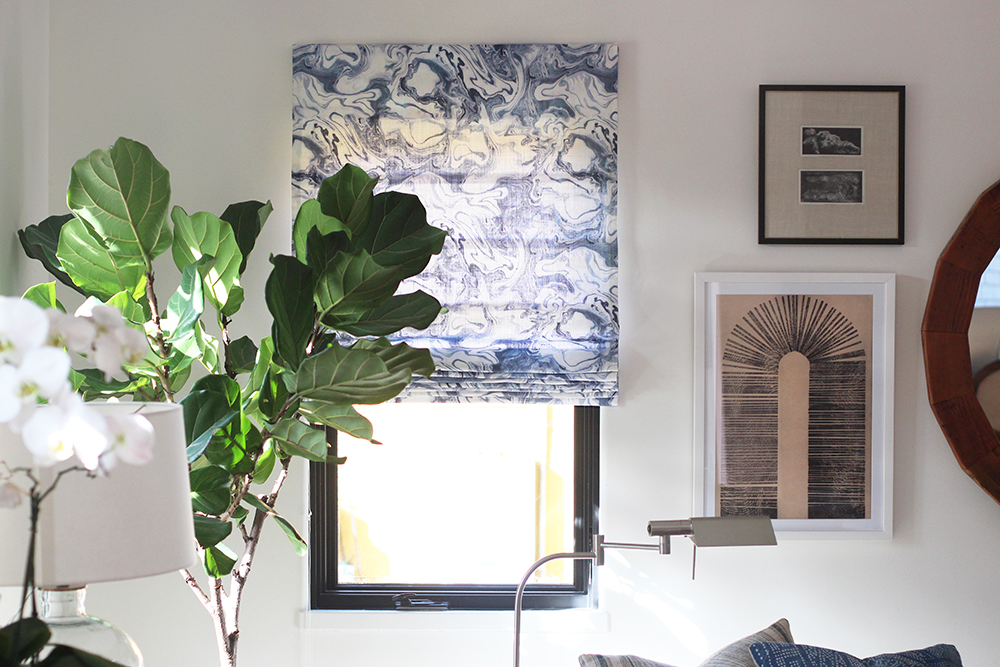
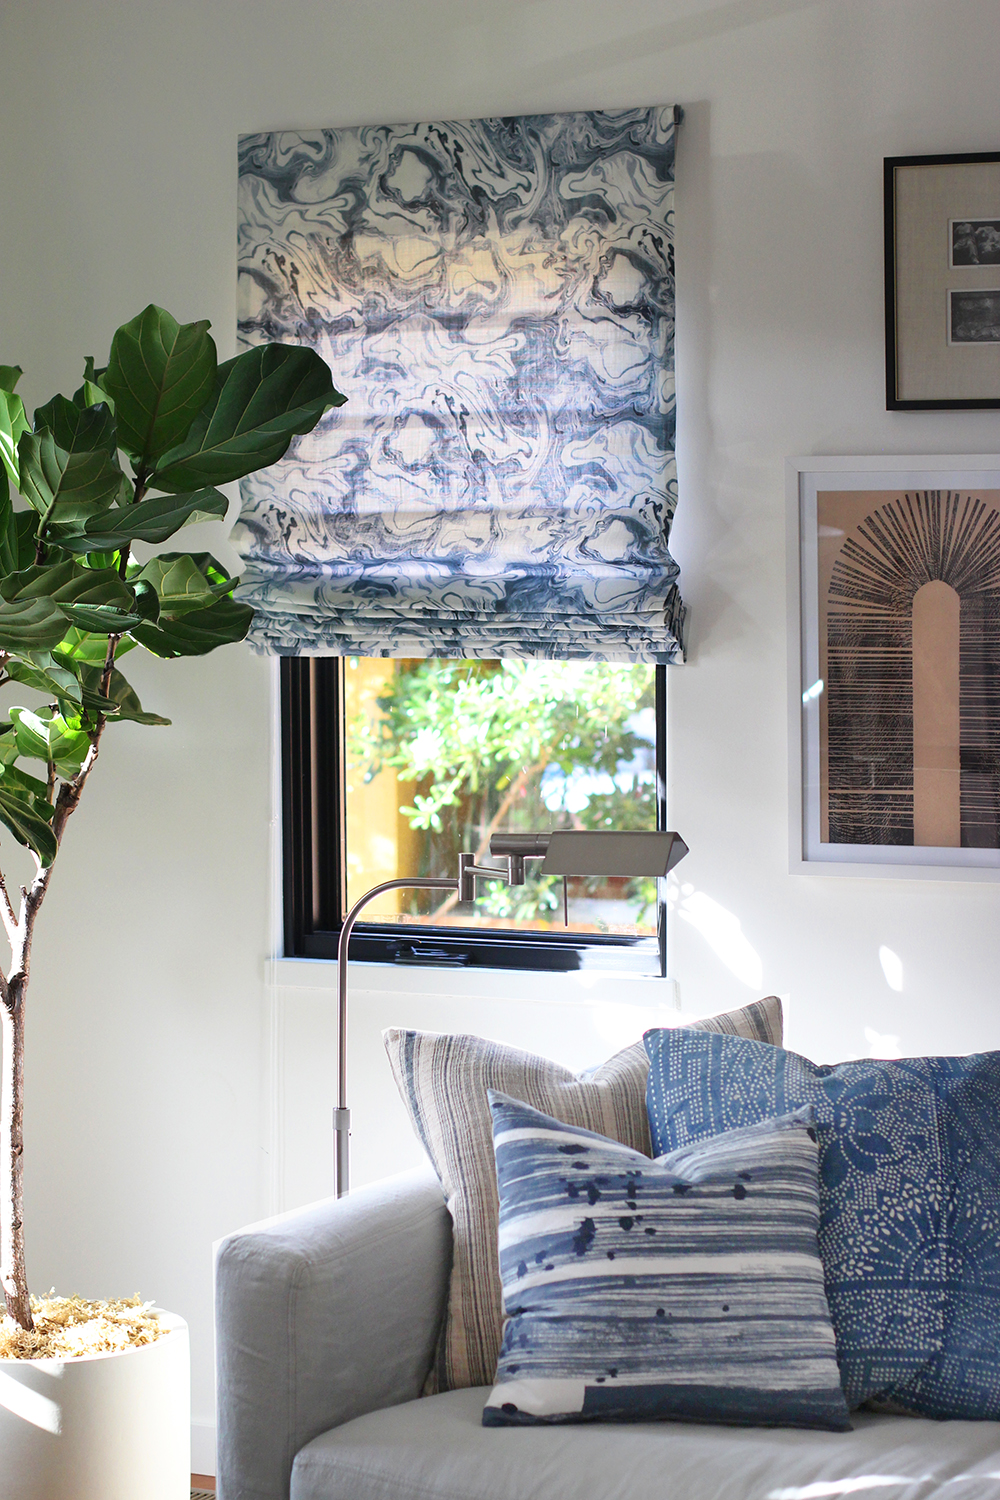
One of the most forbidding tasks I’ve come across after renovating our home has been finding proper window coverings. From the tedious task of picking out fabric from a collection of subpar choices to the daunting cost of a custom order, it’s no wonder countless windows have remained bare and uncovered for nearly a year since we moved in. Privacy is a non issue since we live in such a quiet neighborhood but the addition of texture, pattern and color has been needed for far too long. When textile maven Rebecca Atwood launched her line of digital and screen printed fabrics by the yard (I mean, that stunning indigo marble dyed Belgian linen!!), I knew I had to try my hand at DIYing my own Roman shades. And before I scare you away completely, I encourage you to read through the step by step tutorial. It’s really not as difficult as it seems – it’s just a heedful process. But no pain, no I-have-fabulous-shades gain!
You’ll need:
- 2 yards of fabric
- 2 yards of linen or heavyweight cotton (optional)
- 1″ white mini blinds
- permanent fabric adhesive
- foam brush
- scissors
- iron
- sewing machine (optional)
- pins (optional)

The first step is understanding how the mini blinds work. The super inexpensive mini blind system is made up of a million vinyl blinds that are held together with a set of vertical pull cords and ladder cords. The pull cord is what you operate to retract the blinds. The ladder cord helps keeps all the blinds evenly spaced and close together. You’ll want to find a set of mini blinds that fit the width of your window. The length won’t matter since you’ll be removing everything but about 12-18 blinds. Lay out the blinds, fully extended and open, on the floor or a long table. Take a pair of scissors and snip away the ladder cord – NOT the pull cord, which runs down the center.
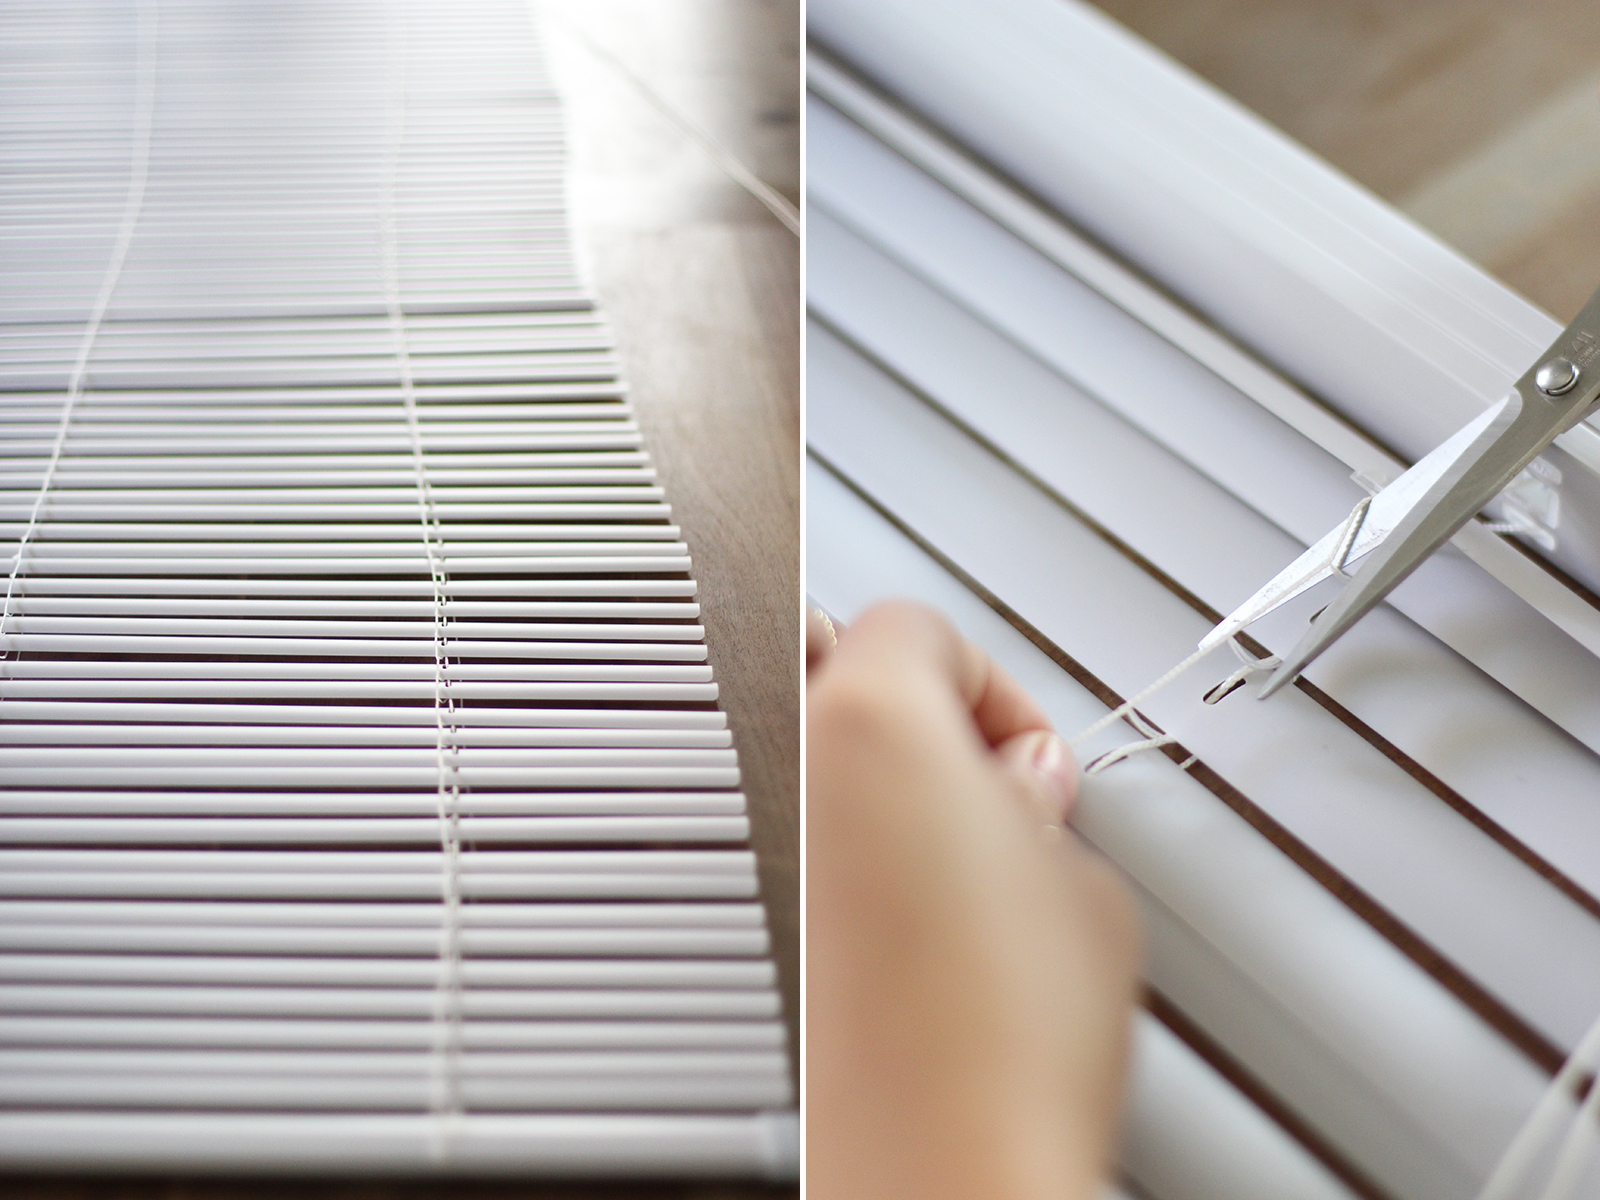
Carefully snip away the ladder cords. The pull cords will stay in tact.
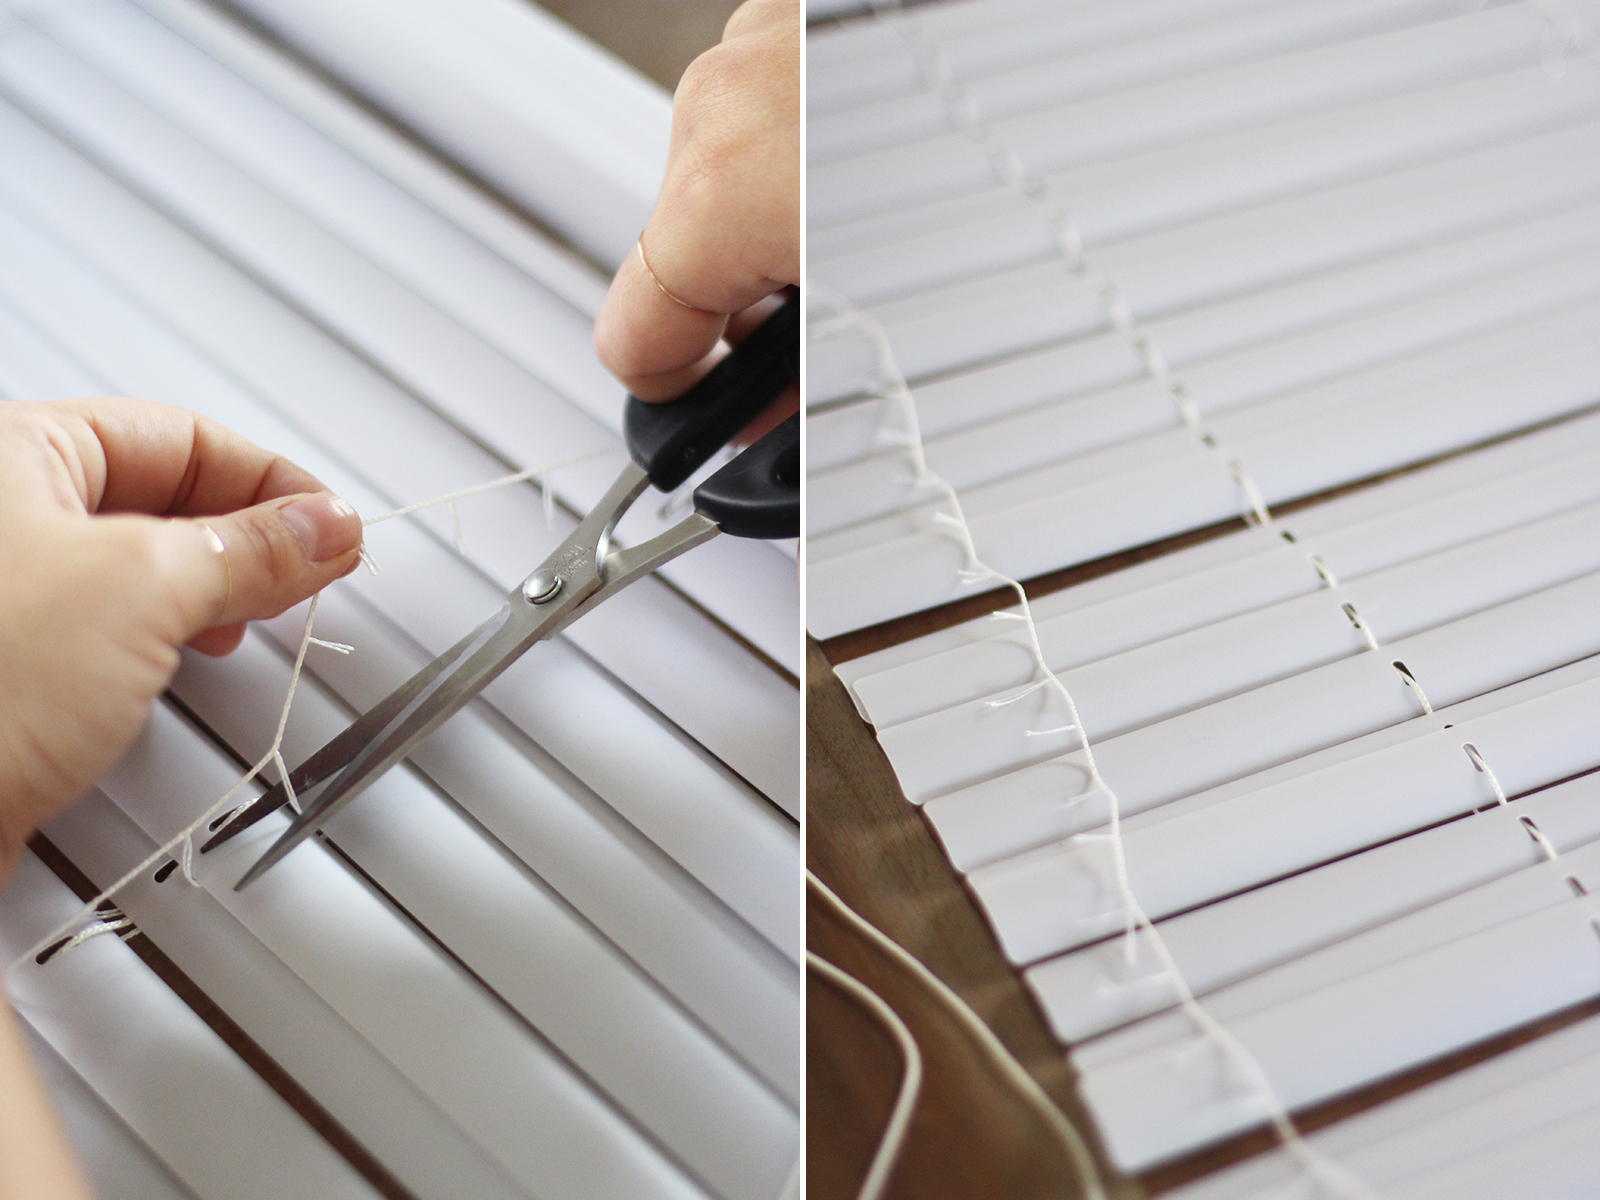
The ladder cord is held together at the top of the binds. Just snip away the fastener to remove the cords. Now the blinds will move freely up and down the pull cords!

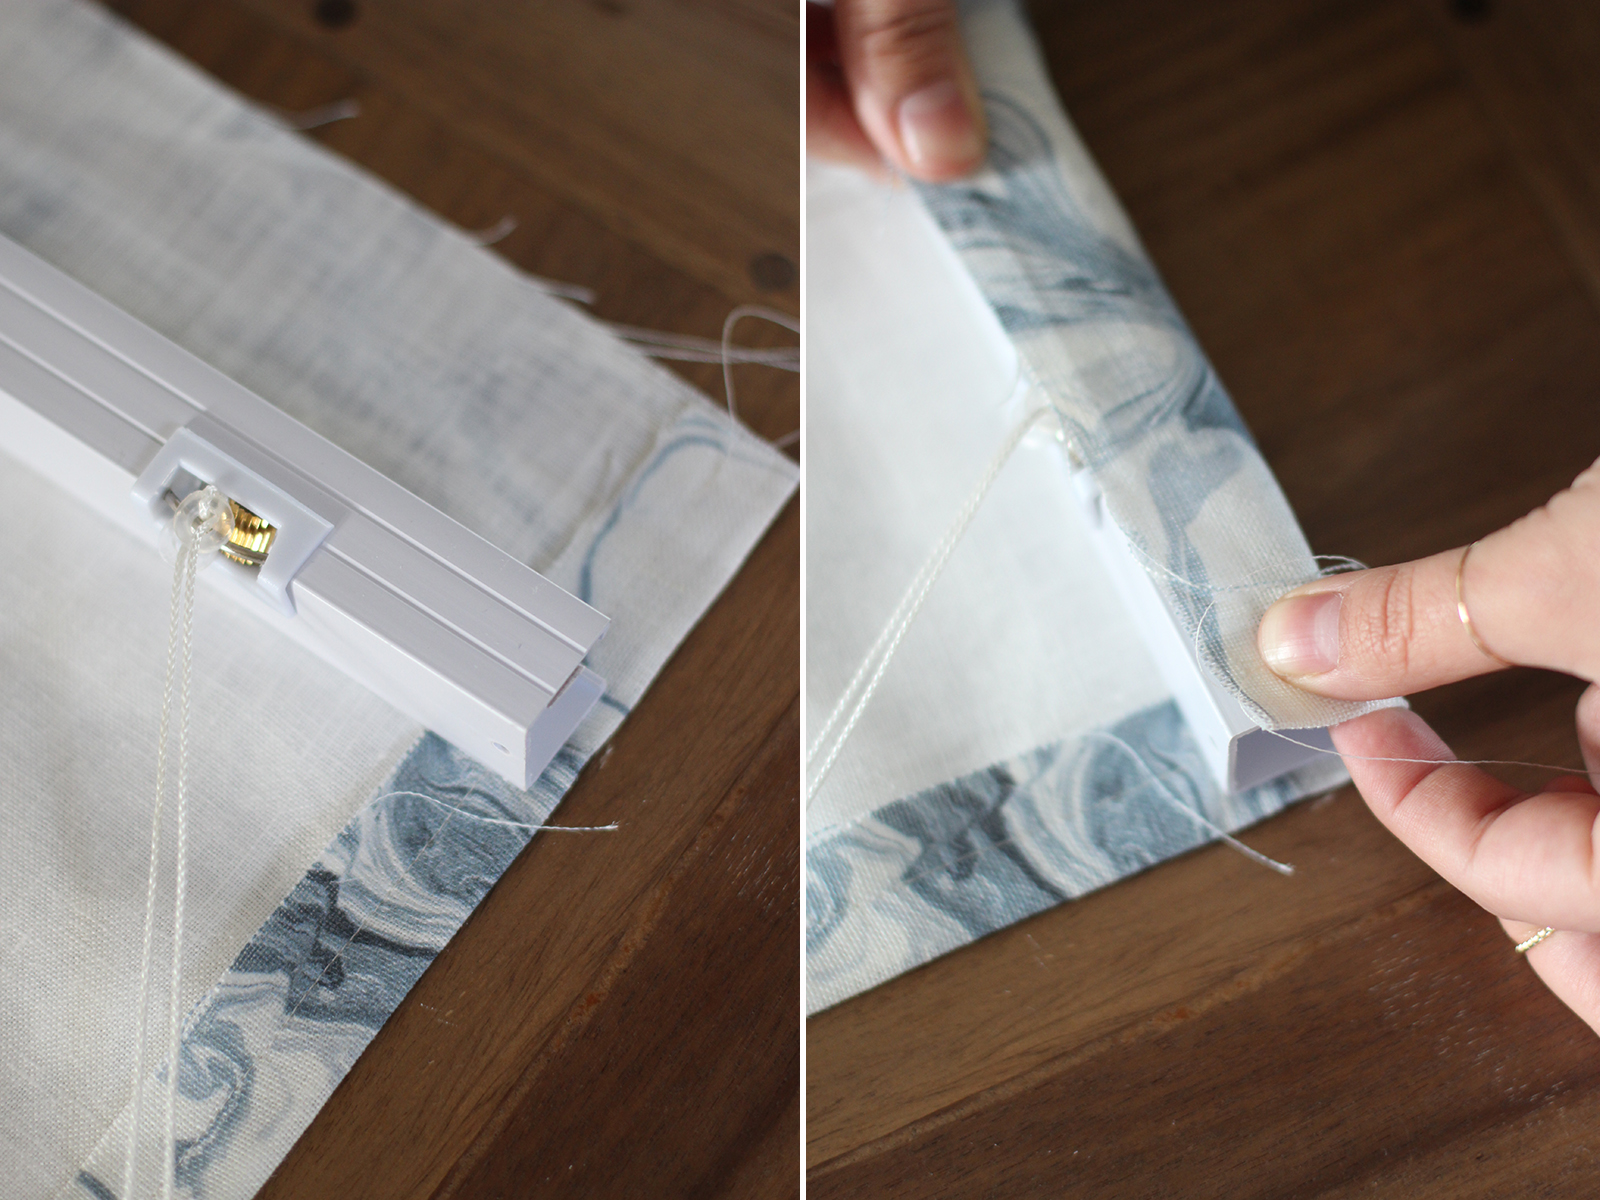
Now you’ll undo the pull cord to remove the blinds. There are 2 plastic caps underneath the bottom bar of the blinds. Pop those open and use a needle or pin to fish out the knotted pull cords. Snip off the knots and remove the bottom bar.

Because my window measured 52 inches long and I wanted the blinds to be about 4 inches apart (for those nice large folds), I needed 13 blinds total. Since that would include the bottom bar, I only needed to keep 12 blinds on pull cord. Remove everything else but the blinds you want to keep. Thread the pull cords through the bottom bar and tie the ends into tight, double knots. Now your mini blind system has 12 blinds, a bottom bar and a set of long pull cords.

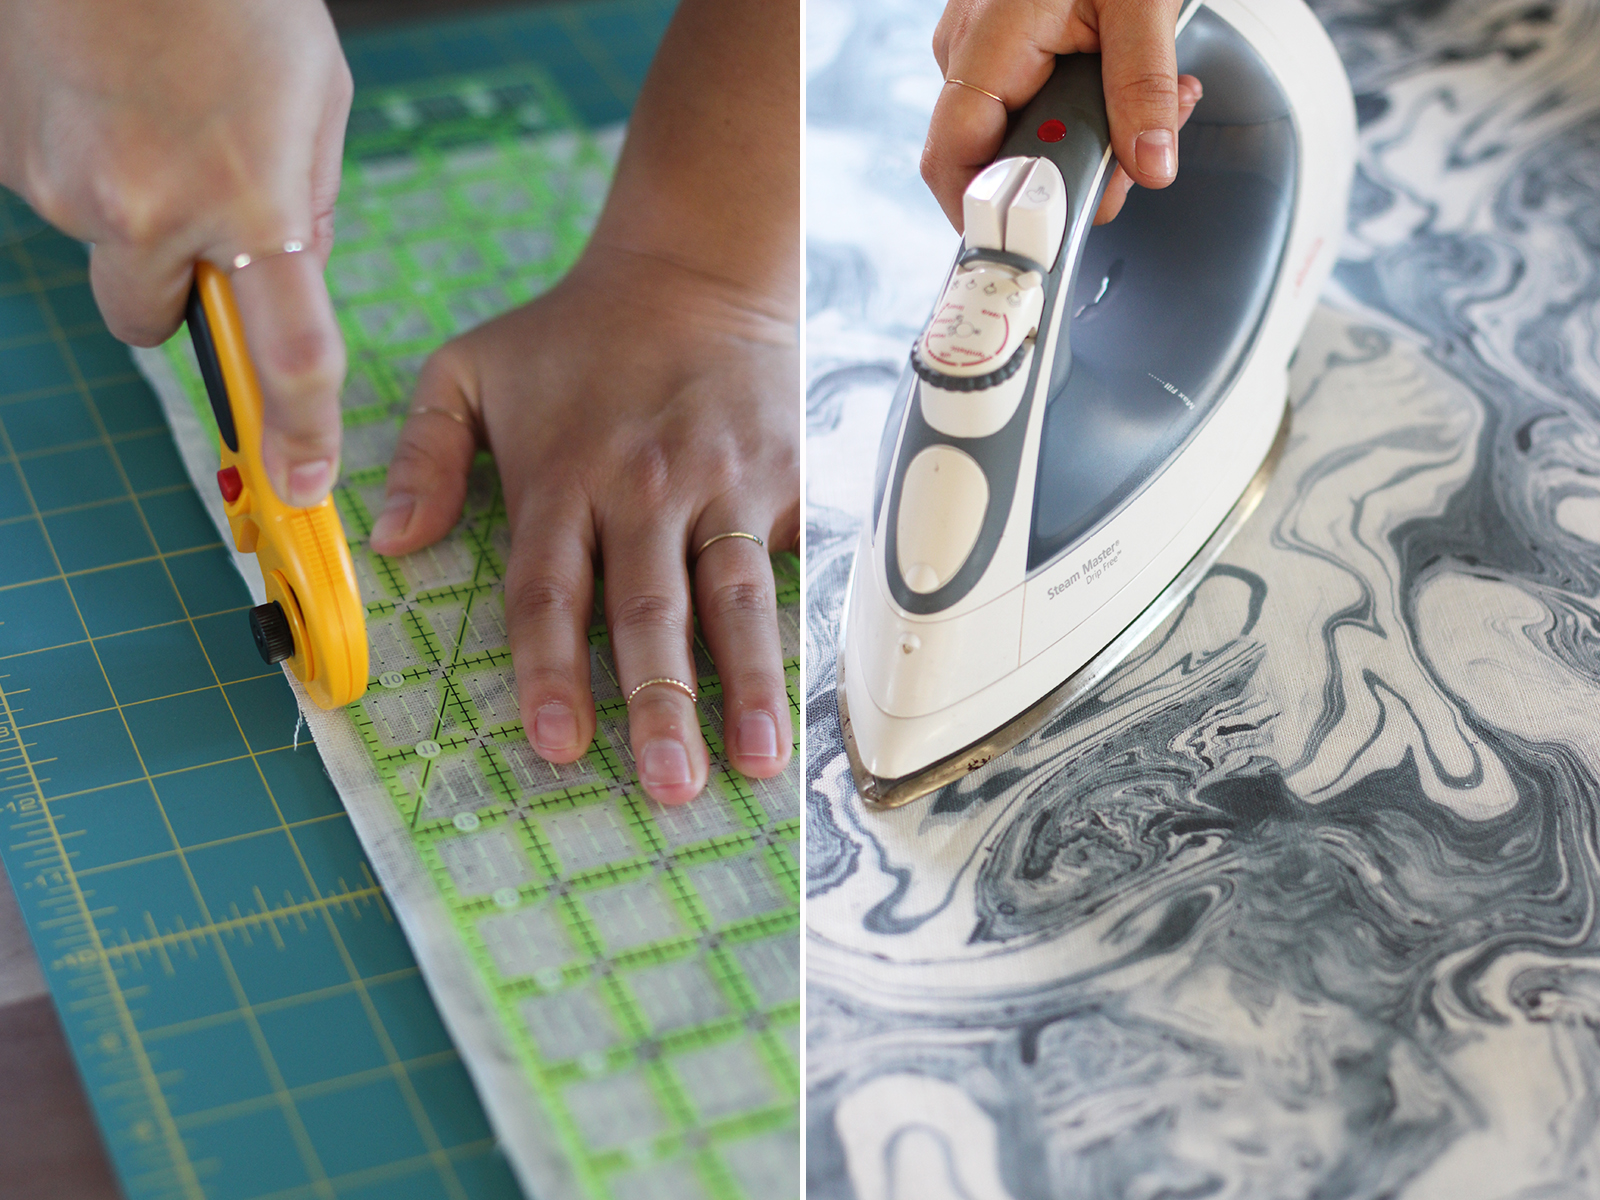
Now it’s time to prep the fabric. You’ll want it to be the width of the blinds plus an extra inch on each side. And the length should be the length of the window plus an extra two inches on each end. Once you have your rectangular piece trimmed and cut, iron it flat. Since the fabric I used was a bit translucent, I chose to line it with another piece of medium weight, upholstery grade linen. If you choose to line with a liner, cut it to the exact measurement of the window, without all the extra inseams.
Use a ruler to mark your inch inseam along the vertical edges of the fabric.
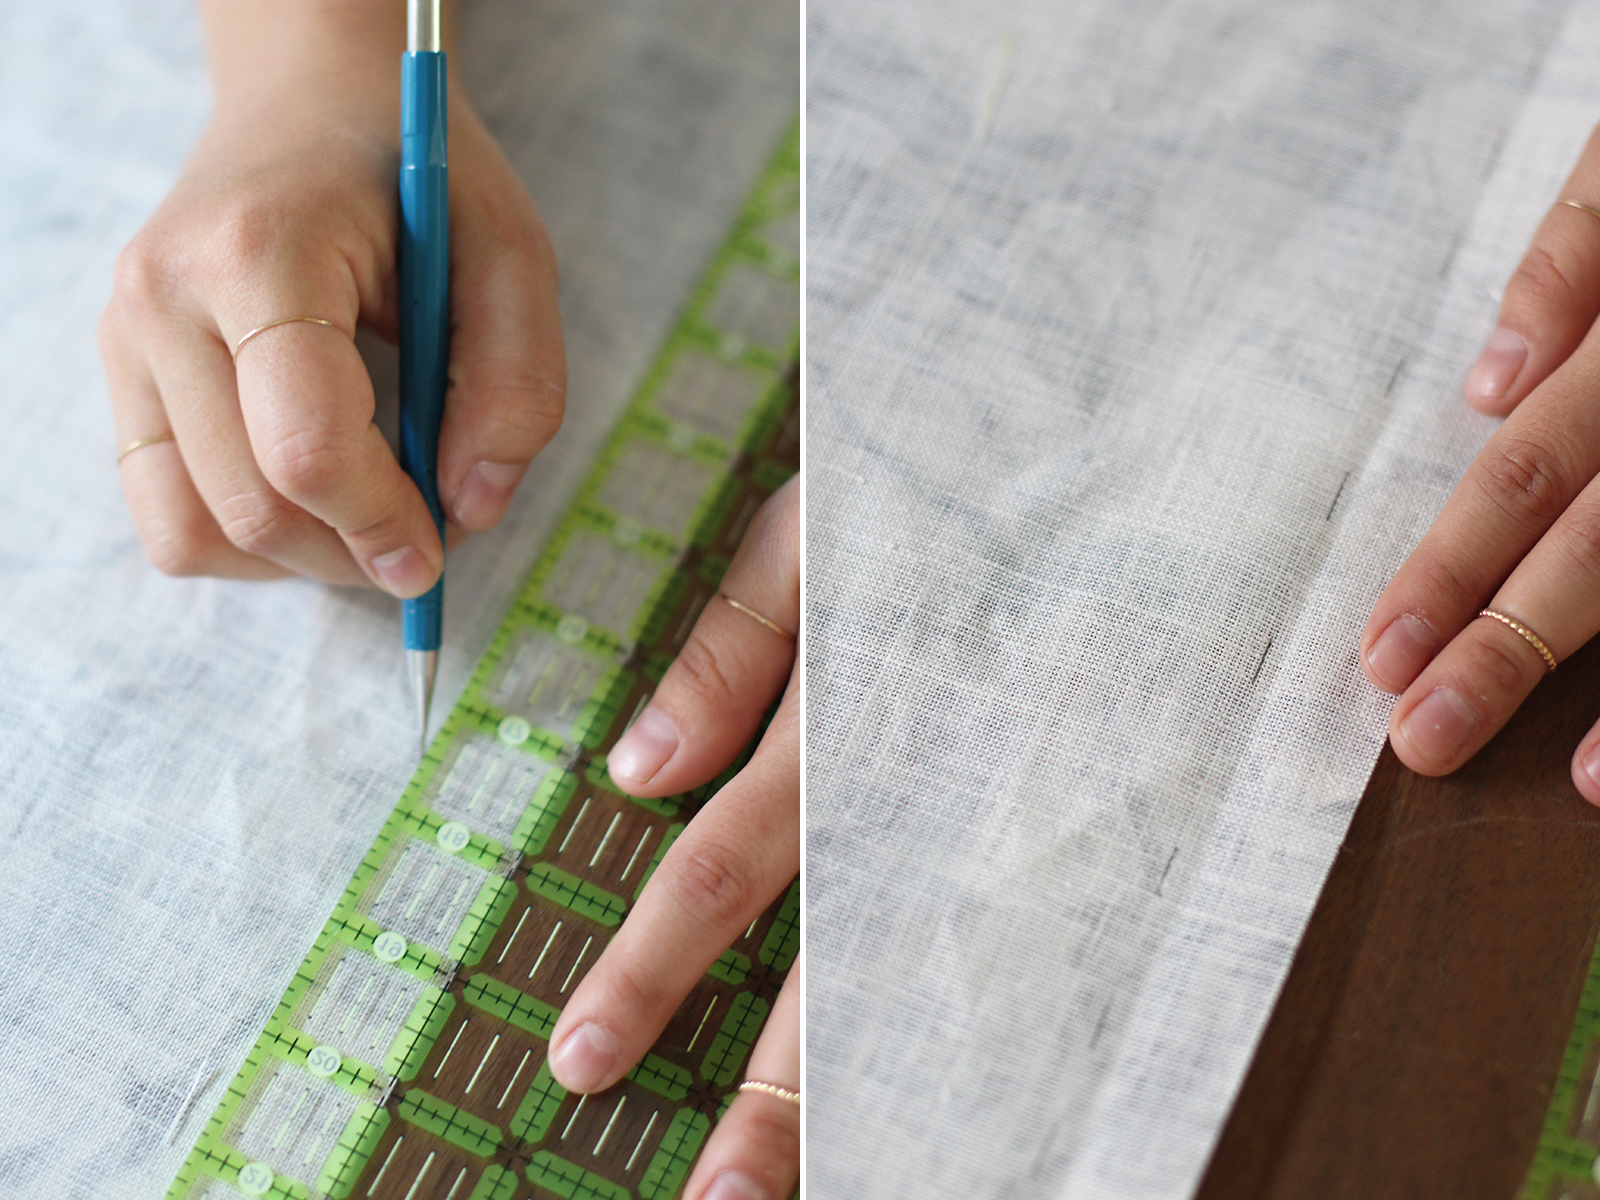
Lay the liner fabric on top of the backside of the fabric and fold the vertical edges in. Iron flat. (I’ve laid a piece of heavy fabric underneath here to protect my table)

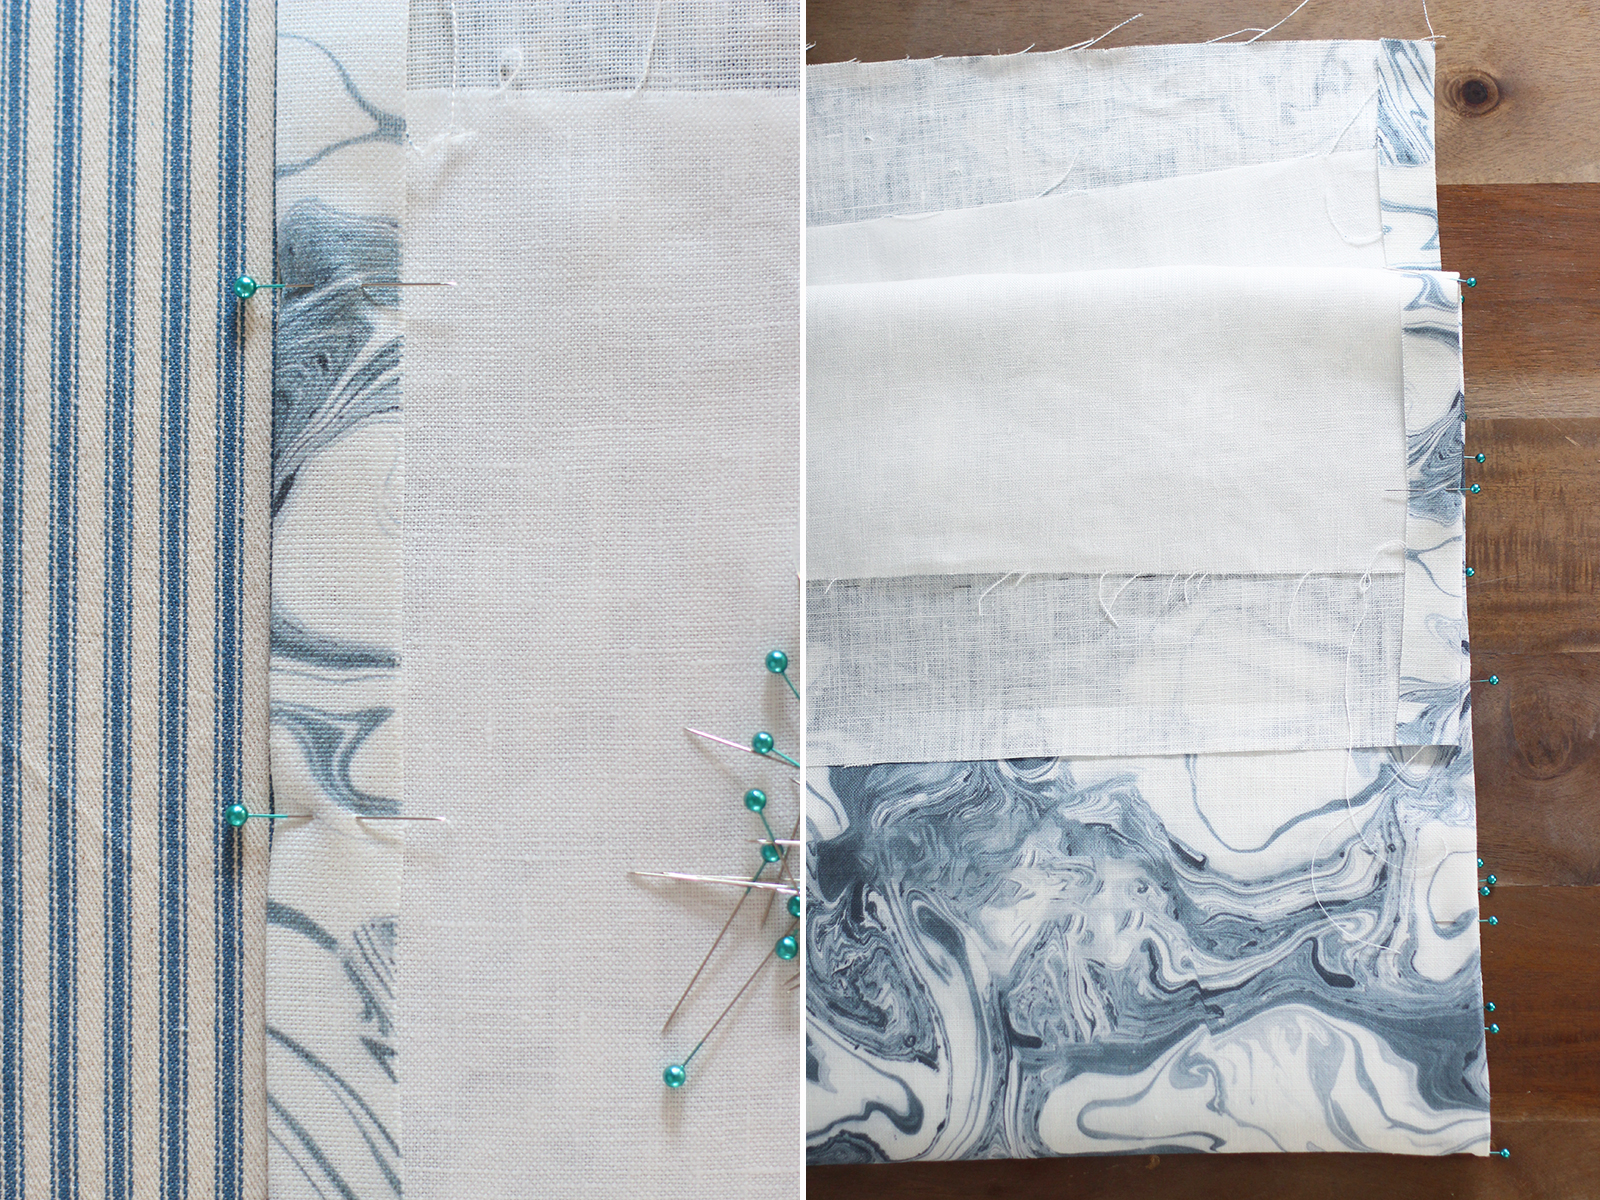
Now that both sides folded and ironed, you can do two things. You can pin it and run it through the sewing machine. Or you can slide a long strip of fusible hem tape underneath the fold and iron it closed.
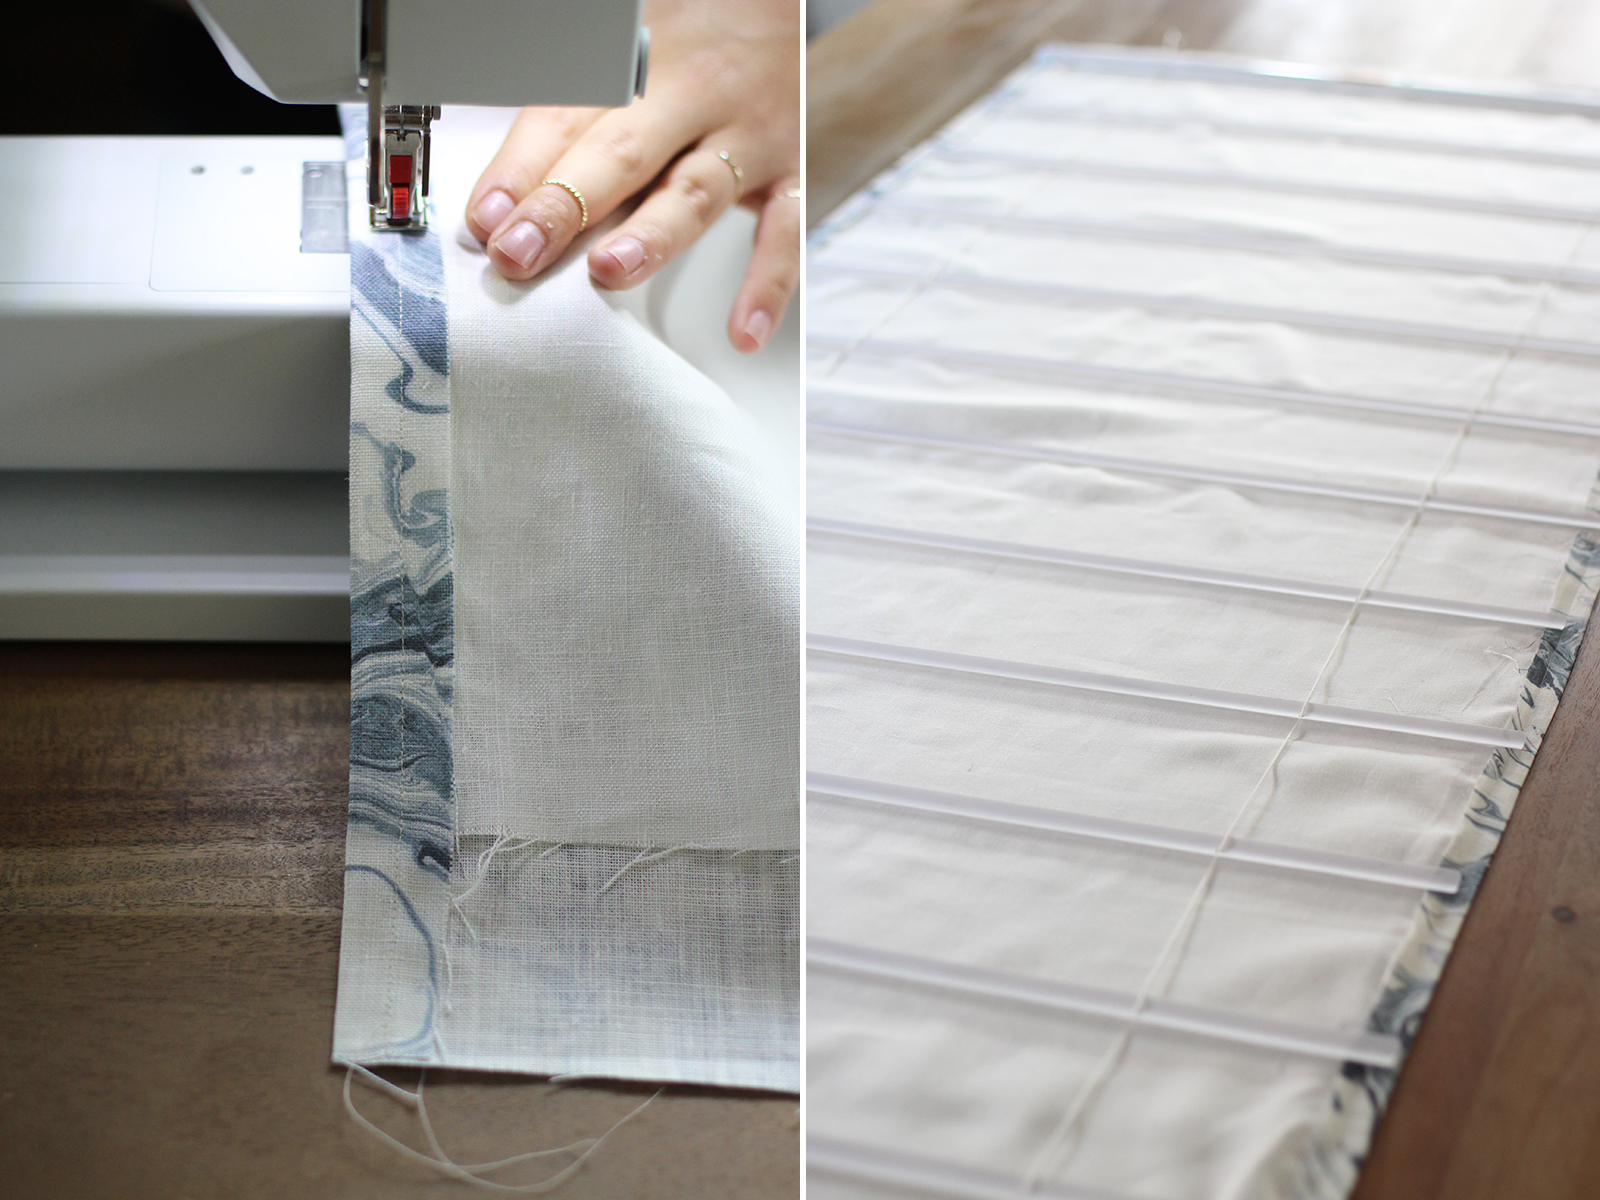
I have a sewing machine and just chose to sew it with a simple straight stitch. Don’t worry about the top and bottom of the fabric – leave it unfinished. Lay the fabric face side down on your flat surface. Lay the blinds on top of the fabric. Separate the blinds so they are all evenly spaced along the length of the fabric. Mark their placement with a fabric marker or pencil if you wish.
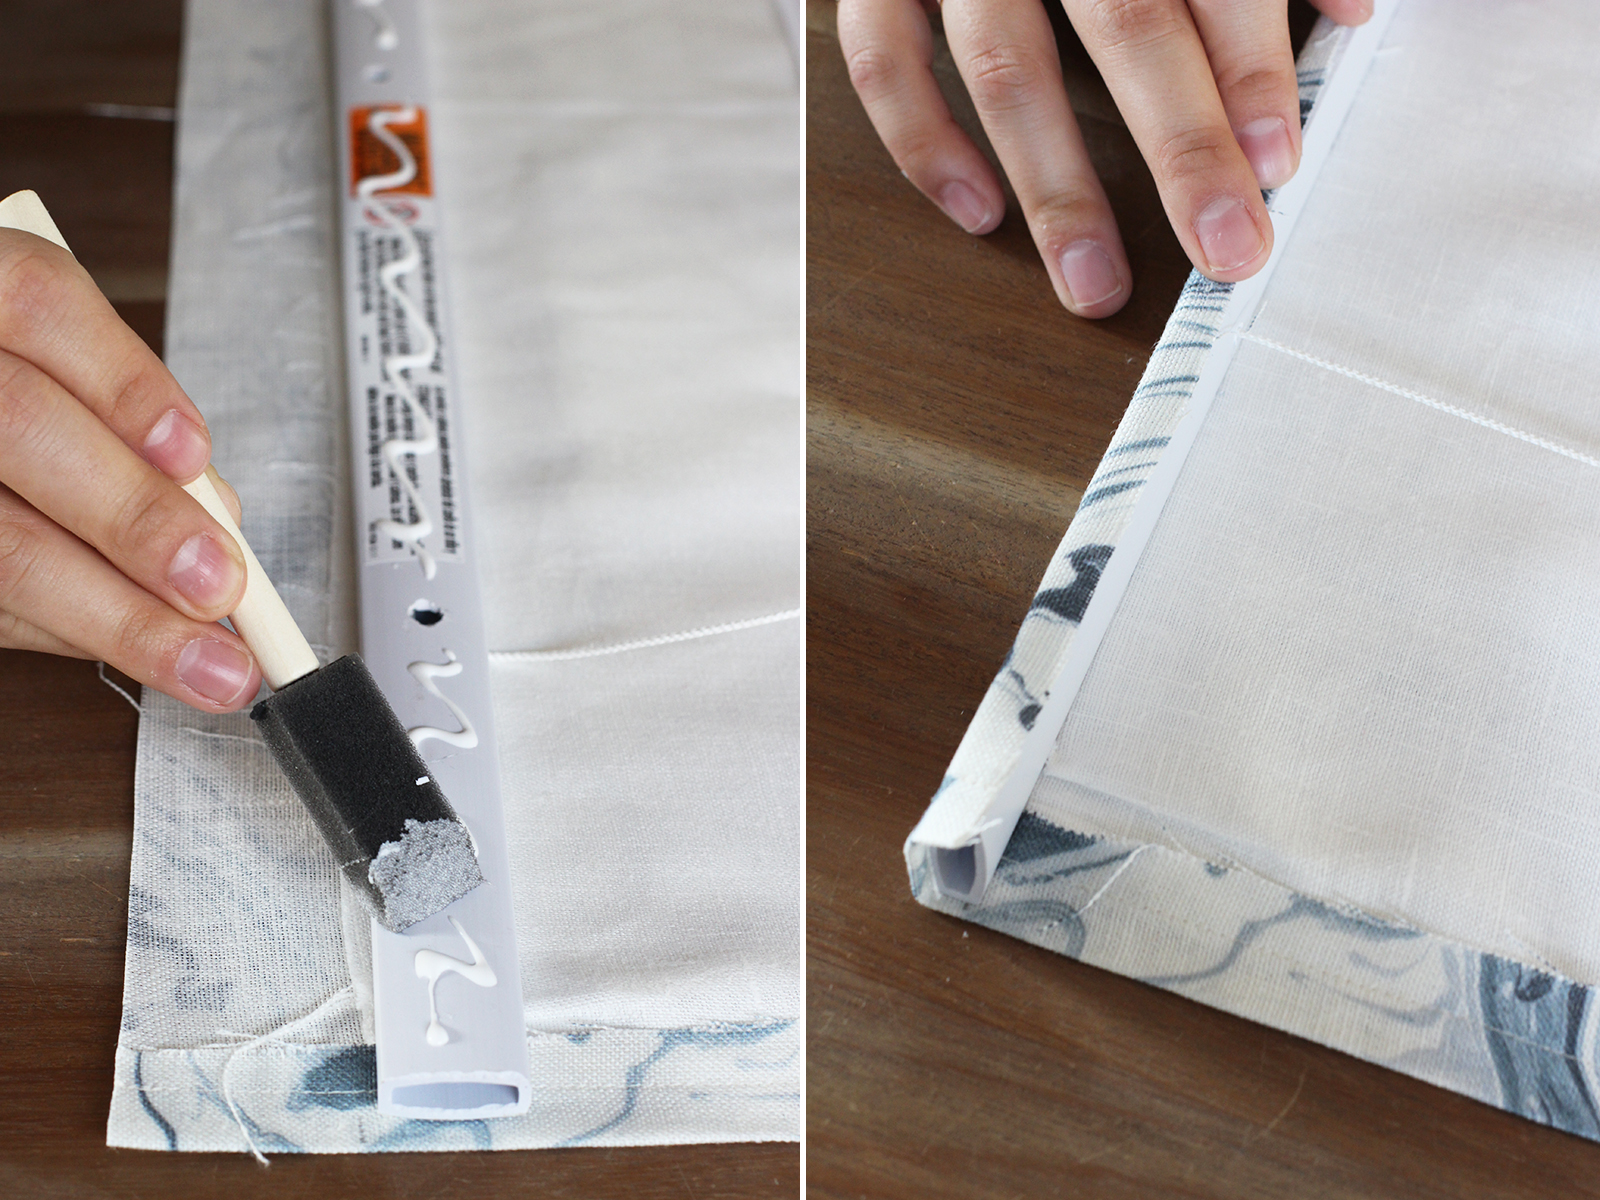
The top should sit two inches below the top edge of the fabric. Take your fabric glue and squeeze a good amount of glue along the width of the operating bar of the blinds. Use your foam brush to help spread the thick and sticky glue.
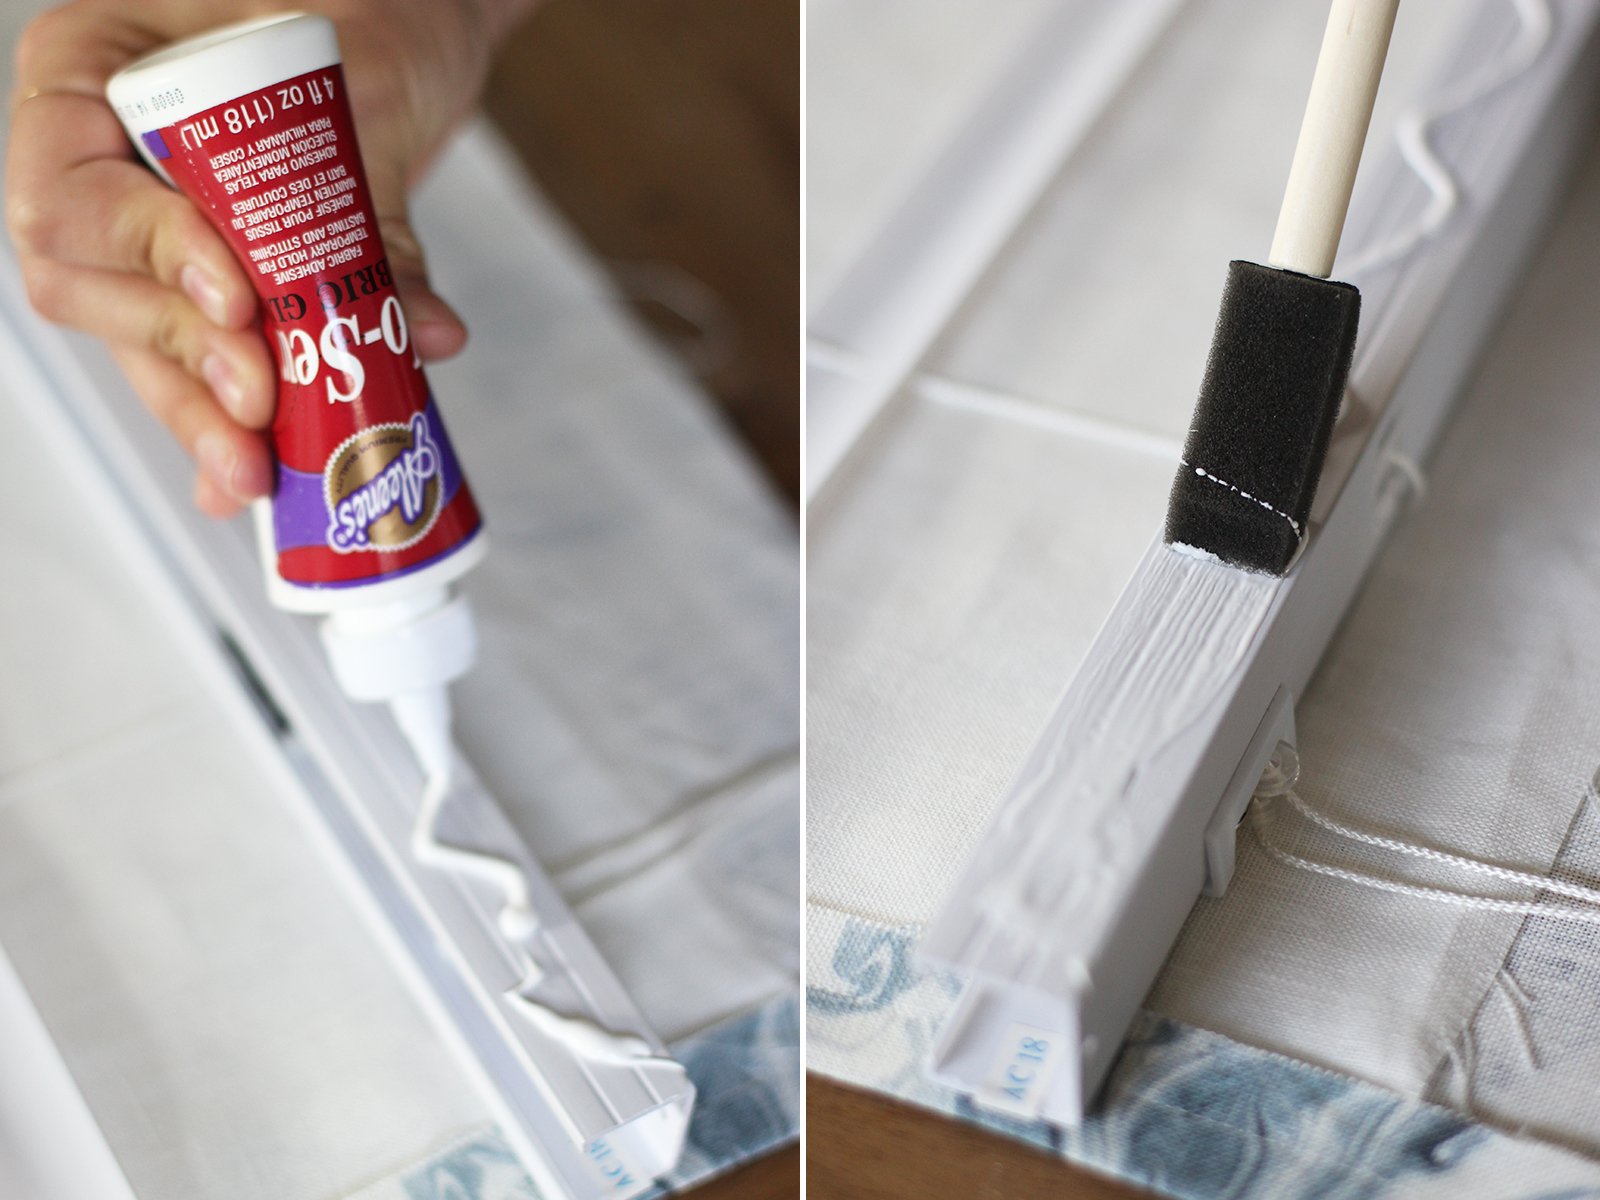
Carefully lay the bar and wrap the fabric around the top bar.
Now you’ll glue all the blinds to the backside of the fabric. Just squeeze a line of glue on the blind, spread it with a foam brush. Just avoid the pull cord section – you definitely don’t want to glue that portion down!
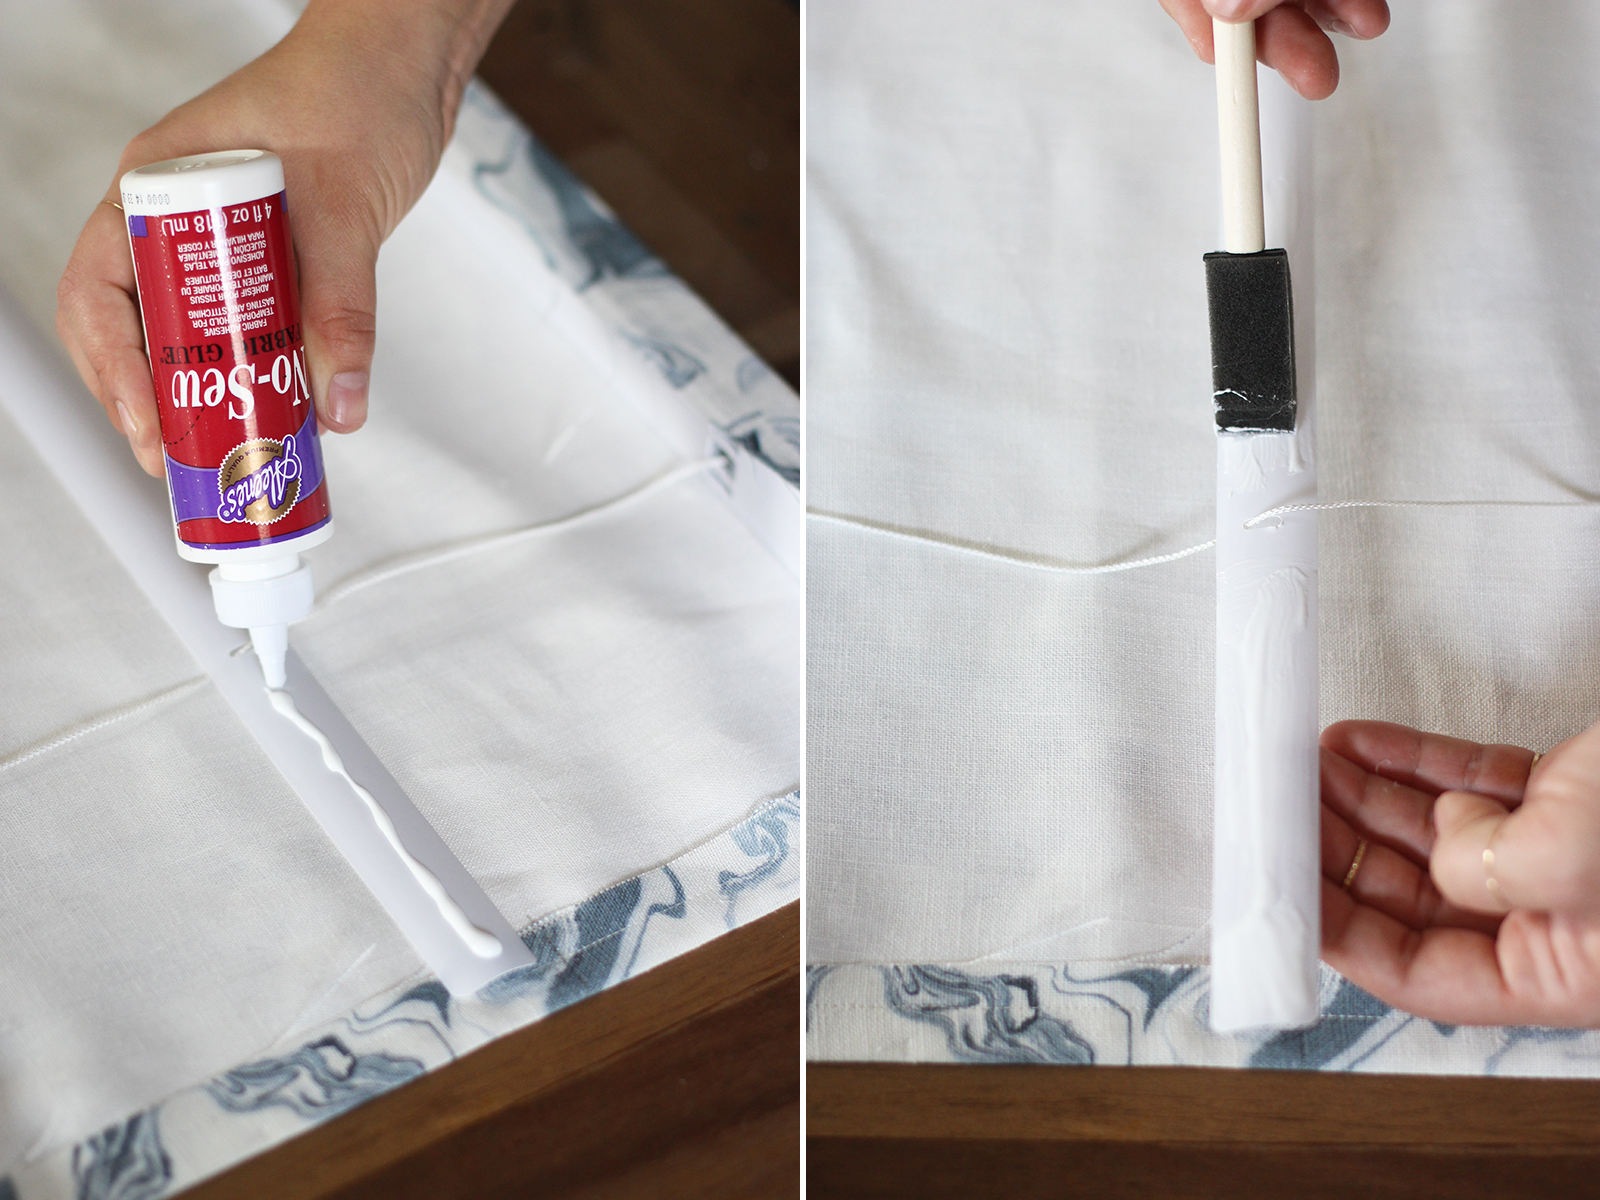
Turn it over and press down firmly. Keep going until you’ve reached the bottom.
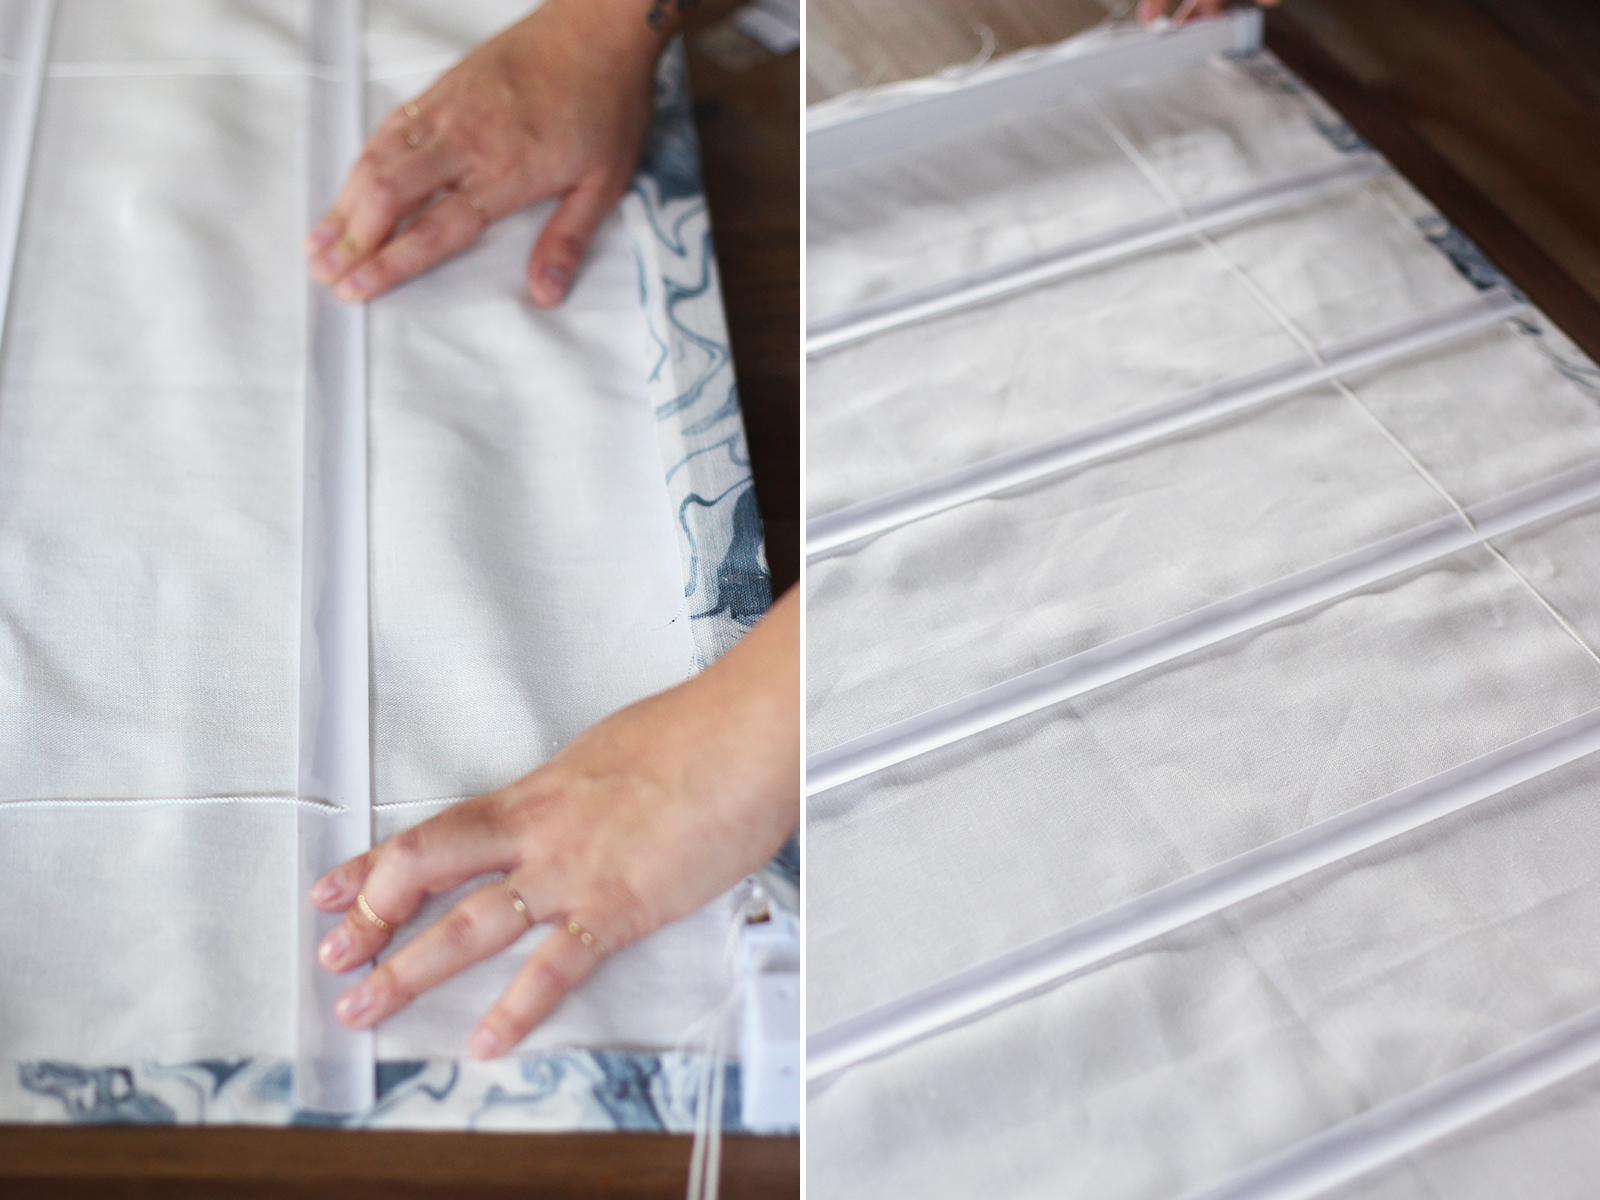
Spread glue along the bottom of the bottom bar and wrap the fabric over it. You’ll want to put another layer of glue along the short side of the bar and fold the wrap the fabric over that. You can carefully trim away any excess fabric after the glue has completely dried.
Allow the entire thing to dry overnight before installing. I recommend using the manufacturers instructions to install.

Windows, I’ve got you covered.
(images by HonestlyWTF & Rebecca Atwood; pillows via One Kings Lane, Amber Lewis and Rebecca Atwood)
Wow it turned out amazing! Thank you Erica!
how far apart do I glue the blades from the blind on the fabric
How beautiful! Loving this blue color scheme 🙂
I’m an NYC style blogger chronicling my stylish adventures in the city. Check out sustenanceandstyle.com to see a glimpse of the fun 🙂
With love from NYC,
Stephanie
This is genius! You have created the single-most commonsense Roman blind tutorial ever- thank you! I’ve been wanting to make a set of these for years, but most of the tutorials I’ve seen were too fussy, complicated, or just plain strange. This makes perfect sense, and could so easily utilize 2nd-hand miniblinds. Thanks for a great, easy tutorial! 🙂
Sweet! But i think doing each section longer than the other would made for a even better layering effect when closed… No?
Looks gorgeous but compacted!
Namrata
http://seasoncheck.blogspot.com
Such a creative project and the marbled dye on the roman shades turn out so beautifully! Thanks for sharing!
Prudence
http://www.prudencepetitestyle.com
What a great shortcut to making Roman blinds. Thanks so much!
having made my own roman blinds from scratch several times i can attest how giant a PITA they are and what a brilliant shortcut this is you have developed. BRILL-YANT. i never want to make them the old fashioned way again. i love this.
Goodness, you are so talented! 🙂 Great work! I love the colour combination as well <3
Oh wow, that awesome, beautiful work
that is really awesome piece of work you have done! really appreciate you efforts bud!
I was recommended this web site by means of my cousin. I’m not positive whether or not this post is written by way of him as nobody
else understand such exact approximately my trouble.
You’re wonderful! Thanks!
Well, ladies I have the first blind glued down and I must say: it was very hard on the back.
1 down and 4 to go!! The next 4 should be much easier. Great instructions I was afraid that I would mess it up.
I didn’t line my shades though. I got some nice Muslim for $8 a yard @108″ wide so I – 50% off made this very economical for a low budget. I’m going to valances also for the windows also, it will add a pop of color.
@Sheila so great to hear. Yes, it can be very tedious but it’ll all be worth it in the end. Would love it if you could share a photo once you’re done!
Can’t upload my pics. Finished the blinds.
Mine aren’t as pretty as yours.
I still have to make the valances and hang the curtain rods.
I lowered them since its dark and for privacy.
This is an amazing DIY. haven’t done any interior DIY projects for hapinesswherever.wordpress.com sad to say 🙁
I have always wanted to make my own drapes from my home and this is the year I’m doing it. Love Roman shades and thank you for sharing this. It will be easy for a beginner like me. Love your pillows too.
Is it important to glue the entire width of the slats or just down the middle? i found it a little tricky to make good contact between the fabric and the slat over the curve of the slat.
Just wondering whether velcro between blinds and fabric would work, that way the fabric could be taken off to wash.
After looking at other sites for some easy instructions, I found yours.
Thank you! These instructions are wonderful and yours turned out beautifully!
I was going to line this with an insulated drape that i took down from the window to cut the draft from the old window. will the glue still work to hold everything in place???
Pinning until I can find some yard sale material and blinds to practice! Love it and going to do it!
Has anyone used this process with a larger window like a 60″ picture window? Would wood blinds work for more strength?
I was wondering … do you think very sheer sheer fabric would work for this project or would it look off?
Thanks for your input.
What can be done. To make this washable.
All I’m finding these days are cordless mini blinds. Do you think it will work as well or should I keep searching for corded?
I have looked at other sites and found that yours is the best one. And thank you for that. I plan to do a patio door. But can you do this and make it come down and be washed. Please and thank you.
Cada año tenemos un par de rock stars míticas que nos
dejan y si hay que seleccionar a uno, Richards tiene todas y
cada una de las papeletas.
I’m wondering if its possible to sew the blind to the fabric, or at least tack it here and there, in case the glue comes undone.
I’m curious how these look from the outside…can you see the hem seams and the glued down blinds on the back from outside the window? Is there some sort of work-around for this, like upholstering both sides of the blind instead of just one?
I must confess that prior to coming across this post, I didn’t know that it was such fun to make window coverings. I have learnt quite a lot by simply reading this post. You can get assistance with correcting errors in an article review by clicking on this link: https://www.literaturereviewhelp.com
I tried these with a heavy liner and the blind was not strong enough.
I ended up using thicker 2 inch heavier blinds to make a 65″ blind with drop cloth fabric and liner. sewed liner to fabric in straight lines at blind placement then glued. so far so good
What do you do with the pull cord. I made Roman blinds lastnight and got stuck at that part. How do you access them?
I spent a great deal of time and bought some nice fabric to make a Roman shade following your instructions. Once completed it turned into a disaster. The mini blind structure and cord are not designed to support fabric, even light, especially after removing the “ladder” cords. The pull cord pulled right through several of the blinds and never did lift both sides simultaneously either. I bought the required one-inch mini blinds at Lowes so they were not real cheap. In order fo this project to work one would need to at least use real wooden blinds with a stronger cord. And then it’s a maybe. Wish I hadn’t wasted my resources.
I was worried about the strength of the blind slats, so I used 2 for each section, glued first one to the fabric, then glued a second one on top of the first one …..as it turned out mine were thin aluminum so that was plenty strong…if yours are vinyl you could use 3 to make them sturdy enough
I am doing these blinds for my rv. The fabric I picked is black. Can I paint the under side of my blinds black so they look nice from the outside.
Hey, can you show us how they are holding up? also, a good clear shot of the finished back?
Thanks!
If you line the fabric and glue the lining to the slats, does the shade fabric fold up or does it come loose?
My friend made a Roman shade according to these
directions and a few months later the fabric glue
let loose. Any suggestions on a better glue choice!
That is just absolutely clever!!!
I don’t even know how I finished up here, however I thought
this post used to be good. I do not realize who you are however
definitely you’re going to a well-known blogger should you aren’t already.
Cheers!
I wonder if we could use thin wooden dowels in place of the flimsy slats to add support to this blind? The weight of the fabric is not supported well by the plastic slats. I’m going to drill small holes for the cord to pass through and perhaps a few more to tack the fabric to it with small hand stitches.
I wonder if his could be done with faux-wood blinds? What do you think?
Why not, if anything they will be heavier weight for the fabric to be weighed down by and therefore sit properly. That’s just my tjinking anyway and being that they are thicker than these flimsy ones maybe stagger the distance each time as one of the other ladies suggested so when its pulled it will sit neatly and not become too bulky.
Once you glue the fabric on the top bar how do you hang it up? My mini blinds have the cube enclosure for the blind to slip into, but with the fabric glued you can’t slide the plastic piece in to keep it in place. Help?
We are just here for the grand theft auto games and we all are celebrating this for some reason. http://gta5moneycheats.com
Love this! I’m wondering about making RELAXED roman shades. Could I do that using this tutorial? Would I just have to take the bottom bar off and attached the pull cord to a flexible string instead of the bottom bar?
Thank you for sharing your tutorial!!
I used canvas fabric and the thin blinds couldn’t support it so I glued the unused slats on top of the ones already glued to the fabric for the extra support needed and now they work great.
@Linda, Great tip!
I loved the way you discuss the topic great work thanks for the share Chaussures Nike Air Presto this page
I liked your designs and it really look nice. Window cover always give a elegant look to rooms.
I hope that this post will really make others happy.
This is my first time visit here. From the Nike Air Zoom Elite 8 Herre Joggesko view my url of comments on your articles,I guess I am not only one having all the enjoyment right here!
Great Article on Diy Roman Shades.
Great Content on Diy Roman Shades.
Information you share really right, thank you, I’ll follow you regularly to learn more Buty Nike Air Max 2017 , wish you many more interesting articles!
Thank You for this tutorial! I am working on a house we just bought, and have decide I need to make Roman Blinds
for three small side windows in the family room. The large double window will have store bought drapes and sheers, with
grommet rings. I was reading this tutorial, and am thinking of an option to eliminate the plastic slats, and only use the header, bottom rail and strings. I want to line my shades. Since I am a stitcher, the traditional dowel rod pocket assembly is my preference.
However, I really appreciate this idea, as it has given me the confidence to take those shades apart!
Again, Thank You for taking the time to write this tutorial!
Hi! How tall is your window? I’m wondering about a “window height – fabric need” ratio.Thanks!
Thank you, so much admin is already providing the cheap Adidas Y-3 Pure Boost Men’s Running Shoes http://www.fanaticrunningwear.com/y3-pure-boost-c-2_51.html to us
I really loved reading your blog. It was very well authored and easy to understand.This post give me lots of advise Air Jordan 7 Retro Hyper Rosa Donne Scarpe Nero 442960-018 http://www.lescarpecorsa.com/air-jordan-vii-c-64_81.html is very useful for me.
Such an amazing idea! I’ve been stuck with my window coverings for years!! This is fantastic. Can’t wait to redo all my windows!
I love that fabric, and your shades look great. But… I checked out the website to order some fabric myself, and $158 PER YARD??? Whoever priced this should be shot. Honestly, WTF, indeed.
Wow! This is incredible – can’t wait to try it!
What do you do with the strings at the bottom before you glue the bottom piece on?
This looks like a great idea, but I have a few questions. How much time did it take to do one window shade? The mini-blinds are annoying, dusty and not very warm, so I have been looking at insulated curtains to improve the warmth in our home. Do you think that this type of treatment helps improve window insulation, especially if the right fabric is used? Is there a problem with the material being pulled off of the top? How would you wash it? Thank you!
I just completed this craft yesterday and I really enjoyed this tutorial. My one question though that this blog nor any of the other tutorials I have read address is once you snap the blinds back into their brackets… How do you get that little plastic square that holds the blinds in the brackets back in?
I have the same kind of blinds. What did you end up doing to solve this? I just need to glue the slats on and I’m ready to hang! I also don’t quite understand where the pull strings will go….
I’m thinking about using velcro on the top…so I install with the brackets, then wrap the fabric and velcro to the top, I’m just not sure it will work.
absolute genius !!!!!!!! i have blind on 2 rooms of windows and am now going to turn those into shades . thank you for a great tutorial.
much easier than traditional method
The Roman blind instructions seem doable. I plan to make these blinds for my new kitchen.
I tried this and was wondering if I pulled the steering too tight when going the fabric, I seems very taught against it and doesn’t seem to fold right? My window is 38 inches long and I only saved 3 slats so they are about 9.5 inches apart. Was that too far?
Do you think this could be done using a cordless lift blind instead?!
http://www.intercrownusa.com/Cordless/Style
Hmmm, I think so? I’m not sure why it wouldn’t work?
I love love his idea! Of. Course I am going to have to read this several times because a little confused on the cords to cut. I love the fabric you chose also. Thank you, cant wait to try it.
I tried doing this with a cordless blind and it was a total fail! Once I cut the support lines the blind just shortened up and would not stay open.
Beautiful job. Can this be done with the new mini blinds that have no pull cord? They’ve eliminated them due to strangulation hazards so now you just push the blinds up and they stick to open. Not sure if that feature would remain once you cut the cords. Thanks!
Very beautiful! I have shibori dye of linen shades and paper that are inexpensive and not so much work than this plastic blind project.
They look super nice! I did follow all the instructions for this project. However, it seems that the chords for opening and closing the shade hang behind, close to the window, and not in front. This poses an awkward problem for opening and closing because the chord gets caught on the slats as you pull it up. Is this the way it is supposed to be or did I make a mistake? If this is the case, it seems that I will leave them partially open always, and for privacy, cover the window (since it was for a bathroom) with this privacy transparent contact paper that I have seen at Lowe’s. So this project produces blinds that are for decoration and not really functional, unless I made a mistake – which is possible! Please let me know. Thanks!
Hi Erica, Where did you source the marbled Dye Blue & White fabric?
Thanks for sharing. A good number of nursing students have perfected the art of procrastinating. At our writing company, we understand the ordeal of nursing scholars. This is why we offer BSN, MSN, and DNP coursework writing help .
This is awesome, thanks so much for sharing. I am wondering what sort of adjustments I would have to make to use the cordless blinds instead of corded ones.
I loved this.. I am going to try this with my kitchen window. However I do have 2 living room windows that are 35 wide x64 tall and the fabric is a bit on a heavier side too. Do you recommend this for larger window too?
I simply love this idea and really want to use it in my home, but my big question is, how do I wash it? We live in a very windy/dusty are and my blinds just do not stay clean.
Hi. So I tried the tutorial to the letter. My shades look so bad I’m crying from laughter. Not sure where I went wrong, but they definitely don’t “pleat” like that. Happy to send a pic to share the joyous fail!
Wonderful project, you are very creative! Would a hot glue gun work in place of fabric glue?
I don’t know about glue but I know a friend used dowels instead of blind slats and used the top and bottom of a cordless blind, then she put little white rings on the back to run the dowels through. She started out with roman shade tube tape. I ran across another website that also use rings and dowels. Here is the web address, alwaysmakingthings.com/make-dyi-cordless-roman-shades/
I am going to combine the best or both sites to make my roman shades. I love the way this lady explained and showed the various steps. Now to get busy!
I can’t seem to find corded miniblinds anymore as they are considered safety hazards. Can I use cordless? Thnxj
This looks a bit intimidating, but I have 3 bathroom windows and my kitchen window, so I think I’m going to give this a go!
I am doing this for the first time & was wondering if I could just remove the individual blinds from the ladder which I do not need, leaving only the 10 blinds I do need connected to the ladder?
Thanks!! Going to try the Roman shades !! very helpful.
Can’t you just like break or cut the slats you don’t need off? Instead of taking that bottom piece off and all that?
Excellent idea. Do you have any idea how much weight it will hold?
I’m making thermal black out curtains, approx: 38″ x 60″,