Growing up by the beach in Southern California, the ability to knot a macrame bracelet was practically a right of passage. Although those days are long behind us, we’ve never forgotten the ever-so-simple square knot technique. This time, however, we’re replacing hemp and wooden beads for more updated elements like colorful nylon cord and glossy metal charms. Happy knotting!

You’ll need:
- 4 yards of 0.5mm chinese knotting cord
- a connector or charm or charm
- an embroidery needle
- a pair of scissors
- flat nose pliers (optional)
- a lighter (optional)

Start by cutting the knotting cord into two 30 inch, two 20 inch and one 10 inch lengths. Fold the 20 inch piece in half, pull the loop through the ring, fold it over the ring, and pull the rest of the cord through the loop. Repeat the step on the other side of the ring. These strands will be anchored and remain stationary.

Center the 30 inch cord under the two middle strands. Fold the right cord over the middle strands and under the left cord. Pull the left cord under the right and middle strands and through the loop on the right side.

Pull tightly and slide the knot up to the top.

Finish the 2nd half of the square knot by folding the left cord over the middle strands and under the right cord. Pull the right cord under the left and middle strands and through the loop on the left side.

Pull tightly and repeat the steps – left, right, left, right . . . Continue knotting until the desired length is reached. Keep in mind that the clasp will take up approximately half an inch.

To finish the knots, thread one of the cords onto a needle and sew up the center of 3-4 knots along the backside. Pliers will help pull the needle through the tight knots.

Repeat the same step on the other cord.

After sewing up both knotting cords, trim away any excess. Save the scraps and melt the tips with a lighter to seal it for extra hold. Repeat the same exact step on the second half of the bracelet.

To make a sliding closure, shape the bracelet into a circle and overlap the middle strands. Use scraps to temporarily tie the cords together at each end.

Take the 10 inch cord and center it under the strands. Start tying square knots exactly the same way the bracelet was executed.

Stop at about half an inch and sew the knotting cords into the backside of the closure. Remove the temporary ties.

The two sets of middle strands are now the adjustable ties of the bracelet. Adjust to fit the wrist and tie each end into knots. Trim away any excess.

Your adjustable knotted bracelets are finished!! xx

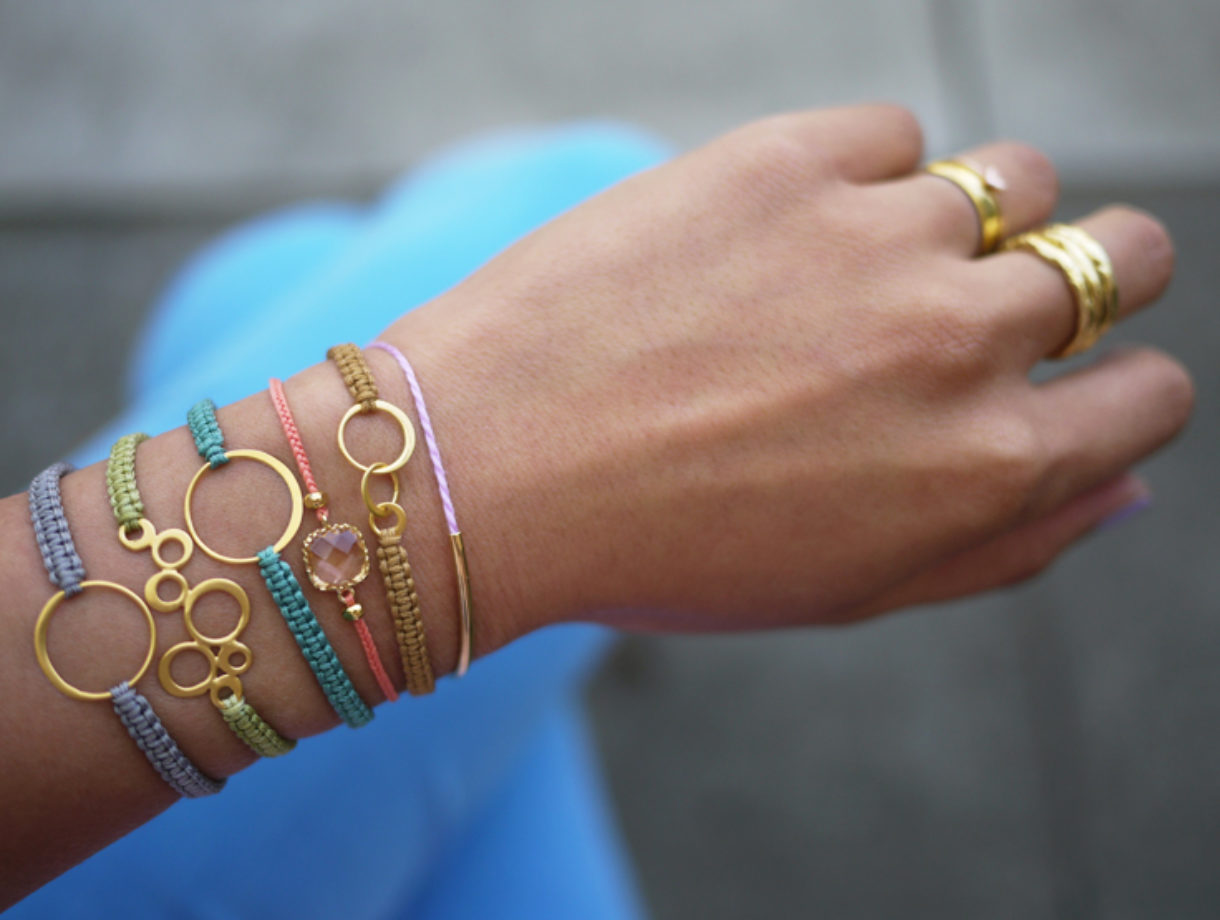
(HonestlyWTF DIY bracelets & Tai pink crystal bracelet; Mr. Kate & Catbird rings; all images by HonestlyWTF)
Really awesome. I like it :D!
Those bracelets look lovely! I used to this when I was little! x
http://thedamselinadress.blogspot.com/
Really nice idea guys! 🙂
xoxo
http://natashafatah.com
Looks so (!) beautiful.
Oh God!! These are gorgeous!!!
Wow, this is amazing! Everything was well explained, thanks for the tutorial!
I love your designs! They are wonderful!
New DIY: http://detrasdellabial.blogspot.com.es/2012/04/diy-camisa-de-blonda.html
LOVE! These are delightful.
x
Michelle
http://www.michellesstylefile.blogspot.com
love it!!!!
http://bonnieclydemarni.blogspot.com/
I have to make them…they’re too nice!!
xoxo
http://www.sparklyfashion.com/
Wow, these bracelets look amazing!! I’m definitely going to try to make them myself!!
xoxo
Andrea
Wonderful and Marvelous
brilliant!
Bises,
monkeyshines
http://monkeyshines-monkeyshines.blogspot.com/
So cool! Gonna try this myself!!
Xoxo
http://www.lolitainthemix.blogspot.com
Lovely! Is the braclet with the crystal homemade as well? I’d love to make my own with the crystal as a connector but I can’t seem to find it. Thanks for your amazing DIY’s!
Love them! Thanks for the tutorial!
Sarah
http://www.tellhershesdreaming.com
this is so lovely!
january, x
jessicajanuary.com
I love these. Very cool!
Cheyvonne<3
http://www.stylishabits.blogspot.com
I totally remember making these bracelets as a child and it’s nice to see that I can bring back my mad skills in a totally updated and chic way! Great tutorial!
http://www.cositabella.com
These are beautiful, I love them in all of the different colors.
Vintagehoneybee.blogspot.com
These are beautiful, I love them in all of the different colors. I’m going to try this with some vintage pieces.
Vintagehoneybee.blogspot.com
This is too complex for my duckie brain but I’ve decided, I’m going to give it a go!!! Uh-mazing.
I love those! I want to make them too but I’m not sure about the last steps.
Beautiful! I so gotta try this! Much more grown-up looking than friendship bracelets!
These look so pretty together. I love the gold metal details.
xoxo
http://www.thewrittenrunway.com
Love that! Simple yet gorgeous!
Beautiful, thanks for sharing!
http://aurelieandangelo.com/
i’ve been wanting to know how to make these! thanks girls! xox em
This is amazing!! I love it!
Do you sell these?
So making it!!! Pretty!! xoxo
http://www.hellohellofriday.com/
ahh i’ve been looking to find this tutorial for a while! thanks!
http://www.tseparfait.com
These are amazing, definitely want to try them!
As someone who spend a lot of time at summer camp, I too am well versed in many knotting techniques <3 I never thought I would still be doing it in my 20's! This would look really cute paired with jewelry from Mr. Kate.
http://mostlyclothes-cristina.blogspot.com/
Your DIY are just AMAZING!! Im gonna try this one out soon 😀
http://madein1987.com
These are really really pretty!
http://www.azrakunworld.com
this is a really great DIY ! i’ll do it for sure. thanx for showing.
http://www.rollolollo.com
these are beautiful! Too bad these weren’t the friendship bracelets we gave out when we were in grade school!
Awesome! I’m DIY-incapable but I think I can pull this one off! Where do you suggest us buy the pretty gold rings and charms?
Pretty! I love pastel palette with touches of gold. Beautiful bracelets!
Hey, do you think you could use embroidery floss for these as well as the nylon cord?
I used to do those, but the bracelet keep turning on itself.. maybe I am tightening it too much..?
Beautiful diy as usual! Thanks a lot for the inspiration
Awesome! I need to try these! Thanks!!
http://www.thegirlson23rd.wordpress.com
omg I am OBSESSED with this totally trying ASAP! thank youuu ; )
http://www.dragonnfruit.com
so beautiful
These are beautiful!
http://stainsofpaint.blogspot.com/
I used to do these knots when I was little too! Totally forgot about how to do them until now…and then it all came back to me! Thanks so much for this lovely DIY! I’ve always wanted to make bracelets with the rings! 🙂
these are lovely, but could we have a DIY for the lavender one with the thin gold tube? Thanks!
I have been doing the same things, but with adding beads on the cords 🙂 easy&nice
http://www.aztecsilver.blogspot.com/
Very nice! I use that knot a lot http://www.etsy.com/shop/carnivallab
soo cool idea! thanks!)
http://martelll.blogspot.com/
Love the bracelets! Where can I get the beads with gold?
Thanks!
Cute DIY! 😀
With love,Mia
Wow! These are amazing! In love with the gold rings. Such a nice added touch! Cannot wait to try this out!
LOVE per usual.
Collections
Wow these are amazing! In LOVE with the gold rings. Such a great idea! Can’t wait to try this out! Great post guys!
LOVE IT!
I love, love, LOVE IT!
http://www.atitelavoyacontar.blogspot.com
Love Love Love! when i will have a spare time i will definitely will make some of these 🙂
very inspiring, thanks for being so generous with your creativity
Love these!
http://www.flairbybrandi.blogspot.com
Brandi
So beautiful! I wouldn’t have the patience to make it myself and therefore I admire your skill even more!
Your links for ring, connector and charm show item not found. I love your findings but need the resource please.
Fun and beautiful!
I’ve been googling for double-ended charms like the one in the photo (love!), but I can’t find anything like it. Where do I find a stone or charm with a ring for attachment on opposite sides?
Love it !! Thanks for sharing ♥
these are really beautiful! my next DIY project!
http://www.miouprincesslovespink.blogspot.com
I love this DIY & of course, now that hardware’s sold out on your link! – Aliya
http://marantphiles.com
I love these bracelets!! Definitely doing this very very soon!
x
http://iloveublank.blogspot.com/
THanks for the link to our site, that’s awesome…
The site has had a few glitches, try again later today & it will be fixed
Thanks again!
Lisa Kaufman @ Baubles & BEads
I’m so in love with this site.. sigh
This is amazing! I’ll be making so many of these!
these are gorgeous
that is a really cool idea. simple yet chic!
love love these! I would like to make mine with a very sparkly connector!
These are super cute! I was wondering would it be possible to make these out of embroidery thread?
Pretty, pretty DIY! Thanks for the inspiration 😉
xoxo
these would look perfect on my wrist….please sell! 🙂
http://mybabykins.com
where can I buy the rings? resources please.
@sylvia @erin gold rings used in the bracelets are linked to above in the supply list. good luck!
So these are gorgeous but…where did you get the great gold rings and gem?!
Cuuuuuuute! So doing this! Love how simple it is. And the grey and gold look gorgeous together.
Love this DIY. So easy but the finished product still looks luxe. Hunter Style approved!
Looks to easy, thats another DIY from you that I can add to my must do list.
Love it! Cant wait to try.
I love this idea, gorgeous!
great inspiration! i love your blog!
http://mademoiselletralalala.blogspot.com/
super cute. love this 🙂
glamDevils
I’ll be trying this one out !
Want to follow each other? : http://letstalksomefashion.blogspot.com/
Thats really beautful! Im definetely gonna try this =)
These are so pretty! Thanks for sharing with us how to make them!
http://www.themirroronthewall.com/
I love these bracelets. Thank you for the link to the amazing knotting cord, cant decide which colours I want.
Amazing site, love all your DIY bracelets.
holy crap freaking awesome
http://youngandimpressionablee.blogspot.com.au/
xx
So fun! I am pinning these to make on a rainy day. Thanks for sharing 🙂
Very nice craft!!
http://mentirosas.es
oohhh God you are fuckin’ talented!!! I love it;) they are beautiful!
xx alex
http://www.placetrends.blogspot.com
http://www.placetrends.blogspot.com
http://www.placetrends.blogspot.com
simply perfect!
Love them!! Should you decide to sell these, please let me know!
Sprucing up an old fav. Awesome!
Hi, These are just awesome.!! Can you tell me what kind of material the cord is? Cotton, or nylon? Thanks a bunch!
@jackie, it’s nylon. link is above in the supply list!
this is gorgeous, great new project for me!
xoxo
ketchembunnies.blogspot.com
So Cool!!
Thank you for sharing it!!
http://robertascoolestplaces.blogspot.com.es/
this is amazing! i’m so going to do this!
I love this! I totally remember making these bracelets out of hemp. I like the cord much better 🙂
http://www.stylingmylife.com
Oh Wow ! These are utterly divine.. like DIVINE! definitely trying these!
SSSx
http://www.stylestreetstalker.com
LOVE THEM!! can you buy these??? Don’t have the dextarity in the fingers to do this. :o)
Thank you for sharing, these are great! Here is another idea on DIY bracelet http://bit.ly/H5Ig02 and necklace http://bit.ly/HAqEZ7
Love this! I’ve always loved making bracelets, definitely will try this design!
Amazing! Love these!
xoxo,
colormenana.blogspot.com
I’m completely addicted to all of your fabu D.I.Y projects. I really love the coral-pink one you created – so pretty! Want it.
Satisfy Your Cravings For Celebrity Style and All Things Stylish and Sweet
I love these! Do you have a DIY for the peach and lavender colored bracelets? Or how were those made?
wack
These are perfect! Love!
Love love love..thanks for always sharing the best DIY’s
Your DIYs are always the best!!!
SO AWESOME:)
Great Tutorial have been looking for some good pictures showing it for ages !
http://girlwiththeskullscarf.blogspot.co.uk/
The finished product look nice ! Might try this.
Brilliant – love it! But where do you get the gold links from? Jox
beautiful, I love how crisp and neat they are. Thanks
I appreciate this tutorial so much; thanks for sharing! I tried one with embroidery floss since I didn’t have enough silk cord. It doesn’t look as polished/glossy because of the thread, but it captures the overall effect.
Some questions: what do you do with the hanging adjustable threads? I kind of wrapped it around the bracelet but it doesn’t look good.. and my adjusted size keeps slipping. The coral and lavender bracelets inspired me to find crystals/accents for my own variations… did you also make adjustable bands for those?
I love these! They look so cute!
Lesley
byporchlight.blogspot.com
Erica- I am IN LOVE with these. Question though- I know you linked the rings, but where can we find the gold tube and the faceted stone? They are beautiful as well and they are great contrast with the gold rings.
HAHA, nevermind, I just read the photo caption and got all the information that I needed. Thanks!
Wow, these are gorgeous!! I love them. c:
kookyquirkycute.blogspot.com
xx
Thank you for the instructions. Thank you especially for links to the supplies for this project.
Omg your diy’s are by far the best online!
This one is, again, super! I will try it asap!
PERFECT! Thank you for the generosity!
Спасибо за идею!! к лету кучу цветных браслетиков можно наплести))))
where can I find the stone link used in the peachy colored bracelet? been searching the web but can’t seem to find them. saw your links in the supply list above, but only for the gold ring components. could you please post where I could find the other? thank you!! love the idea!
Hi Erica!
Just wanted to say thanks so much for this DIY. I just made a bracelet, and I’m super happy with it! Wish I could send you a photo of it because I love it so much! Can’t wait to make an armload!
A fan,
Sabrina
P.S. your directions were super easy to follow. :)!!!!!
This is amazing, thank you so much for sharing! The bracelets are absolutely gorgeous, can’t wait to give it a now. !
Can I make an order?
This is so cool! I tried it 😀
These are amazing, I love them! Can’t wait to make them!
http://www.vintageteesandhomemadecheese.com
OMG!!! I need to do them!! They’re soooo beautiful!!! 😉
sooo beatiful bracelets! i did..:) http://gkdone.blogspot.com/2012/05/bracelets-vol7.html
Where did you find the centerpieces? I love the one that looks like bubbles or different size circles. Please let me know. “
I love the bracelets. I am so excited !!!!!!!
Your diy’s are amazing!
I’m willing to do those and sell them in a flea market to raise funds for a dog shelter.
I hope you don’t mind.
Love the tutorial – I made 4 of them yesterday as Mother’s day gifts 🙂 Where do you get your charms?
wow…brings back memories! they’re beautiful! thanx for sharing it! there will be alot of people wearing these!!!
These are great bracelets! I love how you made things look easy to do!
Annabella Merlin
Creative Photo Albums
Love the pink one! And great tutorial. Thank you! Fanny
These bracelets are really chic!
http://lesjolieschosesbypaulette.blogspot.it/
love your collection – simple and fun colors….how and where can i get these – thanx
bellisimo y facil
thats a dream … love to try it .. when i was in young age i did macramee …
Lovely!!
kiss
http://mywhiteidea.blogspot.com.es/
Do u sell them? They are awesome!
i made them! its awesome
they are amazing they made me shocked cuz again they are amazing congratulations desinger of them
Erica, I see a lot of people have been asking about the crystal connector. Could you please tell us where to find this? I looked at the site you connect to in the caption, but they do not carry them. Thanks!
@Joan, the crystal bracelet was purchased. It is made by Tai. Unfortunately, I haven’t been able to find a “crystal connector” similar . . . good luck!
I made these and LOVE the way they came out! I posted about it on my blog! Thanks for the great post!
I actually had a hard time finding these charms too, so instead of using crystal connectors, I used old dangle earrings that I never wore. You can see what mine looked like with recycled jewelry here:
http://cookieswithcronkite.com/bracelets/
Great tutorial! Can’t wait to go home and make these. Thanks for posting where you got your materials. I really love the stone bracelet in the photograph. Did you make that yourself as well? If so, where did you get the stone?
Thanks again for the great post!!!
Wow, those were just absolutely stunning!
These are amazing, I’d absolutely love to make one like the orange crystal bracelet. Where would i get a connector like that? And more importantly, how do i do that?
THESE BRACELETS ARE SO CUTE , WHERE CAN I BUY THE GOLD RINGS AND GEM ?
I love these bracelets they are fab, do you have a tutorial for some of the other bracelets in the picture too? Especially the thin lilac one on the end. Thank you x
I made one for my mama using hemp twine and an old silver earring that I loved but never wore any more. She loved and I had a hard time giving it away! Good thing earrings come in twos…
Thanks for the reply Erica! 🙂
This are really cute, I’m gonna make one. This is very easy to do.
Where did you find the charm that has the clear stone? I love it!
Where did you get the charm with the clear stone? I love it!
I remember making these in girl scout camp! Oddly enough, I have a huge desire to make them again!
Exquisite! Lovely friendship gift for males and females. Thanks for sharing!
Thank you for this! How did you make the lavender bracelet? I’ve googled for instructions but can’t find them anywhere! Or did you purchase that cord already twisted like that, and just use the connector to cover the knot?
Great DIY… FYI for those asking, you can get the double ended crystals on Etsy. I bought 2 coral ones like the one pictured for about 5 bucks. 🙂
Thanks so much for sharing this! I just made two and am loving them!
bonjour;
Merci de partager ce tutoriel
nadia de Guadeloupe
really helpful..thanks!!!!!!!!!!!!!!!!!!!!!!!!!!!!!!!!!!!!!!!!
I am not handy but would love to buy .where can I find them?
I like to wear such bracelets. Very original works. Thanks 😉 http://www.cigs4girls.net/
Great!
Thank you for sharing. I will try to make one or more 🙂
This is a great tutorial, thanks for sharing. I’m going to make my girlfriend one today! xoxo for you Erica.
Wonderful design!!! Is the crystal in the pink bracelet homemade or is it online? I would love to make this type of bracelet with the crystal!!!
Will someone please make these to sell!!!! There is no way I could do this. My fingers don’t work like that any longer.
Hey there. These are so beautiful. I grew up in So Cal too and never learned how to do this.
Can I PM you and ask you a question about connecting your blog to pinterest. I love your stuff and see that you do a lot of that. Thanks!
P.S. I grew up in the South Bay, went to high school in Manhattan Beach. You?
Any other suggestions of where to buy the cord? Every color I chose was out of stock! It seems like a hard size to find. Thank you!
Hey there, these are awesome! The web site selling the cord also sells different sizes. Have you ever used the 0.8mm-1mm cord? Does it come out the same?
Thanks!
Hi – I also wanted to make the orange colored bracelet that you have shown here, where did you get the piece that’s in the middle?
That looks wonderfull and easy to make.I think i can easily find the strings but i don’t know about the rings.
I’ll keep you in my bookmarks. thanks!
I just made these with Embroidery thread and it worked well. A very cheap alternative. Michaels sells that for .35 and I used and old washer for the connector. Michaels also sold things that could be used if you don’t like the industrial/antique look. I also used a heavier cord and and tiny old skeleton key. Im not very crafty but they were easy to make.
love it – posted a link on facebook – great job – http://www.facebook.com/pages/Partycraft-Secrets/239045209469228 – going to try thi for a teenagers party craft!
These are awesome. Thanks for sharing!
tks for sharing!
Love these and can’t wait to make them. I found a bunch of lovely connectors (like the pink crystal one) on Etsy.
These are really good… I will definitely try it out… Thanks!
http://beelineclothings.blogspot.com
This certainly brought back memories. I love these! I can’t wait to see if I still have the macramé gene. Thanks for sharing.
Love your tutorial!
Perfect tutorial! Easy to follow and adorable outcome =)
Macrame was my first jewelry love! I turned to wire since the nylon cord didn’t hang well as a necklace, but this project turned me back on to this old macrame knot. You can find most of what you need on Fire Mountain Gems or Rio Grande (you have to buy a catalog..but it is one of the biggest sites to buy jewelry supplies!) under findings.
i would also like to know where you find the centerpieces? I love the one that looks like bubbles or different size circles.
Made some of these last night, they turned out super cute!!! My son and I made them for some of his little friends at school. We had a great time, they are really easy and the connectors we found at the local bead shop worked great!! Thanks for the tutorial!
Love the bracelets, thank you for tutorial. The links are referenced above.
cord: http://www.tanglesnknots.com/chinese_knotting_cord_or_nylon_braided_cord
ring/connector: http://baublesandbeads.com/
thank you!! anthro is selling these but i would SO rather make my own!
Gaaaaa! Looove these. Walking to Michael’s for supplies in 3-2-1. Thanks.
Once I saw these I placed an order 😀
They look amazing!
And you can also use whatever you have instead of buying something new.
I used pieces from old bracelets and necklaces and they turned out amazing!
Thank you so much for sharing this with us <3
OMG- that is soo amazing!!! I’ve always known how to the square-knot macrame thingy, but this is such a good idea!!!
I made them,they’re so pretty!!! linked back to this post! xo
http://miouprincesslovespink.blogspot.gr/2012/06/diy-square-knot-macrame-bracelets-1.html
I like everyone else, LOVE these bracelets. I’m on my second one now! I’m using hemp cording (only colors that I could find at Michaels :-/) I plan on ordering from the website you suggested. What colors did you use? Thanks again for the DIY tutorial!
I would love a bunch of these does anyone make them??? please let me know!!! thanks!
Does anybody make these and sell them…like you Erica 😉 I need want and have to have them! Please say you know where I can buy them from!
Love these so much! I never realized how easy they were to make – thanks for the inspiration and the tutorial!!
Sarah
smalltowncatwalk.blogspot.ca
where did you get the gemstone charm that you have on the coral bracelet? ive found all of the other supplies online but can’t find anything like that. let me know!
hey everyone! you can find the glass stone charms (like the one on the coral bracelet) and many similar items at this etsy shop! http://www.etsy.com/shop/SoJewelish?section_id=8050222
Gracias! me encanta!!
Thanks, I love it!
=)
would make a great gift for my girl friend…now all i gota do is find one! 😛
Tutoriel super, bien détaillé.
Je me lance pendant les vacances !
Thanks !
I made something like this, and the knots were called Chinese knots. :3 I really like that small, coral-pink one you’re wearing.
I just made my first one but I couldn’t find the chinese knotting cord in my town. I used bamboo cord instead and looks pretty but was difficult to thread through the knots at the end. Does it make a big difference to use the Chinese knotting cord? If so I will order it from your linked website. Thanks so much for your great step by step tutorial!
I’m going to be traveling for 30 days, I’m going to use that time to teach myself how to do this. Ever since I saw this I’ve been hoarding little loops and things to make them.
I can’t tie the knot at the end 🙁
bonitas y faciles de hacer gracias
What a fab tutorial, and they look fantatsic. I’ve never made anything like this and would love to give it a try.
Hi! Thank you so much for this easy-to-follow tutorial, I have never done this sort of knotting but you broke the process down into really easy steps, and I’ve just made my first bracelet, using waxed cotton cord. Last week I made an Olympics rings symbol with embroidery thread crocheted around five plastic rings, using this method: http://www.craftstylish.com/item/9676/how-to-make-a-crocheted-ring-bracelet , so I wanted a simple way to make it into a bracelet.
Thank you again!
Gorgeous!!! I have to make these……immediately! A question; what size Chinese cord did you use? In millimeter size? Thanks!!! I can’t WAIT to start on these beauties.
If you’re looking for crystal charms like that check etsy!!! I found similar ones!
Can’t wait to try! Does it have to be .5 mm knotting cord?
Thank you- your tutorial is so clear, the photos are fabulous, and your bracelets are divine.
What a great ideea!! Thank you for that. I like DIY things, they are so unique.
You might like to check the DIY necklace I made: http://www.readdresstravel.blogspot.com/
Valeria
fresh inspiration
Oooo! So cool and hip! I am looking forward to making some of my own! 🙂
http://www.etsy.com/shop/GorgJunkie/about/
I love these, thanks so much. So simple to make.
I have already had a go!
http://furiousbakesandmakes.blogspot.co.uk/2012/07/bracelet-make.html
thanks
xxx
Awesomeee bracelets!
Check out my Etsy shop for macrame, stacking and woven chain bracelets :
http://www.etsy.com/shop/UrbanTrend
-xx
Absolutely love!! Will be doing this real soon!!! Thank you!!
Growing up my sisters and I would spend our summers making friendship bracelets for each other and our friends. I love this grown-up version and am looking forward to bringing the tradition back! Thanks for the great idea!
These bracelets are lovely. Have you ever tried making belts doing macrame? I used to make handbags, belts and bracelets doing macrame. It’s been a while since I’ve created something with macrame. You are very creative. Keep up the good works. 🙂
i love your DIY tutorials they are truly an inspiration. I will definitely try some of these projects! Keep sharing!
Gracias Erica por las imágenes y las explicaciones!!!!
Ha sido un tutorial muy útil.
Gracias!!!! 😉
Love these bracelets, can’t wait to try these out. Great summer jewelry. Thank you so much for sharing this tutorial with us!
so cool!
Love these. I am having a hard time finding the crystal charm on the third bracelet up the arm. Can you give me any suggestions? thanks!!
Finally finished a light blue one with the gold circle connector – oh my aching fingers! Had to quit several times because threading my needle was crazy hard. Turned out cute! thank you!
love the brclete and the charms in the middle so cool would the style work with normal floss thread?
I remember as a teen, I could make one of these in literally 15-20 minutes, using necklace and earing charms from garage sale costume jewelry and hardware store cord! One of a kind bracelets for a few cents. Memories. Thank you!
I highly recommend learning to make a macramé buckle, for the serious wearer.
Hello
I like too much what you.pleas I need too talk more with you business .I give you my personnel mail.
Berytos-artphenicien@hotmail.com
I’m waitting your mail.
Best regards!
Zeina Marie du boishamon.
excellent DIY! Can I please ask where is best to find nice quality slim connector rings like in the picture shown – I have looked onlinen and in a few craft shops, but either cannot find any, or else they appear bad quality. I am in the (uk) Thanks so much!:) x x x
Hi
Great tutorial. Can’t wait to try it. Where can I find out how to make the peachy coloured bracelet in the main picture? The one with the gem stone? It looks different from all the rest.
Thanks
Hello from Spain! I love all that you do.
Where did you buy all the stuff that you use?
Thanks for all that you show me 😉
You don’t how long I had been looking for a tutorial on the subject. Many thanks.
It is presented clearly and beautifully!
simple..you give me a idea
Awesome. Awesome. Awesome. Bookmarked!
just wondering what kind of cord was used for the charm with the stone in the middle. It looks thinner than the chinese knotting cord.
beautiful and easy!!! gotta trey it fast!
thnx!
http://www.thestylistpost,com
Love your bracelets!! May I ask where you purchase the double ended charms and rings? Would love to make these for family and friends. My granddaughters & I love to do crafts together and these would be perfect!
Oh wow, those bracelets are just gorgeous! I will definitely be bookmarking this, so I can try it myself later! Thanks so much for posting this.
(I know two little nieces that will adore a couple of these for Christmas.)
where do you buy the charms?
nice pictures and clear instructions. I always have a problem threading the end strings back through, but I love these bracelets so much, I’ll give it another go!
You could probably try vintaj.com or ornamentea.com for all the findings and bits and pieces.
my Zara necklace DIY ——> http://gkdone.blogspot.com/2012/08/inspiration-zara-necklace.html
Just made one, took me less than an hour and it was very easy. Thanks so much for posting all these DIY instructions, it is so inspiring (am gonna try more bracelets soon)!
Cool,very good idea!!
I really like the 3rd small, pink/orange one! It’s beautifull, but this site doesn’t say how to make it. Can anyone tell me? 🙂
omg!! they r so damn cool :o…so cnt wait 2 try t out i hope t cums out well..thnx 😉
its really wonderful… I like it..
Ita really wonderful… I like it
/jobopeningindia.blogspot.in/
Awesome.
I really enjoyed reading your blog and testing the instructions. I achieved great results and wrote about it in my blog.
http://212twoonetwo.wordpress.com/2012/08/14/macrame-bracelets/
Ich kann es jedem nur empfehlen, auch ohne teueres Material erschafft man wunderschöne Armbänder!
AHHHHHH-maaaazing! Love this site, love love love the tutorials! …what size charms (little circles & the quartz jewel) were used for the macrame bracelets??
Hi! What do you call the pendant that looks like glass sort of? The one that isn’t gold!
Cool!! And look my item!
https://www.etsy.com/listing/107757367/purple-soft-hemp-rope-handmade-lucky
Any jewelry making store should have charms and such like that. Those stores are everywhere and they could probably help with any questions that you have about the diy.
how do you keep the bracelet from turning on its self while making it? It’s really annoying! Am I making it too tight?
i know how to do that
LOVE! LOVE! LOVE! Going out tonight to get suppies, no doubt:) SO MAKING THIS!!!!!!!!!!!!!!!:)
Any chance you are selling bracelets like these? Or know where similar ones could be purchased?? Love them and would be the perfect gift for my friend and I just dont have the time to get supplies and make them! Thank you!!!
patience and the beauty will follow …
Where can you buy the charms for the bracelets?
Soo love this!!! Just learned this technique and need to make this
LOVE these bracelets. Could you possibly tell me where you got your charms/circles? I would love to make these in silver. thanks
These are so pretty! Definitely inspired to jump back on the macramé train
Great. Just made my first one. Made those when i was young but couldn’t remember how to make them. Thanks for the instruction!
Just a simple knot technique for amazing knotted bracelets For my daughter. Thank you!
This is absolutely beautiful!!
Hello, can I ask you which connector you have used ( 12mm, 19mm, 9mm or 16mm) ??
hope I hear from you
@Nisa, I used the 16mm half flat ring.
Just listed a few kits for these (I purchased the stuff not realizing how much you have to order of each color:
https://www.etsy.com/listing/111453153/kit-for-diy-macrame-bracelet
I already did but twists. I can do?
This is awesome! You’re so talented girl! Keep up the great work 🙂 <3
Can’t find the chinese cord locally. Have you ever used embroidery floss instead?
so cute <3
How do u get ur knots so perfect?! Mine are either too loose or a limitless crooked. Some look gook good but then the next few look bunched. Am I tying them too tight or not tight enough or could it be that I used a different thread?
I just finished making one of these using a sterling silver bezel gemstone connector . I remember having a macrame kit as a kid, but I never mastered the craft. This tutorial was easy to follow. And the end result is so nice! Can’t wait to make more. (-:
Thanks for posting!
Thanks for saying it was easy! I def want to try it this week but, was wondering if it was going to be easy to follow. =)
Lovely superb idea…i really like this ..nice post
Obsessed with these! So chic…and simplistic
wow, lovely very nice idea thanks
I love these, and this was easy to follow. My only problem is getting the needle through to tie it off. What type/size needle are you using?
Thank you so much!! i used this to make flag bracelets for my group for model UN. it’s really easily explained and i made 4 in an hour!!
This is adorable. I might make some for my friends. CUTE! xx
I just made my first one of these and love it so much! going to make them for christmas for my friends!
Will you please tell me the color of the second on the right bracelet (1st picture)?
wow! this is very beautiful. i really really love it and i will surely do it also.
I have a great question HOW DO I MAKE AMACRAME BRACELET WITHOUT THE IRNGS I DONT HAVE THOSE.I CAN’T BUY THEM, FOR I LIVE IN LOUISIANA!
@yh, you can make the macrame bracelet with any charm! as long as it has one or two holes…
wowwwwwwwwwwwwwwwwwwwwwwwwwwwwwwwwwwwwwwwwwwwwww
Its so beautifull
I dont know how can I say but this are very good
god help me I like make this
Excellent tutorial! I am definitely going to make one!
nice, make the other one please ^_^
nice, make more please 🙂 😛
Indeed! simply awesome! 🙂
/very nice. I loved!! 🙂 <3
PLEASE TELL ME WHERE I CAN BUY THESE!????
Where can I find the gold metal pieces?
@Bri, the gold metal pieces are linked to in the supply list. They can also be found here.
Can you make these using embroidery floss instead of macarame?
@Khadija embroidery floss might not work sine it’s too thin and it would be difficult to have the knots be consistently spaced.
Very nice, thanks for sharing.
@Khadija I made one using embroidery floss, and it worked. It wasn’t TOO thin and the knots were spaced evenly and looked good. However, I got in the Chinese knotting cord that was recommended, and there is a BIG difference in quality. I like it so much better. It adds a shine and makes the bracelet a little sturdier.
I love making these and yous are beautifull. I like to make them with a “dream catcher” center or design one to fit the customers requests, but i love the plane center ones you have designed. great tutorial also! Thanks for sharing.
I love the macrame but it is very hard to finish! could you guys please explain it more simply?
I love all your DIY
Your photo with your arm with all the bracelets is so cool! Realy Amazing love from Holland. I’m building a website just started to make bracelet for people in Holland, http://www.armbandjesknopen.nl/ you inspire me! Greetz Sandra
thanks for the instructions! i made a bracelet with black hemp. it was very easy and fast and looks great!
me encantan, gracias por compartir el tutorial
waoo so amazing and it,s really beauty full and i really like Bracelet make story ,……….:)
Hi! Thank you so much for these instructions. I love your bracelets! I made one and my thread does not stay flat. I did use embroidery floss. Is it turning b/c it is too thin/lightweight. I am hoping to find some Chinese knotting cord today. Thanks again!!
So so beatifull. i made for my daghters and myself and we love them. Thanks for perfect tutoreal.
Rosit
Thanks so much for this tutorial, i can’t wait to try- looks amazing! Does anyone have any idea where i can find chinese knotting cord in the uk??
I’m really enjoying making these, im using 0.8mm cord. After i finish the bracelet the ends stick out and looks kind of funny. Is there a way to fix it?
@Meeks, did you try burning the edges with a lighter?
I used to make macrame jewelry with hemp, wood beads, clay beads, in the 70s. They were way cool then! I love these updated versions & can’t wait to make them for my daughters & granddaughters!
really great..:)
I love these, like the other comments, I am going to have to try these, thanks for sharing
Can I buy these?
Wow I have been searching for a well-done tutorial…found it thank you. Grand kids have been asking for those bracelets. Now I will make them, I will be voted the coolest grand-ma ahahah
Awesome! Now i’m definitely gonna do it. Thanks!
Love those bracelets! Really pretty, need to do this sometime
Did it using regular cord. Turned out great. Been wanting to learn this knot for a long time. The adjustable clasp is a wonderful touch because I have tiny wrists and I hate when bracelets shift around. Definately gonna make a to of these to accessorize and gift. Thank you.
The pics aren’t working 🙁
Flashback to my elementary school days! Love it!
http://thevintagelibrary.blogspot.com/
hello…i am italian and this chinese knotting cord it’s difficult to find.
I want to know if it’s similar to that in the link. Can you help me?
thank you
http://it.aliexpress.com/item/U-Pick-High-Quanlity-1mm-140M-150yds-lot-Chinese-Knot-Beading-Shamballa-100-Nylon-Cord-NCN10/544271589.html
mari
There are no such original accessories in my country.
I wish there were more creative people like you!
Love these, where can i buy some?
Let me know Kathyt.1@live.com.au
Hi u saw this DIY on Pinterest and recently I learned how to do the knotting. But I have a question, where did you get those charms from, because I have been looking for them and I can’t find anything similar anywhere. If you could help me out please do. Thanks 🙂
@Ashley, the connectors & charms are linked to in the supply list. You can also find them here: http://baublesandbeads.com/store/category/10/239/Components-%26-Links/
love your work, brilliant! wanna try to make one this weekend. 🙂
love this! totally trying it. I have a connector ring similar to that which I’ve been dying to use in a project.
Finally! If you accept that Obama will also provide $4 billion retooling tax credits and loan guarantees for domestic automobile plants and parts manufacturers, so that the new fuel efficientcars can be made in the U.S. by domestic workers instead of overseas.
You actually make it seem so easy with your presentation but I find this topic to be actually something which I
think I would never understand. It seems too complex and
extremely broad for me. I am looking forward for
your next post, I will try to get the hang of it!
Love ittttttttttttttttttttttttttttttttttt
Nice creations!
In fact no matter if someone doesn’t understand after that its up to other viewers that they will assist, so here it occurs.
Very cute, but I’m not able!
Hmm is anyone else having problems with the images on this blog loading?
I’m trying to determine if its a problem on my end or if it’s the blog.
Any responses would be greatly appreciated.
Love these bracelets right now! I am in the middle of learning the technique and adding all kinds of different styles to my website on etsy. I will also be selling high quality wrap bracelets for a low low price.
please check out my website for affordable handmade jewelry https://www.etsy.com/shop/SabrinaBJewelry?ref=si_shop
Hi! All so beautiful, may I ask where you got that gem looking bead with the peach colored thread? Third from the right I believe? Thanks and keep the tutorials coming!
I love this bracelet DIY design
Hi 🙂
where did u get this circle bead?
thank you.
Hi , I’m a royal Canadian sea cadet and we use these knots. The official name is portugeuse senate.
wow
where you get all the DIY materialsssssss
wow i like it.improve the way of your presentation.that every one can understand easily.
thanks
i love the simplicity of these braclets. great for smaller wrist and more proportional. thanks for directions
Really, really like these, I’m going to have to try it, used to macrame when it was all the rage (showing my age) so I’ll probably remember how!
Excellent keen analytical eye with regard to fine detail and may foresee
complications just before these people occur.
Hi there! I could have sworn I’ve been to this website before but after checking through some of the post I realized it’s
new to me. Nonetheless, I’m definitely glad I found it and I’ll be book-marking and checking
back frequently!
I love it !!! I do these bracelets by my-self and I sell it. Let see my page on Facebook : https://www.facebook.com/MarjoCreationMacrame?ref=hl
I’ve made a few of these and I’m planning to make more to get the stacking effect. Just one question: Any ideas on how to wrangle the strings that stick out on the underside of your wrist? I think it makes these pretty bracelets look kind of tacky when they stick out like that. 🙁
from where i can buy those online ?
Adorei, são lindas gosto demais de peças com esse toque de delicadeza.
Thank you for this lovely tutorial. I cam across this post on stumble upon and loved it immediately. Very inspirational and can’t wait to get started on my one.
http://mydressroom.co.uk/blog/174/
VERY SIMPLE METHOD TO PREPARED IT
There are three required core courses, namely: (1)
“Soils for Environmental Professionlas” (2) “Environmental Soil, Water and Land Use” (3) “Forest and Soil Ecosystem”.
While a love of plants or nature inspires
cottage and Asian gardens, formal garden designs express the humanistic value of people as the center
of the cosmos. Though there are many companies that can assist
you in helping to maintain the beauty of your property and home, one should not choose the first company that is found.
Wow! These looks amazing. Glad you post a tutorial on this, I can try to make some for Christmas.
are so lovely and cute! love them all!! perfect diy 🙂
Great and easy to make!
oh my god I love these bracelets. Great tutorial, really easy to understand. Thanks for the tutorial. <3
Hi Erica, I just came across these and like all the other comments, I love them too.. just curious with the crystal bead what knotting cord did you use or what knot.. its nice and thin and chic! Different from the one you gave instructions on. ayluh70@gmail.com.. thank you in advance!
The closest I have done to this is a hanging pot holder in the 70’s when I was a kid. Now I will need glasses to do this project, how the years fly by. lol
http://www.youtube.com/watch?v=XLMxC21D6Co
Love the pattern in the rope.
Awesome tutorial, gorgeous!
!this bracelet is so beautiful! great job.. i like it..:)
leather more information
Good macrame tutorials can find here: http://www.youtube.com/user/macrameschool
magnificent points altogether, you just gained a brand new reader.
What would you suggest in regards to your publish that you made some days in the
past? Any sure?
Going to try soon as I find the thread. Looks pretty easy but looks can be deceiving. Lol
Thanks , I’ve recently been looking for information approximately this subject for a long time and yours is the
best I’ve discovered till now. But, what concerning the bottom line?
Are you positive about the source?
Here is my web site – ips for losing weight (Floyd)
I do consider all of the ideas you’ve presented to
your post. They are very convincing and can certainly work.
Still, the posts are very quick for starters.
May you please extend them a little from next time?
Thanks for the post.
Terrific work! This is the kind of information that
are supposed to be shared across the web. Shame on the seek engines for not positioning this submit higher!
Come on over and talk over with my web site . Thank you =)
Erica, I love these bracelets, look like the same they are selling for 20 bucks around the corner of my house.
It’s really amazing
Hi my friend! I want to say that this article is amazing, great written and
come with almost all important infos. I’d like to peer more
posts like this .
Hey I know this is off topic but I was wondering if you knew of any widgets I could add
to my blog that automatically tweet my newest twitter updates.
I’ve been looking for a plug-in like this for quite some time and
was hoping maybe you would have some experience
with something like this. Please let me know if you run into anything.
I truly enjoy reading your blog and I look forward to your new updates.
this is amazing!!!!!!!!!!
Fastidious respond in return of this difficulty with real arguments and describing everything about that.
Its really nice .
Simple amazing – your explanation of the steps is superb as well, I’m finishing up my first as I type so Thank you!
How cool! And they look simple enough that even someone like me could make it.
Hi,can I buy a kit from you or the rings/gems to make these ?
Your informational post is great resource to lots of peoples, so i would like to thank for creating this blog…
Nice weblog right here! Also your website quite a
bit up very fast! What host are you the usage of?
Can I get your affiliate hyperlink to your host?
I wish my web site loaded up as fast as yours lol
Thanks foor sharring your thoughts. I truly apprciate yourr efforts and
I am waiting for your further write ups thanks once again.
Stop by my homepage … stop going bald
Hello it’s me, I am also visiting this website regularly,
this website is actually fastidious and the users are genuinely sharing fastidious thoughts.
These will definitely be in my next blog post! Thanks for the great DIY!
Beautiful!!
Would love to know where to buy those connectors?
I’m from The Netherlands, maybe on Ebay??
Love the bracelets.
Would it be possible to show how the orange one is made. Thanks. X
Good inventions, but for girls. They like things like this
So many great projects not sure where to start!! Thank you!
Wonderful beat ! I wish to apprentice while you amend your web
site, how could i subscribe for a blog site?
The account helped me a acceptable deal. I had been tiny bit acquainted of
this your broadcast offered bright clear concept
Thank you for every other informative web site. Where else could
I am getting that type of information written in such an ideal approach?
I’ve a venture that I am simply now running on, and
I have been on the glance out for such info.
This is such an amazing post..Great invention. Lovin all these bracelets they’re all beautiful! Thanks for posting informative post!
it is so cute.i love the middle green one!
What size circle connector did you use? I would love to make these and don’t want to get one too small
It would be great if you could get back to me.
Thanks
Really cute, but perhaps a good addition would be to indicate the bracelet size you can make with the lengths of cords in the instructions. For taller (5.10) women with18 cm wrists, the lengths of cords are too short.
The amount of thread used in bracelets varies depending on the pattern. The smallest pattern, a double chain knot, requires two strings while the candy stripe can have as 3 or more strings depending on the desired thickness.
Pass4sure 70-412
Good day I would like to feature your bracelet idea in one of our books please get back to me as soon as you can so I can explain the situation further.
Regards
Hedwig
What’s up, all the time i used to check webpage posts here in the early hours in the break of
day, because i love to gain knowledge of more and more.
I love this DIY so much!
Thanks SO much!!! Remember making these with my friends when I was much younger (also cali grl) but it’s been so long I’ve forgot so thanks for the diy to remind me!
Thanks for this, I made my first macrame bracelet from this tutorial! I expanded it for three different coloured strands, I’m well happy 🙂
Just a quick note to say that if you position the second strand (the 30 inch one) through the loop of the first rather than just underneath it, it locks it into position and there’s no sliding around.
Thanks again 🙂
So creative..I love stuff like this
I love this tutorial so much that I included it on my DIY gift guide for this year! Here’s the link if you want to check it out: http://www.thehannahgold.com/2015/12/a-broke-fabulous-holiday-season-diy.html
I’ve made a few macramé in my day, but I’ve never seen a tutorial where the two threads get stitched back into the knots. So much more confident than all others that just snip, glue and cauterize the two working threads. Peace n love. Thank you
WOw, very creative design, and i love how it looks like after! I love this kinda of jewey DIYS. By the way, very good!
PandoraFlora
https://www.pandoraflora.com
Could you post instructions on the coral bracelet? Thank you, that would be great :o)
Nice idea.
Try Nylon Buy
http://trynylon.com/100237
I actually had a hard time finding these charms too, so instead of using crystal connectors, I used old dangle earrings that I never wore. You can see what mine looked like with recycled jewelry here:
http://www.goldbabybracelet.com/
Thank you so much for this tutorial on Macrame!
It helped a lot. My friend likes this kind of bracelet and I wanted to make him one.
And I have noticed that macrame is a little similar to Paracord bracelets.
Thanks again!
Emily
and because I don’t have that Chinese Knotting Cord I used a really thin Paracord and it works just as well but it will be a little thicker than normal
Wow! Simple, easy yet elegant. that is a nice DIY bracelet I would like to make..
Menaka Bharathi has recently published http://simpleindianmom.in/trending-20-minute-exercise-regime-exercises-included-and-advantages
I love them in every color. They are so cute, I need to make them.
http://www.everythingspiffy.com
Hello Erica, I was wondering if you would mind if I made these beautiful macrame bracelets to sell. I would sell only to friends and family, but if my “business” became successful enough, I would want to sell them on Etsy. Please let me know where to draw the line!
Thank you,
Melissa
So nice bracelet thank you very much
Congratulations, well that’s all you have described.
http://www.sash-windows.biz/
Thanks for the tutorial! The bracelet is gorgeous and I will try to make it 🙂
thanks for the great information
https://cysec-co.com
wow! how cute! I love these, good to get that arm party going!
Good article and fantastic information thanks a lot
Wonderful! the macrame bracelet is very beautiful.
hp customer service supports you to deal any problem you face with your any hp product . we have faith in quality and customer satisfaction.
Hp Customer Service
It’s truly a nice and useful piece of information.
I’m glad that you just shared this useful info with us.
Please keep us up to date like this. Thank you for sharing.
Stunning, fabulous, fun! Thank you!
Can you make them wider in width?
I loved these easy – to – follow instructions! Thankyou
Hi did you happen to know a Macrame artist in Dubai. We have our own beads. We want a few samples first for now. Any help will be greatly appreciated
Hi,
I LOVE these bracelets with the gold rings.
Thank you for sharing the pattern 🙂
Where do you buy your rings from? Can I get them online?
Thanks very much
Miriam
Beautiful!
You can buy them here https://www.demacrame.store/2019/06/pulseras-de-macrame.html
Thanks for this great tutorial! Helped me to replace the loose cording on a custom nameplate bracelet my Husband got me. Your pictures and examples are so beautiful.
Looks beautiful
the link for the connectors takes you to a security check website. Can you relink to a better website?
Yes, I’ve updated the list but you can find them here and here
Really cute!!!!
So cute! I would love to use this technique and make a mask chain. How long do you think I need to make the lengths of knotting cord for this longer chain? What proportion do you use when figuring out length of starting material vs length of completed piece? Thanks!
This did not help me at all! I found a way better site and they did it nothing like yours but it worked like it was so posed to!
Such a great collection!!!
Love it.
Engagement Rings adelaide
Pure Envy
love them so cute
Excellent tutorial
Very nice instructions and easy to follow. I do have one question though. For the sliding clasp how do you keep the part you sewed up from pulling out when you adjust the braclet? I did 6 knots for my closure and sewed up through 4 of them. Then I cut my string. As soon as I adjusted the braclet the string came out and the bottom knot loosened. Do you use a touch of glue or am I not understanding the technique?
Thank you for being so gracious in sharing how to make these bracelets. Someone can actually create a side business to help make extra money in these trying times. Cheers to you!!
i tryed the macrame bracelet and it looks amazing i love it
Thank you for the thorough tutorial. I tried a UTUBE tutorial, and I find myself lost. No explanation of the knots or how many.
Thank you