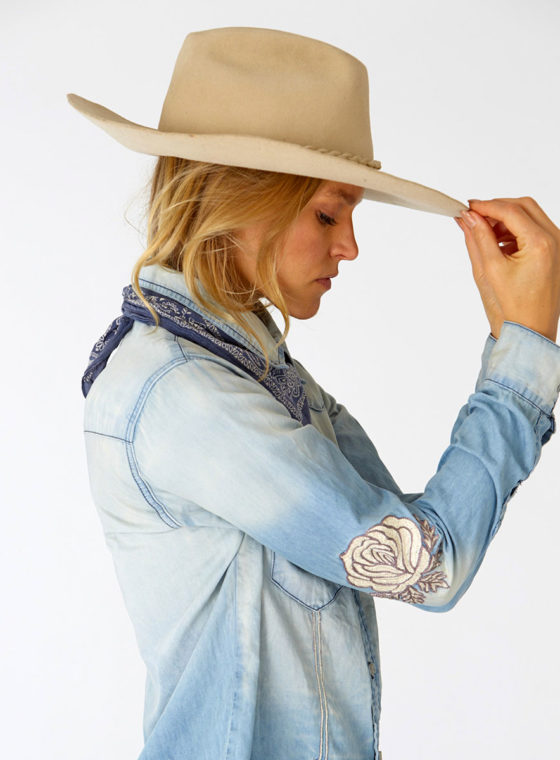
For months, I’ve been anxious to try my hand at denim embroidery but could never figure out how without freehanding under a sewing machine, unsuccessfully tracing or using my horrible penmanship as an adequate enough pattern. I was stumped. Determined to find a way to transfer a pattern or letters onto denim, I went to my local fabric store to investigate. Turns out, there’s a product that will forever change your embroidery experience and that inspired me to embroider all denim in sight. Read on, friends . . .
YOU’LL NEED:
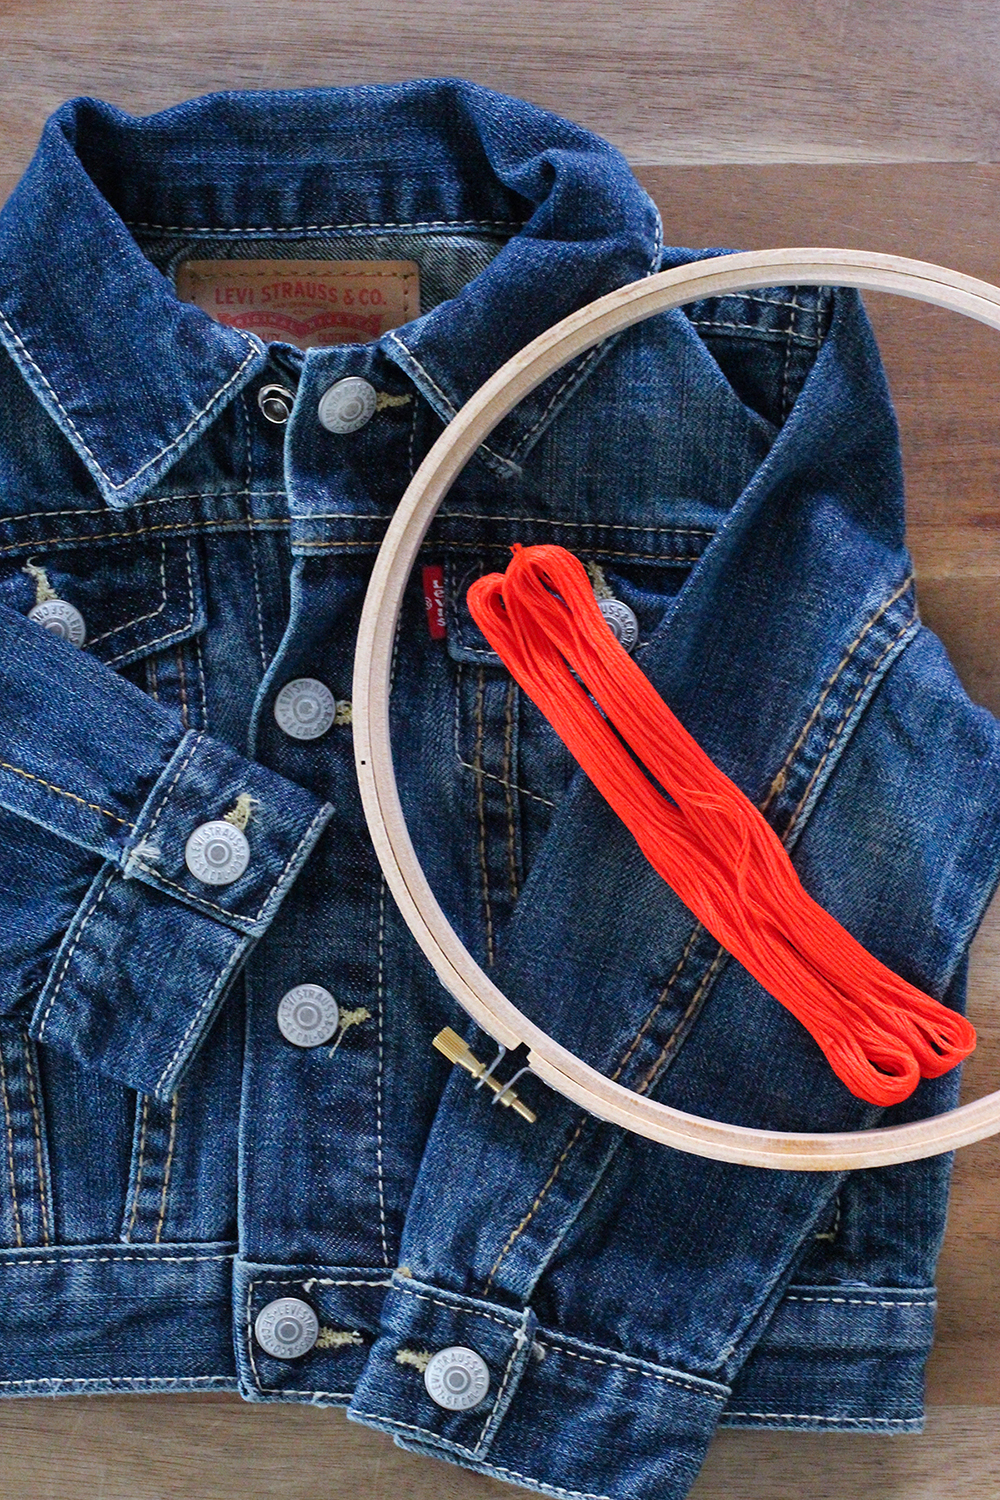
- denim, prewashed.
- pins
- embroidery floss
- embroidery needle
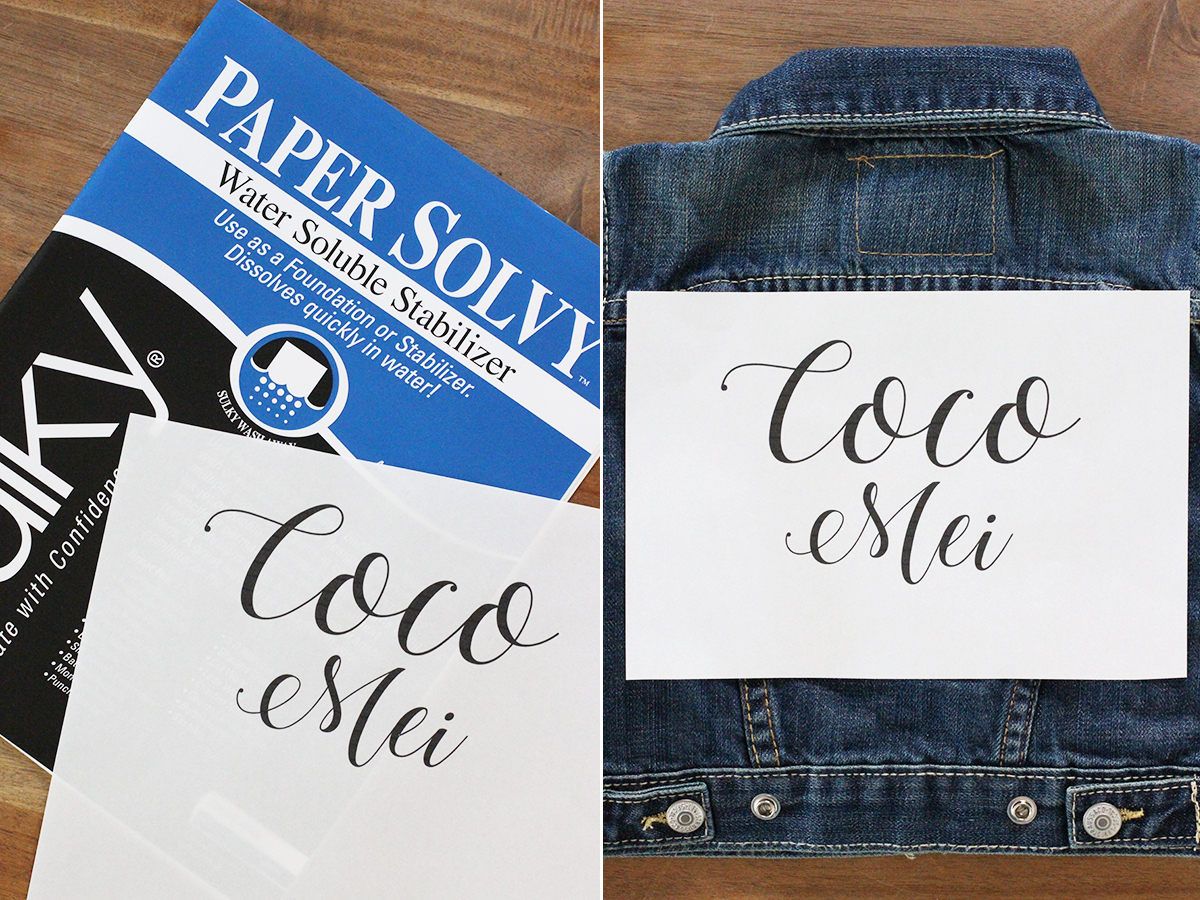
- Sulky Paper Solvy Water Soluble Fabric Stabilizer (or even better, the sticky version!)
- embroidery hoop (optional)
- printer
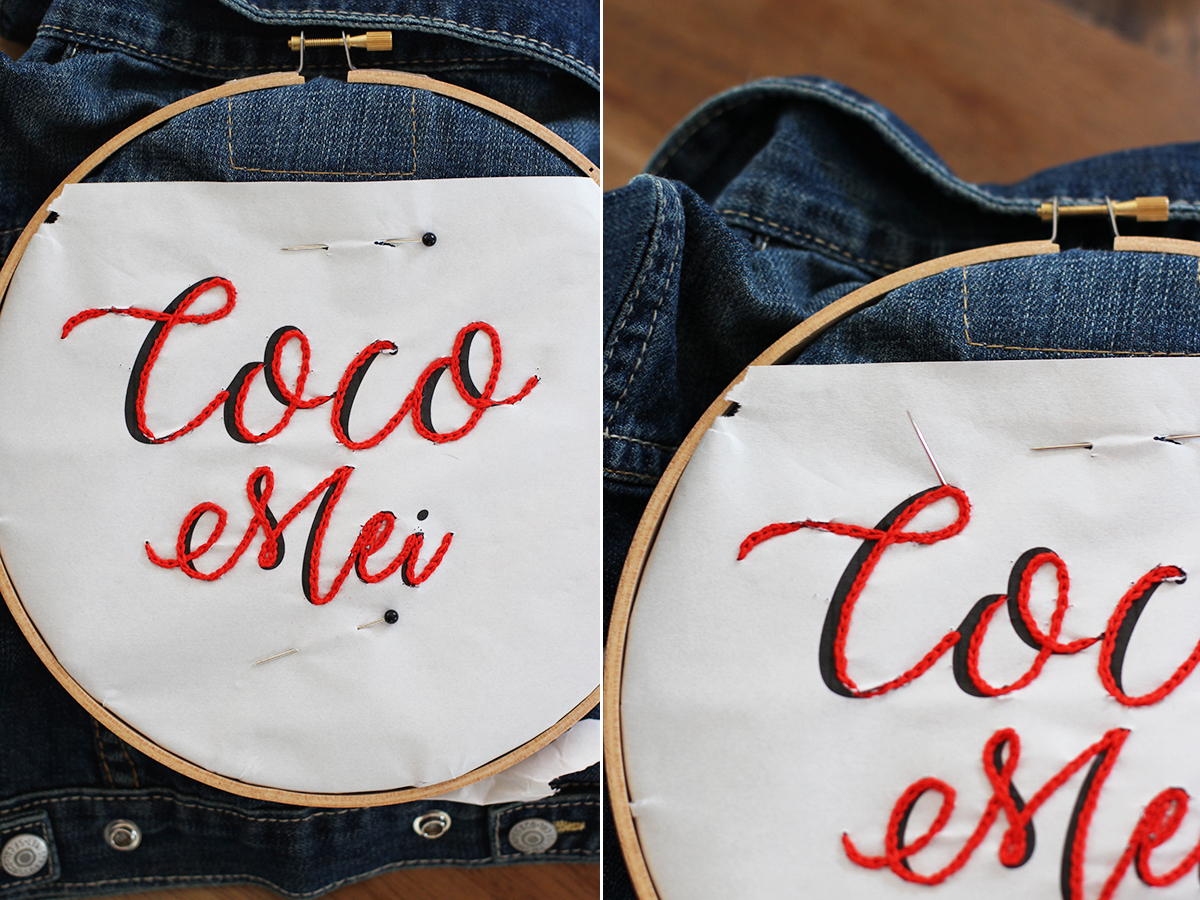
Ok, are you ready for the 411 on the best product ever?! Drumroll . . . it’s Paper Solvy! This stuff is essentially paper that you can print on and embroider directly on. And once it comes in contact with water, it all dissolves away. Like magic! I’m actually super bummed I hadn’t discovered Fabri-Solvy or even better, Sticky Fabri-Solvy, until after I finished my project with the Paper Solvy. The paper was okay to use but I can only imagine how much easier it would have been with the Fabri-Solvy, which has a more fabric like consistency – less ripping and more pliable. And it comes in a sticky version!! Which means no pinning or embroidery hoop necessary! I have yet to use the fabric and sticky fabric version but I’m sure it’s much easier to work with than the paper version. Whichever stabilizer you decide to use, the first step is to print your design and arrange it over your denim.
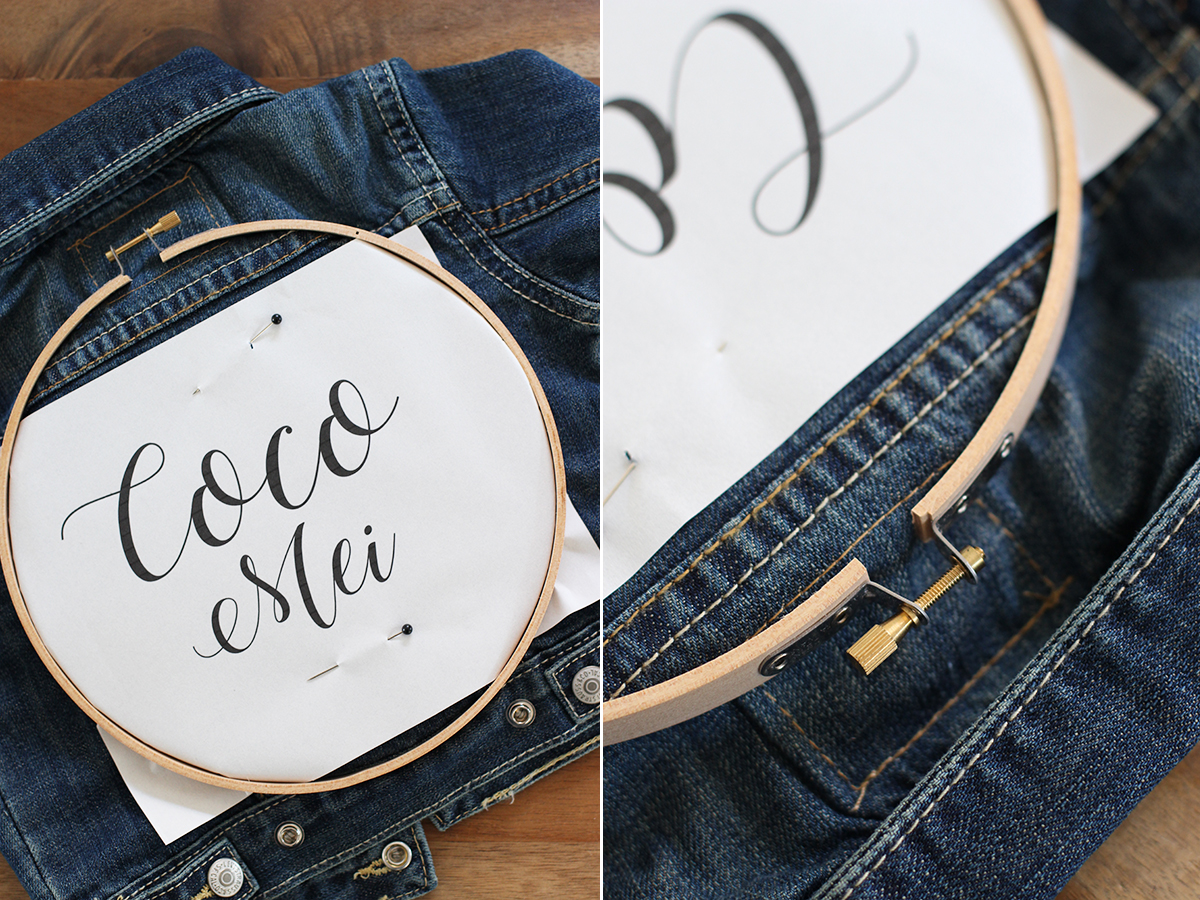
Secure the paper with pins and an embroidery hoop. Again, if you’re using Sticky Fabri-Solvy, then no hoop or pins should be necessary!
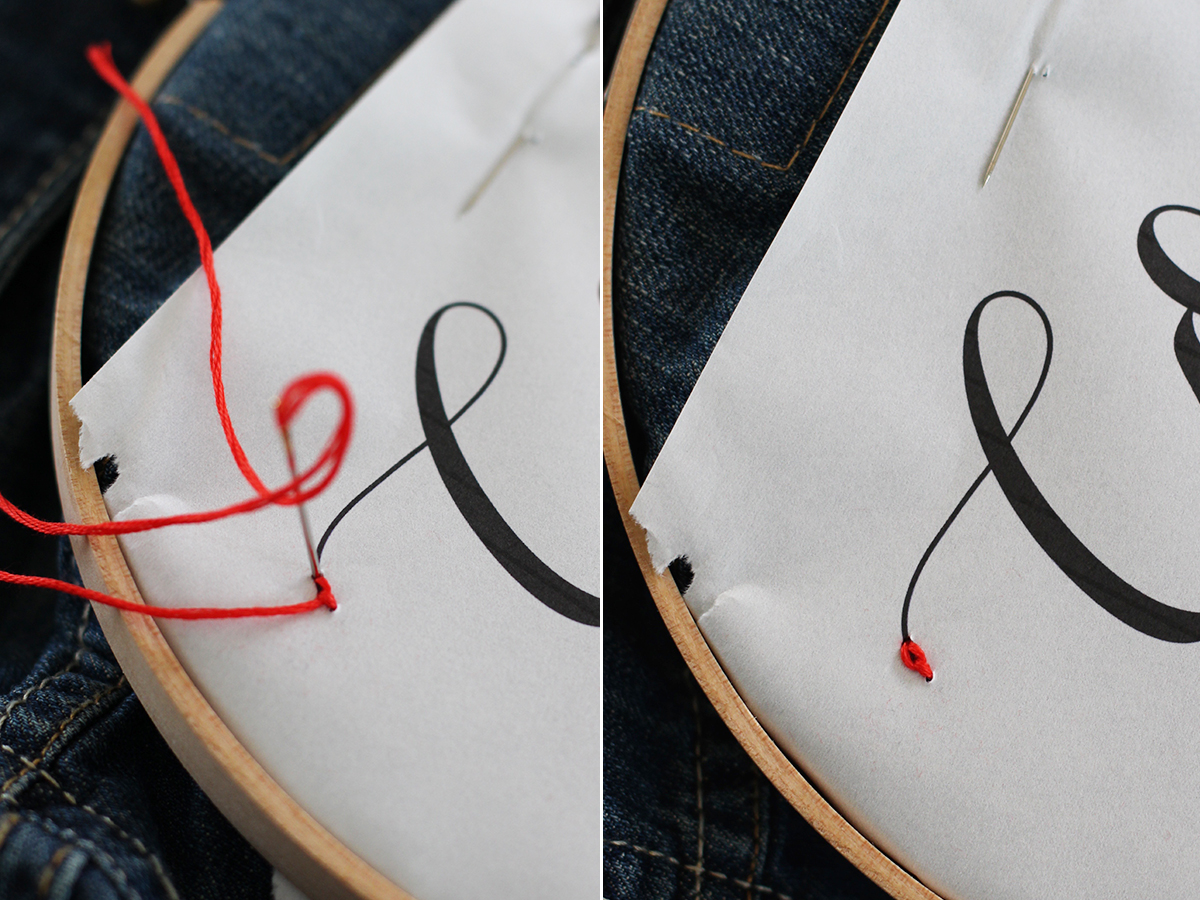
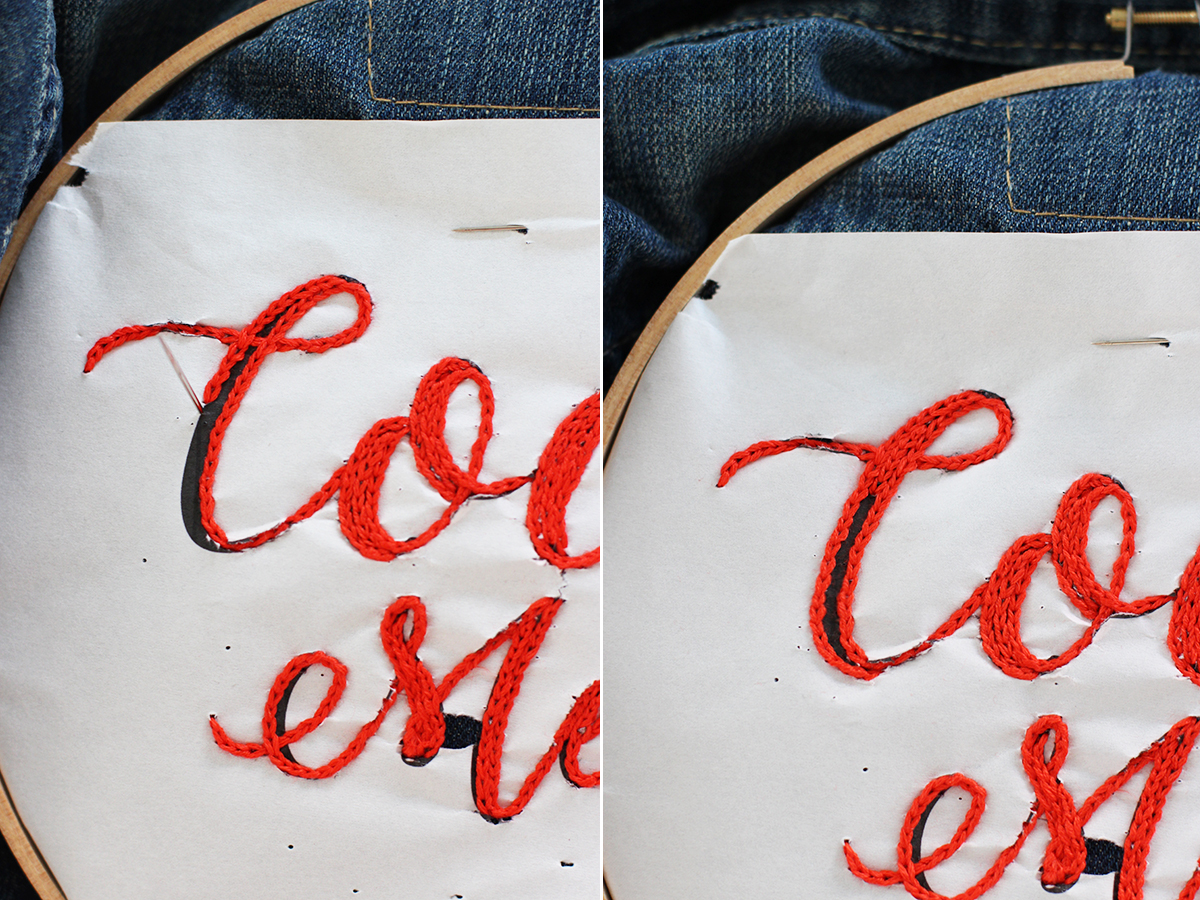
I like using a chain stitch embroidery for letters. It’s substantial enough that you can read the type against heavy, dark denim and it’s also nice when getting around sharp corners or tight curves. Thread the needle with a long piece of embroidery floss. Tie a knot at the end. Push it through from under the start of the first letter. Bring it back down just a couple of millimeters away from the first hole. This is your first stitch.
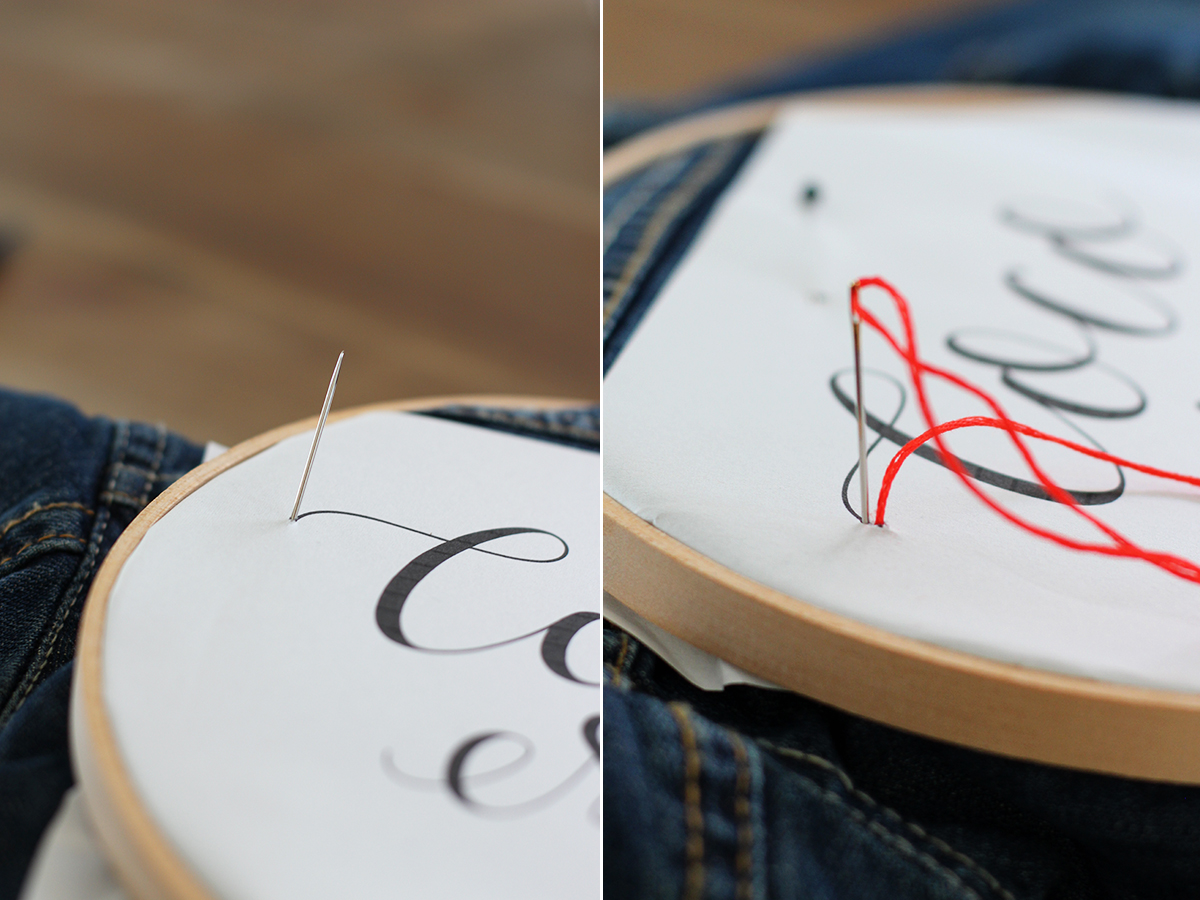
Bring the needle back up, leaving the same distance away from the end of the first stitch. Pass the needle through the first stitch and pull the floss all the way through.
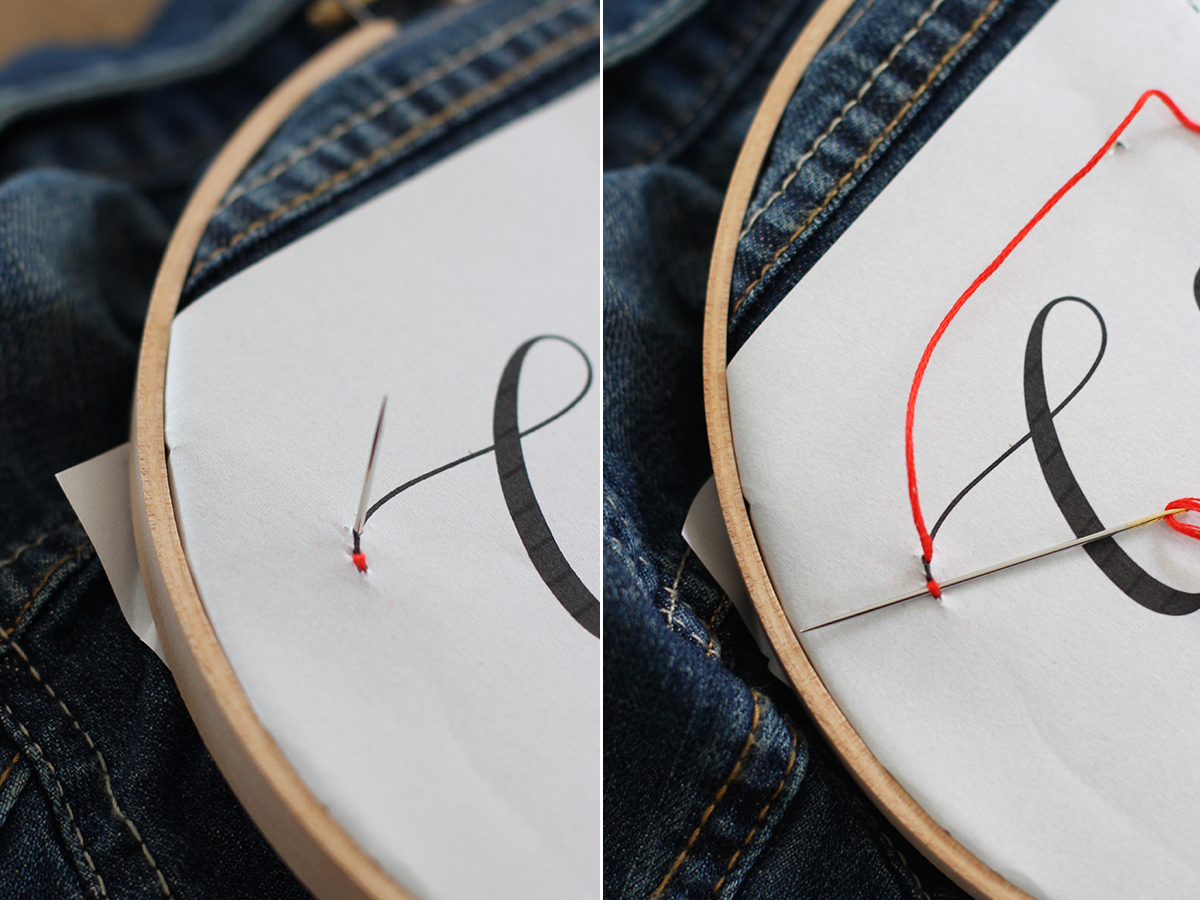
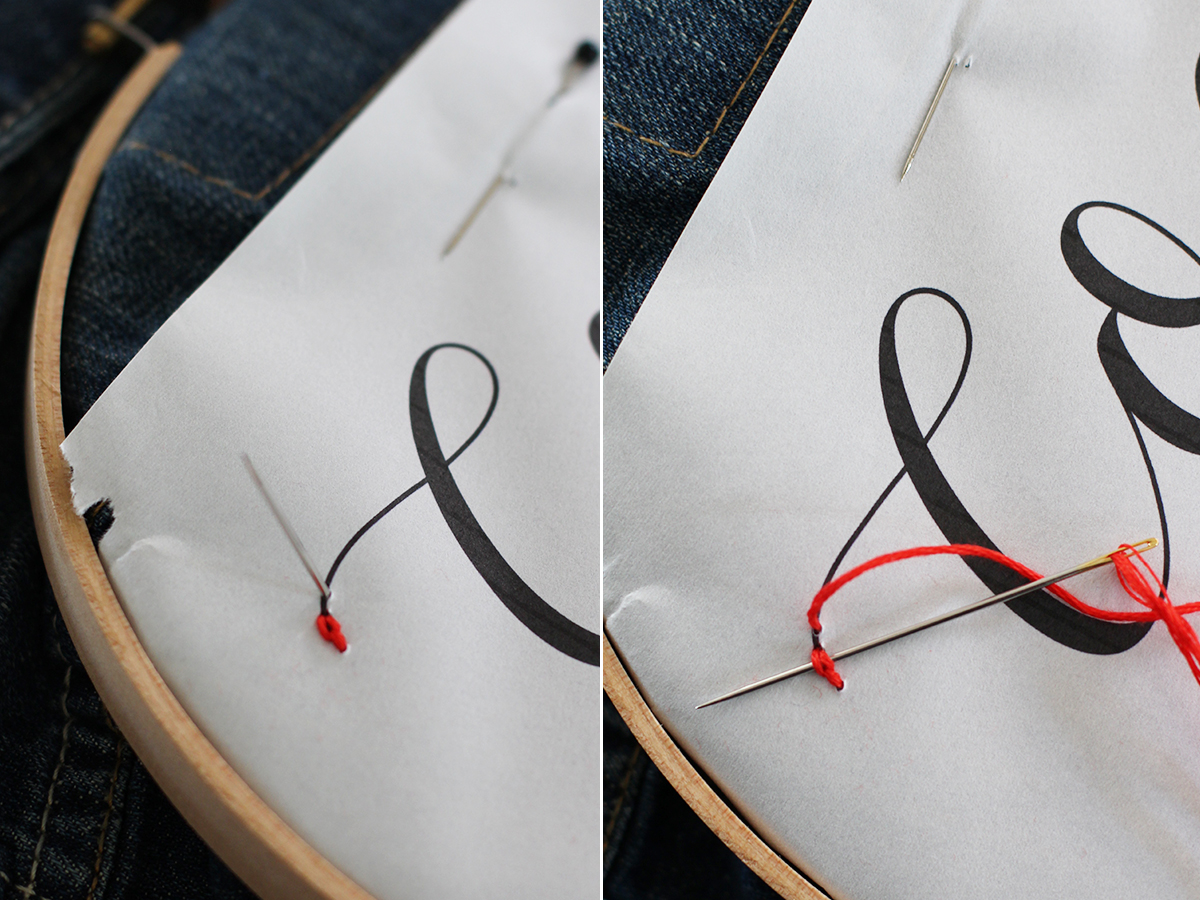
Re-insert the needle back down the same hole and pull the floss all the way through to complete the second stitch.
Repeat the same stitch. Push the needle through the bottom of the denim, leaving another equal distance from the second stitch. Pass the needle through the 2nd stitch and re-insert it into the same hole to create the third stitch.
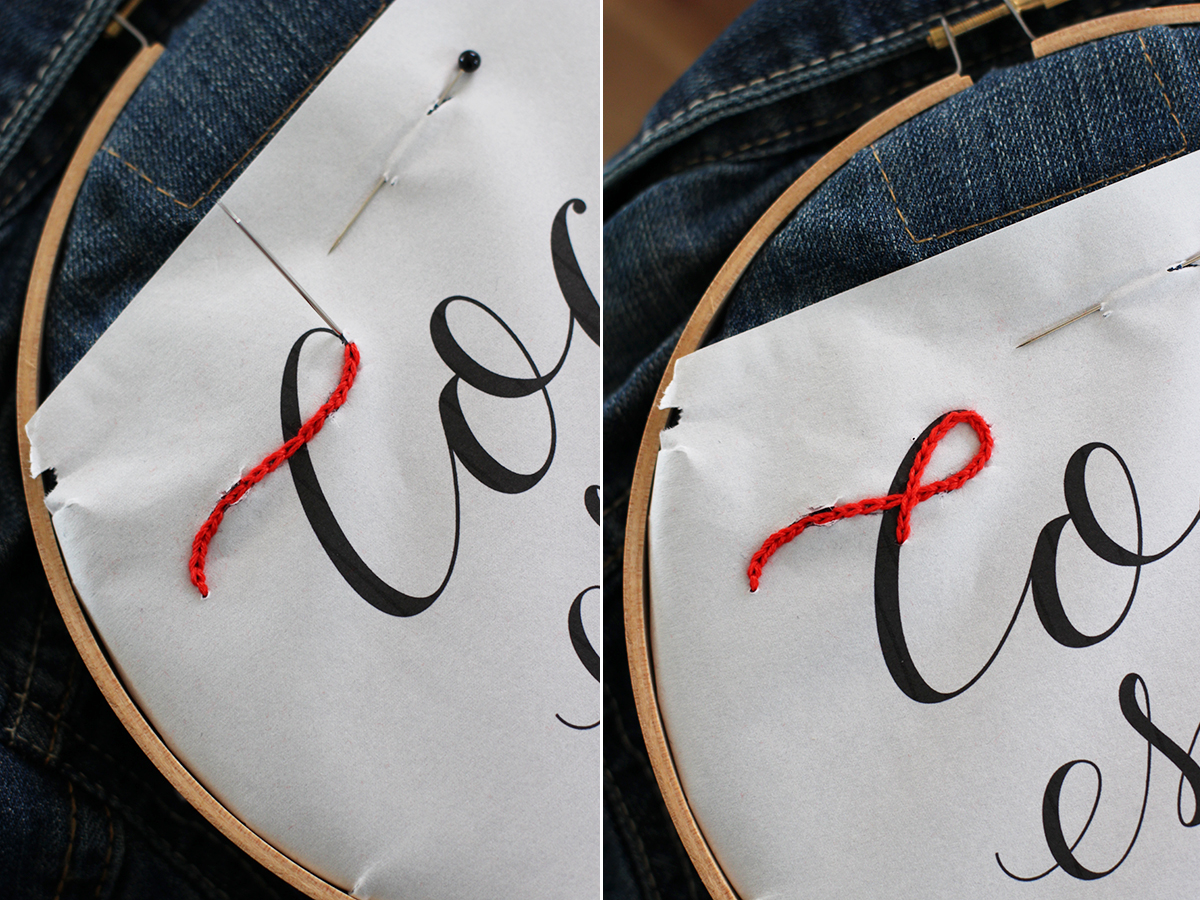
Continue following the lines of the letter. If you’re transferring a letter with thicker parts, just skip them for now and consistently follow them along the either the outer or inner line.
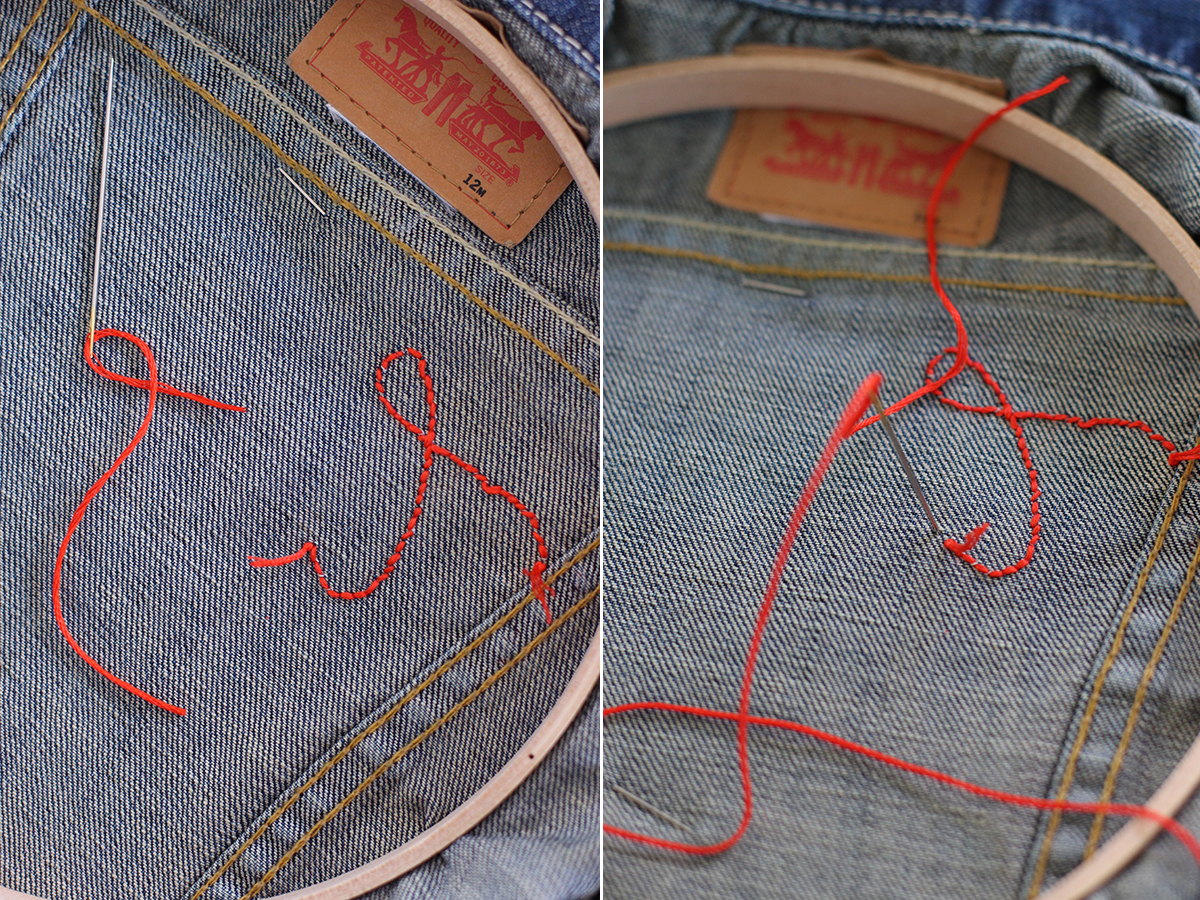
If your floss runs out, simply double knot it on the backside of the denim and start a new piece by coming up to start a new stitch.
Once all your single lined chain stitch is complete, you can go back and add more lines along the thicker parts of the letters.
If the inner part of the letter is complete, complete the outer line. Then go back and fill in a third line down the middle.
When you’re finished, remove the embroidery hoop. Rip away some of the paper without yanking it from under the embroidery.
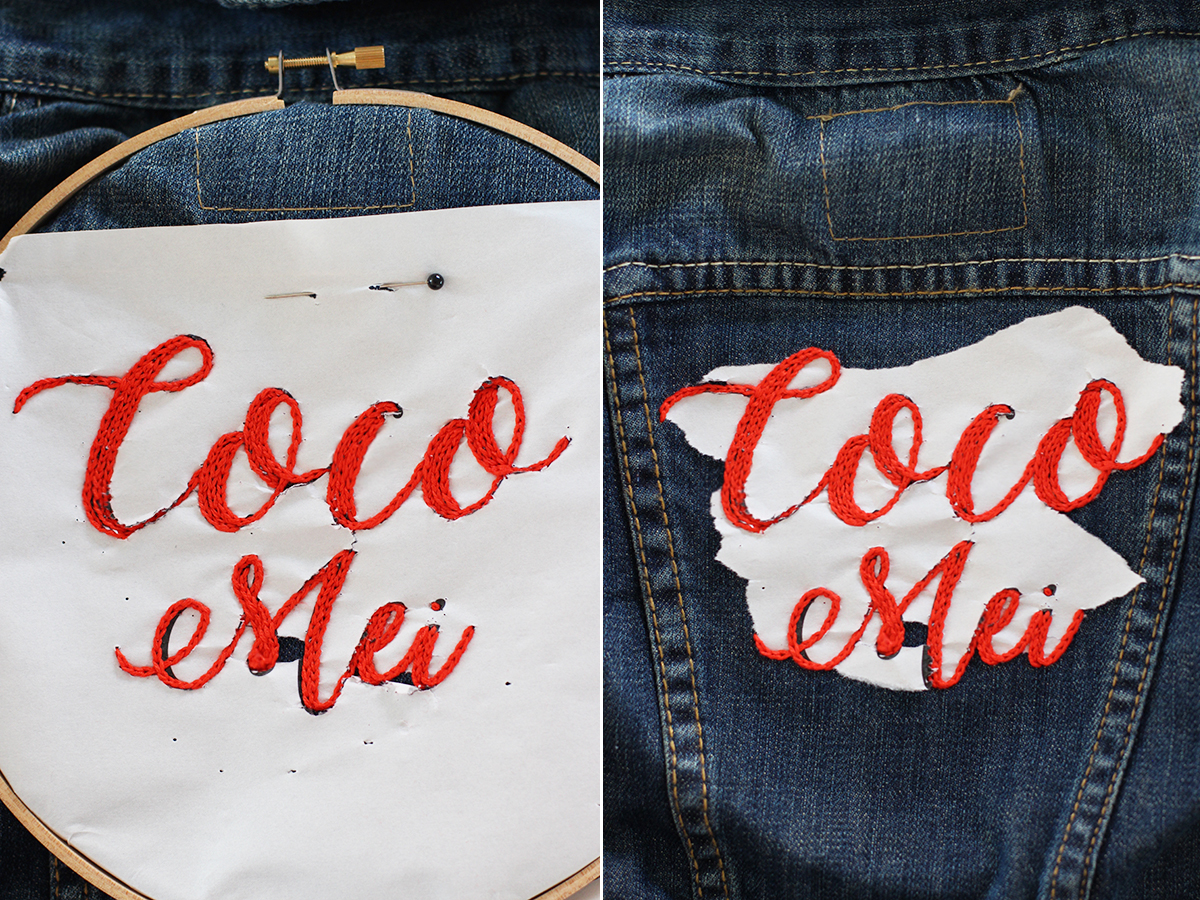
Place the denim under running cold water and watch all the magic happen! The paper will dissolve within seconds!!! Yes, I know! Crazy cool! Agitate the embroidery under water so release any paper trapped under the stitches.
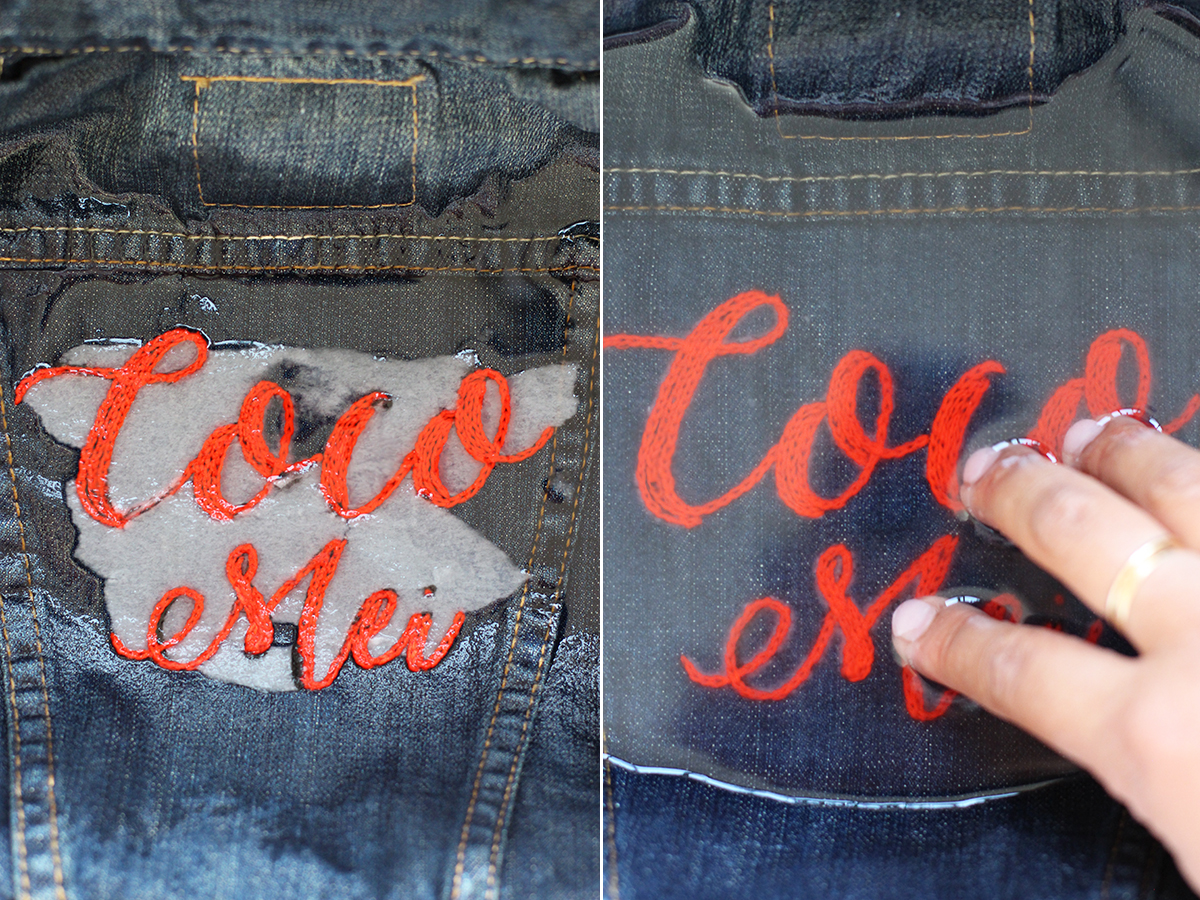
Wring out the water and lay flat to dry.

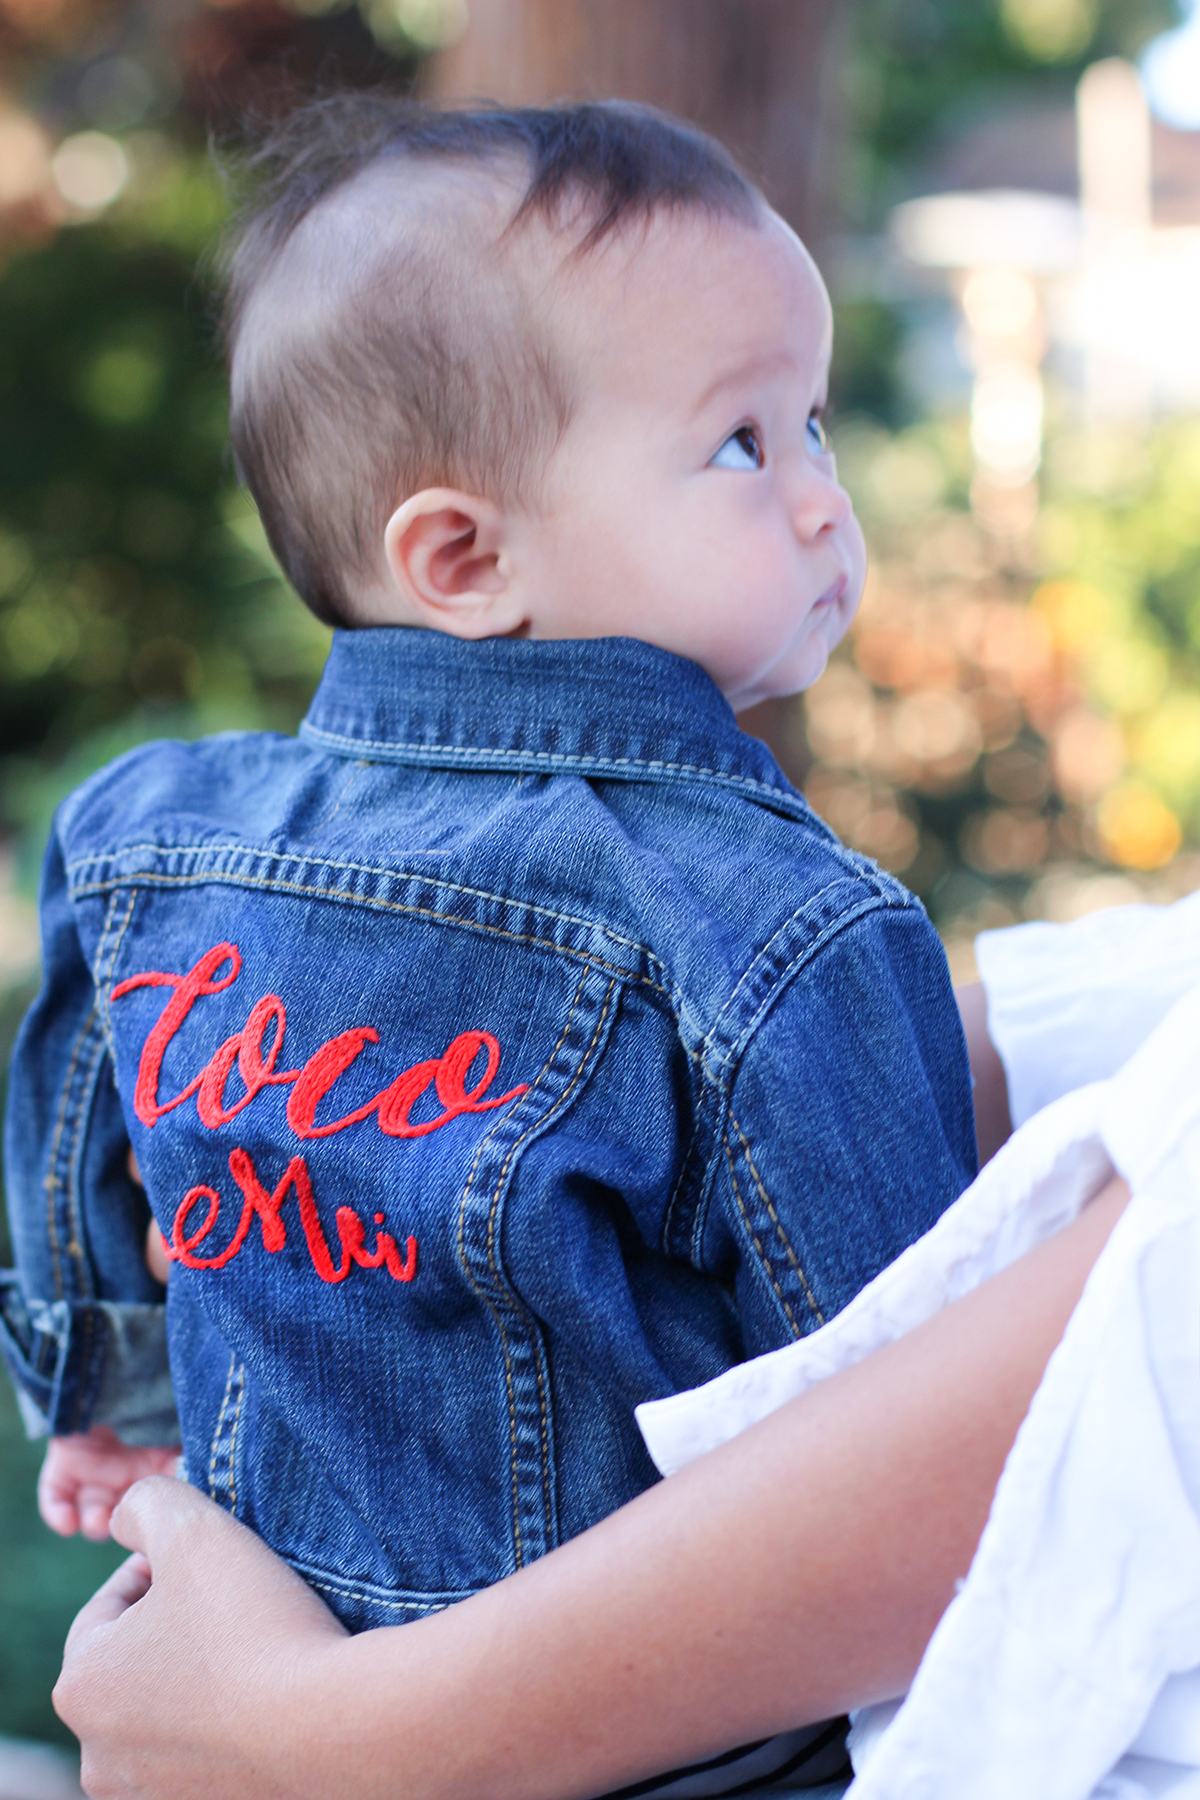
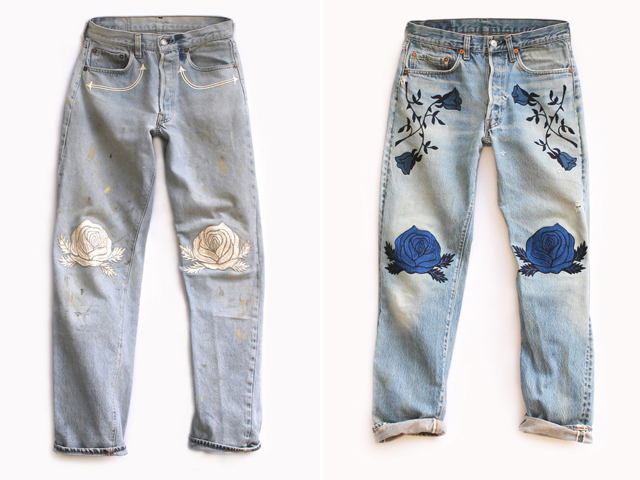
For my baby . . .
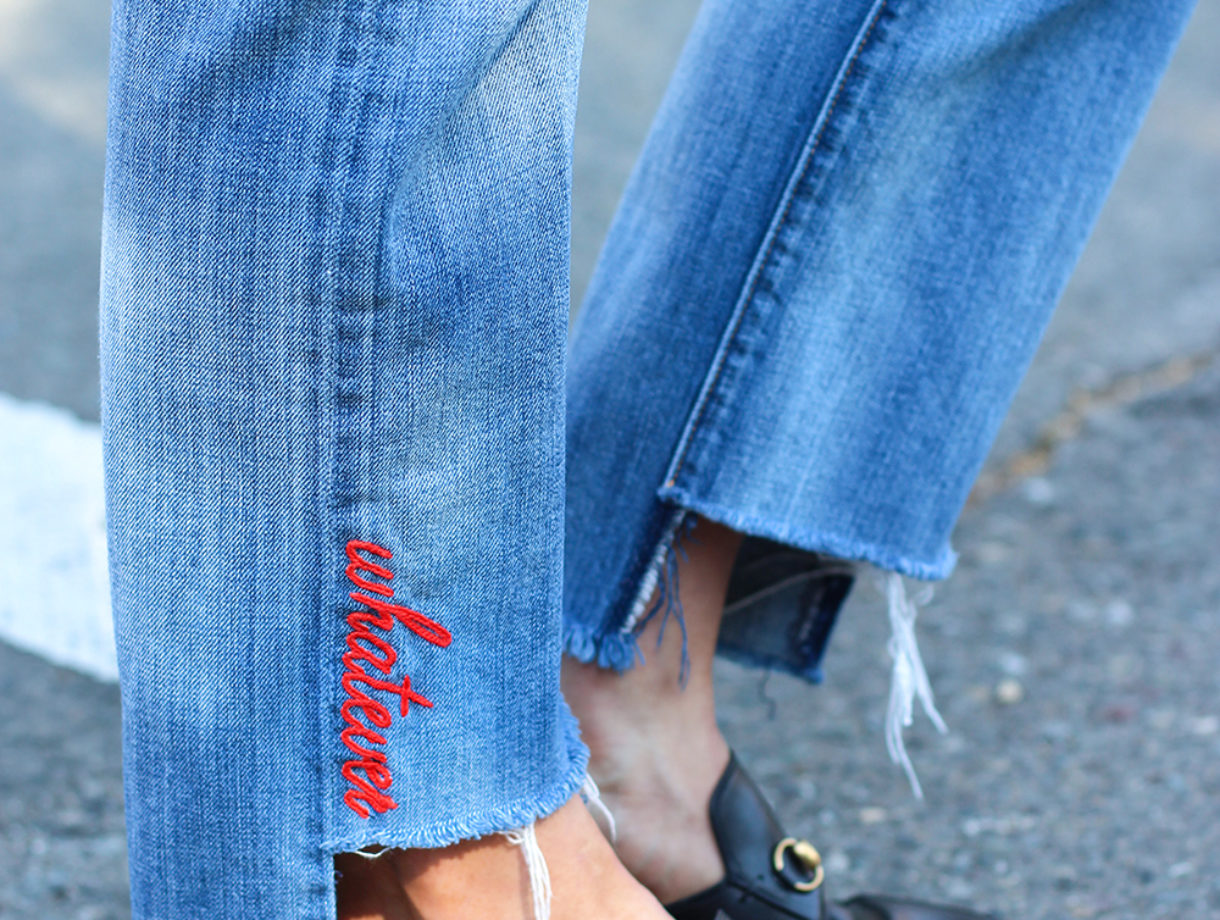
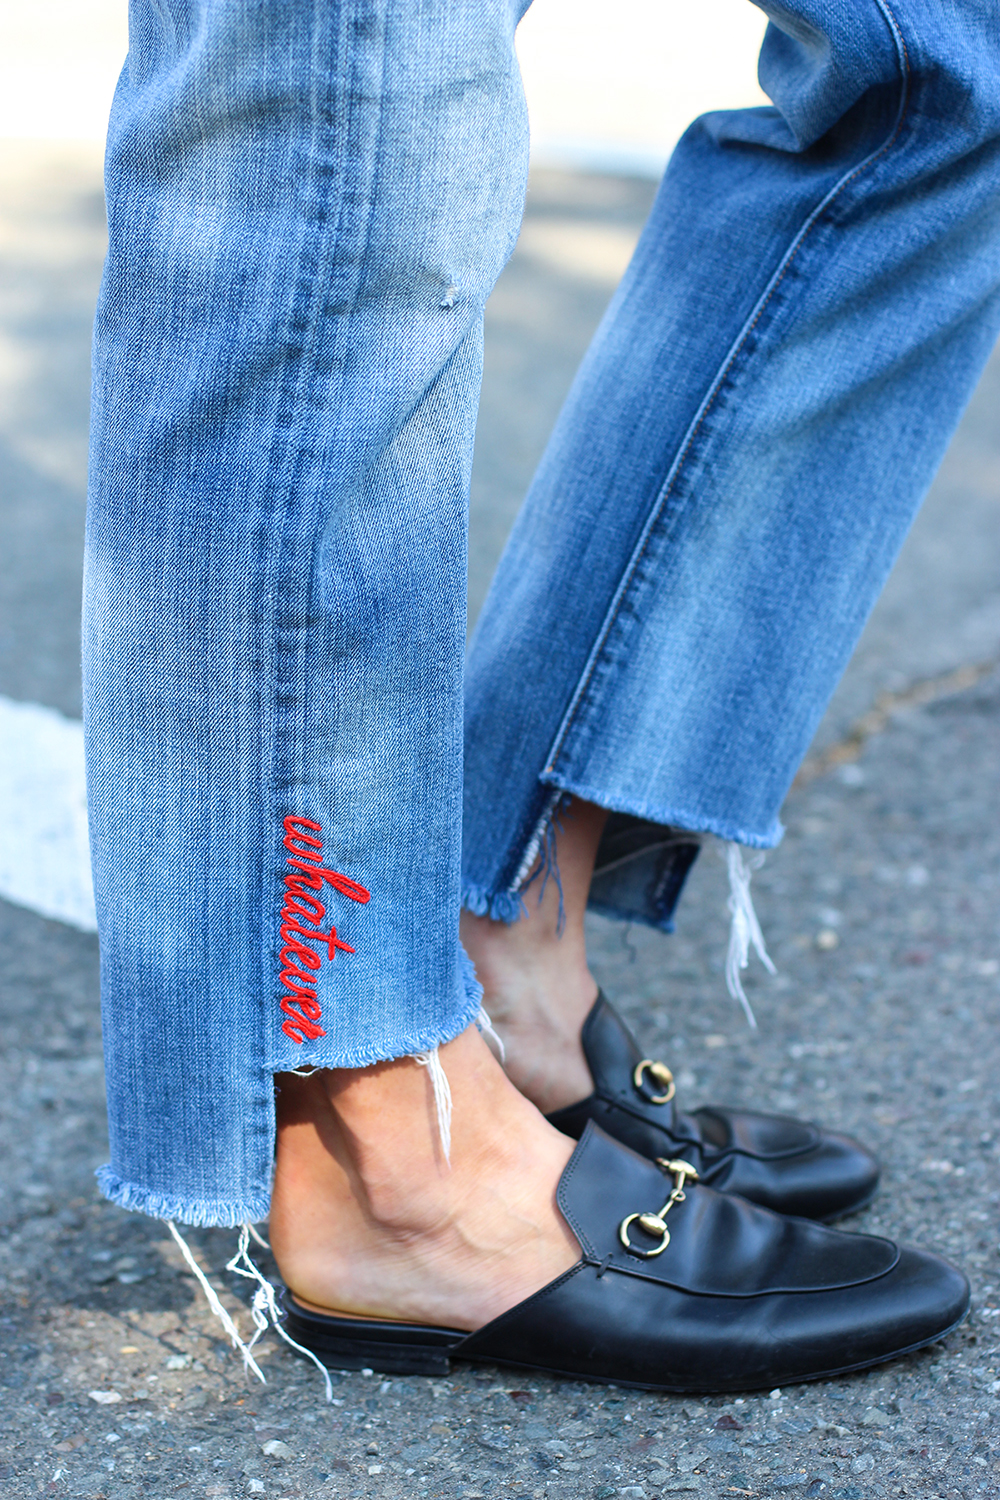
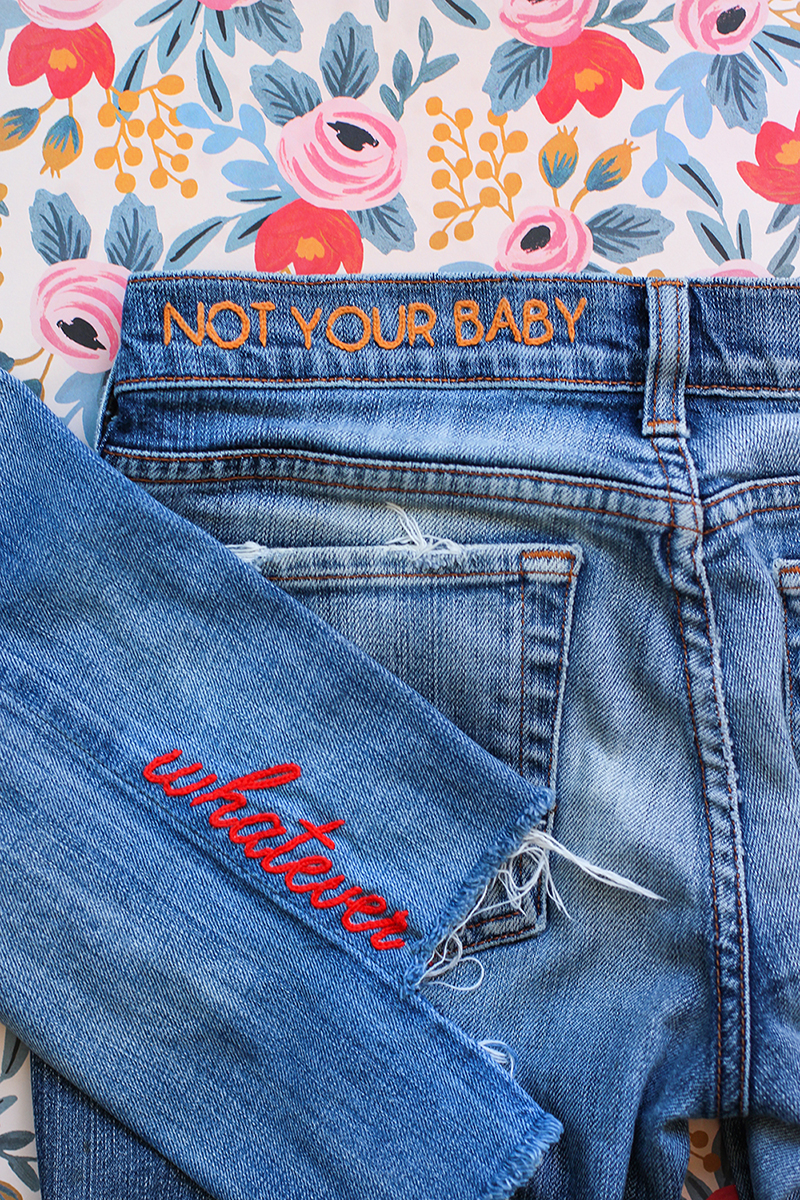
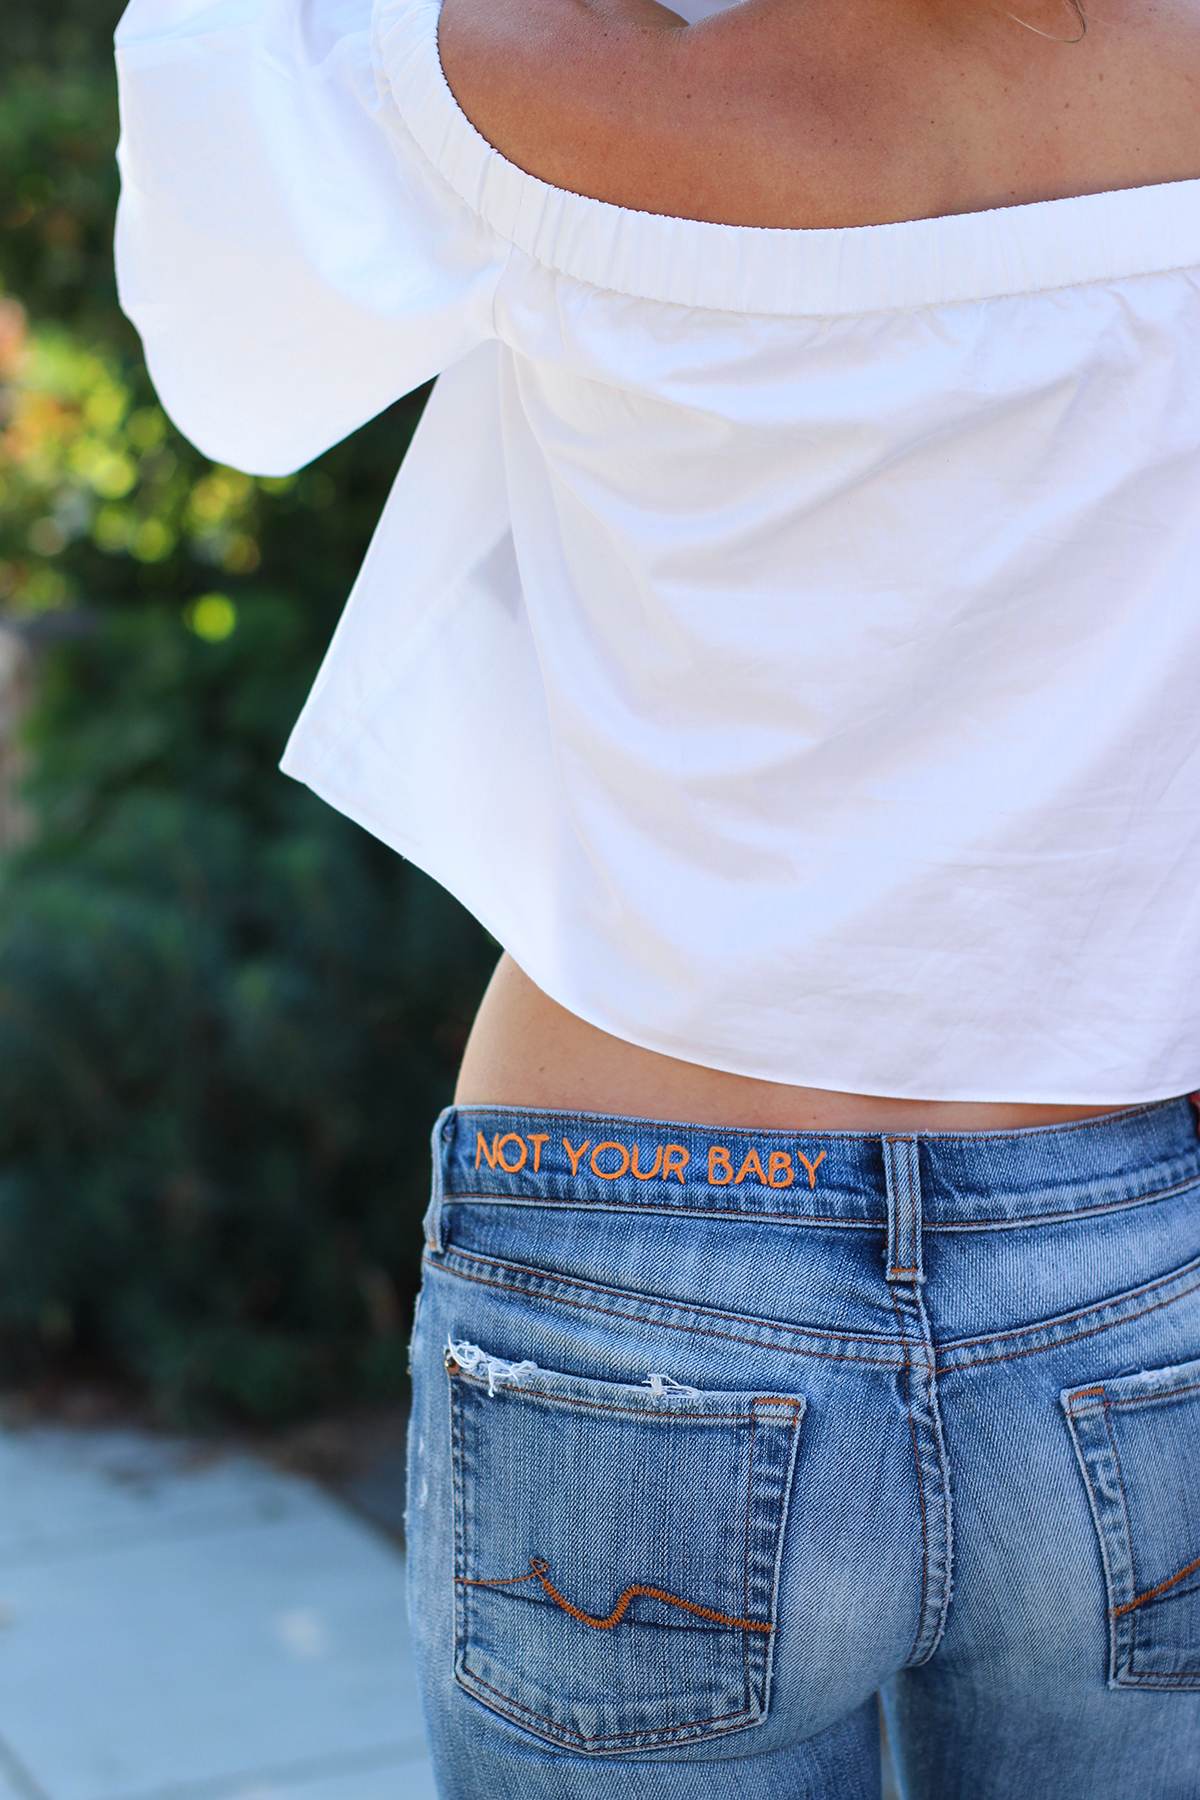
And for my ladies!
(images by HonestlyWTF)
I definitely need to find that dissolving paper! So handy, thanks for sharing!
http://www.dreamofadventures.com/
Wow, that looks like a lot of work, but the outcome looks so amazing!
https://www.makeandmess.com/
Wow. Mind blowing! haha Have to try that out for myself, can’t wait to experiment 😛
Have a nice day!
Wonderlandia
So cute! Brings new life to pieces 🙂 Thank you for this tutorial!
That’s fantastic, although a little too much work for me!
This is so so lovely! How long did it take to embroider the jacket?
Thanks @Mun! Since the jacket was my first attempt, it took me awhile – I picked it up here and there over the course of 2 days but now I think I could probably bang it out in a couple of hours.
I was actually just about to do this with my jeans jacket! This is a much better approach than what I was going to do. Thank you! Would you mind sharing how you printed out the “Whatever” and “Coco Mei” wording? Did you just use a font in Word?
@Carly I downloaded fonts from dafont.com and printed the words after creating them in Photoshop. But I think using Word would be just fine!
Love the way your jeans came out!
http://www.cutandchic.com
Hello!
I ‘m french so I’m sorry for my english.
I’ve read your blog back to april 2014 because I really love it and really would like to know, pleeeaaase ,where does come from the cement tiles of the second picture of your April 6th 2015 post.
I’m searching for cement tiles for my kitchen and they are the most beautiful I’ve seen Coud you find your source?
Thanks a lot xxx
Laure (lauregardner@yahoo.fr)
where are the shoes from?!
Love it, looks amazing! x
josiemander.wordpress.com
OMG thank you for this DIY!! I’m actually going to attempt this one since I’m loving all the embroidery I see all over tumblr and Pinterest and Instagram. Thanks for sharing!
michenn
michenn Ole Henriksen Skincare Review
Your son looks so adorable in his jean jacket. Thanks for introducing me to this product. Pat S
Who makes those shoes? LOVE!
Thank you for posting this! i am completely obsessed and also have tried hand embroidering with my not so artistic penmanship!!!
I can’t wait to try this!
xx
jen
effortlesseverydaystyle.com
I worked embroidery before…. This is great idea… I will try for sure…. Great post. Thank you
http://jristicline.com/en/
What font did you use here? Love it!
Sticky fabr-Soley is pretty good for simple designs. Despite the stickiness, you still need to baste it down and you needl can get a little sticky, but for a project like this, it would be perfect. I’ve used it to transfer designs to a pillow, the had too many lines to transfer to easily by hand. It is also great for dark fabrics like this.
This is such a beautiful DIY! I’d like to get the same effect as you did. Would you care to share the size of needle you used? Thanks!
Amazing! many thanks for sharing! I need it.
hi! i’m wondering what font you used… i like the cursive. thx, caitlin
That looks really amazing. How long it takes to mak it/?
http://www.3escorts.com
THANK YOU! <3 I've been thinking how to decorate my jacket and you helped me a lot. Your blog is really inspiring! Cheers from Poland! I found you on Pinterest 🙂
What a story, it seems to me that such a definition of a topic is a sensational option.
http://www.sash-windows.biz/
What size embroidery needle did you use for this jacket?
Thank you.
Such an incredible tutorial and your writing style is amazing. Thanks for sharing it.
embroiderydigitizingtipsntricks.blogspot.com
AHHHH!
I am smitten! What a valuable set of tools for uniformity and image planning… I am flooded with ideas and projects from my past…now the possibilities …what a great trip…..for everything denim….following your lead. THANK YOU for sharing!
For those asking about the font, pretty sure it’s Bromello: https://www.dafont.com/bromello.font
What!? How have I never heard of this water dis-solvable stuff!? I have struggled with embroidery too and have resolved to only do simple florals. lol. You have inspire SO many projects this mothers day!
THANK YOU SO MUCH FOR SHARING THIS!!!
I can finally try to do some embroidery on my own clothes, which I’ve always wanted to do
It looked perfect! Loved the photos, very understandable. Congrats on your criativity!
The way you do chain stitch is overly complicated. I’ve been doing it a much easier way for years.
https://www.youtube.com/watch?v=KP3q3H5bnf8 Do it this way, it’s easier.
This is awesome DIY project.