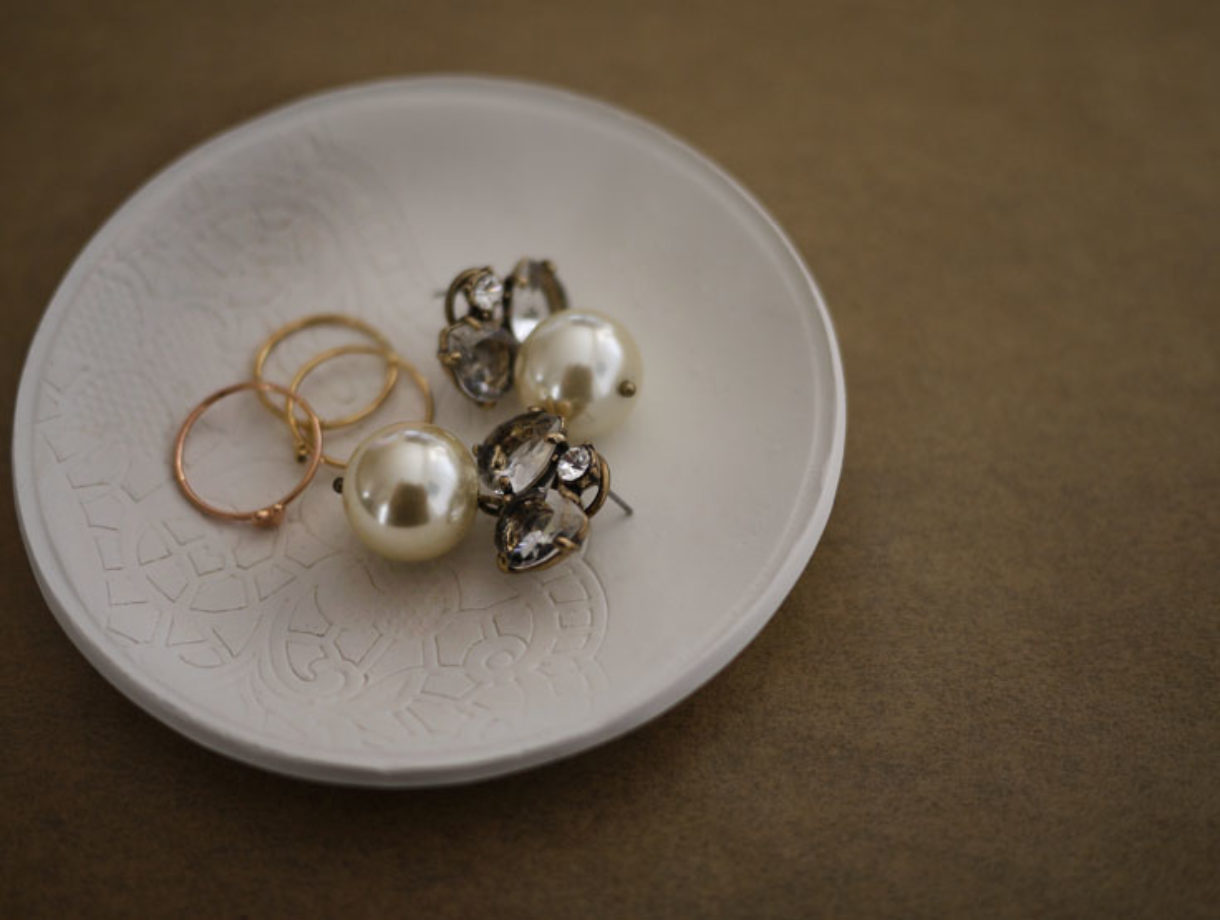
It’s hard to believe that I have yet to find the ideal system for organizing my jewelry. Where is that perfect piece of storage for necklaces, rings, earrings, and bracelets so they could all live happily and neatly in a single place?! Alas, I have a handful of decorative ceramic bowls and porcelain dishes scattered along my dresser, separating rings from bracelets from earrings. And after seeing this tutorial on how to create a sweet faux porcelain dish, I immediately had to try it. Why not add more to my ever growing collection . . .

You’ll need:
- one small and one medium sized ovenproof bowls
- a baking sheet or wax paper
- a paper or fabric lace doily
- a rolling pin
- 2 ounces of polymer clay
- a knife
- an oven
- a nail file (optional)

Preheat the oven to 275°F (130°C). Even though most polymer clay is non-toxic, all the surfaces and tools that comes in contact with the clay should be strictly used for crafts and not reused with food. The first step is to condition the clay. Knead the clay in between your fingers, until it becomes softer and more pliable. Then, start rolling out the clay on a baking sheet or wax paper.

The clay should be rolled out to a thickness of 1/4″. Place a paper or fabric lace doily over the clay and make an imprint with the rolling pin. Gently peel the lace doily away from the clay.

Turn a small bowl over and place it over the clay. Using a knife, trim away any excess clay from the perimeter.

Carefully lay the circular clay piece into a larger and shallow bowl. Place the bowl onto the middle rack of the oven and bake for approximately 15 – 20 minutes.

Allow the bowl to cool completely before removing the clay dish. Use a nail file to smooth out the edges. I personally prefer to keep it white, however, I’m sure it would look just as cute painted gold or sprayed painted in another color. Enjoy!!

(all images by HonestlyWTF; tutorial adapted from here)
Thank you! I wanna do a lot of them in pastel colors <3
Where did you get those lovely tiny rings in the last pic?
Amazing and so simple!
xoxo
http://fashionagony.blogspot.com/
Wow this is such a great idea! Definitely on the ‘to try’ list!
This is lovely and so doable. I’ve been doing polymer clay crafts/jewelry for a long time and anyone can do this project. Also, thank you for highlighting the fact that once polymer clay touches something, no food should come in contact with it. I use a cheap toaster oven to bake it in so I don’t have to use my oven.
I share the same frustration over the lack of one perfect jewelry storage solution – this is an adorable make-do until that glorious day when someone invents the ULTIMATE jewelry organizer!
Will copy it for me!
😉
Girls, look at my blog, yesterday published a DIY with many sequins!
http://detrasdellabial.blogspot.com/2012/02/diy-clutch-lentejuelas-doradas.html
XoXo
will makes this for sure!!
http://bonnieclydemarni.blogspot.com/
I love how easy this looks. And practical.
That’s so cool! Looks simple enough…I love DIY projects that actually seem doable. 🙂
http://atallshipandastar.blogspot.com/
This idea looks great! I might give it a try [: Thanks for posting the tutorial
I am also waiting for the perfect jewelry organizer to fall into my life! i love displaying pieces in bowls, but they are just taking up too much space!
in dramatic fashion
woah this is too cute! I love it in white (a shiny black would be cool too)!
Candy
http://www.tayloranddemolish.com
This is such an adorable DIY. I shall make millions! MUAHAHA… or just a few for my friend’s housewarming.
http://www.dottoddot.com
This stunning. I never thought I’d made such a great product from clay. Thanks for the tutorial!
Annabella Merlin
Love it! I have an earring dish that I use every night…I need to find a reason to have two now!
Wow. Adorable. So sweet, so simple, I love it!
http://nomadic-d.blogspot.com/
What!! This is too cool. I love the printing on it too. I need to try this.
xoxo
http://www.thewrittenrunway.com
I love those bowls and I made several for my wedding and for friends but there is one thing I’d like to add to your post: The original tutorial is from Sodapop: http://sodapop-design.de/2011/01/diy-doily-bowl/ – I think she should receive credit for it and not someone who just stole her pictures. Furthermore she used a special clay that you don’t have to bake in the oven but it will just air-dry.
I truly love this idea. So simple and so stunning. Love the idea of doing this as a gift for someone.
thanks for sharing!
Nice! I love it! I have dishes holding my jewelry too.
A jewelry blog.
http://www.houseofavandan.com
@emm, thank you for the correct source. the links have been updated!! xx
i like it! i made one too (http://passionforfashionandmore.wordpress.com/2011/09/27/doily-bowl/), it’s very easy and so pretty.
xxx
So cute & easy – will definitely give this a try!!
what a sweet and easy idea! nice one!
super super SUPER adorable!!!
Cute idea! I love how you incorporated lace!! xoxo
http://www.hellohellofriday.com
People, I hate to tell you that there are some health concerns about clay that is cooked in your oven. You should not mix food utensils and craft medium. Use separate tools and separate cooking oven. I use an inexpensive stove top oven after checking the temperature with an oven thermometer. Better safe than sorry.
Such a nice idea! This would be an amazing birthday gift for a friend..
xx, Susann
Fashion in Pepperland
LOOOOOOOOOOOOVE THAT ! <3 AMAZING JOB
http://WWW.ONELOVEONEDNA.BLOGSPOT.COM/
http://WWW.ONELOVEONEDNA.BLOGSPOT.COM/
KISSES,
A really good way to display jewellery is by adding small hooks to an old printing press tray. You can DIY or buy it from an etsy seller like this: http://www.etsy.com/listing/61188004/jewelry-display (not my shop)
In the summer I went to an antique market and bought a tray for $10 – I got the fun of DIY, a new jewellery stand, and an item with a piece of history attached to it.
I love this idea! I am definitely going to try it very soon!
great idea, and totally do-able
What an awesome idea! I’m moving to Korea, and I’ve been looking into DIY projects to add a little personal touch to my new place. This seems perfect!
absolutely beautiful! It’s great 🙂
xx
http://WWW.PRETPENSER.COM
http://WWW.PRETPENSER.COM
http://WWW.PRETPENSER.COM
What can’t you do?
Wow! Love it!
that is an awesome DIY project. i work with polymer clay for a lot of jewelry DIY projects and this is probably something i am going to have to add to my list!
http://www.absurdlypeculiar.blogspot.com
I can’t believe how incredibly simple and beautiful this is! You can never have too much jewelry storage. 🙂
xo.-brittany
http://liveeclectic.blogspot.com
yay, I just bought polymer clay 2day.. this gave lots of inspiration x
I absolutely love this DIY!
So cute, clever and useful!
I too have yet to discover the best way to organize all my jewelry.
I might need to make a bakers dozen of these! lol
http://www.RocksPaperMetal.com
A great idea to use polymer clay, i have done a similar thing but i used lace in porcelain which works really well and you can get a great result to ! Ps i love the cute little rings you have pictured as well !
http://girlwiththeskullscarf.blogspot.com/
wow creatif !!! love it
Un DIY espectacular!!! Felicitaciones!
Roos
http://planetamujer.blogspot.com/
GORGOEUS! I will definitely try this out!
XoXo
Plami
http://www.fashionthrill.com/
pretty! all my jewelry lives in assorted jewelry boxes so I always end up wearing the same stuff until i sit down to re-organize and realize i have all this cool stuff I never wear…such is life 🙂
<3 Kate
http://www.theforgetfulwife.com
This is so looovely!
How fun! This would be a great gift too! Thank you for sharing. 🙂
http://www.granola-ish.blogspot.com
Awrsome post!!! Thnx!!! 🙂
This is brilliant, so simple and so chic! I always feel as though people will know that jewelry I’ve made is polymer clay and that it’ll somehow make me seem very childish, but this goes to prove the opposite! I’ll have to give it a try, though I fancy it with a square-bottomed bowl to fit in with my room.
Rachx
What a good idea!
WORLDWIDE GIVEAWAY!!
http://www.atitelavoyacontar.blogspot.com/2012/01/my-memories-giveaway.html
http://www.atitelavoyacontar.blogspot.com
I love your DIY’s! They are so easy to do and look really great!
Please check out my blog!
http://www.2fashionfed.blogspot.com
omg that is awesome!
http://youngandimpressionablee.blogspot.com.au/
xx
I’ve seen similar DIYs before and LOVE this idea!
Ohhh! Great idea, it’s very beautiful and cam adapt it to your fav flowers 🙂 i’ll do it definetly
Great DIY you have a lot of imagine.
I follow in Bloglovin and Google Friend Connect.
You can translate my blog in upright corner frame, if not work please go to frame, focus, and click F5.
Today you can check photos of Munich Carnaval:
http://laviequo.blogspot.com/2012/02/viel-spass.html
XOXO from Munich
La Vie Quotidienne
http://www.laviequo.com
SUCH a cute idea! Love this – I will add this to my ever growing list of DIY to do’s
– Sara @ Gameday Stylist
WOW, this is amazing!!!! I adore the look of this, you guys are creative genie’s!
love K
Here is another solution for organizing and storing jewelry, using old printer trays
http://www.sunbutterandjelly.com/2012/02/diy-creative-jewelry-storage.html
What a wonderful DIY. this is incredibly creative.
Collections
I have to say that I really enjoy your DIY projects. I would love to do this one. It will be a nice piece for my bedroom!!
me encanta!!* algún día lo haré….
gracias
kisss
I LOVE that you added stencil it’s so beautiful. Totally need to try this!
http://www.dragonnfruit.com
Oh Erica, I love this!! I have exactly the same problem. I’ve got all the materials to make this… and a ton of vintage lace from my mom. Need to try it!
Oh God, this is perfect. Am going to try just for fun. ( Because am not sure to do it right)
LAZYCATSTYLE
Oh my goodness! I <3 this SO much!!!
GENIUS! i must make one after this coming week of exams
Love this! I have to try, it looks adorable
and it remainds me polish artist: http://www.behance.net/NeSpoon
wow looks so great feel like i need to try it out!
thanks for sharing.
lots of love
cherrybee
http://live-life-cherrybee.blogspot.com/
I love it! This is a great DIY project- thanks for sharing.
The Dreamer x
http://www.tellhershesdreaming.com
This post was awesome to me on many levels. I actually create custom made jewelry organizers so it’s good to know people like you are looking for a place to store all types of jewelry! I love these dishes, I am just starting to make similar ones out of large seashells, they will be on my website within the next month or so!
Wow, I could go crazy with this project… I can think of so many textures that would be wonderful, and so many uses for a bowl like this. Thanks for the tutorial!
wow amazing
This is sweet! I’m soo going to tryy this:)
This is awesome! I will definitely pass this along to friends that love DIY stuff. I was thinking that you could even use multiple colors of Sculpey to make it that much more interesting! Great find!
I absolutely love this idea! I’d love to make soup or cereal bowls using this idea–does anyone have an idea on how to do this? Or is it even possible? It would be great to make my own, DIY-ed dinner bowls.
We did this in fourth grade in art class! 😀 brings back memories 🙂
http://mustbebeautiful.blog.com
Great diy brings back memories from high school pottery class.
Jewelry Rage
I love this! I will be making one ASAP!
Hello! I just made my first bowl with polymer clay and I had a couple of problems. Hope you can help me. First, the clay didn’t dry completely. It’s still a little soft – and I did bake it at 250 for 15 minutes. Also, when I put it into the container to bake it, there were little folds in the clay. It did not come out smooth on the edges that curve up. Did I do something wrong? Please advise.
Thanks!
Linda
definitely doing this! 🙂
Whatever the thickness of your piece, polymer clay should always be baked for an hour. As you are baking this on glass, put the item in to the oven as cold…let the oven warm up, bake the hour, then allow to cool totally before removing from the oven. Baking for an hour ensures the item will not break if dropped. Really 10 or 20 minutes is not enough.
Linda, try that and also conditioning your clay for longer. Most clayers condition for a several minutes using a pasta machine, which is specifically kept for the reason and no longer used for food. If you do not have one, then you really need to warm the clay in your hands and keep working it for a while. Popping the clay in your pocket for a while to warm up with your body heat before you start is a good tip too.
Good luck!
What size bowls did you use?
Thank you for sharing. I love it. I am going to try it.
Do you have to prep the baking bowl or does the polymer clay really not stick to it? This is awesome.
That’s so elegant!! Have to try it for my next project!
Juju
http://www.jujusprinkles.com/jewelry-display/
I was just planning a DIY tutorial for jewellery dishes for my blog hapinesswherever.wordpress.com and thought of using lace doilies, but would never have been as innovative as you and baked it in a bowl to get that perfect shape! 🙂 Another amazing DIY, please keep them coming! 🙂
OMG I loved it!!!!!!!!!!
I like this idea!!! I was wondering….. Couldn’t you use the one small bowl that you used to trim the clay, and turn it over and lay the clay over it and bake? Eliminating yet another item, etc.