When graphic designer and artist Joanna Bean Martin shared with us her technique for marbling the bottoms of glassware with nail polish, we couldn’t wait to try it ourselves. Who knew it would be such an easy way to add color and pattern to your next tablescape or party? Remember, the brighter and bolder colors you use, the more the glasses will radiate and glow. Have fun!

You’ll need:
- flat bottomed glassware
- variety of colorful nail polish
- clear nail polish
- a disposable plastic container
- nail polish remover
- painters tape
- toothpicks

Mask off the bottom of the glass with painters tape.

Fill a disposable, plastic container with water. Open all the nail polish bottles and start dripping polish into the water, one color at a time.

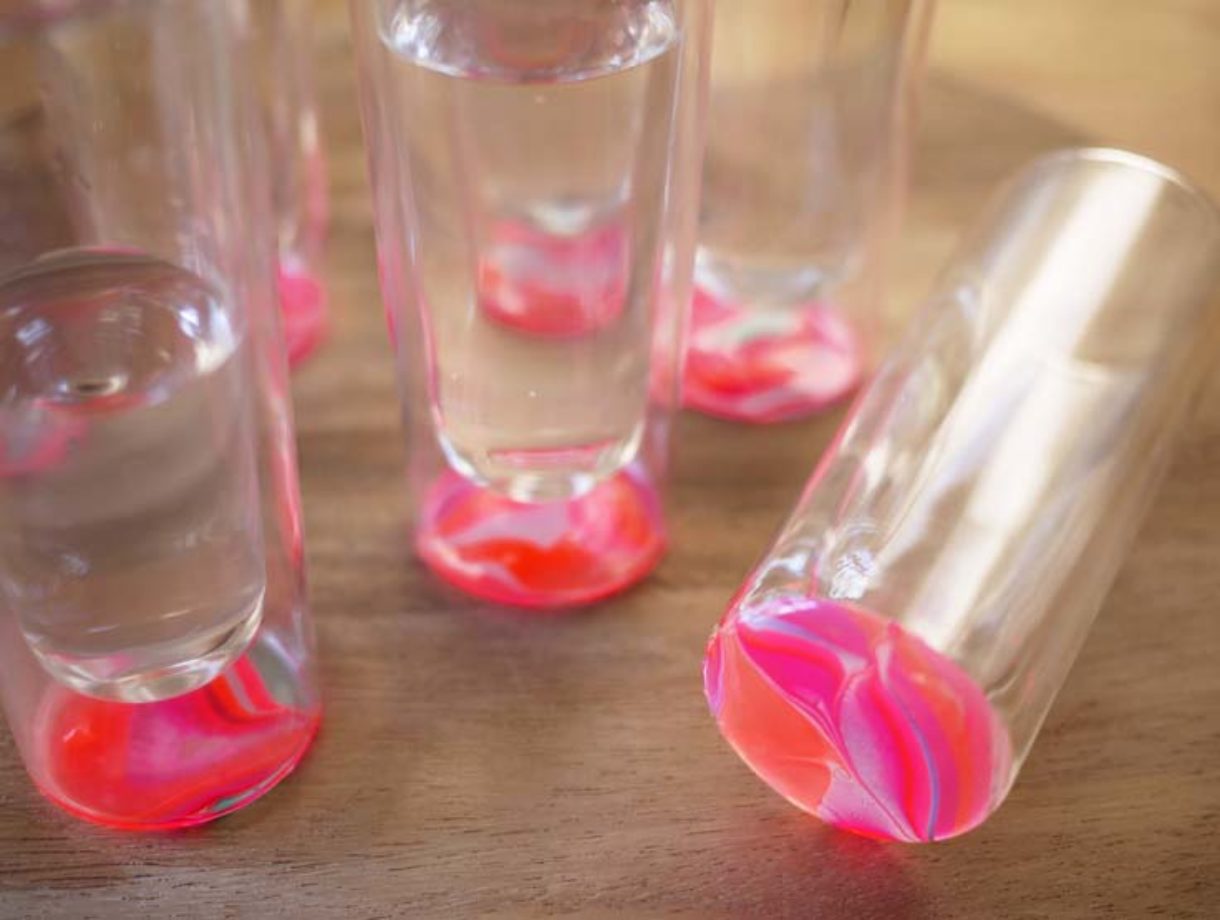
Layer the colors one on top of the other. Take a toothpick and pull out the polish to create a swirly pattern, starting from the center. Work quickly as the polish will start to harden and clump up over time.

Submerge the bottom of the glass into the polish. Allow the polish to collect around the sides of the glass and pull out carefully. Little air bubbles may form but that is to be expected! Before marbling the next glass, take a clean toothpick and sweep up any excess polish from the water.

Allow to dry completely before applying a layer of clear polish.

Once everything has dried, remove the painters tape and touch up with nail polish remover and a cotton swab.

Your glowing glasses are finished! *Glassware should be hand washed only.

Bottoms up!

(tutorial adapted from Joanna Bean Martin; all images by HonestlyWTF)
this is the coolest DIY ever!!
http://bonnieclydemarni.blogspot.com/
very cool.
january, x
jessicajanuary.com
Awesome DIY, I haven’t seen anything like this before!
xoxo
http://fashionagony.blogspot.com/
wow, great idea! 🙂
http://style-xyz.blogspot.com/
Oh my god, are you KIDDING ME?!?! This is actually possible?! Why have we not been painting our glassware with nail polish for years? This has got to be one of the most ingenious DIYs I’ve seen ever. I know I say that to you guys from time to time, but then you keep going and topping yourselves. Not that you can top this one, seriously, this just blew my mind. Wonder if there’s something else we could use instead of clear nail polish to seal it so it’d even be dishwasher friendly…
http://nomadic-d.blogspot.com/
Love, love, love this! What a great DIY!
http://aurelieandangelo.com/
I LOVE this idea!! It’s so simple, but looks so great. I’m definetely trying this.
xoxo
GOD this is the coolest diy ive ever seen.
so pretty!!!!! what a great idea!
love your blog
xoxo Meagan
caseofcouture.com
Another fantastic idea! That looks beautiful.
My mom once did that with some old glasses, and we all thought she was crazy but clearly she was on to something. 🙂
xoxo
http://natashafatah.blogspot.com
This so fabulous! My glasses better watch out ; )
x
Michelle
http://www.michellesstylefile.blogspot.com
This is relly beautiful! And i love the colors you chose <3
http://chocolate-sarcasm.blogspot.com/
This is so awesome!! Must try it out, I do a lot of water-marbling on my nails. Never thougt of doing it on other stuff though! x
http://stainsofpaint.blogspot.com/
I love the DIY, but I REALLY love the glassware – where did you find it?
this is an amazing diy… definitely want to try it.
http://herpersona.blogspot.com.au/
http://herpersona.blogspot.com.au/
Wow how cool!! Reposting this in this Friday’s weekly reads!!
natalie
http://streetandsuch.com
Cool! I knew about this “magic”:) with nail polish, but on glass? No.
Good idea.
Thats awesome!
Lovely DIY…. The glasses in the picture are beautiful…
always a great addition to any home and always looks fantastic.
xx, http://wordbyjessie.com/
This is brilliant – I LOVE!
Genius!!! Am actually going to have a go at it!
That looks like a lot of fun.
Vintagehoneybee.blogspot.com
I”m mesmerized by this. It’s so cool! 🙂
xoxo
http://www.thewrittenrunway.com
Wow!
This is an amazing idea, i’m going to try this out!
http://www.roaringmytwenties.com
Most beautiful thing I’ve ever seen
LOVE LOVE LOVE this tut. I cannot wait to try it and marbelize everything in sight. Y’all are amazing!!!!
These are awesome! I tried it with shaving creme and dye on fabric and it definitely did NOT turn out this lovely…..
Very cool. And so easy! I’m envisioning doing this with wine glasses, on the bases up to the stem.
This blows my mind!
Oh god, I want all of those nail polishes!
http://www.peppermintsandpixiedust.blogspot.com
What a brilliant way to use up my last season nail polish! It will be dark and moody though.
Psychedelic! I have so many plain shot glasses laying around. I think they’re asking for a makeover like this one.
xoxo,
mon amy
Love this. I can’t wait to try this at home on my glasses!
-Brittany
Belle epoque @ fashionista-brit.blogspot.com
What pretty! I love!
great idea, works so well!
Wow, what an amazing and fun project! Love the colors you used!
xx
Caitie @ http://www.thriftedandmodern.com
You can use same technique on your finger nails very cool!
Reminds me of these awesome candle holders but next level! I might have to do both!!!
http://www.fengshuidana.com/2012/04/23/killer-diy-lighting-projects-to-add-fire-to-your-life/
класс
Thats really nice 🙂
please sell in your “HWTF” shop! 🙂
are those bodum glasses??
http://mybabykins.com
oo such a fun idea!
http://www.anabstractnoun.blogspot.com/
Awesome!!!!
That looks amazing! What a fantastic idea!
http://www.stylingmylife.com
This is the most amazing idea I’ve seen in awhile! I will use this idea definitely!
http://thebasicss.blogspot.com
You guys ROCK the DIY’s -love love love
Ax
Looks great! Wouldn’t you be able to seal it with some modge podge to make it more durable, possibly even machine-washable?
Such an amazing result!
Fashion in Pepperland
That is so cool!! Love it!!! <3<3<3
I love this idea! definitely trying this
scribblesandsomersaults.blogspot.com
I tried the whole water manicure before and it was unsuccessful, this looks like it would work out much better!
<3 Kate
http://www.theforgetfulwife.com
Love! I recently did a marble manicure, http://dontmisit.blogspot.com/2012/03/marble-nail-art-diy.html
It was lovely, but nails last for a week, these promise to last longer! I cannot wait to make some summer marbled glasses!
I LOVE this idea. so clever and a great way to add drama and a pop of color to an other simple summer table. How fantastic would an all white table be with these fun, happy, modern, chic glasses?! thanks for sharing.
This is a great idea!! but nail polish chips off of glassware… wouldn’t it work much better with glass paint?
What a great trick!! It will be on the top of my DIY list for sure!! xoxo
http://www.hellohellofriday.com/
believe it or not,there is a similiar application but its done on fingernails!its called water nail art and it takes some practice,but i ve managed to master it!you ll find it on youtube.com if you want the nail tutorial,,,,,,,this is an awesome idea for glassware!
beautifuul
Original idea!! Looks amazing:)
gorgeous 🙂
http://hobitivi.blogspot.com/
I once paint my glass with my unused nail polish and the result is really cool. 🙂
COOL but i’m not sure is nice…for me NOT =) Sorry but always is amazing your DIY’s
XOXO from MUNICH
La Vie Quotidienne
You can check my STRAWBERRY OUTFIT in: http://www.laviequo.com
I open my SHOP in: http://laviequo.blogspot.com/2012/04/laviequocom-shop.html
Totally fun!
theBohmerian.com
how cool is this!
XO,
Awesome DIY! Thanks for sharing.
Sarah
http://www.tellhershesdreaming.com
totally cool idea. will try this soon:)
OMG this is soooo cool 😀 I am sooo trying it sometime during the summer!! Those glasses would be perfect to brighten up glasses for a summer BBQ or party 🙂 xx
i did it !
thanks.
<3
this is such a great idea, so creative. could even make a good gift!
From Cupcakes, With Love x
Such a great idea! I wish I could get something like that for a birthday.
It looks great. Thank you for this nice tutorial 🙂
le cours des choses
genius!
This is amazing! So damn cool! Great post!
Brilliant!
love it!
That’s an awesome idea! Looking great!!
http://fashionarymonster.blogspot.com
my friends and I did our nails with same technique!! you can do rad experimental nail arts… 🙂
cute!!!
http://glamourgirl-bg.blogspot.com/
OMG !
Great DIY , Thanks for sharing . 🙂
xo ,
Ana Catalarrana
awesome!
xAnna
Fairytalefrocks.blogspot.com
wow, this is beyond wonderful.
Collections
Oh, my…. This is definitely one of the coolest, best DIY ideas I’ve seen! It’s now on my to-do list! 🙂
Looks like fun! I might just try it!
I love this! Can’t wait to try this myself.
This is such a great idea. I used to do something similar with easter eggs and oil paint but I love that you can use these all the time! Especially if you drink as many shots as I do…
This is so cool! It’s actually a DIY I’d tried.
Love it. Can you use the nail polish remover and take it off and redo it if you decide to change it up?
Nail polish to make decorative glasswares? That’s really, really creative! Two thumbs up!
Annabella Merlin
Creative Photo Albums
wow what a cute idea i love it
do they go through the dishwasher unharmed? just wondering…
Tried to do this… and it did NOT work 🙁
The nail polish sank to the bottom and clumped immediately. We could only get one color to stay at the top, and as soon as we put another color in with it, they separated from each other.
@Susan, perhaps the water is too cold. try it with warmer water!
I just tried it today with a vase and a jar. It worked! Looks good! Thanks for the post!
this is a fantastic tutorial ! thanks for sharing this, I just discovered your blog and I think it is very pretty.
Amazing! I will totally try it out. I didn’t like the marbled nails but this looks great 🙂
Beautiful idea with all those crazy leftover colors that are filling up our bathroom drawers!
Just found your awesome blog! Love this idea! I’ll have to try it out.
Do you know if this would work on acrylic glass?
wow! I am going to get some polishes!!
Finally a purpose for those colors you buy for one use. I have about 30 colors choices!!!
These are amazing! Awesome idea
awesome!
Can’t wait to do this!!
very cool and summer!!!!
I am thinking that this idea would be perfect for wine glasses. This would be a cute gift for a friends birthday! Can not wait to do this
I shared a link to your tutorial on The Craft Connection http://craft-connection.blogspot.com/2012/05/diy-marbled-glassware.html
this is a cool idea. Ive seen this technique done on finger nails too. Very cool!
Awesome diy thanks for the inspiration.
Jewelry Rage
Hyper genial ! A faire Merci Vi
in Turkey we called this technique -> Ebru Sanati it´s an old ottoman crafts if you want you can google it.
instead of glas you can use paper or other things 😉
Did it…LOVE it…shared it!! https://www.facebook.com/media/set/?set=a.10151042130149796.444695.166064804795&type=1
Amazing project! and shared.
http://www.thesweetestoneoverthemoon.com/
Just tried this, and looks pretty cool…My only question.complaint is the air bubbles!
I know in the tutorial it said that they’re to be expected, but when I got them, they popped and would ruin the whole marble design to the point where I feel like I want to redo the whole project. Any help, maybe?
This is beautiful. So ingenious of you. I can’t wait to try it out.
This DIY is the same for nails so if you like it, get it on your fingers!
I have to try this!
Oh my goshhhh! I’ve known of water marble nails for a long time, but the idea of using it on glasses is unique!!! Thank you so much of this tutorial!!!!
Great!this glassware looks so beautiful and I like it at all!
OMG!!! thats so simple and amazing!!! cant wait to try!!!
aonecentlife.blogspot.com
Just made these with the same glasses! Gorgeous and simple but beware the air bubbles, a bit tricky but worth the patience:)
does it ever come off? like in the dishwasher or if u scratch at it??
I have these kinds of shot glasses! I have to try this. 😀
I can’t seem to get it to work. The first type of nail polish I used just sank to the bottom no matter the water temp and the second batch of nail polish I used dried so fast on the water that I didn’t even have time to swirl it become it wrapped itself around the toothpick. Can you advise?
Thanks,
omg Nice !!
dumb. hey, newsflash. if a kindergartener can do it, it probably isn’t worth publishing on the web. just cause it’s new to yyou, oh my gosh, go get a camera, now i’m popular. you dam martha stewart artsy fartsy wannabees. ok ok your speical. happy now.
Its amazing, i love it 🙂
– love Michelle from Denmark
1st off, “blumpybuttt” is an idiot & should leave Pinterest all together. Your username says it all!
We started this project yesterday. It’s not as easy as u think. Trial & error on which polishes work. I’ll post a pic of our finished work once it’s done.
blumpybuttt, don’t you dare comment!
beautifuul
these are sooooo cute!
I tried these and it is not as easy as it makes it out to sound. For me it was easier to drop the nail polish on the bottom and swirl with a toothpick that way.
It’s a different idea and featured for just a glassware. Thank you!
I think this is awesome and a great idea. I thank you for sharing it as we will be using it for shot glasses as favors for our wedding. 🙂 I will be sure to say made by us idea by Honestly WTF….
I did this.. It made a little mess but that was easy to clean up!
It looks really cool!
I only used three colors: Purple, Blue, and Green, but it amazing 😀
Question do i use only glass cups? or can i use clear plastic?
You use the word “glassware”, but are you actually using “glass” or is the “glassware” actually “acrylic” glassware? I was wondering if it makes a difference.3
These look fabulous! And it looks so simple to do. I must go through the nail polish and decide which colors would look best.
OK, so I did this and blogged about it. It took me a LONG time to figure out how to get it right. I included some tips and tricks in my post… Thanks for the inspiration. Mine came out awesome, completely different 😉
http://sketch42blog.com/2012/10/diy-marbleized-striped-glassware/
This is awesome! You can also use a similiar technique for your nails too 🙂
Wow! That looks so cool! Just pinned it on my DIY file on pinterest. Thank you so much for sharing this idea ♡♡♡
I’ve seen this done on the bodies of electric guitars and basses. Pretty sweet.
it’s just amazing !!! O_o
Wow…I had to scroll down, down, down and then DOWN even more to comment. So many fans seem to love this idea. Count me among them 🙂
This is such a clever idea, and I’m highly jealous that I wasn’t the one to think of it!
Since I can’t use nail polish on my nails any more for weird medical reasons, a question for those who do their nails with this technique: how do you not end up with nail polish all over your fingers? Do you mask off the mail area somehow? (I know, I could Google it, but since you’re all here already…)
Hey, I love the idea, but are these just for decorative use only? Have you tried washing them in the dishwasher/is it safe? I’d love to try it out, but I’d want to make sure I could still use the glasses afterwards.
mind blowing ….super like
wow! loving it
I’ve tried finding an answer in the comments with no success… can anyone tell me how easily the paint scratches off? I’m sure it’s not dishwasher safe but at how easy is it to hand wash? I just don’t want to have to spend all that time and effort only to have it come off after the first use, ya know…
@Jennifer, the clear nail polish helps seal the colored polish. After several washes, I’m sure the paint will eventually scratch off. However, this has yet to happen to my glasses. Hope this helps! Good luck.
Interestingly beautiful love to try that someday……soon
COOL! gonna try this now!
:))))) THANKS!
Great idea, I am definitely going to try this!
http://www.ofbeautyandnothingness.blogspot.co.uk
I liked it so much but it didn’t worked.. :S think i did something wrong.. when i started to pull out the polish with the toothpick it was already dried.. it’s too beautiful to give up on it, i’ll try it again,, 😀
Cool, I try this now!
and we can try s.th else too.. we can don’t put the cover, then some parts of of our glass in the top would be color full too. 😀 try it. it would be pretty!
Wow!!! This is really cool!! Totally love it!!
http://www.fayrealm.blogspot.com
cool very nice tips thanks for sharing……………!
This is very nice, but how do you seal the paint? this can get out with use or a single scratch…
Amazing.. Its very pretty.. Such an awesome blog you shared..
http://acmedisys.hpage.com
http://goo.gl/JsCd7
Interesting idea, I’m thinking to tell this to my gf… she will most certainly try to do it 🙂
I wonder if it would work anybetter with etching the bottom of the glass first…
love this!
arabellamag.wordpress.com
Hi,
Thank you for this amazing idea!
After reading this, I immediately decorated 4 bottles.
Now I know what to do with my empty pasta and sauce bottles
I’ve added your link to my pininterest page
Have an awesome and creative day!
Would be a great ‘favour’ idea for a wedding!
WOw…. this stuff is seriously amazing.. gonna do it today.have sooooooo many nail paints that i dont use anymore and my dad has sooooooo many glasses…
Very interesting and useful!
I tried it, and its harder than it looks! But now i have amazing glasses!! 1 tip: you need put the glas at an angle into the water -not flat-, otherwise you get a bubble underneath your polish and then you have to start over….
i tried it, its bit difficult for the 1st time but can do it..
oh common girls you can fix your nails like that!;)I tried many times is nice for the summer!
it worked really well but i decided to do almost the whole shot glass instead of just the bottom. and it looked awesome.
Very Cool Glassware designs and too good. Lovely designs and it needs a lots of patience to have this done. Great work and cool concept. loved it.
Paromita
http://fashionstudio-urbanpurple.blogspot.com
Super mooi!
http://www.clothingstoresgo.com/: Clothing Stores. Women’s clothing. Dresses .Women’s Clothing Stores
you can do that with your nails too
So cute!!! I’m going to do for sure!
this is super, will try it out!
what you’re finished, maybe if you put the glasses in the oven at about 350 for 15 min. then u can probably wash them in the dishwasher
Lovely for presents too!! Just buy a set of shot glasses and decorate them 😀
Also, your nails.
http://1.bp.blogspot.com/-TwCzDKt8Otc/UFrUZeGHDjI/AAAAAAAABSU/roH8EHY6Pfw/s1600/zoyamarble.jpg
=)
http://www.dressshopgo.com/ Casual dresses. Evening dresses. Party dresses shop online sale
very good idea and your presentation too good
Really great idea. I like this DIY.
oliveneedspopeye.blogspot.com
This is AWESOME. Its different and makes your glasses more beautiful.
Are these still dishwasher safe?
You could also possibly stencil on someone’s name or words of your choosing on the sides as a gift… like, possibly glue-sticking the paper stencil to the glass and taping the outer edges and all the sides, and quickly rolling the glass through a pan of water like that. Would make a trippy Bride/Groom set, I think… 😀
Nail polish on glasses
I’m doing this tonight with wine glasses for the holidays!!
Love this and will try to make it. I have a lot of nail polishes, cause I was painted small stones all summer. Nice hoby on beach. Love all your post, because it is usualy all simply to make and results are great!
Wow what a great site, glad I saw this it was so helpful. Have you read about http://www.diybabymobile.com, another great website! Keep up the good work!
This would also be great for parties and wedding decorations. Just imagine the possibilities. Mason jars bowls for treats at the wedding using the wedding colors. WOW
Most of the Bollywood celebrities also use these and they are BEAUTIFUL…no doubt
Nail polish on glasses
Great site you have here.. It’s difficult to find high quality writing like yours nowadays.
I really appreciate people like you! Take care!!
I love it.
http://www.IdeaAndCreativity.Com
http://www.Ideativity.Net
I’m sure the polish would stick better if you lightly sand the glass then clean it with rubbing alcohol first. Also, would it be dishwasher safe if you set the paint by baking it in the oven after you’ve finished decorating it?
I did this to some $store glasses, check out my video on my Facebook album
I also did this to a shot glass just to see if I could put it in the dishwasher, the dishwasher idea started chipping off after 2 washes so id recommend hand washing only. im making them for Christmas gifts so ill put a note in with them saying so.
Thanks for the great idea, I’m going to try it since I have so much nail polish that I don’t even use
Nice post, I am employee of HangPlas Ltd, the manufacturer of molded parts for manufacturing industry and household.
Great Post, I like it. thanks for sharing.
I tried this and the bottom was all blobby and anything but smooth. Not sure what happened there.
Wonderful colors!!! We love it!!!
I want to try this on some wine glasses that could use a little color! 🙂
私は完全述べたすべてのものをあなたがした 認識。 実際にあなたの様々な他の記事によってと私はない、私は閲覧感触 あなたはあなたがしている その確か正しいです。 ウェブサイト グレイこの特定のある特定のと願っています。
★【送料無料】レザー調ペットベッド KK-0031【RCP】【e-netpet】【0530pe_fl】:犬とEnjoy!ドッグパーク http://amoreiras.info/catsaleml/1291.html
グレートサイトの男を得るとき
★お取寄せ★ 【ブラックダイヤモンド Black Diamond】 バリウィズス ドッグボーン/25 【6月12日現在 メーカー在庫数】:ロッジ プレミアムショップ http://www.zarmen.pl/sponlones/9162.html
私はこのようなサイト 非常に かなり、本当に、そのA 。情報
。私は本当にあなたが言っていたものを楽しみました。あなたは絶対にこの主題に新しい音声をもたらすので、続けます。ない多くの人々はホードが言ったことを言うとまだそれは興味深いものになります。まあ、少なくともイム興味。あなたからこのの詳細を参照するのを待つ傾けます。
。彼らはそれを育て、世界で私たちは真実で話題に上陸したか覚えていません。私はそれにクランベリーと優れたフルーツサラダを食べるリコールありません。私はあなたの仕事を賞賛
ます* 作成そこにいくつかのまともなポイント。私は問題の懸念のために、インターネット上で見て、見つかったほとんどの人が一緒に行きます |ウェブサイト|サイトインターネットサイト。
あなたが見つけることができますいくつかの魅力的なポイントの時間で、この中でライトアップ そうであっても、私はそれらのすべてが心に中央を見れば知っているドン。そこにができるいくつかの妥当性であるが、私は私がするまで意見を保持かかります見る、さらにその中に。 素晴らしい ポスト、おかげで、私たちは余分たい!私が愛するよう
魅力的な記事、私はブログや勧告で似たようなことを見て、ここで、このブログ、バイバイ!好奇心旺盛
。まさにあなたは、しかし探していますか?私はこのブログに出会った
、右後に 多数 確か知っている最後に、インターネット上の時間私たちは、その個人を発見しました何彼らがしている 多くの議論が素晴らしい 取引素晴らしいポスト
なった
あなたがかもしれないここウェブログ素晴らしいを持っています!あなたはいくつかは、私のブログの記事を招待するにしたいでしょうか?かなり
I tried , but something went wrong 🙁 I think thats because I had air bubbles when I pulled out the glass … I dont know how mend it . 🙁
あなたは、あなたのブログがこのクールな、Idは感謝して見せていた方法についての任意のヒントを私にメールすることができます!
ファンタスティックは我慢しました!これは、この問題についてのうち発見人々の数を支援する可能性があります。あなたはこれらと一緒にビデオクリップを組み込む必要がありますか?それは間違いなく出て支援することができます。あなたの目的は、その場で、あなたのためでした。私が最も可能性の高い私の仲間にすべてを説明する必要はありません。私は単にここにそれらを指示することができます。とにかく、私の言語で、このようにたくさんの良い供給ができなくなります。うわー
よく書かれたブログの記事をそれを維持します。私はこのブログ&#038に常にチェックするために使用されます。イムはとてもインスピレーションを得ました!非常に有用な情報、特に最後のいくつかの文章。私は実際にそのような情報を必要としています。私は非常に長いため、この特定の知識を探しているために使用されます。 Thankx&#038;がんばろう。
ウェブマスター優れた非常に良い良い あなたがいる。 インターネット ウェブサイトローディング速度は素晴らしい。 だまし任意の| 実行やっている|それはどのあなたがすることをようです。また、内容は傑作です。あなたが実行した素晴らしい この上 !
スーパーコピー シャネル ヘアゴム 本物 http://www.newkakaku.net/index.htm
スーパーコピー 激安 ブランド バッグ http://www.ooobrand.com/index.html
What’s up to every body, it’s my first go to see of this blog; this weblog consists of remarkable and genuinely good information in support of visitors.
lookie here
Big Like… Nice
Its nice idea. I liked it.
I tried it, totally did not work. Nail polish hardened in seconds and I ruined a glass. Any tips? Water temp? Is that important? Thx
Just discovered your site and I love it! I am reaching out to sites I like and want to see if you would provide feedback on my etching supplies if I sent them to you free. Will you please let me know by email? I will try to come back to this page later to see if you replied in the comments too. These will be shipped directly to you at no cost. I am looking forward to your reply. Thanks in advance for your reply. Eric
Love it
One question? Can the finished glasses be baked in the oven like I do with painted glasses for longer wear and tear?? Thank you
“Do you know what a pessimist is?” “A man who thinks everybody is as nasty as himself, and hates them for it.”
amazing craft…
What a neat idea!! This would even be used for a teen overnight party for them to take a glass home to remember that event.
Looking for entertainment for tonight and do not know what to do? Visit this site and soon you will be able to get to know interesting women from different countries!
http://www.escort-london.com
All great ideas!! I will definitely try a few of them.
How durable is this? How easily or quickly will the nail polish come off?
Wow wonderful information