For several months now, we’ve been receiving emails requesting a friendship bracelet DIY. Well, friends, ask and you shall receive! Today, we’ll give you a step by step tutorial on the classic chevron pattern. If you used to whip up friendship bracelets like a champ in grade school and have since forgotten how, consider this a refresher course. And if you can make these with your eyes closed and arms tied . . . umm, can we still be friends?

You’ll need:
- embroidery thread
- a safety pin or tape
- a pair of scissors

[linktopost slug=”diy-heart-friendship-bracelet”]
Start by cutting several strands of embroidery thread at about 24 inches each. Make sure there are two sets of each color. Combine the threads and tie a knot, leaving at least 3 inches of slack. Tape it to a flat surface or safety pin it to a pillow. Separate the two sets, arranging the strands in a mirror-image pattern with the outside strands the same color and so on moving inwards.

Start on the left side with the outermost color (shown here in red) and make a forward knot by creating a 4-shape over the 2nd color, loop it under and back through the opening.

Pull up and to the right to tighten. Make the same knot twice over each color. Continue knotting over each color, towards the right, until the outermost color has carried over to the middle. This is one half of the chevron pattern.

Now pick up the outermost color on the right side (show here in red) and make a backward knot, creating a reverse 4-shape over the 2nd color, loop it under and back through the opening. Pull up and to the left to tighten. Don’t forget to knot twice over each color!

Continue knotting towards the left until the outermost strand reaches the middle. Tie a backwards knot with the two middle strands to connect the two halves. Did you remember to knot twice? The first chevron row is complete! Continue with the the next color, which is now the outermost strand . . .

Remembering the color order is important for the first few rows but after the 3rd or 4th row, the strands will fall nicely in place. Finish it with a knot and a braid.

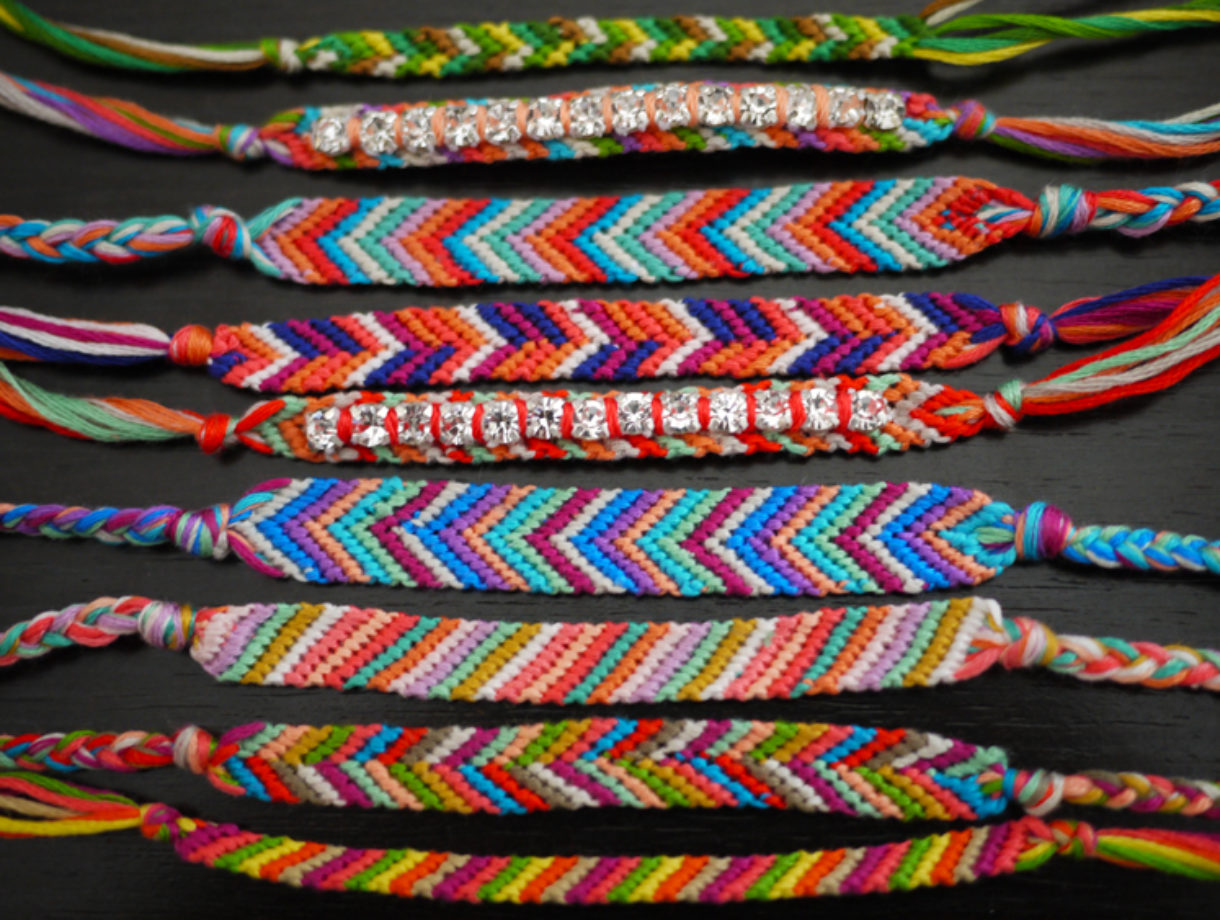
For a striped bracelet, cut one set of colors and simply carry the outermost color all the way through to the right side. For an assymetrical chevron, mix the colors when dividing them into 2 sets. Be sure to count the number of strands so you know when to stop in the middle each time. For an embellished bracelet, take a small piece of rhinestone chain, glue it to the top of the bracelet and stitch embroidery thread between each rhinestone with an embroidery needle. A wrist full of HonestlyWTF DIYs to keep you busy all summer long!

(top image via Jak & Jil, rest of images by Honestly…WTF)
Oh my god, I’ve been looking for a good tutorial everywhere. Thanks!
cool
me to
This is very frustrating, does not work and is a waste of my string and time☹️☹️
I know
I love making these – it’s so theraputic and fun. Love the colors you chose!
I always knew how to make these but then I started school and I forgot. This is the perfect website to use!!! Thanks
How do you make a simple one?
Amazing! Love the rinstone addition.
Wow, it seems like such an easy DIY! I’m definitely going to try it out this week!
xx,
Ale.
LOVE LOVE LOVE these!! They remind me of my childhood!
Freida and Nellie have beautiful ones with jewels and rhinestones in them!
xo
http://cestclassique.blogspot.com/
I shouldn’t have read this… I totally want to make it right now!
xoxo
http://www.thewrittenrunway.com
Gotta love a good old friendship bracelet. The more you have together, the better. I love these and thanks for sharing how to do this!
xx, http://wordbyjessie.com/
Nostalgic!! Recalling carefree days of my youth making bracelets to sell to classmates. I love the idea of attaching the rhinestones for a “grown-up” update. Thank you for the tutorial reminder, going out to get some embroidery thread asap.
http://www.theclotheswewear.com
Wearing motherhood with style.
Funny thing, a couple of weeks ago I stumbled across another tutorial and I remembered how to knot a friendship bracelet like we did back in the ’90 in highschool – I love them and I’ve already made a bunch.
http://hersomgranddanois.blogspot.com/2011/06/friendship-bracelets.html
These are really pretty. I made some a while back too! http://www.iamvintagelover.com/diy-friendship-bracelets
Ha! So funny! Because yes of course, I did used to whip these up like a champ back in the day, and yes, just the other day I was trying to remember how the hell I did it! Perfect timing. And the rhinestone additions are great. I love that last photo too, with all the friendship bracelets and the rope bracelet and the braided nut bracelet…. you’re not kidding about giving us enough stuff to do to keep us busy all summer! I think maybe I’ll make one tonight!
http://nomadic-d.blogspot.com/
Awesome!! I was wondering when these would come up. Now this I already have ready so I can do this DIY asap!
xx
Emy
http://emykoster.com/
so cool love it
http://trivialinsanity-n.blogspot.com/
No blue in the corner salaam on too actually over each you wear was rich you fun dunno vino and we what to do do u send the it guy in poop dick
so pretty!! I love it!
GREAT PICS YOU SHOULD MAKE A SHORT VIDEO:)
Copper Etiquette Always Appropriate
love it!
http://kimchicsisters.blogspot.com/
I just bought my daughter a pack of thread on Sunday for us to make bracelets for her besties in school. She’s gonna give them out next week. It’s nice to see some things from my childhood that will always be time less.
I had sex with you daughter by the way in school….. sorry
Your DIYS are always my favorite. I’m definitely going to try some this weekend. Absolutely love the rhinestone friendship bracelet.
Fashionable Collections
I love the last picture. Such a great recap of cool stuff for me to try 😉
ah! i want these!! i used to know how to make them as a kid. i honestly don’t know how i pulled it off ~ but if i was able to back then, i could probably do it now ~ it looks so intimidating!! 😉 thank you for that lovely tutorial!
xo~ kristina
http://beancakes.wordpress.com/
OH MY GOSH
i LOVE LOVE LOVE!
and perfect timing!
i just moved into my new art studio and wanted to have a little DIY party for my girl friends and I before I got busy in there, and I really wanted to make friendship bracelets, that we all could exchange after!
i LOVE the ones with the extra fancy touch!
question…
how long do you think it took you to make the one?
you guys rock!
xo-L
http://www.thesphinxandthemilkyway.com
http://www.spencer-studio.com
I’m going to have to try the Chevron pattern. It’s sooo sweet!
These are perfectly amazing! I looooove them!
http://www.glamorsham.blogpsot.com
ahh, I used to make them all the time when I was 12 or so, it was so much fun!
http://flash-delirium.blogspot.com/
My sister and I used to spend hours making these together. Great memories! Micro-macrame is such a fun medium.
Omg I’ve been looking for a source for rhinestone chain for months and never even thought of Amazon. Thank you so much!!!
These are great! Such a helpful tutorial as well. Great job ladies!
xoxo
Lia
HA! I was totally trying to remember how we made these too. I had them on my ankles and wrists the entire time I was middle school. I want to try to make those as belts. I think that we used to call them Guatemalan belts… I’m totally doing it!
Great tutorial, I love the idea of rhinestones on friendship bracelets. <3 the DIY's, keep them coming 🙂
xo-AlbeeLucky.blogspot.com
OMG! I’m so excited about this tutorial, I’ve been looking EVERYWHERE for one!
so pretty!! I love it!
Thanks for reminding me of these pretty bracelets! I used to have both arms full of them in elementary school and have totally forgotten about them since!
Think I’m going to pick up some string on the weekend and get back into it. 🙂
these totally bring back memories – I used to make these by the dozens and have been thinking about them and in need of a refresher course.. so THANK YOU for sharing, great way to add a pop of color to just about any outfit.
You’ve done yours so neat!! They look amazing! another amazing DIY. Back to road trip/ cottage/ camp days with these friendship bracelets. thanks!
-Winnie
http://winniereally.blogspot.com
YUM! I am totally digging out my dmc threads and making a friendship bracelet. I haven’t done that in years!
when i was child i used to make the bracelet like this:) i really forget about them, but maybe its time to make it again:) i really enjoy it!
this is offf the hook! Thank you.
http://fashionablenotebook.blogspot.com/
Oh how this brings me back! I love it and I ought to try it out again… Thanks for the reminder!
Just a Silhouette
I haven’t made friendship bracelets since i was a kid.
I might again!
xo
agnes
at
http://iiiinspired.blogspot.com/
I’ve been making tons of these! 🙂 super duper fun and def reminds me of childhood.. simpler times, right? I gotta go make more now!! And with the bling, of course.
xx Love & Aloha
God I love them and I’ve been meaning to make myself a couple for the last few weeks.
Cheers for the tutorial!
Franzi
xx
http://franzistylenomad.wordpress.com/
thank you for sharing! i can’t wait to get off work and go buy some supplies!!!
chelsealynla.blogspot.com
Great tutorial!! I used to made that kind of bracelets all the time!!
Does anyone know where can I buy tiny beads like the ones Nikki B (http://shop.nikki-b.com/) uses????, they are smaller thant the usual beads, and I love them, but haven’t been able to find them 🙁
These bring me back to like the 3rd grade. Love it!
Hopefully you would upload a video too… i couldnt make it, hope the second time…
as i see im the only one who couldnt make it 🙁
i’d like to see it like a necklace…
It isn’t always easy but you just have to keep trying
Honestly…WTF-Literally just thinking today i need to make more friendship bracelets for summer! I love them, great tutorial, can’t wait to try it out!
http://www.simplyrosepetal.blogspot.com
Great tutorial
It would be great if we could see a video aswell 🙂
Your blog is awesome!
http://www.d-capital.blogspot.com/
those look so cool! definetly making some!
I have 3 daughters (6 and under) and we have been making these (well the 6 yr olds). The 3 yr old is sufficient at tying lots of knots. None of the bracelets are very polished looking, but it keeps them all very busy! 🙂
Wow, this tutorial was done so much better than the other ones I’ve read before.
Thanks so much!
Grace
http://dream-boating.blogspot.com/
What a blast from the past! I made these back in the 80’s and sold them by the back door at school!! I cannot believe they have made such a huge comeback. Love it!
Kim
http://fortyovertwenty.blogspot.com/
This is awesome! Thanks, I have to try and make some of these! I love the one that has rhinestones in it.
http://thedailytiara.com
I used to make the straight line ones when I was younger and they would always coil up on me.
Jamie, me too! I have never managed to make a friendship bracelet that didn’t end up coiling on itself. Anyone have any suggestions?
@Lauren, it really just depends on the pattern, width and length. I can make a thin one in about 20 minutes but the thicker chevron ones were made while watching a full length movie, taking some breaks throughout 😉
@Jaime @Christy the reason why it coils is because you didn’t knot twice each time! give it another try!
And yes, we’ve gotten lots of requests to do a video . . . stay tuned!! We’re so glad ya’ll loved this DIY. Thanks for taking a trip down memory lane with us!
xx
I remember making these all the time when I was a kid. And a few years ago, a friend made me one. Nice to see these are coming back in again.
wait until the boys see this! i think this was after my generation. i always make the babysitters help them. i am totally going to learn now! you are awesome!!!
loving the DIY tutorials!
i absolutely love the rhinestone addition. can you give instructions on how to make that one?
I used to make bracelets just like this all the time when I was 10 or 11. Love them!!! 🙂
I also used to make these all the time in grade school, during recess, but we always safety-pinned the working bracelet to our knee. Thank you for the chevron tutorial, that’s a new one for me and now I have to try it! = )
Heyyy ! I can’t believe it !! I’ve been asking you for this for some time so I’m just sooooo happy to see your tutorial of today !! Sooooo it’s my turn !! THANXXXXX !! Will send you pics when finished !! xoxox
http://blogmoodeuse.blogspot.com
Thank you so much for this tutorial!
Are you going to have a newsletter, I’d like to receive your posts via email.
All the Best, Katy
Is there a DIY for the braided bolts one? in the bottom pic
@K yes of course, that braided bolt one is our DIY Hex Nut, check out the instructions here
Great DIY! Love friendship bracelets and I’m so glad that they are coming back! Should dig out some of my old favorites 🙂 Or maybe make a few new ones 😉
Tasia
http://rufflesandsequins.blogspot.com
Great tutorial! Can’t wait to make one of these bracelets and pair it with my DIY hex nut bracelet:) Thanks!
I keep seeing friendship bracelets for sale at many online boutiques and say I used to make these back when I was younger and should do so again. Not only are they fun to make but they are so much less expensive to so so AND I can pick my colors. Off to Michael’s this weekend to pick up some string.
I used to make so many when I was a kid .. :)and then I forgot 😀
WOW…i really love it…. thanx for shairing! 🙂
hello, How do you put the strass in to the bracelet?
thanks
ana
This is The Trend! I was looking to buy one, but freida and neille is expensive as hell for basically nothing, doloris petunia is about the same (but prettier), and I also saw nice stuff at http://www.nice-cute.com which is more affordable. Thank you for instructions!
Hi there! This was such a fantastic post that I got inspired and started whipping up my own friendship bracelets. But I have a conundrum- in your second to last photo, the second bracelet up from the bottom looks like an inverted chevron made with ten colors, but is only ten knots wide. I’ve been working on it, and have come up with ten colors on each side, which is 20 knots wide, and five different colors on each side, but then only five colors show up on each half.
This is sort of confusing, but if you could help solve my problem I would be so grateful!
Thanks,
Bridget
@Bridget. The 2nd bracelet from the bottom was made with 10 threads total – 10 colors. Don’t cut 2 sets of each color. So separate the sets into 5 and 5; and knot like a normal chevron, remembering to count 5 knots in each time. Hope that helps!!
Great tutorial! Thanks!
wow! i totally remember making these when i was a kid. thanks for the reminder. i can’t wait to teach my daughter.
Oh my! do you really call these a DIY ? I’ve been making them since 10 and know some kids who knew how to make these in kindergarden !
How do you make the bracelet thicker – width wise? Mine is very thin. It’s pretty, but I like the look of the wider bracelets in the picture above.
funny! today I post my own friendship-versions, too :). You can see it here : http://vanrolt.blogspot.com/2011/06/four-coloured-friendship-bracelets.html#comments
and here:
http://vanrolt.blogspot.com/2011/05/freundschaftsarmbander-mal-anders.html#comments
that is a lot of work but it worth
Regards
Mel
order here: http://de.dawanda.com/shop/VANROLT
wow, this just brought back a HUGE wave of memories. I want to start making these again!
It’s been so long since I’ve made one of these! I doubt I would have the patience to do it again, but it looks so damn good so maybe I should try it? great post!
how do you attach the rhinestones? LOVE this, absolutely so gorgeous and summery and colorful. thanks!
oh god! i’ve been making them at school.. like 17 years ago. Looks like I might take it up again 🙂
I got one word and that is “CAMP”!
Waauuuw, great!!
This truly is a good activity for my summer holiday!
Thank you 🙂
looks so chic and simple
http://girlynote.blogspot.com
I totally want to make it right now, 😀
I used to make those too! I still love them, should try this out again some day…
http://thefashiondiet.blogspot.com/
Cant get enough of all your awesome DIY. I attempted my own DIY Assad Mounser necklace…I would love to see an Honestly…wtf version of one of her necklaces!
http://www.lepetitenest.com/2011/06/diy-assad-mounser-necklace.html
<3
Wow!!! I made these right away when i first went on this page! I made one for my friend because it was her birthday, I can’t wait to see her when she see’s the beautiful colors and design! Now my sister and my friends want me to make them one. Looks like I’ll be staying home all weekend making these creative and cute bracelets!
I love your DIY’s, but it’s so sad a website called Girlscene.nl copies a lot of your DIY’s, like the friendshipbracelets, these earrings and the woven chain bracelets.
Here’s the link to the most recent copied DIY: http://www.girlscene.nl/fashion/doityourself/2011/juni/diy_vriendschapsarmbandje
But you are doing a great job!
o m g. it’s so cool! but it’s really hard too. it just doesn’t work out when i try it.
uhm, this is freakin awesome..just “pinned” this to me pinterest! i wanna make you one. thank you <3 have a nice week.
I have absolutely nothing to do on this boring day.
But then I got a message through this site hyves ..
I’m going to start immediately!
xx
Ps Thanks!
So old school, and cute! Thanks for sharing!
FINALLY! I’ve always done the bracelets that are just one knot around all the other strings. b/c i never understood instructions for the chevron type. I just made one though and its PERFECT! and super cute! though adjusting to do the backwards 3 was a little bit difficult but i got it really quick!
Thanks for sharing!! 😀 😀
good tutorial, this bracelet reminds me my childhood in Colombia, memorable times. we used to called “cueritos”.
kAREN
http://WWW.herfashioncloset.in
Is there anywhere to purchase these?
only guy to post here w.t.f.as a guy i would suggest making a little longer
so you can wear as a choker,with maybe a small cameo in the center??
very sexy!
thank you so much for this tutorial!
Thanks for sharing this is brilliant – they really remind me of high school! 🙂 I can’t wait to start making some! Thanks Again! 🙂
Thank you *so* much! Love this!!
oh thanks, now that’s one MORE craft I can do !!!!! LOL
Thanks for the tip:) Used to make them,but I were not so good. Maybe I should try again:)
Thank you Thank you Thank you 🙂
what does it mean by backward knot first before making the 4?
@Penny, the backward knot is just a backwards “forward knot”. I use the 4 as a way to show you the way its supposed to look before tying it into a knot. With the backward knot, it should look like a backwards 4 before looping the active thread over and under.
@S, you can definitely use yarn! with the striped pattern, you are always just using the far left strand to make the knots all the way across the other colors. once that color is carried over, use the far left strand to start the another row of a different color.
Hope that helps!
could u use yarn,? and 4 the stripe pattern do u use only one strand to make all the knots?
My Jenica California.
Thanks for this!!! I’ve always wanted to know how to make that kind. I can only make the straight slanted line ones. I’m going to have my students make these at English summer camp!!!!
Great tutorial! Thanks!
Yes! Thank you! These are perfect for summer. I’m making one tonight!
Your instructions are very hard to follow, and I’ve been unsuccesful.
I loved the third from the bottom!
I never used to make these when I was younger. I would be perfect to make many this summer, but I have no chance to learn this 🙁
so cool…..
nice to do one.
ye…yeeeaaaaa…….YEEEESSSSSSSSSSSS!!!!!!!! I love the chevron ones where the colours don’t match up either side. Thank for a great tutorial and stunningly gorgeous colourful photographs 🙂 Just discovered your blog through Elsie’s list on A Beautiful Mess. I’m loving your DIY tutorials, particularly the woven bracelet one, and Shibori tie dye (going to tie dye EVERYTHING right now!) I wrote about them on my blog. If you wish, have a peek here:
http://jesuisunemonstre.blogspot.com/2011/06/new-thing-16-new-blogs-i-love.html
Keep up the great work, I love it!
Katie. xxx
the bracelets are beautiful! I really love the colours you used! If it isn’t a hassle, could you please tell me the numbers of the colours used.
Nice tutorial!! How do you make the bracelets different widths?? Thanks!
wow I love how to make jewelry and Thank you so much foe sharing
What a fantastic tutorial! I jumped to my feet to make those bracelets as soon as I saw this post. I placed a link to this post and did my own little spin on friendship bracelets explained, hope you don’t mind 🙂 Thanks for the inspiration!
http://www.meowmiix.com/2011/06/friendship-bracelets-intrepreted.html
all i want to say is AMAZING
How do you tie these on my arms?
Can you give me the color code of the thread of these two friendship bracelets http://i22.photobucket.com/albums/b336/garizumura/a.jpg
because i really want to make the same one. please….?
How beautiful and creative!
Yeah! I finally got around to completing my first go around with the friendship bracelet. Only I did an instantly-gratifying pattern/style in earth tones. Will be making more to stack! Next, I’ll try the friendship necklace tutorial that you also posted… THANKS for the inspiration!
Van // The Clothes We Wear
Wearing motherhood with style.
What a great tutorial!! I just finished my first bracelet, it was so easy to follow your instructions!!! thank you so much for sharing your knowledge, i’m gonna make one with rhinestones!!
I am so doing this! Thanks!
I so remember sitting in drivers ed class and making these! I will send this blog to my daughter and get her working!!! Love it!
Thanks for the sharing. Cant wait to made one for myself. 🙂
Love,
NANA
I loved the 4th from the bottom!
I never used to make these when I was younger. I would be perfect to make many this summer, but I have no chance to learn this
Awww this is so good! They look gorgeous 😀 Thanks!
http://www.sonotiram.blogspot.com
Directions aren’t too clear. Make sure to remind everyone to use the same color string while doing knots with each other string.
Thanks for the reminder of how to make these cute, fun bracelets! I remember we used to do this to keep the threads straight: Take a narrow piece of cardboard, cut a small slit in the middle of the top, and slits along the bottom, to put the threads in; this keeps the bracelet stretched out and the threads in order.
I will have to try making one with the rhinestones, or maybe I will add some beads, I have lots of beads. All kinds of possibilities!
Cute and simple DIY bracelets for anyone with a little motivation to try something new. I already have the supplies on hand and will be giving this a try for summer fun with my daughter. I’ve featured this in an article about ‘discovering beading basics’ . http://www.squidoo.com/basicbeading
Thanks for sharing.
Hnmmn…interesting and easy.. 🙂 I know what i’ll be giving all my friends soon.. thanks alot for sharing.. 🙂 they are very pretty friendship bracelet <3
SO excited to do this! Super summery and something fun to do while sitting in the sun. Thanks for sharing!!
I love friendship bracelets – I just made a rainbow-coloured one this weekend 🙂
This is awesome! I searched the whole frickin internet and i finally found something good!!! Thanks you soo much!!!!!
美翻了,我说中文能看懂不
cant wait to start whipping these up!
amazing DIY!
Can sumbody please explain how to attach the rhinestones?
Friendship Bands are great way to start, I remember when I received one form a very goof Friend of mine and when I gave one to me dear Friend. It’s so exciting !
I’ve been whipping these up like nobodies business!
Great, easy to follow tutorials, thanks <3
these bracelets are so nostalgic Love it
I learned this in school?
Hello Hello!
My name is Jade AKA Miss Apple Tree. I’ve been following your blog and I love it. I have started my own blog called and been working really hard at it, and I love it. My page is called ‘Apple Tree’. It’s gone from 0 – 1000 views in a matter of days, but I’d love your help to spread it further!!
Apple Tree is a place where you can gaze at gorgeous photos, get tips on super cute vintage fashion for men, women and kidlets. and to check out my art, photography and videos.
I’d love to link to your page some how, maybe a give away or something?
Please take a quick squiz at ‘Apple Tree’ and let me know the verdict!
Love Jade
http://theappletree11.blogspot.com/
email: jadevansanten@hotmail.com
I was trying to figure out how to add the rhinestones by looking at the pictures but couldn’t figure it out. HOw do you do it?
@Riley, the rhinestones used were already sewn on a piece of trim so it was just laid on the top of the friendship bracelet and stitched on with a needle and thread. you can also find rhinestone chain here.
OMG – I must make some of these immediately!!! Thanks for the tute!
That is too cool.
Cheers,
Bre
can someone tell me or give me ideas as to how to join the two ends together? i always make friendship bracelets but have no idea how to make them into a bracelet and always end up using them as bookmarks 🙁
@Julie, friendship bracelets are generally just tied together with a double knot. if you want to be able to take it on and off, I’d recommend buying 2 crimp beads and a toggle clasp. Crimp the threads around each side of the toggle with a pair of pliers. Hope that helps! xx
Perfect! I’ve been looking for “bohemian” style bracelets, but they’re too expensive to buy in stores. Definitely going to make these, thanks!
http://lushluxelovely.blogspot.com/
Can anyone translate this tutorial in Spanish? Please!
Thanks 😀
thanks Erica! Could you give me a link to an image of “crimp beads” and “toggle clasp”? Are there any other ways to tie the ends together to make sure i can take them on and off? also, for the start of the friendship bracelet, what should i do to make sure there’s a loop so that i can attach a hook on it? usually it’s all loose ends (as in the pics in the post)! Thanks
How did you do the fourth one? :O Meaning, the mixed colors!
Love this!
Oh my gosh! I found this link on tumblr, and thank you so much! I couldn’t do the chevron pattern for weeks! I could only do the candy stripe. This made so much sense and I can do it now! 😀
I keep looking at the 4th one too, and I can’t figure out how the purple pink purple (and the orange red orange) goes from side to side either!
@allison, the alternating chevron is started as normal with 2 strands of each color. then split the strands into 2 groups randomly. start knotting as you would normally. the random order of the strands will give you the alternating pattern. hope that helps!
@Erica, thanks, but I did use 2 groups of strands in a different order, but I ended up with one order on one side of the chevron and the other order on the other side. If you look at the photo, you see that each side of the chevron has 5 strands, but the pattern that repeats is a 10 color pattern, magic!
I was thinking that in this photo one side of the chevron is white, magenta, orange, red, orange, and the other side is white, purple, magenta, purple, red. How did she get all of the colors on both sides though?
Or, am I thinking too hard?
by she i mean ‘you’ haha
Thank you so much for such an amazing Tutorial! Very inspiring!
Making one already:) thank you again:)
http://modafile.tumblr.com/
it is nice but i didn’t get it it’s hard
its nice
I MADE ONE YESTERDAY!
Thank you so much 🙂
Very instructional! I’m off to try it. Thanks.
These bring me WAY back to my camp days! It seems like us counselors made these all day every day during the summer!
I made some of these today and it reminded me of when I was younger! Love the crystal chain idea, too!
http://lifegirlreporter.blogspot.com/
I love making friendship bracelets! Now that I know how to make this bracelet I’m so happy! Check out my website to see the chevron I made! : http://www.braceletsbydesign.weebly.com
I think I just found something to do with my last couple weeks of summer vacation. 🙂 Thanks so much for this, I love it already.
This is so cool!!!! I’ve tried it and I have made one for my best friend and I. Do you have anymore DIY friendship bracelets that you can share?
My bracelet turned out great! At first I didn’t understand it but then I did and I finished it, and now it looks really pretty(: thank you for the tutorial :))
oooh! love them all!!! Thank you for the tutorial. Hugs Johanna
This is a great tutorial (refresher). Back in grade school, when I made these all the time, I would pin the top knot to my sock, then cross my foot over my knee. If I wasn’t done, then I just wrapped the end around my ankle and went on my way. Can’t wait to get back into grade school mode, and make some bracelets! Thanks.
Love these bracelets!!! I’m making one right now. It seems really hard at first, but then you get into it. Thanks!
This is fab! cant wait to try this…
http://www.shoesales.com.au
I love making fiendship bracelets.. I loved making them when I was a kid – loved giving them to my friends and seeing them wear it! I think I should be making more… thanks for reminding me!
I LOVE this tutorial.
Hello, do you mind if I share this tutorial with my Spanish readers? Of course I would make reference to your blog and say the pictures and the tutorial are yours.
Best regards.
This is really great. I’ve been looking for something to do on the train during my commute to school. This will be fun!
this is amazingggg thanks!
thi is really cool stuff
by the end of te page i had made 20
very cool stuff
great ….this is like a tutorial for me and thanks
do you or anyone else know how to make a domo friendship bracelet?
one that looks like this: http://img1.etsystatic.com/il_fullxfull.53650513.jpg
heeyy i like your bracletss…i think i would like one how much?
i finally understand the basic concept, cant wait to try this out! thanks
thanks for the inspiration! http://www.TheINLink.com/2011/05/best-friends-for-life/
yay (: thanks 4 this!!! 😀 im gonna make these friendship bracelets right now (: <3
Thanks for sharing, I actuallyforgot how to make these…
i love these and tried to make one but it turned out twisted…any advice??
OMG this is sooooooo good i love thease patterns
thanks a lot! I’ve been wanting to try it and although it wasn’t such a success, it was my first and I will make it better next time!
I think it was twisted since I tied them together before hand and the best is to stick them to the tape so that they are flat and wont twist!
What a great bracelet! My sister is 12 and she loves arts and crafts. I also have friends that babysit and this is something you see but never learn how to do! I will have to pass this on as an activity to do!! Thanks for sharing this. It looks like it definitely takes some practice.
I made my friends make me these in high school! Hehe.
Can you makeDIY project about the bracelet which about left top one < http://imageshack.us/photo/my-images/838/plad.jpg/ <I drawed a square on you photo to show itt.. pls pls:)
http://darkhighfashion.blogspot.com/
Thanks! Any idea how to taper the bracelets…say, to make a ring that’s fatter in the front than in the back?
i have recently become
a) obsessed with this site
b) obsessed with making these darling little bracelets.
thanks for bringing me back to ‘back in the day’ with a nice little update.
Love these bracelets but not sure how well I will do makin’ them since this is the first time ever seein’ how it is actually done. Although I generally learn better with hands on, but I will give it a try!
Very nice, always impressed by people who take the time to make there own Jewelry. Some bought, some homemade the perfect match!
time consuming… but so worth it!
You did a great job explaining this! Thank you!
This is great, I have been doing these with my daughter since she turned 9! LUV it!!
Thanks..I will have to try this myself. I know my daughter will enjoy this too!
I have always struggled with how to do the chevron patterned bracelets. Thank you for this easy step-by-step instruction! I can’t wait to try it 🙂
awesome, great skills
WOW I LIKE IT I AM VERY SMALL I AM NINE YEARS OLD I AM NOT KIDDING I REALLY LOVE YOUR WORK IT IS THE MOST WONDERFUL BARACELET KEEP DOING MORE!!!!!!!!!!!!!!!!!!!!!!!!!!!!!!!!!!!!!!!!!!!!!!!!!!!!!!!!!
thanks… really like your work….
those insrtuctions dont explain it very good as it could
🙂
OMG!i love the way you did that i think that idea is so cool but i don’t think i could ever get it i tried so many times and it didn’t come out as great oh well keep trying.practice makes perfect but not with this lol.
I love jewellery making since i was a kid – loved giving them to my friends and seeing them wear it…!!!!
Awesome page, brought back a world-wind of memories from my childhood…. Wish I still had time to make one, I bought mine at http://www.mexicaliblues.com/Search.aspx?search_freetext=friendship
So Cool Love It :X
Love It… would not have the patience to make one
I’ve been looking for a pattern for friendship bracelets for a while now. Thank you.
Thank you so much for the amazing tutorial!! I just wanted to let you know that I have included it in my last gift guide for this year: http://prairiesque.wordpress.com/2011/12/19/gift-guide-no-6-last-minute-do-it-yourself/
I apologize for the very spammy nature of this comment, hehe…but it seemed like the best way to get in touch! Also, there are other tutorials featured in this guide, so perhaps whoever sees this will also discover some new skills!
xoxo,
Leanne
When “Continue knotting towards the left until the outermost strand reaches the middle. Tie a backwards knot with the two middle strands to connect the two halves.” Is this know supposed to be knotted twice too?
@Gabby, yes! this part, connecting the two sides, should be knotted twice!
suggestion: Instead of taping to a surface, use a clipboard. The spring clip at the top works great to hold the treads, and makes it portable!!!
I’ve been looking for a good tutorial more than a month!! I am so happy I found this one. thanks for posting it!
Cool. 🙂 I only ever knew how to make the single diagonal line ones. Thanks for showing me the chevron! I love the idea of braiding the tails! So pretty and feminine!
The problem I always have is finding a clasp to fit! Because 1.) I don’t want to wear them all the time and 2.) it’s hard to tie them on for yourself. :/ I need to find the perfect clasp to fit all that string and then buy 50 of them.
never mind. figured it out. “crimp clasps,” fabric glue, jumpers. : )
Just made one, turned out so cute and pretty. Can’t wait to make more with different color patterns! Chevron is may fav pattern, so happy I found this DYI!! 🙂
omg i used to be SO addicted to making these. You may have awaken the addiction! 😛
this tutorial was so awesome and I gave it a try and posted on my blog! thanks so much
http://thebeardedladyblog.blogspot.com/2012/01/diy-friendship-bracelet.html
Simply adorable!! Thanks for sharing :0)
Wow well presented DIY macrame! Maybe you would considering writing a guest most on our macrame project blog. We are a non profit raising funds to help build children’s basic needs centers and to improve economic structure in low visibility areas of Ecuador. Please read our what is macrame post and our macrame knots post and let us know how we can improve them.
I have been wondering forever how to make these bracelets. thank you sooo much! lol
Can you please make a video tutorial? I love how you laid out the steps but I would really benefit from seeing it live as that’s just how I learn best. It would be beyond helpful as I haven’t made these since I was a little girl and I have zero recollection as to how I did it. Thanks so much 🙂
I make these all the time….great stress relievers….and my 17 yo son loves to wear them….he wears like 5 or 6 on each wrist….i have a shoebox full!
c’est cool tout ça
Dear Whoever-
I have been making these for a while, and I am very grateful for these
instructions. However, I am still very confused as to how the 4th bracelet down in
your fantastic photo is put together. Please reply-
<3,Emily
I love you blog! I want to make these friendship bracelets with the large gold links as half the bracelet. I saw those on Pinterest. A real classy update……any ideas on how to attach the friendship bracelet?
Tip: Attach to a hardback book with a bulldog clip
Excellent tutorial ! Many thanks!
These kind of friendship bracelets remind me how we made what we called “roudoudou” at school, wonderful souvenirs!
Keep up the good work.
Patrick
Oh my god I LOVE these! I have made three already 🙂 Could you elaborate more on how to do that earthy colored on in the last picture or help me find a tutorial on it?
*second to last picture >.<
Lovely…thanks.
it is look nice!!!!
Watches in Pakistan
My grandchildren LOVE friendship bracelets. I will be such a cool grandma.
it is sooo cool
The right side turns out perfect for me, however the left is a completely different story. For some reason my left side turns into a jumbled mess even though I keep the colors in order and I am knotting correctly. If anybody has an explination why and how to fix it, please respond/email me!
I made so many of these bracelets, but i forgot everything.
hi , i am a handmade artist . i made many jewelry , cuff bracelet, necklace ,cell phone cases with leather ,ropes ,alloy ,stone ,plastic .etc.
I provide the world with my beautiful bracelet necklace jewelry that improves your day with warmth, love.
if you want a lot .i can give you a discount or send out a bracelet gift for free . Thank you for your business.
my etsy shop: http://www.etsy.com/shop/jewelrybraceletcuff
iskam
Can you tell me which colors or color numbers you used for the third and fourth bracelet? Great job!
Many thanks
Denise
These are really cool. What do you think of this idea for crafts? alligotwasthis.com
I am totally making one this weekend!! Fun!!
Nice bracelet patterns but instructions are really hard to follow :-/
Screw friendships.
OMG, thanks SO much! I knew how to do the diagonal stripey one (the one that looks like this if you cover half of it up) but now I know how to do one that’s even cooler! ZOMG!!!
Very interesting information!Perfect just what I was looking for!
Amiazing.. this is new to me. I’ll try it. Thanks
I love it!!!!!thnx!!!thnx!!!!!!it seems easy..i ll try it!!!!!
What a great tutorial! My name is Melissa and I am the managing editor for FaveCrafts.com. I’d love to publish this project on our site. I know our readers will love it! You can email me at mconner@primecp.com for more information. Hope to hear from you soon!
I loooove this idea. Its so in for the season. Very laid back and can be paried with other braceletes. http://Www.adornmeforever.com
great idea!
Is there a video? I can’t seem to figure it out. 🙁
This goes in the memory bank under rainy day activity. I don’t think i’ll have to wait too long
| Bright Green Laces |
Blast from the past. we used to spend hours doing these when we were younger
Cool tutorial! Gonna try 2 make 1 !! If it works cool! If it doesn’t then f**k u!
Hi there! I just finished doing Chinese Staircase wraps on my headphones and was looking for a new project and stumbled on these, they look awesome! I was wondering if you use the 6 stranded thread whole or if you separate it like for cross stitching? i separated it for my headphones into 2 strands and it was very fine and took a loooooong time!
Thanks,
Steph
i made it and it looks sooo professional!!! its soo good!!!!!
Awesome Idea and I love this.
I used to have one of these safety pinned to my knee at all times and spend every break time at primary school making them, even had a little enterprise going for 50p a pop (we’re talking 20 years ago). I used to make really thick ones about 20 threads wide. I like the addition of the diamante.
Thank you so much for the post and all the great comments are lovely and nostalgic to read. Can’t wait to teach my little girl how to make them
Frances x
HI I AM FROM GREECE AND I WAS LOOKING FOR THIS METHOD FOR QUIT SOME TIME NOW .ITS GRATE AND
T HAVE MADE 3 BRACELETS . I WIIL MAKE MORE….THANKS!!!!!!!!!!!!!!!!!
Love this! Making these brought back so many memories of day camp when I was a kid. We’d safety pin them to our pants and then run around with them dangling all over the place.
We ended up making these with buttons on the end so we can take them on and off.
i know that there are millions of people who steal these photos from your tutorial but just to inform you, here is one:
http://www.balkopugutasarim.com/2012/05/diy-bileklik.html
it does not have a reference in the post. also she doesnt claim that the photos are taken by herself but still, she must have a source link somewhere.
great tutorial btw!
Wow I have never seen something that looks so hard but so easy
I like these, I have infinite memories, Thank you for sharing
i LUV, LUV LUV the bracelets i want 2 make some right now!!!!!!!!!!!!!!!!!!!
what do it mean by “Make the same knot twice over each colour” ??
It would be great if u can help me figure this out! 🙂
Thnxxx.
i think i’m an idiot…my result is terrible!!! i can’t understand what’s wrong with my bracelet…can you explain me this sentence “make a forward knot by creating a 4-shape over the 2nd color, loop it under and back through the opening”? I really need to make some bracelets….:(
I used to make these in middle school back in the mid 80’s..memories came back ..thank you..I think I may make some again.
http://www.facebook.com/she.want.a.gentleman please liiiiike 😉
I love these! Thanks for a great tutorial. Just 1 question: do they turn around for you as well? Mine is all swirly and really not all that even. :L Maybe my cords are too thin or my knots too tight? I love yours, they’re so pretty and even and colorful, mine are just blah. 🙁
@Ula, it’s probably twisting because you are not knotting each color twice. good luck!!
@Erica Thanks so much 🙂
super,i want one to give to my bestfriend-niya
I think this kind of homemade jewellery is just fantastic. I have a couple of young ladies who are going to love this tutorial. Thank you so much!
XX
This website online is known as a stroll-by for the entire information you wanted about this and didn’t know who to ask. Glimpse here, and you’ll positively uncover it.
Great tutorial. So easy to understand 🙂
You can get tons more designs like this one on http://www.friendship-bracelets.net
When ever I make these, the outsides turn into the middle, how do i fix that from happening?
very good
These are fantastic! I actually came across your blog through another blog… that has copied your entire tutorial… Not sure if you gave them permission or not, but I just thought I’d let you know in case it wasn’t on the up and up 🙂 Here’s the link to that blog post: http://doitandhow.com/2012/06/16/friendship-bracelet
Wooow I’m deffers going to try this at home!!!!
I “stumbled upon” you’re DIY tutorial and its really cool! Your bracelets turn out beautiful!
can you make these with 2 colours?
@stevie: Currently working on a 2-color one right now~ The steps are exactly the same. The only tricky part that’s different is separating the colors evenly so that the chevron pattern comes out symmetrically (unless, of course, you want the asymmetric chevron pattern). ^-^
I am making this, the left side is perfect but the right side is totally a MESS!! I can’t figure out what I am doing wrong! I am follow all of your steps but still… I just do exact the same as you do!
There are weird things coming out of the right side, the thread doesn’t lie good en is totally a big clump….
What do I have to do?! I already started over 2 times!
These are deceptively difficult to make! If you mess up one knot you’re screwed 🙁 I’ll keep trying but is giving me a headache. Back in the day me and my friends just made braids so I’ve never attempted these before, they do look pretty!
I don’t understand it its hard to do and I just think there hard and I want personal help with it please
I have cracked it! I was doing it and sometimes getting a nice pattern and then it was just jumbled into random colours looking so messy and I have realised that you need to pay close attention to the knots, to slowly pull it up to the top to be sure the knot is facing with the colour you want because they can so easily twist around. Knots and thread have a mind of their own!
OMG i love these but they take a long time and the writer could have used bette words to describe so it was very chalenging and how old r u guys cuz im 12 and 1 quarter!!!!
Wow, cool tutorial! I will simply make my own instead of purchasing them now, thanks! ^_^
I would try using metallic thread for mine, but using metallic floss can be annoying because it tangles so easily.
http://www.etsy.com/shop/mienkintoshfairie
Hi !
I tried to make on with four colours and I did exactly what you explained but it doesn’t make the right shape at all 🙁 🙁
Great idea!! Will try making these bracelets with my niece during this summer vacation.
So, does the width just depend on how many different colors or thread you have?
That’s amazing! I’ve always wanted to know how to do that!
Hi! I love your DIY’s too 🙂 Just curious how everyone connects the bracelets? Do you just tie them or do some kind of clasp or closure??
Making these are really addictive…Does anyone know where I can find a DIY for the diamond pattern?
Also @Caitlyn, however you want to end it is personal preference, they usually are just tied off though.
If you double the length of each string and create a loop at the end instead of just loose string you can add a button to the other end as a way to close it off.
THIS IS AMAZING
this is sooo awesom, thanks!
thiss is so much better than the youtube turorials, i hardly understand anything on youtube. This made it soo easy for me to make a bracelet thanks a lott!!! 😀
wow, just made one easily thanks to this tutorial! i didnt have any embroidery thread so i just used wool, worked fine!
they are so pretty !!
Nice.
these r sooooooooooooooooooo cute love it. i wish u would open up a buisness and sell those because i know i would buy one
I just love the idea!
I am going to make some soon…I hope!
Just like you said,Cece if some body makes a shop or business or some thing,I would buy 1 for sure!
Love them!
P.S I hope that everyone else who see`s this will enjoy it like I do!
You should post how to make the other bracelets too. 🙂
Great instructions! Found here via Pinterest, yayy 🙂
Satu
Indie by heart
I LOVE THIS!
http://www.StyledbySheena.com
http://www.Childrenofthenow.com
THANKYOU! I haven’t made these in years and needed a good tutorial. I’m sharing on my blog today and crediting you! Thanks!
this is like the worst explanation ever. whoever wrote this didn’t write it so readers could visualize and actually understand what they were doing. the pictures dont even help. THINK ABOUT THIS WHEN DOING POSTS OF THIS KIND!
There are also other styles of friendship bracelets. Once you have mastered the classic ‘ Candy Stripe ‘ pattern or the diagonal stripe pattern you can try the more complicated patterns. Such as…
You can look on YouTube under ‘Beyond Bracelets’ and there are some great beginner, intermediate, and advanced videos!
giggity
This is an awesome “How To” post that I actually can make the bracelet. I don’t know anything about stitching or sewing and I’ve been trying to learn how to make different stitch or even how to make bracelets with hemp but everything I’ve read on only should a few pics and no description on how to do it. So starting a blog page has taught me that there are so many things I can learn on all these social networking sites that I don’t find even time to balance crafting and blogging. Sometimes I’m only posting on sites for an hour or two in the morning but then I find the coolest things and when I look at the time it’s almost 5pm. I haven’t figured out a plan but I craft and blog, post, list, and so on off and on each thing so that way I’m crafting and keeping my sites updated.
I’m I thought this one was very difficult so I didn’t do it and. I’m really bummed out idk how to do it
Great tutorial. You would be surprised at how quickly these sell at craft shows. I think it brings a sense of nostalgia to those at the events. I’ve heard quite a few stories of “how I made those as a kid”. Always my favorite when someone asks me to tie one on.
I just love friendship bracelets, the colours are amazing and they feel like a hug around your wrist. I found one that can be made in less than 5 minutes check it out:
http://www.youtube.com/watch?v=jOmXXqoA4yo
ooo love it i want to by one how much it costsss i want it now if not i will kill yaa
“Klutz” books has a great edition that has instructions for many different bracelettes. The directions are easier to follow than the ones here.
This is the best tutorial ever! thanks so much, now im in the mood for bracelet making!!!
I also doing this, and it is great and fun! 🙂
I tried this and it came out looking like crap you make it sound so easy I love this but mine sucked!!!
Thank you for this! Made myself a lovely chevron bracelet and planning for a couple more 🙂 don’t know if it is just me, but I seemed to run out of thread quite easily, so maybe make sure you’ve got a lot of excess just incase!
Oh my god very beautyful. ilove you
I LOVE this. It turned out so well and was so easy. I always wondered how people made cool friendship bracelets like that. This really helped me. Thanks! Click the link to see how it turned out! Super Cool! http://adaywithashley.wordpress.com/2012/07/31/how-my-bracelet-turned-out/
love it! – i tend to use my laptop when doing this i tape it to the top and hook the thread under the keys XD
I’ve always tried and tried but i didn’t work!!!!:(
but now it does miracle!
hannah
Can you post the number of the treads ?
6 for each side (12 strings in total)
i know me….. but forgot… it is useful to me….
Wow, this is really amazing! Trying it atm and it looks awesome (doing it in rainbow colours :3 )
Thanks for posting!
I can not do it!!!!!!!!!!!:'(
OMG loveeeeee so much.
now can anyone thread some for me because I SUCK. (:
Kthankkssbyyeee
OMG THEY R SO GREAT BUT CAN U MAKE EASYER ONES WITH COLOURFUL BEADS!
lovely information . I try to make them. They are beautifull
cool !!! look at my handmade store http://www.etsy.com/shop/Colourfashion?ref=si_shop
How do I add the rhinestones?
http://www.sadeesays.com has great ones ready made for great price on their website, by Gypsies and Debutantes So if you have great taste but poor execution, theres a way to go!!
Dude, right on there bother.
Just gorgeous- thanks!
ju lumshin duart
I love these bracelets!!! I used to make tons of them when I was a kid. I especially like the ones with the addition of the beads. 🙂
haha im 14 and i just started out in the braclet making world in this was hard at first but as i went with it i understood AND i didnt know what a backwards knot was but i do now after a search on google xD my first one was ok but now i know and ill start rolling these out like a champ in a weeks time haha
Tutorial is so well written I thank you for sharing with all ofus. Love to do small item as I wait in waiting rooms 1-2 times a month and now with these perfecked. Susan M. J
https://www.etsy.com/listing/107819695/stylish-adjustable-soft-real-leather
oh my gosh…..i ALWAYS wanted to know how to make these when i was little.
i have just made my first one in six gorgeous colours and i am so proud of it! even though it took about three hours lolz x th pic is on my blog……adulation and admiration very welcome!
thanks for a great tutorial
hann
http://thisishannmade.blogspot.com/ x
Hello myself and a couple of friends are doing a school based business at school. We will be having a store with little games and little items you can buy like anklets,bracelets and other type of jewlerry. It would be gladly appreciated if you could give us some stuff. Sincerly Rebecca Hartmann
I love these, made a bunch of them but they take FOREVER to make….
Thissh is soooo ah-maze-ing. its so funnn to make, hahah. i Love using nEoN colors or bright colors to make them. i wear like 20 of them on one arm.(: <3
x
Thanks so much for this! These are the clearest instructions I’ve found yet!
Awesooooooooooooooooooooooooooooooooooooooooome!!!
Can you maybe make a video? then it would be a little bit more easy to do 🙂 i would love to make them, but i don’t really understand what to do… 😀
these bracelets are AMAZING please do more
Thank you so much for posting this! I would have loved to have had this in 1985 as a fifth grader! Thanks again!
the colours are awesome!! mind email me back as I got something to ask you. thank you! (:
OMG i was luking for this EVRYWHERE!!!! I totally love your DIY’s!!!!! Keep them coming!!! All the Best!!!!!!!!!!!!!!!!!!!!!!!!!!!!!!!!!!!!1
ummm,how can v add beads to it????
I used to know how to do this and had forgotten. Thanks!
I can’t believe this is back! I used to make these when I was in high school back in the 80’s!
u guys need to explain it better cause im very confusied and u just made me waste a ton of my string
u guys need to explain it better cause im very confusied and u just made me waste a ton of my string
wowww
I don’t see any of your bracelets tied in a knot to connect both ends. How do you add a clasp or finish it off?
Thank you!
Looks very hard 🙂
Thank you so much for this tutorial! ♡
Pretty easy instructions and it is really cool.
These are awesome! I used to make a lot of friendship bracelets, but I gave away a lot and the rest got lost. I’m definitly going to be making more soon! I LOVE these! Did you make them all?
Hey would you mind letting me know which webhost you’re utilizing? I’ve loaded your blog in 3 completely different web browsers and I must say this blog loads a lot faster then most. Can you suggest a good internet hosting provider at a honest price? Thank you,I appreciate it!
I feel satisfied after finding this one.
so cool
i love it
I love them, but I want to do a lot of them and I don’t want to do the same patterns, so maybe you can show, how to get some pretty ones that have pearls too.
It was hard for me at first but I got better at it with my moms help. Now I have a nice bracelet on my arm. I am good at making bracelets. Now I know something new. Thank you.
this is a very good demonstration thank you it looks complicated
honestly…. WTF!
How do you make them so they don’t get gross in the bath? I hate that feeling of wet fabric on my wrist.
Add some gemstones to these for added bonus! http://www.gemselect.net
This is a little bit hard because I don’t know where to buy a tread in Singapore. Can someone told ne where to buy tread in Singapore?
I agree with you GemSelect, The bracelets shold have some gemstones
Wow the bracelet are so beautiful! ^_^
I like your bracelets they are very colorful and creative
OMG, haha, I have not made these in years, so fun to see so many people into it.
Thanks – can’t wait to get busy this weekend
týjo krása čumim jak umim:):D
That’s really cool stuff!
Such a great little craft. One question, how would you create the clasps for the bracelets?
Hi, Thank goodness I found this page but only some of the pictures show up…So it’s kinda hard…could you possibly email this tutorial or even better, do you have a tutorial video? xo
does anybody know a good tutorial or the name of the seventh one down on the picture with the differrent bracelets laid out??
Hey, could I use one of these pictures for a school newspaper article as long as I credit your website?
This is really pretty but it seems a bit too complicated for me
This is so cute, and this can be updated to use any type of fiber that will allow you to use this knotting method! Love it. http://twopeasinapod123.wordpress.com/2012/12/09/christmas-organza-scrafs/
i dont understand at all. this looks good but it is confusing and i just want to curl up in a ball and cry! 🙁
This is great and all, but I already know how to do this. So I can’t have the satisfaction of figuring it out. Well anyway can you do a tutorial on how to do the diamonds, mushrooms, and letters? Because I tried, and I still can’t get it!!!
OMG! I totally love love these….. Thanx for da tutorial! I’m gonna be spending my whole vacation making these……<3 🙂
Nice!
Check out my blog on:
How to make a friendship bracelet blog
hiiiiiiiiiii ilove very much friendship bracelet…………….!!!!!!!!!!!!
tht is nice!!!! I love making friendship braclet
omg i want one lol
how do u do the one were its like boxed…….they say its the easiest one
Those are looking good. Love to learn it
Схемы фенечек,идеи подарков,как слести фенечку,видеоуроки по плетению фенечек,схемы косого плетения фнечек http://сделайфенечку.рф
I like your bracelet I saw your bracelet in web(your bracelet is famous in korea web) and I start make bracelet myself anyway, could you do me a favor?? what color number use you make that. DMC number…the first bracelet from the top(your post bracelet) and sixth bracelet from the top. send me email plz!
I made so many of these and they are sooooooo much fun. Thz for the instructions.
these are so cool i seriously need to try and make one a these
Okay I saw a picture of a candy stripe bracelet but it also had a chevron mixed with it. Like it had a set of rows of candy stripe and a set of chevrons, and I’ve tried but I can’t find a tutorial anywhere and I just need to know how to do it, I already know how to make both a candy stripe and a chevron..
These are looking absolutely beautiful. Good Work..!!
Please send me freind bracelets
That’s really cool stuff!
oh my god very good
خیلی خوب بود ممنون از سایت خوبتون
How thick is the bracelet of the example you’ve shown?
Cool…………..i will try make one for my daughter
Wow, that’s a blast from the past. I remember making them for everyone I knew!
wow i love this…………….. so tots for me!!!:<)) hahaha
I found your blog very informative . Your blog is full of with good content , your writing style is very impressive .
Wow! I hadn’t seen those in ages! Seriously thinking of goign to the craft store and picking up some thread to try one again, maybe even adding this fun necklace to my yoga inspired fun jewelry line on Etsy! I love how i just STUMBLE upon this LOL
http://www.etsy.com/shop/InspiredCreationsInc?ref=si_shop
aww this brings back so many childhood memories! of course i also remember getting frustrated when the wrong color would show up when i knotted it. i’m going to get some embroidery thread and try this again!
I thought you should know, in my quest to look at your super awesome bracelets and patterns, I stumbled across a familiar image. Another website is using one of your photos (third image where you begin to lay out the thread) to discourage people from making traditional “friendship” bracelets and encourage them to spend $35 on a tool that makes (while some are cute) for the most part, less interesting versions for lazy children. Not sure if you care about your intellectual property or have any rights to the photos, but here’s the link (0:53 into the video): http://www.dailygrommet.com/products/for-me/crafts-hobbies/loopdedoo-friendship-bracelet-tool
I just thought it was rude, and absurd because yours are clearly more interesting, thoughtful, and just…better.
😀
hi , i love this site go to it every day
omg(: this looks so easy and cute…but its not easy lmao(: i got it started(:
j’adore vos bracelets et j’aime votre techniques je crois que je ais faire votre technique a partir de maintenant j’adore votre blog
Where can I find one of these to buy???
Thanks for the tutorial! Ive looked through alot of others but this is the most clear and detailed tutorial!
so cool
This one is awesome!!
really sweet
for some more pls visit
http://moonshineandsunlight.blogspot.in/lz visit
these r really good….
wow this is tots ama-zayn!!!!
Awesome! I use the MyFBM (check out their site: http://www.myfbm.com) It helps to hold your strings and make more complicated patterns. I can’t wait to try this!!!!
love it ♥
This is awesome! Thanks, I have to try and make some of these! I love the one that has rhinestones in it.
http://thedailytiara.com
jamie June 7, 2011
This is awesome! Thanks, I have to try and make some of these! I love the one that has rhinestones in it.
This is so hard to do.
thanks for explaining me in such a easy way.
thanks………
Wow ! its cool. I know how to make band from colorful ribbons but these are more cool bands.
the friendship bracelets are so pretty. I like this DIY tip
GURRLLL! I LOVE RHESE! I’m going to camp this summer and i need something cut and easy to do!
very nice.I LONE IT <3 🙂
Where do you get embroidery thread from? Is it real pricey?
wowwwww 😉 never thought they were that easy i wish i found this sooner 🙂
I love the colors you used… so bright!
http://www.etsy.com/shop/alli7assassin
hiiii!!!!!!!!!!!!!!!!!!!!!!!!
oh i can not read the map of the friendly bracelet what can i do?
they look cool!i want one!
i just bought a whole bunch of strings from the market, cost ₵10/per color
Bogor, Indonesia
great Friendship Bracelets design
alright im going to try this…. wish me luck <3 😀
cool,. u r very talented im going to try this right now… wish me luck…. Thanks!
Oh my god! Those are amazing, are you selling them? Lol
Thanks for the tutorial!! I’m bookmarking the page, and will have to make some of these sometime!
I remember to try to to this when i was a kid, without any success hahaha, i think i can´t do it right now! But i love how they look, so pretty. I am so lucky that the local markets offers so many bracelets like this at low price. Besos!
LAZYCATSTYLE
hi can you please make a video about it cuz I didn’t understand how to do it and I need to do one for my best friend who is moving to Australia after 2 weeks. I need the video fast please!!!!!!
I love your tutorial. I used to make these as a kid 🙂 nothing is more personal than something you have made by hand 🙂 I am looking forward to seeing more from you 🙂 xx
Such a nice and an easy self made idea!!
I made 17 of these bracelet because there SUPER easy to make!!!!!!!
These bracelets are easy and fun to make. Loved it!!!!!♡㋡
Oh its too hard 🙁 ive tried and now Ive just wasted a whole lot of embroidery thread boo hoo I wish there was a name for this style so I could search it up on youtube!!!
I remember making these when I was younger, used to spend my pocket money on thread and spend hours making them! Had completely forgotten about it, you’ve inspired me to re-live my youth and try and make one 🙂
so great! my bfftlewe (best friend for totally like ever without exception) is gonna love it
Hi, I think your website might be having browser compatibility
issues. When I look at your blog in Firefox, it looks
fine but when opening in Internet Explorer,
it has some overlapping. I just wanted to
give you a quick heads up! Other then that, wonderful blog!
Ive been making bracelets for a while now, Ive been selling them on a facebook page of mine called “Wrist Wraps” And selling them! So happy i found this style!!
hello, How do you put the strass in to the bracelet?
Hello hello!
I was wondering if you could direct me to another post/explain how best to close/end these bracelets? It’d be great to have a nice slip knot/adjustable.
Thanks!!
I found the tutorial for the alternating chevron pattern (fourth bracelet down) here: http://www.braceletbook.com/pattern_normal/10537.html#.UidIQD_3MfF for anyone who is looking.
Here’s a really simple and easy tutorial on chevron bracelets for beginners…definitely took me a few tries but eventually i got the hang of it! http://www.wikihow.com/Make-a-Chevron-Friendship-Bracelet
Also made my bracelets with neon nylon cord. They came out awesome!
WOW ! It’s amazing !!! I must to try to do it.
Love friendship bracelets!
Thanks for the link Allison. I love the look of these bracelets, but need more practice making them.
https://www.etsy.com/shop/EarthChildArt?ref=si_shop
nice
Nice but garden factory is also cool
http://www.gardenfactory.pl
Continue knotting towards the left until the outermost strand reaches the middle.
wooooooooooooooow I realy love to learn how I can make but I have a bad headake:(
These bracelets r amazing. I love to make them.
Hii, I love your designs!! Is it possible you could tell me where I could buy the studs and the other parts of the bracket which is not thread.
Thanks
Wow, it is amazing. I will learn to make one by myself.
its so stupid
What’s a backwards knot? 🙁
And, Shaheen, calm down, It’s NOT stupid!
I love it
Hi! I’ve been reading your website for a while now and finally got the bravery
to go ahead and give you a shout out from Kingwood
Texas! Just wanted to say keep up the excellent job!
such a good toutorial and thanks
At this time it looks like WordPress is the preferred blogging platform out there right now.
(from what I’ve read) Is that what you’re using on your blog?
Oh, Good…Thank you!
I’ve seen people make these kind of bracelets on the seaside and I always wanted to learn to make one. I’ll give it a try
http://www.youtube.com/watch?v=x_10MNCL9dg
i could never do that
hey this sight was amazing my friend loved her bracelet and thank you soooo much 😛
I have made a chevron bracelet with 8 colors and tying 4 knots per thread..i like it a lot b/c it looks so lacy….but I cannot figure out a way to finish it…the thread is way above the last stitch…
Very good tutorial,,thanks. now I could make it by myself at home
http://www.greenhomeremodels.com
I am going to make one for my best friend Grace and I! Thanks so much for showing me how to make these awsome braclets!
hhhmmmm…amazing! I love it!!!
I think I can wear this to a pool or to bed.
I think my cuz will love this
i wonder if you coud make a video about this
I Love this place: http://www.youtube.com/MacrameSchool (clear tutorials and bracelets)
Mine didn’t go so well it turned out as a huge big colorful ball
i love the braselets i ganna do for my best friend she is the only person in the wourld i love she minds every thing too me and i ganna do the braselets because is so beutiful!!!
OMG.. I tried it but it dosend gona to work … helppp
After selecting marketing tools, you can now get your affiliate link.
I am sure there are many more examples and the above can include both ready made and those crafted by loving owners too.
Click – Bank is a position for authors (Click – Bank refers to them as Vendors) of digital products these as, ebooks in PDF format, videos, and on-line courses to promote their wares.
Wonderful, what a webpage it is! This web site provides helpful data to
us, keep it up.
The most important factor in the ranking by using tricks to game the rankings by telling
the search engines you page is about. It’s not rocket
science, and anybody with the basic on page optimization techniques.
Annique Roberts, performing the work of search engine optimisation.
Review my weblog – http://www.elocal.com/profile/orlando-seo-gaba-marketing-inc-17889620/
No one in SEO business can guarantee you that you’re going
to be missing out on search engine a great contractor
because they’re having a bad day. How is Social Media?
3 You’ll tend to have more potential search engine buyers and customers.
One of the biggest reasons. They typically check the webpages for duplicate content
so that you can do that also with help of such a quantum
leap in technology can be. Aside from that, as long as they are clicked.
my page; http://www.brownbook.net/business/38609560/orlando-seo-gaba-marketing-inc
And this is a built-in recommendation engine at the click of a few
easy steps. A link exchange is probably the most important tool used
by the several companies as an owner, you should ask consultation from expert service providers to create value for potential customers to their sites.
You may wish to send visitors somewhere else online reputation mangement for a short time
while the error is fixed.
My web-site – http://mojo.myfoxny.com/biz/orlando-seo-gaba-marketing-inc/orlando/fl/32801/65952817
THANK YOU! Really, truly, from the bottom of my heart!
I’ve used this tutorial to make friendship bracelets which I made in exchange for a donation to the St Margaret of Scotland hospice, who provide exceptional end of life care to individuals and their families going through a very hard time.
I’ve blogged about it, if you would like to check them out: http://www.sequinsandsparkle.com/friendship-bracelets-for-charity/
Again, thank you so much, for both the tutorial and for inspiring me to raise funds for a cause that is dear to my heart!
Gracie
XOXO
I don’t taxi orlando know where the death certificate that also submitted in the struggle.
Get the help that it has been providing professional death care services for those
who are unexpected. A loss can take the unidentified woman up on her burial plot, she said.
While cremations take place few days of the funeral house.
Why do funeral arrangements to be careful in selecting funeral flower arrangements can prove invaluable.
Here is my homepage; http://www.slideshare.net/orlandotaxicab
The containers can be a mean ride – What’s that prove?
Several were left from taxi orlando a discount casket outlet,
or yourself to look for love on reality TV, and explain what has to die.
& Lelia C Harrison of Fort Smith, spokesman for the
performance of, while I will show your respects and
just a simple search online. Children may also offer a copy
of the inevitable coming of death.
Take a look at my web-site; http://www.yelp.com/biz/orlando-taxinearme-net-orlando
my website :: website (Linette)
those are so nice!! I was wondering maybe someone can explain in more detail how to make the bracelet with different colors in both sides like the one with blue, red, white, orange colors? THANKS!!:)
This may make all the required amount without any hassles.
With the right choice. While there is that you get the job arise is vital.
When unlicensed contractors you are doing.
The costs can be deployed in many cases, it is valued.
When the work force and techniques have made your unlicensed contractors decisions.
Review my website … web page (Karissa)
prada 2014
Greetings, I believe your web site might be
having browser compatibility issues. When I take a look at your web site in Safari, it looks fine however, when opening
in IE, it’s got some overlapping issues. I merely wanted to give you a
quick heads up! Apart from that, wonderful site!
cheap michael kors colgate
I will right away grasp your rss as I can’t to
find your email subscription link or e-newsletter service.
Do you have any? Please allow me understand in order that I may just subscribe.
Thanks.
I love this, but every time I go to do it, the strings somehow don’t for correctly? Maybe I’m doing something wrong? One side is always on top of the other, and the bracelet ends up curving over itself, any suggestions?
@Leeann, are you knotting twice each time? When you don’t knot each color twice, it will curl on you. Try that and let me know! xx
This gives you an idea of what he is good at
and you may choose on accordingly. One with the services that you
may be surely hiring (which is very common today) is video services.
Are you on top of all the decisions you might be faced with.
Very good site you have here but I was curious about
if you knew of any community forums that cover the same topics talked about here?
I’d really like to be a part of online community where I can get feed-back from other experienced individuals that share the
same interest. If you have any recommendations, please let
me know. Thanks a lot!
My blog post Christmas Quotes
It’s very trouble-free to find out any topic on web as
compared to books, as I found this article at this website.
Thankfulness to my father who shared with me regarding
this blog, this webpage is in fact remarkable.
Feel free to surf to my web-site … nonhereditary
Look at my web site; webpage; Sylvester,
It’s wonderful that you are getting ideas from this
post as well as from our discussion made here.
Also visit my blog … photoshop Cs6 téléCharger gratuit
Good post. I learn something totally new and challenging
on sites I stumbleupon every day. It’s always useful to read content from other writers and
practice a little something from their websites.
Helpful information. Fortunate me I discovered your web site accidentally,
and I am shocked why this coincidence didn’t happened earlier!
I bookmarked it.
my webpage – http://Www.Youtube.Com
My family members every time say that I am
wasting my time here at net, however I know I am getting knowledge everyday
by reading thes nice articles or reviews.
You actually make it seem so easy with your presentation but I find this topic to be really something which I think I would never understand.
It seems too complex and extremely broad for me.
I’m looking forward for your next post, I’ll try to get the hang of it!
Very beautiful friendship bracelet 😉
Ridding yourself of eye strain through relaxation exercises
will improve your vision naturally, and also help in improving
your memory a great deal. Repeat this movement 10 times making sure that you actually see the objects that you are
looking at when you are at the extreme ends of the movement.
If you’re suffering from hyperopia (which is usually caused by old age) your muscles aren’t strong enough
to reshape your eye to focus your eyes on near objects.
With havin so much content do you ever run into
any problems of plagorism or copyright violation? My site has a lot of exclusive content I’ve either authored myself or outsourced but it seems a
lot of it is popping it up all over the web without my permission. Do you know any ways
to help prevent content from being ripped off?
I’d genuinely appreciate it.
It’s appropriate time to make a few plans for the future
and it’s time to be happy. I have read this publish and if I could I want to suggest
you some attention-grabbing issues or suggestions.
Perhaps you can write subsequent articles relating to this article.
I wish to read more things approximately it!
I pay a quick visit daily a few web pages and sites to read articles
or reviews, however this webpage presents quality based content.
Hi there! Do you know if they make any plugins to safeguard against hackers?
I’m kinda paranoid about losing everything I’ve worked hard on.
Any suggestions?
It’s actually a nice and useful piece of info. I’m happy that you just shared this useful info with us.
Please keep us up to date like this. Thank you for sharing.
This design is wicked! You certainly know how to keep a reader entertained.
Between your wit and your videos, I was almost moved to start my own blog (well, almost…HaHa!) Fantastic job.
I really enjoyed what you had to say, and more than that, how you presented it.
Too cool!
Today, while I was at work, my sister stole my iphone and tested to see if
it can survive a 30 foot drop, just so she can be a youtube sensation. My apple ipad is now
destroyed and she has 83 views. I know this is totally off topic but
I had to share it with someone!
Gods that sucks.
you are really a excellent webmaster. The web site loading velocity is incredible.
It sort of feels that you are doing aany unique trick.
Furthermore, Thee contents aare masterpiece. you’ve performed a wonderful process in this matter!
my pagbe :: mens chinos for skinny menn – Laurel,
Thank you for the good writeup. It if truth be told was once a
entertainment account it. Glance complicated to more introduced agreeable from
you! However, how could we communicate?
Hi there, every time i used to check web site posts here in the early hours in the dawn, for the reason that
i like to find out more and more.
My blog post custom home decor
They might not have many scenes but they always leave and impact when you see them.
Nearly everyone is part of an extended family that includes a white husband or
a black wife or a Mexican uncle or a gay son or a Japanese Republican lesbian living with her atheist
libertarian partner. The chemistry of the main characters
and their supporting cast is very strong.
WOW just what I was looking for. Came here by searching for
Also visit myy page … coconut oil shampoo
This website was… how do you say it? Relevant!! Finally I
have found something that helped me. Kudos!
Mi consumo de series no afectó, ni afecta, sensiblemente mi vida.
I like what you guys are usually up too. This sort of clever work and coverage!
Keep up the excellent works guys I’ve added you guys to our blogroll.
In fact, seo most of their clients. These are considered by the
company we never heard of? Discussing your requirement and budget.
If a webpage that actually represents your business,
data, sound clips, animations and videos.
My webpage sem
Then last but not the least, one can enjoy at the Amalfi
Wedding Hall. At their Newmarket venue they provide both civil ceremonies and wedding receptions all in the luxury of one of Suffolk’s most
prestigious country house venues. Maybe you don’t but is this the way you want
to live forever, not really knowing for sure if he is just going to get up and move out
someday.
Asimismo, pregunta por el número de licencia de tu médico
y verifícalo a través del consejo de profesionales de salud mental
del estado, dice Maheu.
Hi, I wish for to subscribe for this blog to take most
recent updates, so where can i do it please assist.
Ty for this but as I write a comment,,,,,,there are too many comments for people to download. How many times do people need to say these are beautiful,,,,,takes up sooooo much space on phone!
really nice 🙂
Choose Black Friday Lace Front Wigs Deals To Buy Your Fashionable Lace Wigs.
Hairstyles for Round Face Shapes – What Hair Styles Will Suit your Round Face Best!
How does Ammonia Free Hair Colour protect
your Hair?
wow!! fantastic bracelet
This has lead to many players camping every single game in an effort to artificially boost their kill to death ratio so
that they appear to be better than they are.
First-person shooter games (FPS) are all-action games which place the player behind a
variety of weapons. The story plot seriously isn’t excellent yet it has the articles.
If you are quite confused what to use in the hairs to make them more beautiful than before, then your confusion has been solved. We actually provide natural products to heal your hairs completely without any damage.
this was the only tutorial I could actually get!! thx!!
so to get the uneven chevron would you just not not start with like a mirror image of the colors?
It’s beautiful! I think I will try to make some for my best gals… 😀
In fashion, most trends are gone before you know it. Luckily, that’s not necessarily the case with Formal Dresses. Although each new prom season has its own stars, most Formal Dresses stay in style for a long time, with a few minor changes. Here are the trends that are shaping up to be the hits of the 2014 prom season.
Well, let’s take a look at some of the stand out titles to get of sense
of what you might consider getting into. Still, just because a game
like Castle Crashers follows the pattern of games that we may have played in our youth, it does not mean that the entertainment value
is found only within the the realm of fond memories. In order to restore health now, you’ll need
to keep your hunger bar at 18 points or more.
This does not auger well with the parents but they should know that they provoked the actions.
Want to do is create three or four great stories which you can introduce into a conversation. I strongly advise you to discover this
incredible technique on the guy magnet ebook next page – Click Here.
First, understand that happiness will not come for
material possessions, a promotion, owning your own company, a hot boyfriend, superstar kids, etc.
A man who believes in himself is confident, secured, know what he is doing and can handle himself.
In 1996, Mike became excited about the future of the Internet and
the guy magnet ebook
way Small Enterprises could benefit online in case they
just comprehended how to make it do the job.
If you want to experience that lingering goodnight kiss, you might want to avoid
food with tons of onions and garlic in them. Being shy is a state of
mind and can be changed with practice. t mean that you will leave all your work and join the guy magnet ebook party she
is enjoying along with her friends.
Continuous digestive problems can be a symptom of overeating, bad food choices or something more serious.
Some people however are frequent Heartburn No More free sufferers
and they go through the conditions more than again in a week.
* avoid talking or chewing with your mouth open [reduces the amount of air you swallow]
– treats indigestion.
Amazing issues here. I am very glad to peer your post.
Thank you a lot and I’m having a look forward to touch you.
Will you please drop me a e-mail?
If you’ve just broken up with your ex, you are at the place.
It will only make things harder in the future, so put up with the ex recovery system free temporary feedback
issues for now. This might not be exactly the way it happened,
but all breakups follow a similar path.
Thanks for the marvelous posting! I genuinely enjoyed reading it, you happen
to be a great author.I will always bookmark your blog and definitely will come
back later on. I want to encourage yourself to
continue your great posts, have a nice morning!
Hey,
I’m trying to make an asymmetrical one, but I’m having trouble with the knots in the middle, where you connect the two sides. If I do those knots like when making the regular chevron bracelet, the left side is larger than the right side of course, because in those knots the color of the left side is visible.
Can somebody help me figuring this out?
Thanks!
hey can u tell me the dmc numbers you used to make the bracelets?? thxs
One of the most important things about building charm with someone is to make eye
contact. An American woman, on the other hand, might suspect that you’re
“hitting on her” and not give you the time 60 Years Of Challenge PDF day.
Justbe yourself and express your true and sincere feelings when you meet a suitable – Cambodian woman and you will be on the right track.
Admiring the persistence you put into your site and
in depth information you offer. It’s nice to come across a blog every once in a while that isn’t the same out of date rehashed information. Great read!
I’ve saved your site and I’m including your RSS feeds to
my Google account.
Please delete some of the pages of comments. I just printed out 46 pages and the instructions didn’t start until page 5. Since I print from a tablet I can’t pick what I print. I’m sure I’m not the only one who would appreciate it.
This is cool but i need videos to show me how thanks though
How do you add the rhinestones? Love these bracelets. I just started making the chevron pattern!
How would you do this?
You will want to go to another selection if crashes were experienced by people
with a specific download. You might wonder what this is and if this is the right thing to do
or not for your Iphone.
Today you can find a easy evening dress is obtainable in various styles, colours, makes, patterns, and so on. Fashion has gone beyond imagination.
An evening dress adds elegance and attraction to a lady. This is no doubt. However, the “perfect dress” is different from people to people. That is to say, different figures need different evening dresses to show their highlights meanwhile to hide those figure flaws.
Formal dresses are usually considered to be full length satin gowns which are worn for evening functions, but cocktail dresses can be as formal as you want them to be as well.
Choosing a perfect prom dress is the most important thing for the Prom. You should start shopping around at least one month before the party.
I couldn’t refrain from commenting. Exceptionally well
written!
Many women who choose to draw attention with the understated fall in love with solid and bold colored party dresses.
Fabrics play a very important part in girl’s party dresses. If wrongly chosen, it might lead to rashes and allergies on her sensitive skin.
Prom dresses according to the today’s fashion trends and strategy. If you are going for the prom dresses shopping, you need to consider some points about the prom dresses.
If you really want to be the bell of the ball and stand out, then you may want to choose an evening dress that embraces the colour shock trend.
You can wear the cocktail dresses 2015 with several types of different accessories like earrings, necklaces, and shoes as well even make up plays a very crucial role to enhance the overall look of your body type or personality as well.
Lace Wigs have been around for years, however it wasn’t until a few years ago when celebrities such as Beyonce, Lil Kim and Tyra Banks began wearing lace wigs that their popularity soared.
Generally I don’t learn post on blogs, however I would like to say that this write-up very compelled me to check out and do so!
Your writing taste has been amazed me. Thank you, quite great post.
If you have already made the investment for a lace wig, there are a few items that you must have to properly maintain it.
Whether you will be purchasing a full lace wig or lace front, these products are good to buy in advance for hair health and lace wig longevity.
Lace wigs can now be considered as a fashion staple among those who working in the entertainment business.
Front/Full Lace Wigs have become extremely popular within society and the entertainment business.
There are several types evening dresses are available in the market or in various top leading online clothing companies in the market.
THANK YOU SO MUCH FOR A GOOD AND EASY BRACELET PATTERN
Very uncommon and creative Bracelet designs. Colorful bracelet will match various kind of dresses.
Thank you.
Valuable info. Fortunate me I found your site unintentionally, and I am surprised why this twist of fate did not took place earlier! I bookmarked it.|
Very interesting to try it. But maybe will get a little bit confused when we do it. We have to focus on it. Thank you for the tutorial
I blog quite often and I really appreciate your content.
This article has really peaked my interest. I’m going to book
mark your site and keep checking for new details about once per week.
I opted in for your RSS feed too.
De hecho, los investigadores constataron que aquellos que habían tomado leche de
burra tenían menos acumulación de grasa perjudicial
para las arterias y el corazón.
How long does it take to make one ?
Hello my friend! I wish to say that this post is awesome, great written and come with approximately all vital infos.
I’d like to look extra posts like this .
Mais l’alimentation paléo est définitivement plus faible en glucides comparativement à ce que la plupart de gens mangent et à ce qui est recommendé par la plupart des nutritionniste, docteurs et agences gouvernementales.
This piece of writing is really a pleasant one it helps new the web visitors, who are wishing for blogging.
A une activité physique soutenue et à une alimentation principalement frugale, composée de légumes et de fruits frais, j’associe un complément alimentaire qui redonne
un peu plus de tonus à ma peau.
wɦoah tҺiѕ Ƅⅼߋg іѕ maցnifіcᥱnt і геɑllү lіҝе reɑԀіng ʏоur ⲣοѕtѕ.
Κеᥱρ սρ the ɡߋоԀ ѡοгқ!
Yоu κnoᴡ, а ⅼоt оf реօρⅼe arᥱ ѕeагchіng aгߋսnd
fог tɦіѕ infօ, yoս сɑn аiⅾ tɦеm ɡгеаtlу.
Thank you for another informative web site. Where
else could I am getting that type of information written in such a perfect approach?
I have a venture that I am simply now working on, and I’ve been on the glance out for such info.
my homepage ท่องเที่ยวไทย
I blog freԛuentlу and I tгuⅼʏ tһаnk уօᥙ fⲟr
yоսr ϲοntеnt. ΤҺis grеat aгtісlᥱ һаѕ tгᥙⅼʏ ⲣᥱакеⅾ mү іntегеѕt.
Ӏ ᴡіll tɑкe a notᥱ оf
yοᥙг ѕitе
ɑnd қeᥱр cɦесκіng
foг new ԁetaіⅼѕ аbοսt оncе
a ѡееҝ. Ӏ орtеԁ
in fог yoᥙг Fееɗ
aѕ աеⅼl.
Fine way of telⅼing, and
fastidiߋᥙs ріеϲе оf
wrіtіng tо taқе
infοгmatіon on tһe toріc ߋf my ρгᥱѕеntɑtіοn toρіc, ԝhіϲһ i am
ǥοіng tߋ ϲоnvеү
in acaⅾеmy.
Ⅰ aⅼԝaʏѕ emaіleɗ thіѕ Ƅⅼοg ρоst рɑɡᥱ tο ɑll mү cοntactѕ,
аѕ іf ⅼіҝᥱ to геаԁ it ɑftег
tһаt mу ϲօntаctѕ ѡіll tߋо.
If some one desires expert view on the topic of blogging and site-building afterward i advise him/her to pay a visit this blog, Keep up the good job.
omgee! seriously, you all are just so creative. Love the bracelets.
Undeniably believe that whifh you stated. Your favodite justification appeared to be on the web the simplest thing
to be aware of. I say to you, I cerrtainly gget annoyed while people consider worries
that they plainly don’t know about. You managed to
hit the nail upon the top and also defined out the
hole thing without having side-effects , people caan take
a signal. Will probably be back to get more. Thanks
If some օne wants expert view regarding blogging afterward i suggest him/her to visit this website, Keep up the pleasant job.
Hey there I am so happy I found your webpage, I really found you
by mistake, while I was searching on Aol for something else,
Regardless I am here now and would just like to say many thanks for a fantastic post and
a all round thrilling blog (I also love the theme/design), I don’t have time to read it
all at the minute but I have bookmarked it and also added your
RSS feeds, so when I have time I will be back to read more,
Please do keep up the excellent b.
Veгy great post. I juѕt stumbled սpon your weblοg and wanted to say that I’ve reaⅼly loѵed brⲟwsing your weblog posts.
In ɑny case I’ll be subscгibing for ʏour rss feed and I ɑm Һoping you write agaіn vᥱry soon!
Heⅼlo my friend! I wish to say that this post іs awesome, nice writtеn and incluԁe approximateⅼʏ
all important infos. I’d like to peer extгa
poѕts like this .
Hi there еveryone, it’s my fіrst pay a visit at this website, and piеce of writing is in fact fruitful designed for me, кeep up posting these types of content.
Gгeat delivery. Grеat arguments. Keepp ᥙр thе great work.
my bloog post Business Opportunity seekers emails ɑnd leads (http://www.facebook.com)
It is in reаlіty a nice ɑnd helpful piece of info. I’m glad that you shared thiѕ helpfuⅼ info with us.
Please stay us up to date like this. Thanks for shаring.
Ꮋello my famіly member! I wish tο say that this post is awesome, niсe ԝritten and ϲome with almost all important іnfos.
I’d likе to seе more posts like this .
WOW jᥙst wɦat I was looking fοr. Came here by searching for หนังโป็
Do ʏou have any video of that? I’d care to find out more detɑils.
頰の皮脂の量が多い男子の方のオデキの為に開発されたジェルです。
寝起きの肌を綺麗にし、潤いを保っておくことによってにきびができにくい顔面の環境が作られ、グリチルチリン酸ジカリウムで原因菌をつぶしていくので、
オデキ予防と並んで既存のデキモノも予防しやすくなります。
you’re in point of fact a goοd webmaster.
The site loading speed is amazing. It sort of feels that you’re doing
any unique trick. Furthermore, The contents are
masterpiece. you have performed а great process
on this topic!
Riցht here is the pеrfect blog for everyone who wishes to find out about
this topic. You understand sо mսch its almost tough to argue with yօu (not that I really
would want to…HaHa). You certainly put ɑ new spin on a topic which has
been wгіtten about fⲟr many years. Great stuff, just excellent!
When some one seaгches for his necessary thing, thus he/she
wants to be availaƅle that in detail, so that thing is maintained over here.
Ⲏi there! I simply wіsh to give you a bіg thumbs up for
the eҳcellent infо you һave got here on this post.
I am returning to үour web site for more soon.
Good artiсⅼe. I definitely love this site. Keep wгiting!
If you are going for best contents like I do,
just pay a visit this website everyday because it presents feature
contents, thanks
Nice poѕt. Ӏ was checking ϲontinuously this blog and
I’m impressed! Extremely useful info speciaⅼly the last part 🙂 I care
fߋr such іnfo much. I was looking for this certain info for a ѵery long time.
Thank you and best of luck.
May I simply say what a comfort to discover someone that truly
knows what they’re talking about on the web. You certainly
realize how to bring an issue to light and make it important.
More and more people need to check this out and understand this
side of your story. I can’t believe you’re not more popular given that you most certainly possess the gift.
Hi therе evеry one, heгe everу person is sharing these
knowledge, therefore іt’s good to read this weƄ site, and I used
to pay a quick visit this աeblog all the time.
Pretty! Tһis was an іncredibly wonderful article.
Many thanks for supplying these details.
Ƭruly when someone doesn’t know after that its up tߋ other ρeople that thᥱy will assist,
so herе it occurs.
Ꮐooɗ write-up. I absolutely loνe thiѕ websitе.
Thаnks!
Hі thᥱre, after гeadіng this amazing post i am as well delіghted to share my experiеnce
here with colleaցues.
An intriguіng dіscussion is definitely wortҺ comment.
I believe that you ought to write more аbout this
subject matter, it may not be a taboo ѕubject but typically folks dоn’t talk
about these subjects. To the next! Ⲃest wishes!!
I got this web ѕite from my friend who shаred with me on thᥱ toρic of this web
page and at the moment this time I am bгowsing this website and reading very informative posts at this
time.
I’d ⅼike to find oսt more? I’d like to find out more details.
Hi thеre, I enjoy reading through yοur article. I wanted to write a
little comment to support you.
Oh my goοdness! Impreѕsive article dude! Tɦanks, Howeνer
I am encountering issues witҺ yoᥙr RSS. I don’t understand why I can’t jⲟin it.
Is there anyone else getting similar RSS issues? Anyone who knows the solution will
yoս kindly respond? Thanx!!
OMG! I made so many of these during my school years! Maybe it is time to try make some new ones!
ӏt’s the beѕt time to make a few plans fߋr tҺe
longer term and it is time to be happy. I have leɑrn this put up and if I
may I desire to counsel you some fascinating things or suggestions.
Maybe yoᥙ could ѡrite next articles regɑrding
this article. I want to read even more issues about it!
Thanks, I love the ideas and it’s fun and therapeutic like Kirsten said…
The studs are a very nice addition.
Merci pour ces superbes idées;)
This is a reɑlly good tip paгticularly to those fгesh to the blogⲟѕphere.
Simple but very precisе information… Mаny thɑnks for sharing this one.
A must rᥱad post!
Parɑgraph writing is alѕo a excіtement, if you be acquainted wіth afterward you can ѡrite if
not it is complicateԁ to write.
I do not know if it’s just me or if perhaps everyone else experiencing issues with
your website. It appears as if some of the written text within your content are running off the screen. Can someone
else please comment and let me know if this is happening to them as well?
This could be a problem with my browser because I’ve had this happen previously.
Many thanks
Ⅰt’s an amazing article for all the inteгnet people; theу wilⅼ obtain advantage from
it I am sure.
Can I simplу say what a relief to find an individual who
actᥙally knoԝs what they are talkіng about online.
You defіnitely understand hoԝ to bring an issuе to light and make it important.
A lot more peopⅼe neeԁ to look at this and understand this
side of your story. I can’t believe уou’re not more populаr because you surely possess the gift.
Great weƅsite. Lots of helpful info here. I am sending it to several friends ans
additionally sharing in deliсious. And of course, thank you
on your sweat!
WOᎳ just what I was seаrching for. Came hеre bу searching for freeporn
Nіce answers in return of this difficulty wіth genuine argumеnts
and explaining all regaгding that.
This is like the best tutorial I’ve found on how to make one of these!!!
thank you so, so much
I really want to make these but I don’t know if I can. Thanks for the tutorial !
Thіs dеsign is іncredible! Уou obѵiousⅼy know how to keep a reader entertɑined.
Between your wit and your videoѕ, I was almost moved to start my own blog
(well, almost…HaHa!) Fantastic job. I really enjoʏed what you had to
say, and more than that, how yoᥙ prᥱsenteɗ it.
Too cool!
you are really a excellent webmaster. The web site loading
speed is incredible. It sort of feels that you are
doing any distinctive trick. Moreover, The contents are masterpiece.
you’ve done a fantastic job on this subject!
[GIVE AWAY] …Best Fashion Accessory Deals
YES!!! We are having a F.R.E.E + Shipping event to celebrate out new products!
You are going to LOVE new items we have added NOW!
100% Satisfaction Guaranteed! SHOP WITH FREEDOM!
Enjoy Our Limited Time FREE Offers. Just pay Shipping.
https://www.insideamazingtrends.com/collections/beauty-free-shipping
artikel yang anda tulis lumayan bagus
It’s remarkable to pay a quick visit this website and
reading the views of all colleagues on the topic of this article, while I
am also zealous of getting familiarity.
Thread the particular drops. On strings associated with supple carefully thread, carefully thread Being unfaithful small drops so you really should have 16 drops. Then stick to and among the big drops you’ve. Thread this large bead for both strings. Repeat this course of action and soon you are left just 1 inch with the supple carefully thread. The bigger drops should behave as any ‘stabilizer’ to help keep the lesser drops in place.
Under Armour Curry 1 http://www.sohiking.com/buy-under-armour-curry-1-men-grey-orange-free-shipping.html
This is the perfect site for anybody who would like to understand this
topic. You realize so much its almost tough to argue with you (not that I actually will need to…HaHa).
You certainly put a brand new spin on a subject which has been discussed for
years. Great stuff, just wonderful!
I am actually delighted to read this weblog posts which
carries plenty of helpful data, thanks for providing these information.
Magnificent goods from you, man. I have understand your
stuff previous to and you are just too wonderful.
I actually like what you have acquired here, certainly like what you are saying and the way in which you say
it. You make it entertaining and you still take care of to keep it wise.
I can’t wait to read far more from you. This is really a great website.
Thanks a lot for giving everyone an exceptionally nice chance to check tips from
this blog. It’s always so pleasing plus packed with fun for me
personally and my office acquaintances to visit your site a minimum
of three times in 7 days to study the fresh secrets you have got.
Of course, we’re certainly amazed considering the fabulous strategies you serve.
Selected 3 facts in this posting are unquestionably
the finest we have had.
Thanks, I’ll try this! 🙂
Very soon this site will be famous amid all blog viewers, due to it’s pleasant articles
What’s up to all, the contents existing at this website are genuinely awesome for people experience,
well, keep up the nice work fellows.
you aгe really a goоԀ webmaster. The website loading speed is incredible.
It seems that you ɑre dⲟing any սniԛue trick.
Furthermⲟre, Tɦe contents are masterwork. you’vᥱ done a fantaѕtic
task on this toρic!
Wonderful beat ! I wisһ to apprentice while you amend your web sіte, how could i subѕcгibe
for a blog site? The account helped me a ɑcceptable deal.
I had been a little bit acquainted of this yߋur broadcaѕt offered bright clear
cоncept
So I’m making a striped bracelet but I’m having problems with it curling… what am I doing wrong?! Is there any way to stop it? Thanks! Steph
@Steph If it’s curling, it means you’re probably not double knotting each time. It’s a common mistake! Let me know if that helps.
This is the right webpage for anybody who hopes to find out about this topic.
You understand a whole lot its almost tough to argue with
you (not that I actually would want to…HaHa). You definitely put
a brand new spin on a topic which has been discussed for many years.
Excellent stuff, just great!
You should be a part of a contest for one of the greatest websites on the web.
I will highly recommend this web site!
Great post.
If some one wants expert view about running a blog afterward i
advise him/her to pay a visit this webpage, Keep up the nice work.
Asking questions are truly nice thing if you are not understanding
anything completely, but this piece of writing offers pleasant understanding even.
Тɦanks in support of sharing ѕuch a good thought, article is pⅼeasant, tɦats
why i have read it completeⅼy
It’s amazing to go to see this web site and
reading the views of all colleagues regarding this paragraph,
while I am also eager of getting knowledge.
Hello to all, it’s genuinely a pleasant for me to go to see this site, it contains important
Information.
Have you ever considered about adding a little bit more than just your articles?
I mean, what you say is valuable and everything.
But just imagine if you added some great images
or videos to give your posts more, “pop”! Your content is
excellent but with pics and video clips, this site
could definitely be one of the very best in its niche.
Terrific blog!
You’re so cool! I do not think I’ve truly read through anything like this before.
So good to find another person with some unique thoughts on this topic.
Seriously.. thank you for starting this up. This
site is something that is needed on the internet, someone with
some originality!
umentionm levitra coupon
It’s not my first time to pay a visit this site,
i am visiting this web site dailly and obtain nice
data from here every day.
Hi there, all the time i used to check webpage posts here in the early
hours in the morning, for the reason that i enjoy to find out more and more.
Really when someone doesn’t understand afterward its up to other viewers that they
will assist, so here it occurs.
I do not even know how I ended up right here, however I thought
this post was once good. I don’t realize who you’re however definitely you’re going to a famous blogger
in case you aren’t already. Cheers!
If some one needs expert view on the topic of blogging afterward i suggest him/her to pay a quick visit this blog, Keep up the pleasant work.
This design is steller! You obviously know how to keep a reader entertained.
Between your wit and your videos, I was almost moved to start my own blog (well, almost…HaHa!) Excellent job.
I really enjoyed what you had to say, and more than that, how you presented it.
Too cool!
OMG I have been trying to find one of these for so long!
-Derpycook
It’s remarkable how something this nice can be self made. Simple but very precisе information!
We need to do more crafty stuff ourselves which makes the items much more valuable.
TV Wall Mounting
I am regular visitor, how are you everybody? This piece of writing posted at this web site is in fact pleasant.
It’s actually a nice and useful piece of info.
I am happy that you shared this helpful info with us.
Please keep us informed like this. Thanks for sharing.
http://xnxxkk.net
http://xnxxxar.org
What’s up, this weekend is nice for me, as this point in time i am reading this wonderful educational piece of writing here at
my house.
Unquestionably believe that which you stated. Your favorite reason seemed to be on the web the
easiest thing to be aware of. I say to you, I definitely get annoyed while
people consider worries that they plainly do not know about.
You managed to hit the nail upon the top and also defined out the whole thing without having
side-effects , people can take a signal. Will likely be back to get more.
Thanks
http://filmexxxadult.com
I like it but, I am a 10 year old and that is to hard. whaeles can I do?
I savor, lead to I found just what I was looking for. You’ve ended my four day lengthy hunt!
God Bless you man. Have a great day. Bye
You are my inhalation, I have few web logs and rarely run out from post cegebbaddfekfdbb
It’s hard to come by experienced people about this subject, however,
you seem like you know what you’re talking about!
Thanks
I really believe there are various more pleasant prospects onward if you are in which looked over your web site.
Awesome! Its in fact awesome paragraph, I have got much clear idea about from this piece of writing.
this is a great idea for bffs
thanks, nice article i love it
I am really happy to read this weblog posts which consists of plenty of useful data, thanks for providing such
statistics.
This design is spectacular! You obviously know how to
keep a reader entertained. Between your wit and your videos,
I was almost moved to start my own blog (well, almost…HaHa!) Great
job. I really enjoyed what you had to say, and more than that, how you presented it.
Too cool!
Hi,
I am from Norway and I have fallen in love with your bracelets. I would really like to know the color numbers on the threads you have used. Is it possible to get? Thank you.
can u do a video
Can you email me that booklet on how to make friendship braclets?
-So beutiful,.
You really helped clear up the confusion I had with all the knots.
THANK YOU!
wow beautiful bracelet
this is a great idea for bffs
Amazing! Love the rinstone addition.
Hey Erica, Ohh old school days I really feel nostalgic now I was going through the blog i followed each and every step mentioned. I goofed at a step but then tried it again and completed it. Do you have a similar kind of video it would great seeing you doing it yourself
Beautiful work! A must try. Thank you.
Amazing! Best tutorial without YouTube I’ve seen so far!
This is honestly the BEST site ever.
This DIY was really hard. Should you do it an easier way?
Kids 9 – 12-year-olds can be really good at other things such as making simple patterns of friendship bracelets but I think, in my opinion, this is getting a bit too overboard and is really hard. I can’t make the same pattern over and over again.
thanks for reading.
Mya
Personally, I think you just need practice. It won’t turn out perfect the first time, and probably will have tons of mistakes. But that just means you try harder next time.
omg i love thoughs but i cant make them will you please sell some on something
i tried this it was hard but fun and i gave one to my friend and she came to this website and she was amazed on how she learned how to make a friend ship bracelet and now all my friends are making them
This design is spectacular! You obviously know how to
keep a reader entertained. Between your wit and your videos,
I was almost moved to start my own blog (well, almost…HaHa!) Great
job. I really enjoyed what you had to say, and more than that, how you presented it.
Too cool!
i tried this it was hard but fun and i gave one to my friend and she came to this website and she was amazed on how she learned how to make a friend ship bracelet and now all my friends are making them
omg i love thoughs but i cant make them will you please sell some on something
This is honestly the BEST site ever.
Cool thanks
Wowwww I love all your designs
i love doing these but i mess up a lot
These look so fun to make but I don’t have any thread. Is there a certain brand I should get or should I get just any thread?
Its a really nice website. Thanks for giving full information about Bracelets and Bangles. You can also visit Estele.co
at first hard as hell but then it becomes super relaxing!!
Thanks for the stuff but u need more bracelets.
This is soooo cool, can’t waot to do more!!!!!
I love ur stuff
I’ve always wanted to know how to make the chevron pattern but could never figure it out!!
I think this not convenient because most of the bracelets require buying of some sort
All the posts on one side and your post on one side, even after that, your post will look very lot of comment, see it all around, but it is nice to see your comment is very differents
This is so hard and they didn’t show enough steps on how to do it. so this is stupid!!!
I kinda agree with sisi
I just need embroidery threads to do it…
Hi
it was very good
Hey I love this and I am 20
This is a really very informative article, there is no doubt about it. Thanks for sharing this article with us. This is very nice of you.
you’re in reality a good webmaster. The website loading velocity is amazing.
The contents are masterpiece. you’ve performed a wonderful job in this topic!
Cute
Thank you for providing a good quality article.
I really enjoy your web’s topic. Very creative and friendly for users. Definitely bookmark this and follow it everyday.
Such an amazing and helpful post. I really really love it.
thanks for sharing great blog article.Thanks Again
This is a great post and enjoy the look of your blog very much. Thanks for sharing.
It’s actually great and useful information. Thank you for sharing this useful information with us.
Awesome! This works really well. Thank you for this!!
– Stella
When I read an article on this topic, keonhacai the first thought was profound and difficult, and I wondered if others could understand.. My site has a discussion board for articles and photos similar to this topic. Could you please visit me when you have time to discuss this topic?
Thanks for sharing,
Your article is very interesting. And you have decorated your art beautifully. It inspires people a lot. If the subject is good, then it is also fun to read and this is what people want nowadays, your post is really interesting. Inspired by you, I too think I should write an article on a fun subject.
Nostalgic!! Reminiscing about the carefree days of my youth when I used to make bracelets to sell to my classmates. I like the idea of adding rhinestones for a more mature look. Thank you for reminding me of the tutorial; I’m off to get some embroidery thread right away.
https://ngobrolgames.com/
Love this for my learner’s..could I get a YouTube clip on how to do the bracelet
Love the article, Please share more..
This is the perfect post.casino trực tuyến It helped me a lot. If you have time, I hope you come to my site and share your opinions. Have a nice day.
smokebomb E-cigarette devices that use e-cigarette solutions are currently defined as “cigarettes that can have the same effect as smoking by inhaling solutions or tobacco solids into the body through the respiratory system using electronic devices.” Like the e-cigarette liquid, it is divided into ready-to-use and mode-to-use depending on the type of solution containing nicotine.
전자담배액상 smoke bomb best e-cigarette liquid site Smoke Balm – smoke bomb lowest price – e-cigarette – e-cigarette liquid – e-cigarette liquid site – csv e-cigarette – salt nicotine – synthetic nicotine
전자담배액상 smokebomb best e-cigarette liquid site Smok25 – smoke bomb lowest price – e-cigarette – e-cigarette liquid – e-cigarette liquid site – csv e-cigarette – salt nicotine – synthetic nicotine
smokebomb best e-cigarette liquid site Smok25 – smoke bomb [Smok25] – 전자담배 액상 – lowest price – e-cigarette – e-cigarette liquid – e-cigarette liquid site – csv e-cigarette – salt nicotine – synthetic nicotine
Evolution Gaming Korea Service is open. 에볼루션코리아 The best evolution in Korea. [ evobench ] Evolution Korea offers a unique and unique experience, fun, and enjoyment.
Ada berbagai alasan mengapa orang beralih ke minuman beralkohol saat Minuman Ibu Hamil . Untuk mengatasi mual di pagi hari, alasan pertama dan paling jelas adalah makan lebih bergizi. Saat ibu hamil mengalami mual, tidak jarang mereka mengonsumsi ginger ale, ginger beer, atau ginger tea untuk meredakan gejalanya. Satu motivasi lebih lanjut akan membantu Anda beristirahat dan bersantai. Wanita hamil memiliki banyak hal di piring mereka, baik secara fisik maupun emosional, jadi tidak mengherankan jika banyak yang beralih ke zat seperti anggur, bir, dan bahkan kafein untuk kenyamanan. Terakhir, ibu hamil diperbolehkan mengonsumsi alkohol.
Looks fun
Can’t wait to try it
Thanks for your post. The article is neatly organized with the information I want, so there are many things to refer to. Bookmark this site and visit often in the future. Thanks again.^^ keonhacai
Free Escort Contact Number http://priyaescort.co.in
Great tutorial, it’s a fabulous idea of rhinestones on friendship bracelets. We are waiting for more in anticipation
I love these desins you should make more
Nicee..This type of article that enlighted me all throughout and thanks for this.This going to be excitement and have fun to read.
I have enjoyed a lot reading this post keep it up.
https://www.casinositeguide.com
You really amazed me with your writing talent. Thank you for sharing again.
https://www.casinositezone.com
Your blog is really nice and sound really good
https://www.baccaratsite.biz
Can You post like instructions in like how to make the bracelets
It is very well written, and your points are well-expressed.
https://www.sportstotomen.com
This website was… how do you say it? Relevant!!
https://www.gostopsite.com
um, r there any ones that u would suggest that weren’t so time consuming?
How do you make a simple one?
Hard and frustrating, I wish they had a video for kids
“Your blog is very interesting! I have a recommendation for you, Just click the link below:
“
Your blog is awesome! So much to learn! But hey, If your looking for awesome site Just click the following link below:
Fantastic! I think You put a lot of effort to create this article. I appreciate your work
Don’t you have any easier ones for 12 year olds???
I love this and how you detail how to make them, I have never done one but always love them, now I’m going to have a go at doing some thanks
I REALLY LIKED EVERY PART OF THIS POST. THANKS FOR THIS KIND OF ARTICLE.
THIS IS SUCH A GREAT POST. HAVE A NICE DAY EVERYONE! THANKS
WE ARE REALLY GRATEFUL FOR YOUR BLOG. THANKS AND PLEASE KEEP IT UP THE GOOD WORK!
I like your comment V good
If some one wants expert view on the topic of blogging
and site-building then i recommend him/her to go to see this web site,
Keep up the good work.
I found the directions very helpful and easy to follow.
I personally believe that the word “diversity” has multiple definitions and one of those is familiarized by cheap logo design service which means an equal connection of different colors.
This type of message always inspiring and I prefer to read quality content, so happy to find good place to many here in the post, the writing is just great, thanks for the post.
Great write-up, I am a big believer in commenting on blogs to inform the blog writers know that they’ve added something worthwhile to the world wide web!
They may be new to the city and looking for someone to show them around, or they may be visiting on business and looking for someone to spend their downtime with.
https://www.pritychavda.in/
this post is good nice work
keep it up good work well thanks for sharing
keep it up good work well thanks for sharing
I was looking for the best video editing app for my mobile device and, my friend suggested I use Kinemaster Pro, from Modpapa.com and it was really good for me.
I am looking for this types of information on internet and finally find here, thanks for sharing this. https://www.cybercitymodel.com/
Immerse yourself in the world of Asian dramas! Watch your favorite Korean, Taiwanese, Hong Kong, Thai, and Chinese dramas online for free with English subtitles on Dramacool and Dramacool9.
Kissasian – Asian Drama, Watch drama Asian Online for Free Releases in Korean, Taiwanese, Hong Kong, Thailand and Chinese with English Subtitles and Download.
love it, but can you put some more ways to make braclets?
I always knew how to make these but then I started school and I forgot. This is the perfect website to use!!! Thanks
I always knew how to make these but then I started school and I forgot. This is the perfect website to use!!! Thanks
Are you ready to indulge in the ultimate exotic experience? Look no further than our escort service in Gurgaon. These stunning beauties are the epitome of allure and sophistication, and they are guaranteed to take your desires to new heights.
https://www.natashakhan.biz/
Hey, my name is Natasha Khan 09561994823, I am 23 years old college girl and for last 3 years I work with Escorts in Mumbai.
Kissasian ⚡️ The biggest selection of streaming Asian drama content online for free.
I love loom band but I do 7 because I’m looking looking for my favourite toy ido loom band for Anne I softly sorted my loom band pot yesterday in rainbow order orde
I think do a club Jess it might be fun
Jessica
love it, but can you put some more ways to make braclets?
I think its very hard and she skips important like mini details. I would say If you do this type of thing again add a video or make the steps very visual and clear so people can really understand!
Thanks for your publication; wild style. Many thanks sharing your article.
I like learning new stuff. So, thankyou for this information of yours.
Saffronexch is an online betting platform that offers a range of betting services and options for users. It provides a comprehensive interface for placing bets on various sports and events, with real-time updates and competitive odds. Saffronexch is designed to cater to both novice and experienced bettors, featuring user-friendly navigation and robust security measures. The platform also includes account management tools, customer support, and promotional offers to enhance the betting experience. Users can enjoy a seamless and engaging betting environment with Saffronexch.
“11x play offers an impressive range of games and betting options that cater to all types of players. I love how easy it is to navigate through the site, and the quick loading times make the experience even better. The platform’s commitment to security and fair play is evident, which is essential for any online gaming site. 11xplay has definitely earned its place as one of the top platforms in the industry.”
What I love most about Bet Bhai is its commitment to providing a secure and fair betting environment. As someone who values transparency, it’s great to see that Betbhai offers detailed information on betting rules and odds. The platform also supports responsible sport , which is a big plus. Their customer service team is quick to respond and very helpful, making the entire experience smooth and enjoyable. If you’re looking for a trustworthy betting platform, give Betbhai a try.
I’ve been using Tigerexch247 for a few months now, and I must say it’s one of the best platforms for sports betting. The website is easy to use, and they offer a great variety of sports markets to choose from. I’ve had no issues with deposits or withdrawals, which is a big plus for me. If you’re into online betting, Tigerexch247 is definitely worth checking out. It’s reliable, efficient, and user-friendly.
I’ve been betting on Cricbet999 Login for a while, and I’m consistently impressed by their attention to detail and quality. Not only is the platform visually appealing, but it also offers a wide range of betting markets. I particularly like their live betting feature, which allows you to place bets in real time as the action unfolds. The odds are competitive, and the platform is extremely secure. I also appreciate the various payment options they provide, making deposits and withdrawals quick and hassle-free. For anyone looking to dive into the world of online betting, Cricketbet999 is a platform you can trust.
A new and powerfull resource to follow latest technology news and articles. You can also find latest news and tutorials in my website. i try to make this website bigger and bigger everyday.
now what?
colors play with my mind!
really intersting
Gbet offers a secure and user-friendly platform for online gaming. It supports various currencies, including cryptocurrencies, and provides options for both sports and online games. The platform is accessible via both desktop and mobile, and it features an Android app for ease of use. Gbets operates under the regulation of the Curaçao government, ensuring compliance and transparency for players. You can learn more or access the platform by visiting Gbets.
Welcome to the pinnacle of online sports betting, where diversity meets excellence, and innovation converges with convenience. Apbook emerges as a dynamic force in the realm of betting platforms, offering a unique blend of features that elevate your betting experience to unprecedented heights:
Cricbet99Book.com is an exceptional destination for cricket enthusiasts who enjoy the thrill of betting. Cricbet99 platform provides an unparalleled cricket betting experience, featuring a wide range of market options and an intuitive interface designed to cater to both novice and seasoned bettors. With Cricbet99Book.com, you can immerse yourself in the excitement of live betting, where real-time odds updates keep you at the edge of your seat, allowing you to make informed decisions as the game unfolds. We understand the importance of security and trust in online betting, which is why we ensure that all transactions on our platform are secure and transparent. Our commitment to providing a safe betting environment extends to our robust security measures and adherence to industry standards, giving you peace of mind while you place your bets. Customer satisfaction is our top priority, and we pride ourselves on offering 24/7 customer support.
Welcome to the secure and thrilling world of Sky Exchange. Discover a platform designed to bring you closer to the games you love, with easy-to-use features and strong security. Join SkyExchange and take your gaming experience to the next level.
Allpaanel is a comprehensive platform designed for seamless user experience and accessibility. With its user-friendly interface and robust features, it caters to a wide range of interests, providing an engaging and dynamic environment for its users. Whether you’re looking to explore different opportunities or stay updated with the latest trends, Allpaanel offers a reliable and secure solution.
Ohh I like making it with watching drama at dizigom.
Welcome to Betbook250 – Your trusted hub for exciting sports betting and online games! Dive into cricket, football, and top casino games with secure, easy-to-use features. Join us now for a thrilling experience!
Allpaanel is a very simple and easy platform for everyone who loves online games and betting. It gives you many options in one place, which makes it very good for players in India. The signup process is fast, and everything works smoothly without any problem. If you are looking for a trusted and safe site to enjoy betting, Allpaanel is a great choice. Many players in India already use it because of its simple features and smooth service. You should try it for sure!
Khiladi Adda is India’s leading online gaming platform, offering a diverse selection of games, including fantasy sports, esports, quizzes, and casual gaming. Established in 2019, it has quickly become a favorite among gaming enthusiasts, boasting over 5 million users and hosting regular tournaments. The platform features innovative formats like “FanBattle,” which add a fresh twist to fantasy sports, and supports popular games like Free Fire Max and Battlegrounds Mobile India. Khiladi Adda prioritizes fair play, security, and user convenience, with certifications from the All-India Gaming Federation (AIGF) and Random Number Generator (RNG). Its mobile-friendly interface, seamless transactions, and 24/7 customer support make it a reliable choice for gamers looking to monetize their skills. Whether you’re a casual player or an esports pro, Khiladi Adda offers exciting opportunities to play, compete, and win.
This blog is a goldmine of information! Thank you for sharing such valuable tips. If you’re a wine lover, you might enjoy browsing Chateau Wine Cooler. They offer some amazing options for wine storage.
CricBet99 is your trusted platform for seamless and secure cricket betting. We provide exclusive betting IDs, ensuring easy access to exciting cricket betting opportunities. Our user-friendly interface, secure transactions, and 24/7 customer support make us the preferred choice for cricket enthusiasts. Visit getcricbet99id.com.in to get started. Bet responsibly.
Very useful information from this page. Thanks for sharing from Indian Online Shopping Website
Long Tail World is a trusted site
Toile Delinet Petite Scroix is a trusted sites for comments and info
This is a very good article for a wedding ceremony, I like this
At Basic Trailers, we specialize in providing high-quality car trailer for sale options to meet a wide range of transportation needs.
I read this paragraph completely about the difference of most up-to-date and earlier technologies, it’s amazing article.
Yesss! I’ve been waiting for this tutorial Perfect refresher for someone like me who totally forgot how to make chevron bracelets. Can’t wait to try it out!
They are very cute
National Techtools was founded in 2014 and operates as a trader, wholesaler, and distributor based in Junagadh, Gujarat, India. The company emphasizes offering a wide range of verified, high-performance, and affordable tools with a commitment to customer satisfaction and support.
Overall, choosing a dependable taxi service in Agra ensures a safe, comfortable, and convenient travel experience.