
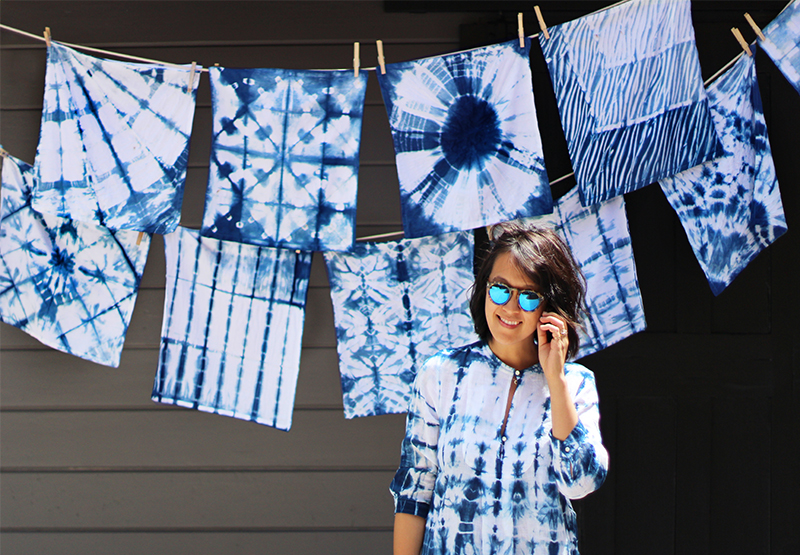
Today marks HonestlyWTF’s four year anniversary. Four years! To celebrate, we’re revisiting the very first tutorial we ever featured on the site: shibori tie dye. Lauren and I first discovered shibori after discovering an old photo on the web. The idea of recreating an ancient Japanese dyeing technique inspired us to spend an entire weekend experimenting with our favorite deep blue, indigo. After dyeing just about every white article of clothing in sight, our blue stained fingers excitedly uploaded the tutorial – we couldn’t wait to share it with our 30 readers. And so began the ongoing series of tutorials and DIYs. We hope you enjoy the throwback, one of our favorites to date!
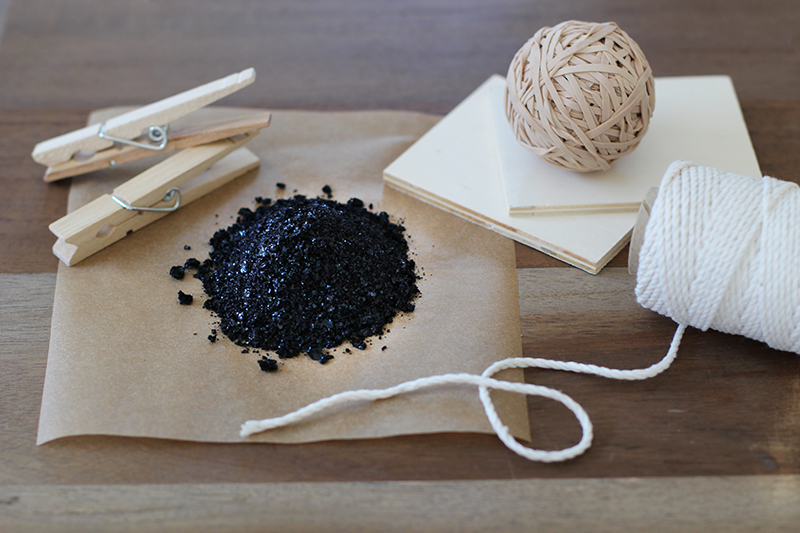
You’ll need:
- an indigo dye kit
- natural fiber clothing or fabric
- 2 5 gallon buckets
- rubber gloves
- small wood squares
- rubber bands
- twine
- a PVC pipe
- a long wooden stick
- a drop cloth
- rubber gloves
- scissors
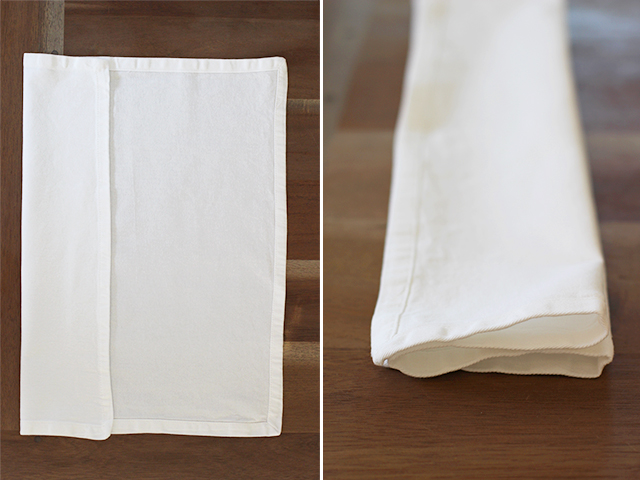
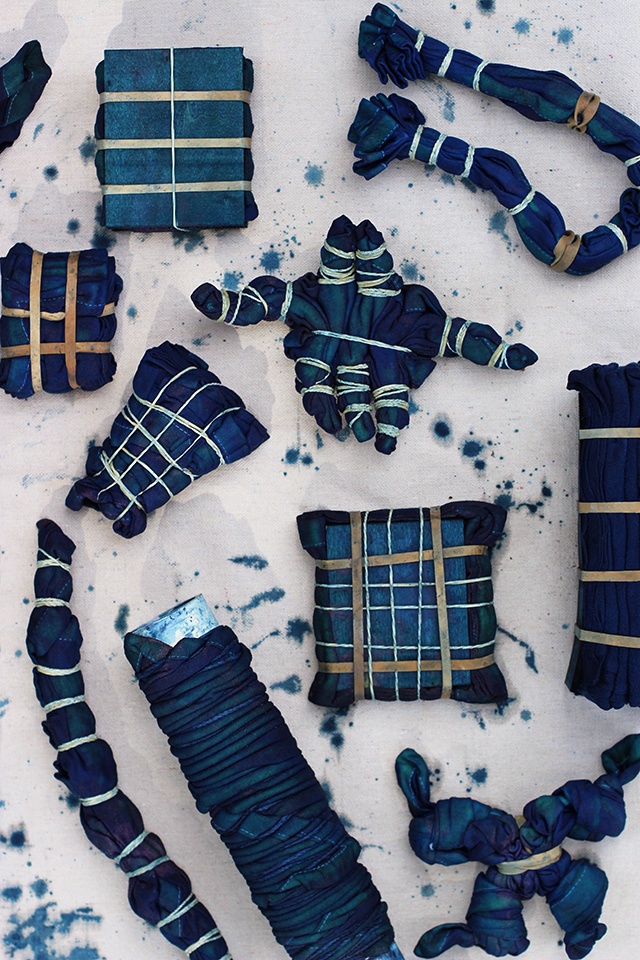
When choosing fabric or clothing, it’s important that made of natural fibers. Cotton, wool, silk or linen work best. I also like to pre-wash my fabric before dyeing. Here I’m using rectangular dinner napkins but obviously, any shape or article of clothing will do! Here are just a few basic binding techniques to try:
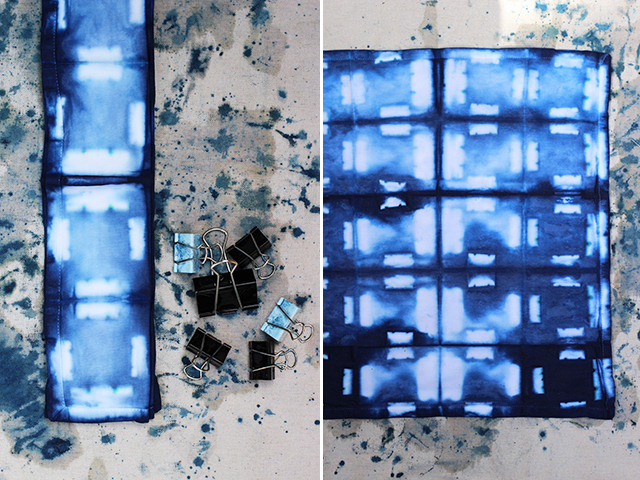
Itajime shibori is known as the shape-resist technique. To start, fold the fabric like an accordion.
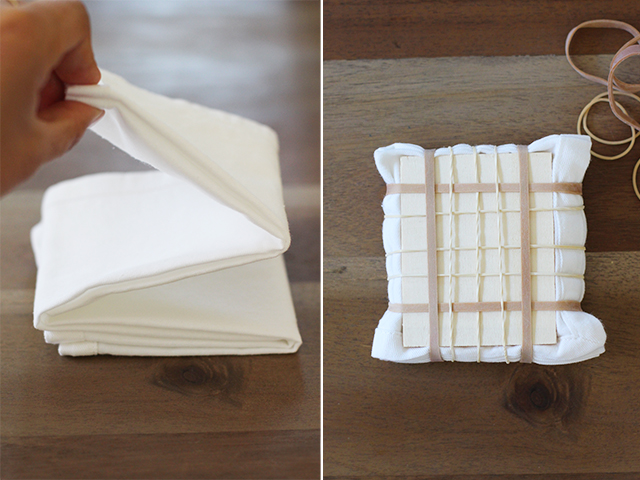
Fold it again in the other direction – again, like an accordion. Place it between two pieces of wood, or any flat shaped object, and bind it together with string or rubber bands. The shapes and rubber bands will prevent the dye from penetrating the fabric they cover. The larger the shape and the more rubber bands you use, the more white you will see. The smaller the shape and fewer rubber bands you use, the more indigo you will see.
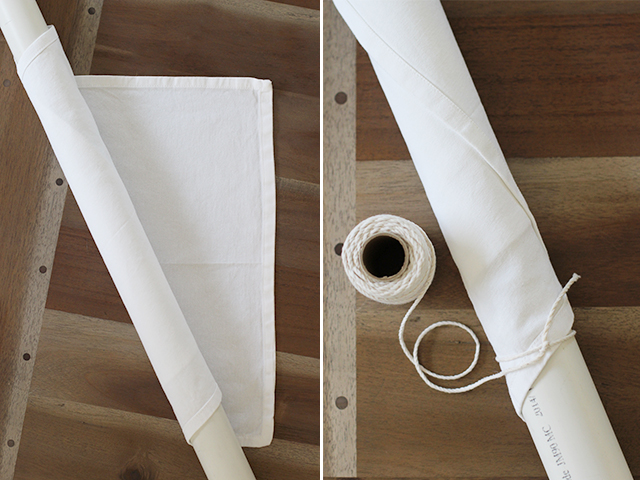
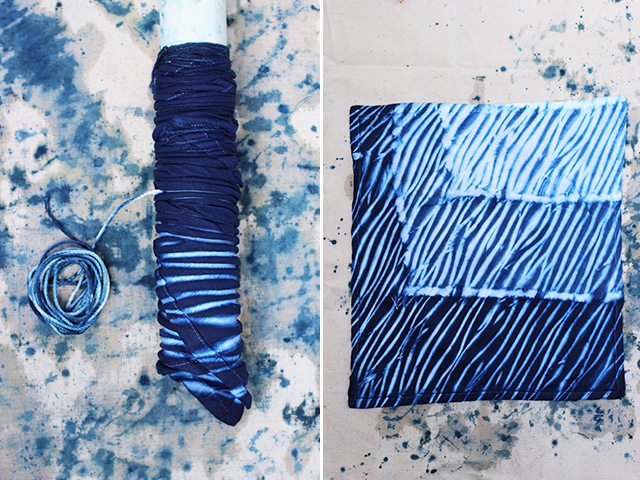
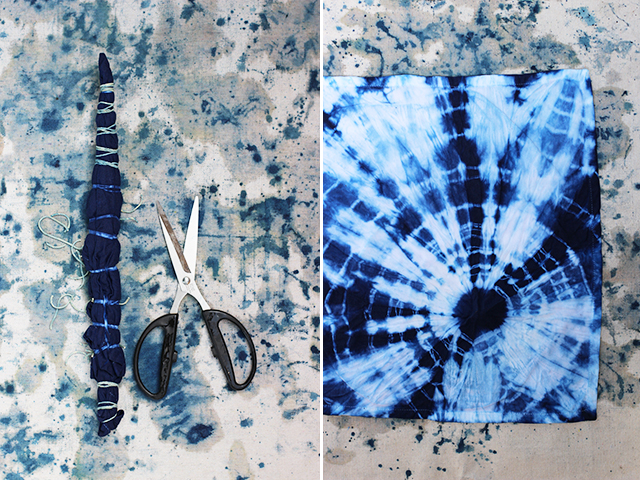
Arashi is the Japanese term for “storm” and it’s also known as the pole-wrapping technique. It starts by wrapping fabric around a plastic PVC pipe at a diagonal. Once the fabric is wrapped, tie a piece of twine into a double knot at the base of the pipe.
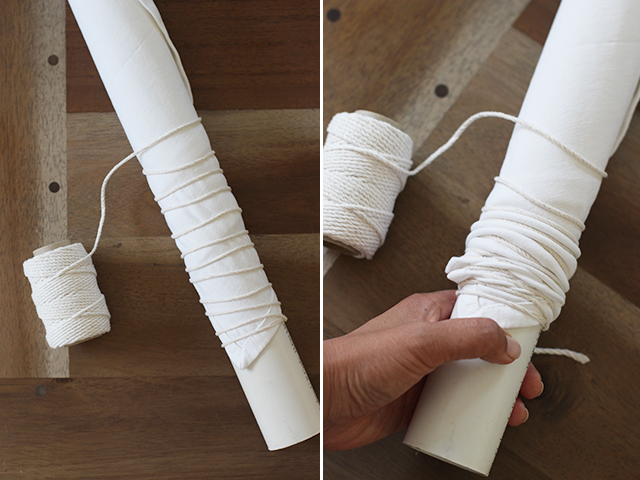
Wrap the twine around the fabric. After 6-7 wraps around the pipe, scrunch the fabric down. Give the twine a strong tug to tighten. Tightening before scrunching will make it more difficult to control and move the fabric.
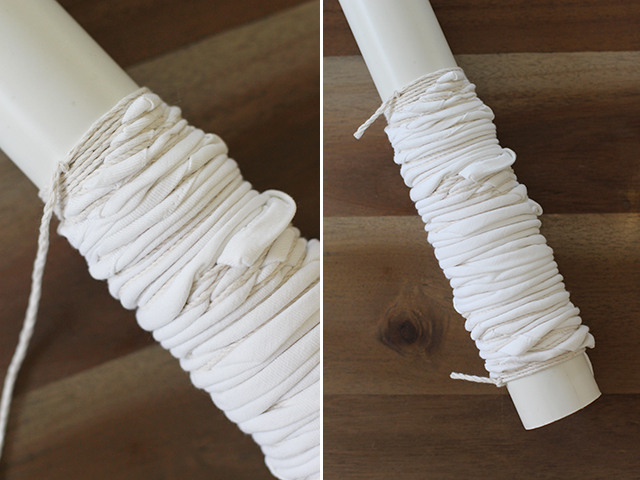
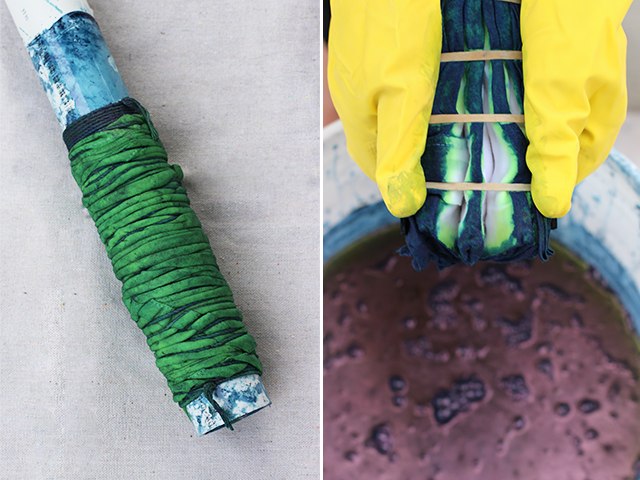
Continue wrapping, scrunching and tightening until all the fabric is compacted. Tie a knot above the fabric. The pattern will be on a diagonal with thin lines of white, where the twine is binding the fabric.
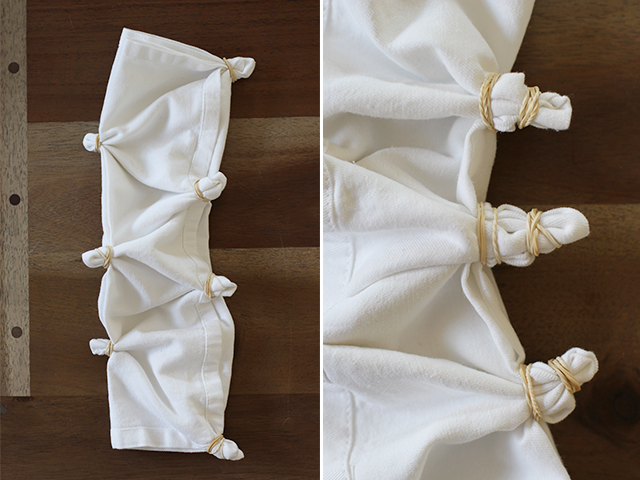
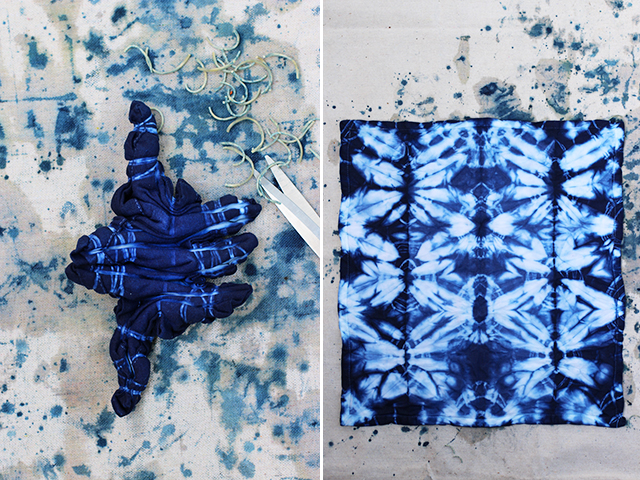
Kumo shibori is known as the pleat and bind technique. It involves binding the fabric in very close sections, which results in several spider like designs. This is just one of many ways to experiment with this technique. Start by folding the fabric into an accordion. Pinch and bind into equal sections.
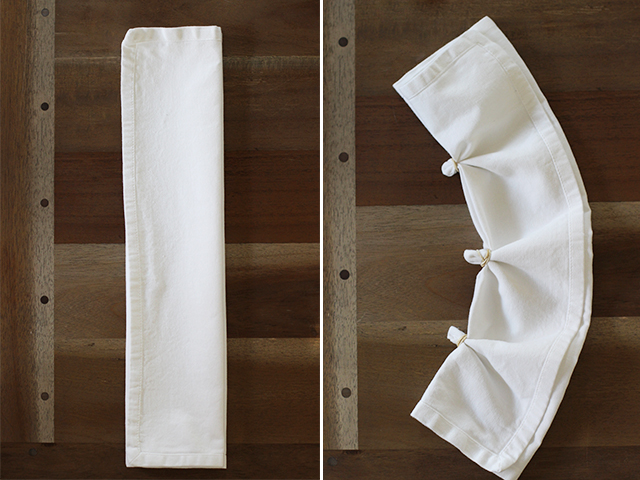
Do the same with the opposite side, in staggered sections. Continue binding with rubber bands, working your way towards the center.
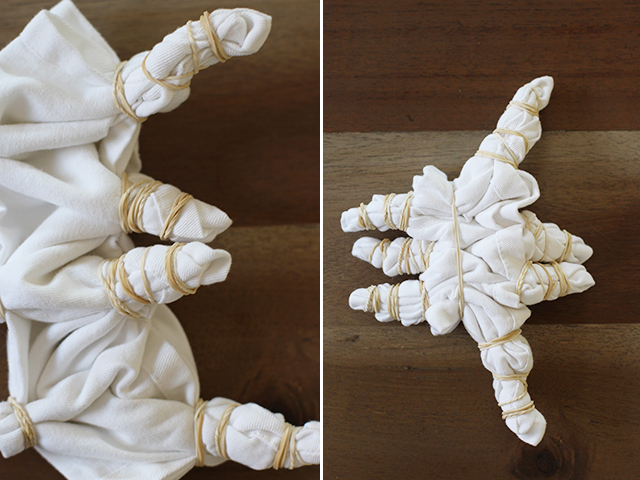
Keep binding until you can’t go any further. Add additional rubber bands to make the fabric into a tight bundle.
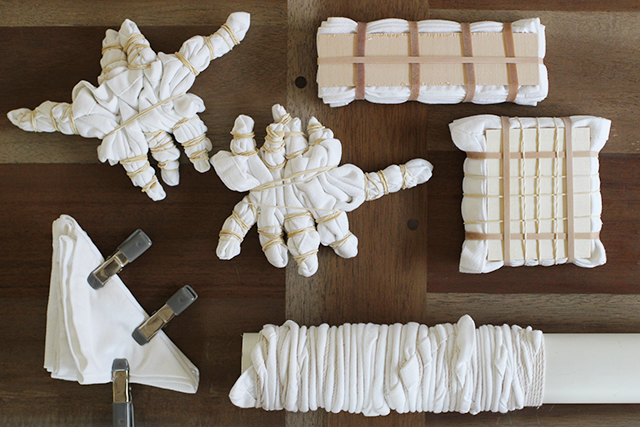
Be resourceful when binding – use clamps, paper clips, binder clips, odd shaped wooden pieces, canning jar lids, etc. There is no right or wrong way to shibori!
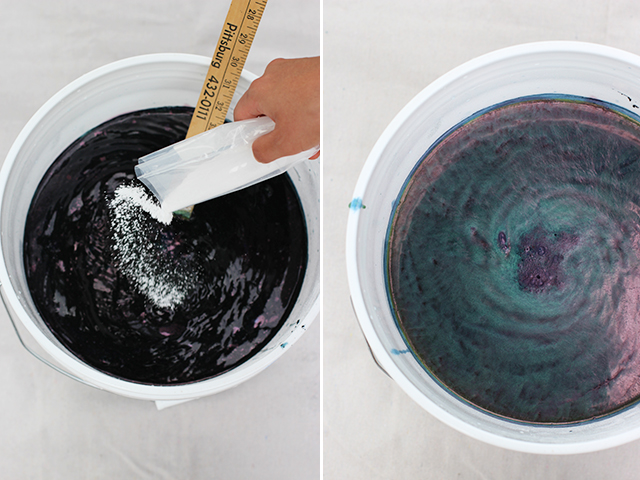
To set up the indigo dye vat, follow the accompanying dye kit instructions. For this particular kit, start by filling a 5 gallon bucket with 4 gallons of warm water. Pour the indigo dye powder into the bucket and stir in a circular motion.
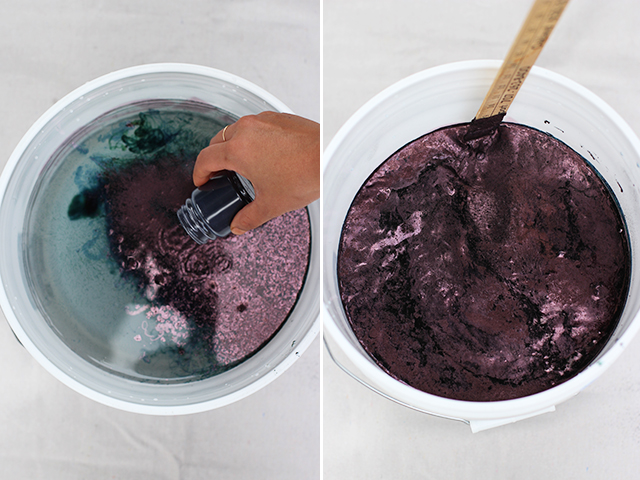
Then pour in the soda ash and reduction agent. Stir again in a circular motion and then in reverse. It is important not to oxidize the dye bath so keeping it covered and stirring it gently is recommended. Once the dyed is well mixed, cover for at least an hour. When you check on the dye, you’ll notice a foamy oil-slick looking top layer and a neon yellow-greenish colored liquid below. This is when you know the dye is ready.
Rinse the fabric in another bucket of clean water. Squeeze out all the water before submerging it into the indigo dye bath. Gently manipulate and massage the dye into the fabric. Again, try not to agitate the dye by working gently under the surface of the dye.
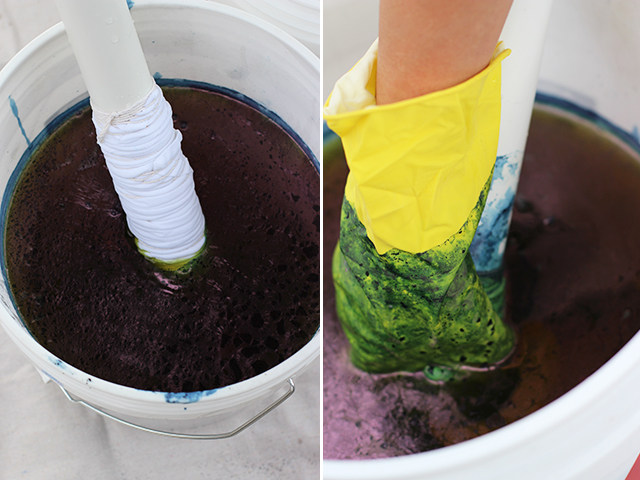
After about 5 minutes, take the fabric out of the dye. It will have a green hue but after several minutes, as it is exposed to oxygen, it will turn dark blue. Carefully peek inside one of your pieces and you’ll see the areas in which the dye wasn’t able to penetrate. Lookin’ good!
After all the pieces have been dyed and allowed to oxidize, go ahead and repeat the dying process. The more it goes into the dye bath, the darker the indigo hue the fabric will be. And remember, the fabric will always look darker when wet and will fade a bit when washed for the first time.
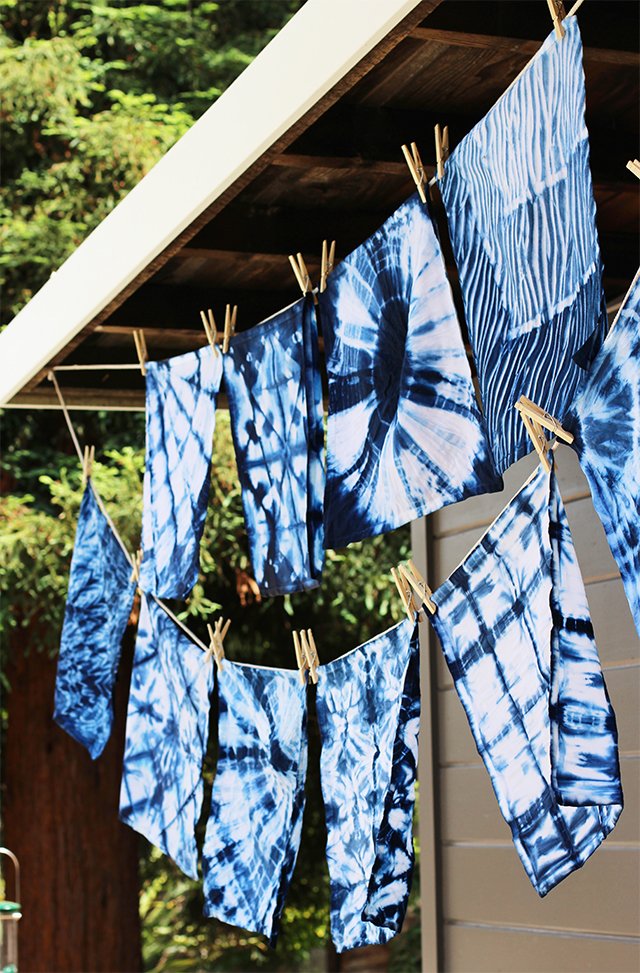
After dyeing, allow the pieces to dry and set. I like to leave them overnight before unwrapping the pieces. Put on a fresh pair of gloves, grab a pair of scissors and keep that bucket of clean water nearby. Give the bound pieces a good rinse in water and then carefully snip away the rubber bands and twine. First up is the shape resist technique. See how the fabric is gridded with striped lines from the rubber bands? My wooden squares weren’t able to exclude the dye completely and I love it! That is the beauty of shibori – there are no mistakes.

Now for the pole tying technique . . .
And the pleated and bound resist technique . . .
I used binder clips here to bind a square accordion fold.
Here, I simply knotted all four corners of the fabric individually.
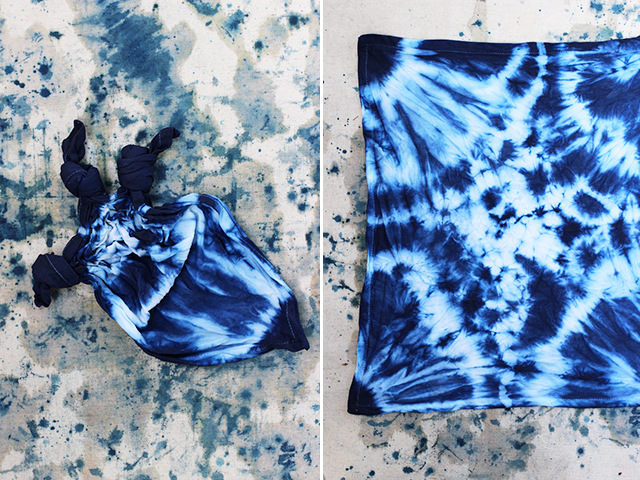
And then there is the good ol’ binding method we all did in grade school.
Once all the pieces have been unwrapped, wash them in the washing machine with cold water without detergent. Line dry, or dry on the lowest heat setting in a dryer, and iron to set the color.

The dye vat should allow you to dye at least 5 pounds of fabric. If you keep it covered after each use, it should last up to 5 days. Have fun!
(images by HonestlyWTF)
Beaitiful idea http://stefy81fashion.blogspot.it/?m=1
Congratulations for this 4 years!! this DIY is really cool!!!
http://www.stelstyle.com
Congratulations on 4 years! Love this DIY.
http://juliettelaura.blogspot.com
Thank You for this awesome tutorial. I love it..Thank you again
Very nice inspiration.
xx
http://www.fashiondenis.com/
Love the idea of napkins! Makes me nostalgic for that time 4(!!!!) years ago. XO
Love this DYI! Might give it a try over the weekend.
Happy 4 years! Love this technique! Xoxo
Lelaandlace.com
Congratulations on your 4 year anniversary and wish all the best for the next years to come! Also,this tutorial is so great! The tips on how to keep the textiles and set the patterns!
http://taliawaynebeauty.blogspot.com/
YES.
How cool!
This is a definite must-try~
xo
Deanne Castro
http://myfashavenue.com/
This was a very good tutorial with lots of information. I dyed tea towels using lots of patterns and am happy with the results. I was inspired by Indigo Girl! Thank you!
I have been wanting to try shibori (and even bought the indigo dye supplies a few months ago) but have been hesitant for some reason. Your tutorial was one of the most robust tutorials I have seen – thank you for sharing! This is just the impetus I need to give it a try this weekend (yay for long holiday weekends!).
this is so cool!
xxx
http://www.dominiquecandido.com
I just saw a ton of indigo tie dye in Bazaar Magazine. I’ll have to try some of these! They’re beautiful!
Caitlin
lifealamodeblog.wordpress.com
Congrats on four great years! Can’t wait for many many more 🙂
Rory
http://www.WearAboutsBlog.com
Love your blog,I do love how you explain all DiY.
I can not stop reading it, go on please!!!
Thanks!!
xo
buy online diesel watches
Indigo Tie Die. So Hot right Now!
There is always something nostalgic about the tie die and Summer.
Lovely inspo and DIY!
XO
Jeanne
http://fashionmusingsdiary.blogspot.fr
Congratulations on your anniversary! How exciting! And thank you so much for sharing the DIY tie dye, it’s absolutely gorgeous and my daughter would adore a project like this. Have a great week!
~Bre
It’s really a nice and useful piece of info. I am happy that you shared this helpful
info with us. Please keep us informed like this.
Thanks for sharing.
Happy DIY Anniversary! Thanks for sharing all of your rockin projects!
I have to try this! It is so cool! Thanks for four years of DIY!
Can beat a bit of tie dye for summer
Lauren
livinginaboxx
Love this diy <3
Happy blogiversary! Can’t believe it’s been 4 years!
What a wonderful DIY, so pretty!
OMG this is so pretty….makes me wanna jump off my chair …right into a bucket of dye!! so beautiful
WOW, amazing technique!
Thanks for sharing it.
Lots of love, xx
http://marysreturn.blogspot.com.ar/
http://marysreturn.blogspot.com.ar/
Congrats on your 4 successful years. Love your blog. Pat S
Congrats! I wonder if you have advice about how to do shibori on a garment?
I can’t believe it’s already been 4 years… 🙂 congrats!
What a great throw back. Congratulations at reaching 4 years.
http://beautifulpromiserings.com/
Thank you for providing a great idea along with the directions. At Afrobeatnik, we have an artisan program where you can create more by working less. I see many connections between this post and Afrobeatnik!
afrobeatnikshop.com
Happy 4th Anniversary!!! I hope you had an epic dinner party and used these beautiful creations as napkins or placemats, or heck – beautiful flags in the night breeze!! Love your site! Definitely pinning this one for future use! Thanks!
Wow. Absolutely must DIY! Congratulations on the four years by the way!
http://dzyana.com
Thank you for the thorough tutorial.
Honestly , brilliant and simple ideas..
Great tutorial and great results too – glad you reposted it after 4 years.
Wow, your binding techniques are so creative and they all turned out so rad! I just started experimenting with indigo; it’s pretty addicting! I also started an Etsy shop with some indigo products; you can take a peep at my shop here: https://www.etsy.com/shop/karalylah
Each piece is absolutely beautiful! A great DIY Tutorial and what a great result!
Tie dye definetly made a comeback.
Amazing.
http://tinygoldengirl.com/
WOW! This is amazing! I gotta try this! So much perfect this summer.
Congratulations for the wonderful 4 years! Keep it going.
How gorgeous! Do you think this technique can work on a large wool blanket? Or is it best for small pieces of fabric?
@Carla, Yes – it would definitely work on larger pieces of fabric like a blanket. I would just make sure you leave it in the vat long enough and be sure to return it to the dye vat a few times so that color really saturates. Good luck!
<3 brilliant, your are
This is so amazing! Going to try!
This was a great tutorial. I took a workshop from John Marshall several years ago and bought the Indigo Dye kit. Bur your Shibori tutorial was excellent and helped me create some beautiful patterns (like yours). I do have one question, though. I loved the white/blue contrast but once I washed them (actually more like rinsed) my white turned into a pretty light blue. Did I leave something out?
Great and Excellent and I am trying now but It’s harder to find same as yours.
Excellent, I have made it… Huhhhaaaa
Thanks so much. Can’t wait to start dyeing.
Wow, 4 years! 🙂 I hope hapinesswherever.wordpress.com is ard 4 yrs later- and if I’m half as successful as HonestlyWTF would be elated 🙂 Didn’t know this technique was called Shiori 🙂 Love learning new things! 🙂
TE FELICITO , HE VISTO VARIAS PAGINAS DE INTERNET EXPLICANDO ESTA TECNICA, PERO TU LA ENSEÑAS DE UNA MANERA PRACTICA, SENCILLA Y MUY COMPRENSIBLE …GRACIAS POR COMPARTIRLA…..POSEES ESE DON DE ENSEÑAR……….QUE DIOS TE BENDIGA SIEMPRE Y QUE LAS PERSONAS QUE TE ADMIRAMOS PODAMOS SEGUIR COMPARTIENDO CONTIGO…..HASTA PRONTO…….MARTHA
TE FELICITO, HE VISTO VARIAS PAGINAS DE INTERNET EXPLICANDO ESTA TECNICA, PERO TU LA ENSEÑAS DE UNA MANERA PRACTICA, SENCILLA Y MUY COMPRENSIBLE……GRACIAS POR COMPARTIRLA…….POSEES ESE DON DE ENSEÑAR……..QUE DIOS TE BENDIGA SIEMPRE Y QUE LAS PERSONAS QUE SEGUIMOS TU PAGINA, PODAMOS SEGUIR APRENDIENDO CONTIGO……HASTA PRONTO MARTHA
Where did you purchase napkins for dyeing?
Beautiful post!
Thank you.
Love the napkins you dyed. Learned a great deal of techniques to try on my own. http://www.sanassilkywayshop.com
love it have it in my SHOP but from INDIA
I love tie dye, I enjoyed it so much at school, this makes me miss it a lot! I love the colours and the patterns, so pretty x
http://leannewinters.blogspot.co.uk
This is one of the BEST tutorials I have seen– Thanks so much for doing this!
One of the best tutorials ever !! amazing. thanks
very nice ideas
Can’t wait to try this! How do you dispose of the dye solution post-project? Thanks!
is this vat dye or reactive dye you used?
What is the powder that you are uaing?
You are a prolific teacher, nice teaching
Do you think it is possible to do the same techniques but use bleach instead of the dye?
http://al-qaisumah.net/صحيفة القيصومة الإلكترونية الصحيفة الأولى في القيصومة الصحيفة الرسمية . اخبار.الصور.الفديو.المقالات.الشعر.الحوارات.الاقتصاد.العربية.السعودية
Indigo dying
Boy, you created some beautiful patterns. I’m definitely gonna try your techniques soon. About 2 weeks ago my daughter and I did some tie dye shirts for her friends at school and I wish that I had found your blog before we did our projects. Thanks so much for sharing. Am definitely sharing this on my Pinterest. Take care, Terri of Two Pink Peas. http://www.TwoPinkPeas.com
i am in love with this process of shiboir! thank you so much for the easy to follow and “you can do it” how to!
i put my own experience on my blog and linked it back to you for the beautiful photos and tips! glad i found you!!
Looks like such a great idea!
http://www.dianavilic.com/
That tie dye has come out so well, and it looks like such a fun process too!
Beautiful! There is one, bottom line all the way to the left, almost looks like feathers, how did you do that one?
You mention soda ash and reduction agent. does this come in the pkg of Indigo Blue ? Or is that separate?
@Nancy, yes – both are included in the Indigo Kit!
Thanks Erica for the beautiful experiment and so nice of you for sharing it with us. Result is amazing and will definitely try it.
What is the technique you used to get the pattern second from the left in the upper row? I love that one but I can’t figure out which technique it is?
When some one searches for his essential thing, therefore he/she wishes to be available that in detail, thus
that thing is maintained over here.
Wow this is innovative dye can’t wait to start dyeing
Hi I just came across your site – I wanted to ask with the Shibori dyeing tutorial what process was used for the shirt shown in the picture looks great
thanks
Simone
I love the one that is second from the left on the top row…how did you accomplish this look? Didn’t see it in your descriptions.
Hi Marta!! First of all I love your work!!
I’m trying to do Shibori foulards, and I have been testing different textile inks.
Is the Indigo Dye kit a good ink? when you wash the fabrics in wash machine the white areas, still continue white?
Thanks for your post, and I will be grateful If you answer me.
Thanks in advance!!
Silvia
Greate pieces. Keep posting such kind of info on your page.
Im really impressed by your site.
Hey there, You’ve performed a fantastic job. I will definitely digg it and individually suggest to my friends.
I’m sure they’ll be benefited from this web site.
I love shibori and I purchased a piece at QuiltFest. Hand quilted the design that was prevalent in it and made a quilted wall hanging. It turned out fantastic. I use it for everything and I love just looking at it. Thanks for the tutorial in dying the fabric.
Nice idea. I will definitly try it!!! Thank you:)
Looking for a monlight color blue I have come across to this page and samples and to my enormous suprise the girl in the photo is identical to me. Can you please get in contact with me as I am totally astonished. I levae in Spain but are Colombian originin and cannot understand why I am in that photo as it is oractically impossible to believe I may have a twin somewhere..
I will be much pleased if you could be so kind to contact me at my mail box so that I can share photos of myself with you to proof my statement..
Many thanks,
Maria
i love all of these and have completed most, but my favorite of all the one you said binding method the one which we all learned in grade school i cannot seem to remember can you tell me in an email how you did that one? it is my all time favorite and i want to get it just right please and thank you
– Jordan
I Like it !
This is an awesome tutorial! I absolutely love that you showed how the items were tied up and how they looked after – can’t wait to try!
XO, Rachel
http://www.seashellsandsparkles.com
lookie here
Thank you so much for this DIY tutorial! I have a crap load of cotton dyes but I’m mostly a wool dyer. Now I have a new project 😀 thank you!
Hi! I love these and was wondering where do you buy the fabric to make these with?
I like your all the tricks for white cloths. The most impressive thing that I like most is to make all these patterns on cloths by using any color without using any Machine.
nice tutorial , thans for info , Shibotik
Is it just uses a blue color indigo plant? whether there are other extras that make the blue color was so beautiful and so bright? is there a special way of coloring on the fabric?
Always love the indigo shibori, great job. Will feature something in my website too. http://www.denimfans.cn
Magnifique, je vais essayer!!!!
Merci
Hi, How did you get the napkin with the pole dying technique to look like 3 different shades of blue? Does it automatically do that because of how it is wound, or did you vary how much of the fabric you submerged in dye?
@Jen it just turned out that way because of the way it was bound. The overlapped fabric will take in less dye, which creates a lighter shade of indigo.
I don’t even know how I stopped up right here, however I thought this
publish used to be good. I do not understand who you might be however
definitely you’re going to a famous blogger
if you happen to are not already. Cheers!
Only just came across this tutorial! Love it. Just bought the kit. Does the soda ash and reduction agent come together in the pack? The link only lists ‘reducing agent’ as being included’…do I have to buy soda ash separately..?
Thank you!!
innovating dyeing I like it
I enjoy what you guys are usually up too. This kind
of clever work and coverage! Keep up the terrific works guys I’ve included you
guys to blogroll.
Hello, This is a great article with so much detail and great photos to go with the content.
Can you tell me have you ever tried this technique on white leather? I have come across some pieces of leather and wondered if this would work? Love to know 🙂
nice Contetn. Enjoy it.! 🙂
U can be used to be a good time to time
Hi Thanks for a very helpful tutorial. I wonder if you could help me with some advice as my experiments have not been as successful as your beautiful pieces. As soon as the fabric is doubled up (for example if wrapped around a cylindrical object twice), the layers underneath come out totally undyed/white or much much lighter. I wet my pieces before dyeing. Help! What am I doing wrong?
Also what are your tips for keeping unused indigo dye and reactivating it for later use?
Thanks and warm regards from South Africa
Christa
I love this! just purchased a indigo kit and some white cotton tea towels! I can’t wait to try it!
NativeHouse.etsy.com
Really nice work! The blues patterns are always a hit. You have talent for the craft.
Thanks for this wonderful article. Three of us used it as our guide today as we did our first round of shibori dyeing! More tomorrow!
I l’île shibori. I née more exemple.
Thank
Malika
I like shibori. I need more exemple.
Thank
Malika
Hello, I am Mr. Larry Saliga a teacher from the Philippines. I am currently writing a Module for out of school youth (ADM-Alternative Delivery Mode). I would like to ask permission if I can use your Photo as an illustration on the competency on textile tradition in Tie-dye in Japan. I am hoping for your positive response.
https://honestlywtf.com/wp-content/uploads/2014/05/shibori21.jpg
Thank you very much.
Beatifull 🙂 I need more exemple.
My blog and e-commerce site http://nakkase.com
nyc attempt …
its lovely
Wow! Thanks for sharing!
-Egoteest
http://egoteest.com
awsome design
thanks for sharing
http://fashionablebatik.com
I will like to know where I can order this beautifully blue and white cloth
Hi Erica & Lauren,
I am the Social Media Specialist for Michaels Stores responsible for Pinterest and we would love permission to pin DIY projects, especially the Shibori to our Pinterest boards. We only pin with permission from the original source so our pins link correctly. We believe in giving credit to content originators.
Thank you for your consideration,
Nina O.
Your results look brilliant ! Pity some of the technical instructions are so wrong…. a) ironing does NOT set indigo – the oxidisation process does this. b) Soda ash will not dissolve in warm water – you should dissolve the soda ash in very hot water and then add to the vat c) indigo dyed pieces need to be washed extremely well in hot soapy water multiple times to remove all the surface dye – cold water and no detergent won’t be sufficient. I could go on…. How do I know this ? A lifetime of dyeing experience with industry experience and technical qualifications. Thank you !
Please tell us more!? Especially the “AFTER” product?, as the dye definitely loses colour and fades if the piece isn’t treated right. Eg. I was told not-to-wash my piece, at all, for a week!?! Definitely not told to rinse it. I could use more tips… Otherwise GREAT article and lovely picture diagrams!
great idea! I am sure the fabric exchange has so many choices of fabric for this kind of project.
Hello,
really nice. But I wonder how the color remains after first wash??? I have bought some nice indigo fabric but unfortunately the color is not waterproof .. even before washing you have indigo on your hands.
I have indigo color but not the kit you talk about… maybe some chimical product could help to fix the color??
Thanks. Else.
I’ve just read Lynne comment .. is there a way to save my bought fabric with hot water and detergent?? no chimical product?
One of the best step by step tie dye instruction guides posted on the web. The pictures are superb. The wording is clear. Congratulations on such a good post. Tie Dyed Shop
Thank you, Erica, for the wonderful write-up. The step by step guideline does make the process very exciting and fun filled. Thank you for your efforts and the wonderful images.
Roopali.
http://www.roopantaran.com
Thank you so much for this amazing DIY I fell in love with shibori tie dye it is absolutely amazing and you made it so easy, for a school project I had to make a tie dye pillow I looked through heaps of tie dye designs but could never find the right one but when I came across your page I knew this was the one. Something about the traditional and contemporary style really stood out to me, I chose the itajime style and it looked fantastic! I can’t wait to decorate it and to put it on my bed, Thank so much ❤️❤️❤️
Dear Customer ,
Wish you a nice day!
Very glad to know you may need Indigo Dye.
It is mainly used to dye cotton fibre .The pop “cowboy” clothes mostly are made by
indigo.
We are the professional manufacturer and supplier for Indigo dye with good quality and very competitive price in China.
Indigo Dye: Dark Blue Granular
Content: 80%min-94% min
If you are interested in Indigo Dye, please don’t hesitate to contact us for more information.
Look forward to hearing from you.
With Kind Regards,
Linwang
Hebei Linheng Bio-Tech Co.,Ltd
Website: http://www.hblinheng.com
Email: linwang@hblinheng.com
Phone: +86 13932126562
Address: No 10 Yuxin Road ,Qiaoxi District,
Shijiazhuang City,Hebei Province,China
Hi,
This is so beautiful. I tried it myself already twice and love it. However, once I wash the dyed pieces in the washing machine, the white parts take on blue color as well and turn light blue. I am a bit sad because I particularly loved the.contrast before. Do you have an idea how to prevent that? Has it never happened to you? I rinsed the fabric and even let dry the fabric before washing without detergent at cold temperature… Can you help? Would be very much appreciated. Thanks, Nancy
I have noticed you don’t monetize your blog, don’t waste your traffic, you can earn extra
bucks every month because you’ve got hi quality content.
If you want to know how to make extra $$$,
search for: Mrdalekjd methods for $$$
Hi
Nice
Lovely indigo shibori, great job.
I’m “dyeing” to try it! What was the name of the kit you used? Would it be better or cheaper
To buy everything separately and what would I need to buy? How much indigo (a certain kind?)
How much soda ash? Anything else to buy? Thanks, eva
I LOVE SHIBORI ITS JUST PART OF MY LIFE #SHIBORI I LOVEEEEEEEEEE IT #SUPPORTSHIBORILOVERS I HEART SHIBORI
I have just discovered your post. I know I’m late but thanks You because it gives me a strong motivation to try.
Regards
Thank you for the information. I love this and plan to do my own thing with it
Beautifully explained! I’m experimenting with fabric spray paint and shibori, but this looks even richer.
Me encanta esta técnica
Congratulations on your 4 year anniversary and wish all the best for the next years to come! Also,this tutorial is so great! The tips on how to keep the textiles and set the patterns
http://www.textilebuzz.com
Brilliant Read!!! loving ur ideas.thanks for publishing such an informative post.
Can you use the Rit Dye method using salt and dish detergent as a substitute to this method?
Thank you
Terry
I find that other dyes don’t achieve that rich, blue hue as well as real indigo powder does. But that’s just my opinion! It’s worth a try!
Just took a ‘shibori’ class at our Library … loved it !
Where can I buy the shibori dye??
Wow this is magic just got into this I’m a artist who works with vintage bed sheet this would be perfect for me thank you
tango for mac https://www.tangoforpcdownload.com/tango-for-mac-pc-free-download/
This is soooo helpful!! Thank you!
Bjr, je cherche l accompagnement d un designer de textile artisanal avec confection de moule ou procedure tie and dye pour mon projet
nice post
THank you 🙂
Thks a lot for yr superb tips.i am doing it for years in India but not indigo.now I will try this in indigo too.congratulations on completing 4years all d best for yr future.thanks once again.
I’ve never heard of this method but I’ve seen it for sure. Absolutely beautiful – I’ll definitely give it a try. Thanks for putting a name to the technique & step by step lesson.
I love this. It was so helpful.
very helpful and have shown in details how to do shibori diy. Thank you for sharing step by step guide
I learn good ideas.
Wow, really nice, i tried but it got messed LOL, mine is not looking good, i’ll have to go with some other color
Obrigada por partoilhar esta linda técnica de tingimento. Mas fiquei com a;gumas dúvidas: Posso usar esta técnica usando outro cor? A tinta para tingir precisa ser em pó? Qual o fixador para esta técnica após a lavagem?
Brilliantly fold
rubbish
HI sun
Hi, I have 6 oz of freeze dried indigo for dying. Nothing is mentioned in the dying kit about adding soda ash or a reduction agent. Can you tell me what those are needed for and about how much water I’d need to use the 6 ounces? I have several pounds of neckpieces from old Japanese kimonos. Each piece has a different weave or design and the fabric is mostly silk or a rayon type fabric. I’d really appreciate any help. Thanks so much, Kathleen DuBois
PS I love your website
Wow, really nice, i had tried couple of times earlier but my t-shirt looks weird LOL, i’ll try again using this method.
Thanks
Thank you. Very clear instructions and tips, and great photos to help our understanding.
I love what you have done! I’m looking forward to making some fun items during the winter break! Thank you for the informative instructions.
I love Indigo!
SHIBORI DIY TUTORIAL WAS EXCELLENT. Enjoyed the history and names of different techniques. Appreciate the before and afters photos too. Your hints about the colors( blue,green, white) were very helpful. Can’t wait to get started.
Hi, I just found these tutorials and I’m so psyched to try them! I especially want to try shibori, but on a duvet cover. Would it still work as well if the cover was folded in fourths? Thanks again for the beautiful inspiration!
I meant, specifically Arashi. Oops! A duvet is too big to wrap without folding a few times so I’m wondering how deep the dye would penetrate. Thanks!
I like to touch it whilst nude
Very nice demonstrations, thank you. I will teach one of my class of fashion design based on this lesson. I hope you don’t mind. Will give credit to you for sure.
I want to do this. . . So beautiful.
Love your Shibori tutorial! Can’t wait to see what else you are sharing.
Would this work on a clean, white canvas painter’s tarp?
I’m thinking it would make a nice throw rug.
Yes, it would!
Do you have a pdf of this? I am gathering spurces for a quick i tro to shibori for my SCA group.
Thanks for THE tips
Here it is , November 2020-and I’m enjoying your DYI shibori tutorial for the first time! Great instructions to learning the steps for a new artistic adventure with this beautiful art form. I’m on my way to create something wonderful. You’ve passed on wonderful tradition, many thanks!
I can’t wait to get started I wish I came cross this during the beginning of the pandemic. Ii hav 2 terminal lung diseases do activities outside my home & with other are limited due to my immune system & compromised lungs thank you for being so generous.
Wish me luck
This is one of the best tutorials I have seen– Thanks so much for doing this!
Okay, i have a question about the arashi. The darker part of the fabric, was that the bottom corner or top corner? Thanks!
It reminds me of the blog article on the Japanese origins of the tie dye. The two are quite complementary I think.
https://tie-dye-store.com/blogs/blog/tie-dye-and-its-japanese-origin
Its great
Beautiful results. Thanks for sharing your techniques. Can’t wait to try them!
I loved ♥️
Dear Erica,
I would like to know if you have projects for long sleeve t-shirts using Shibori. I have found some articles on Google, but I’m doubtful if it works. This post on Shibori is one of the few informative pages I have read. Additionally, your dyed top is really stylish! I think you have more expertise than most. Please let us know of any projects for long sleeve t-shirts.
Anna
excellent work….thanks…
Hi, I love all the pattern.
But which technique is your blouse?
Jessica
First of all, thank you for your post. keonhacai Your posts are neatly organized with the information I want, so there are plenty of resources to reference. I bookmark this site and will find your posts frequently in the future. Thanks again ^^
That was wonderful to read. nicley put acros the points.
Read about block printing in India, fabrics and more at
https://lushfabjaipur.com
Beautiful pattern
Such a nice information on boho maxi dress tutorial. Read more at meesho online shopping saree & blouse work designs.
Thanks for the amazing artice. It was fun reading. Keep posting.
I like your shibori article and DIY……Keep it up.
Kurtis with bottom catalog
Nice article . Keep writing article like this. I am looking forward to more post like this.check shirt for men
have been wanting to try shibori but have been hesitant for some reason. Your tutorial was one of the most robust tutorials I have seen – thank you for sharing! This is just the impetus I need to give it a try this weekend. Love the idea of napkins! Makes me nostalgic for that time 4years ago. Love your blog,I do love how you explain all DiY.
I can not stop reading it, go on please
OLÁ, BOA TARDE.
ACHEI MUITO LINDO TODAS AS TÉCNICAS, E SEU TRABALHO.
GOSTEI TAMBÉM POR VIR COM EXPLICAÇÕES BM PRÁTICAS DE COMO EXECUTAR, E TB SEU SIGNIFICADO. MUITO OBRIGADA, VOU TENTAR FAZER E VAMOS VER SE FICARAM TÃO BONITAS.
thank you for such amazing tips on dying the clothes . i really enjoyed reading and also learnt a lot about dying the cloth. Thank you for such an amazing article hope you post more such articles.
I appreciate all of your white cloth skills. The most amazing part, in my opinion, is that any of these patterns can be created on fabrics using any color and without the need of a machine.
amazing blog i rally like it thanks for sharing with us
greet article i really like it thanks for sharing with us
greet post i really like it thanks for sharing with us
we get a best idea from this blog
Congratulations on your 4 year anniversary and wish all the best for the next years to come! Also,this tutorial is so great! The tips on how to keep the textiles and set the patterns!
Gym Clothes
I loved it ♥️
Gym Tshirt for Men