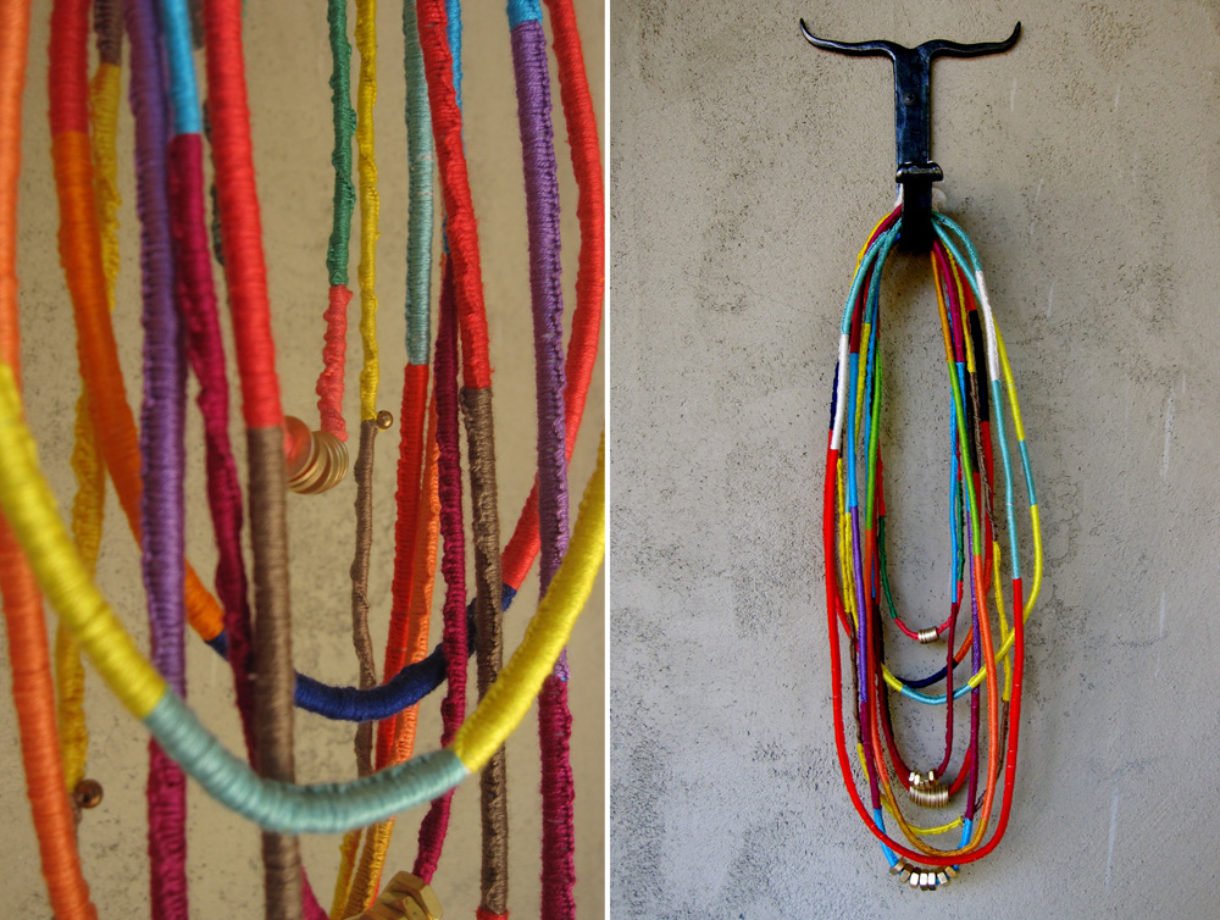
As soon as Lauren and I saw this editorial in Flare Magazine, we knew we had to recreate these awesome, friendship bracelet-like necklaces. We promise they are super easy to make and the perfect way to pass the time during those long summer roadtrips.

You’ll need:
– cotton rope or twine
– a pair of scissors
– nuts and washers
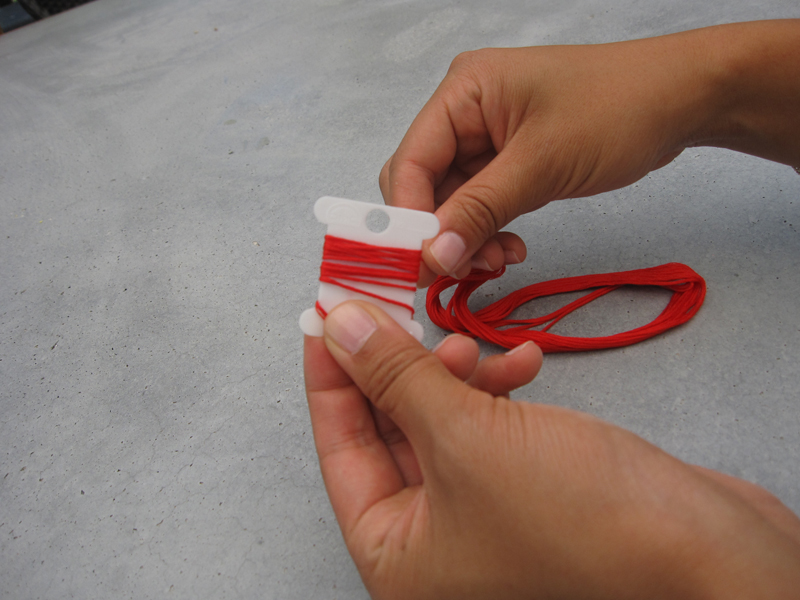
– embroidery thread
– thread bobbins or squares of cardboard (all of which you can find at your local hardware and craft store)

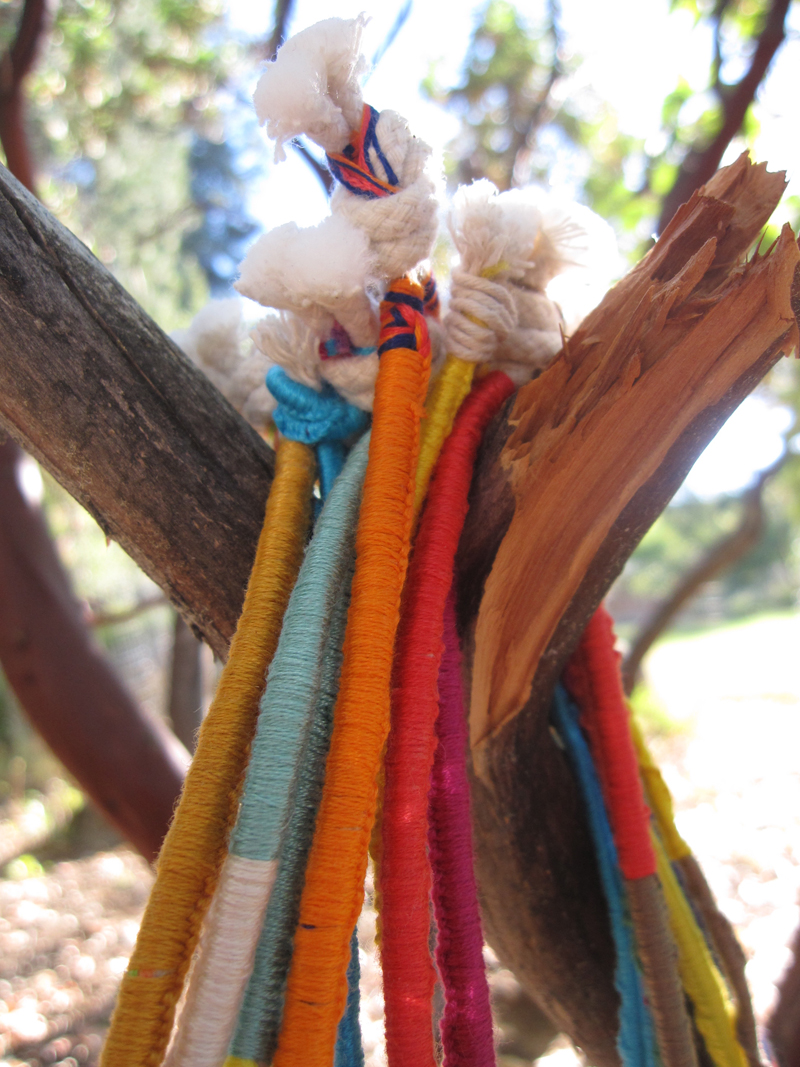
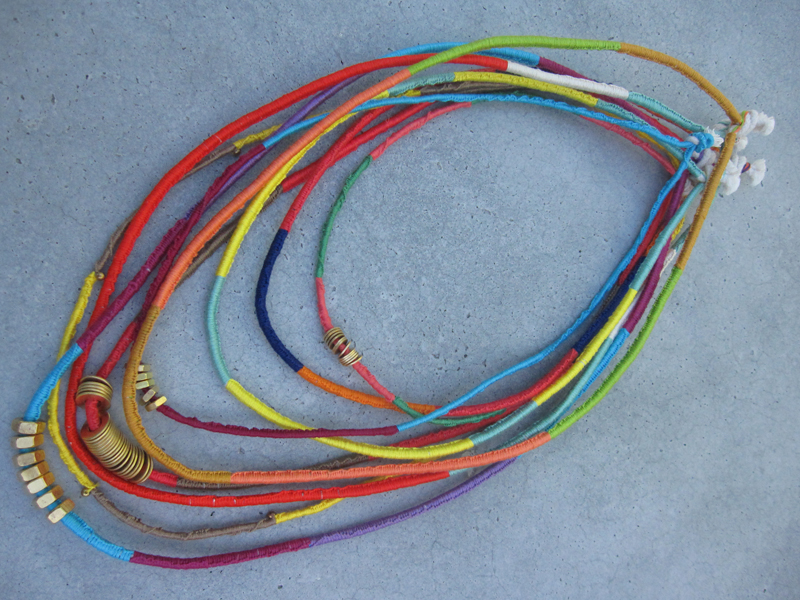
To make a 2-tone necklace, cut a long piece of rope and wrap two different colors of embroidery thread around its own bobbin. Tie a starter knot along with the two colored threads you are using, leaving at least 3 inches of slack, Tape down the slack to a flat surface or safety pin it something that will help keep it in place (feeling nostalgic yet?). Lay the color that isn’t being used (shown here in purple) in your left hand, along with the rope, and hold them taut. Take the active color (shown here in red) in your right hand, pass it over the rope, loop it under and back through the opening. Pull up and to the right to tighten. Repeat the knots until you are ready to switch colors. (Click images to enlarge)

To alternate colors, simply put the inactive color (red) in your left hand and the new active color (purple) in your right. Repeat the steps.

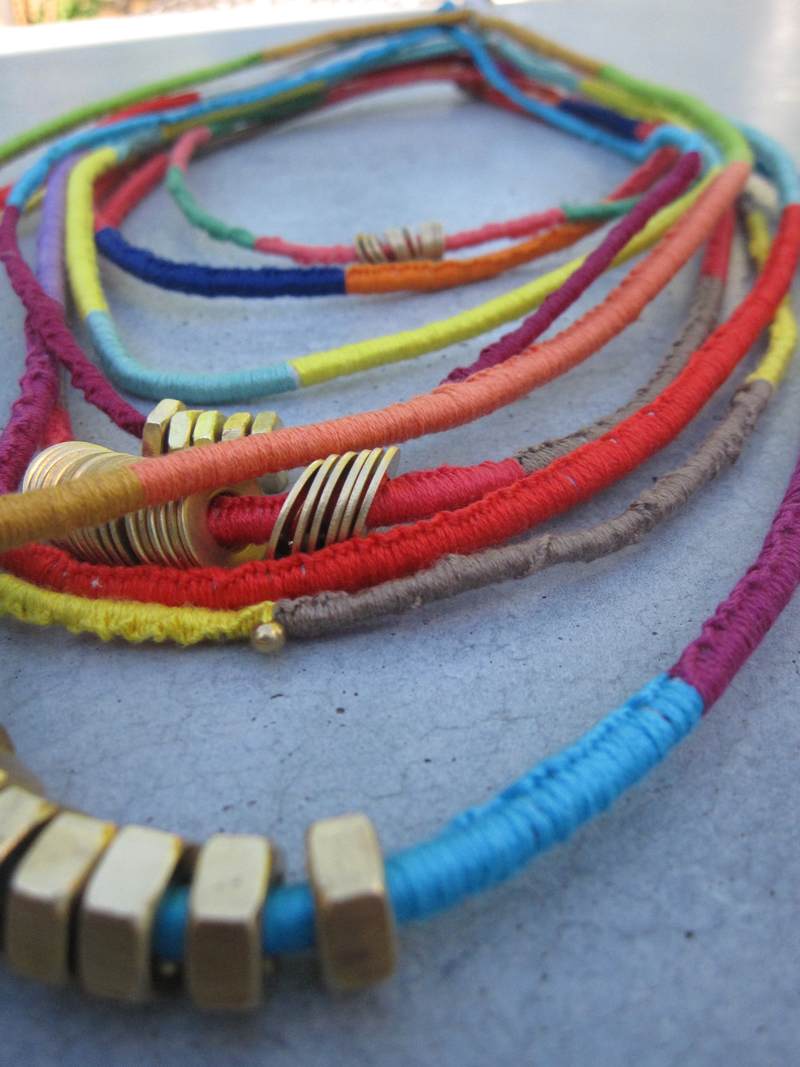
Once you’re done knotting, add a few nuts and/or washers to the necklace. Undo the large starter knot and tie both open ends together, creating your very own friendship necklace! Trim any extra rope and tread. Continue making necklaces at different lengths, using any color combination…in our opinion, the more the better! Easy enough, right??

(top image via Fashion Gone Rogue, rest of images by Honestly…WTF)
Great ! thank you ! ^^
Awww. It’s like summer camp but more fashionable. 🙂
Wow, this brings back memories. I used to do these in my hair!
Another great DIY tutorial, thanks ladies! Love the pictures too!
Wonderful – I love them. Thank you!
Great DIY! This is so great for summer! Thank you
http://behindthelashes.com
This is sooooo great for summer, thank you!!!
Those are gorgeous necklaces – i am so impressed by this DIY. Going to have to try this one myself!
thanks guys!! we’re so happy you like!! 😉 send us photos! we’d love to see what you’ve done!
yay friendship bracelets!! I’m so excited you gals posted this 🙂 Totally gonna do it soon!
My grandchildren love these, I have started making things like this again, a whole new being cool, whole new generation, are always looking for something new they think.
Thanks Linda. (Granny)
love it!
will definately be making some!
I found this post via Refinery 29 – I will be making these for sure (and reblogging at my blog)! Thanks so much!
http://www.heygoodlookinblog.blogspot.com
Defintely going to try this!
thanx!
(:
I also used to do these in my hair. I’m having a carefree summer day and now I’m so inspired to do this again!
Wow, these are so pretty! How perfect for summer, I’m in love. I just came across your blog via Poppytalk. I would love to link to this if you didn’t mind.
Your necklace is so beautiful! We used to make frienship bracelets like this in our childhood. You make we wanna start again. A big necklace like yours would be so great!
THANKS ¡¡¡ I JUST LOVE IT
I used to make these like crazy when I was kid. Between embroidery floss friendship bracelets, and beaded lizards, I kept pretty busy! 🙂 Thanks for the nostalgic how-to. XO!
These are lovely! I remember wearing them as bracelets when I was younger.
Thanks for sharing your tutorial:)
I always wondered how they do these bracelets. Thanks for sharing 🙂
-Samya
thanks for sharing! really cool xxo
these are super awesome. thank you!
this inspired me to call some of my friends who i haven’t seen for the longest time. they totally remembered how we used to make these back in high school. we promised we’ll hang out sometime and make friendship bracelets again! or necklaces this time!
Cool idea! Glad that you share this! So gonna try making one! :>
Wow! This is utterly amazing..
Im lost for words 🙂 Im going out and buying the material as soon as the weekend comes!
These are awesome!
Thanks for sharing 🙂
Do you know what i really feel like having some hair braids chanel that inner child, hippy on holiday look.
Jaymie
♥
http://jaymieocallaghan.blogspot.com/
Thanks for giving me a road trip passtime! I have too much embroidery floss, and honestly, i hate embroidering shit.
This may be the most awesome thing I have ever seen…
Awesome!
Awesome! I’m definately going to make some necklaces, but I was also inspired by this post to make this: http://www.flickr.com/photos/gieske/4861534337/
wow, Amy! that is GENIUS!!! LOVE! xx
Great necklaces, so colorful and fun. Linked back to you from my blog.
This is a great idea! I want to make one!
Great tutorial!! I love how one can wear several or use just a single one with a focal. I will link in an upcoming blog post! Pearl
I am SO in love with this! Thank you SO much for sharing – Cannot wait to make many of these!
this brings me back to the days of hair wraps.
love the tutorial. i tried and make some necklaces and they look sooooo nice!
it seems a zillion of years that I last made my friendship bands. its a great idea to wear the friendship band as a fashion accessory=)
xoxo
http://stylison.blogspot.com/
i was looking for a way to make a belly chain from embroidary floss but i will def be making these too. it makes so much sense to use rope because it gives it body, awww i think im gonna have a collection of these.
do you think we could get away with these in winter if we mute the colors?
I think soo!
I just found your blog via Poppytalk and I love it!! Can’t wait to try the pompom garland and these friendship necklaces are too adorable for words! Thank you!
I want this!! 😮
Soo great – I love it!
Hi!
Wanted you to know I posted a link to this tutorial today on my blog, PaperFriendly.
Nancy Ward
PaperFriendly
http://www.nancywardcrafts.com
OMG! These are so fabulously fantastic. Love love love!
Hi ! I just wanted you to know that I made a post about this and I used some of you images her: http://www.liveandenliven.com/2010/10/diy-stylish-friendship-necklaces.html LOVE this D.I.Y! THANKS!
Too beautiful! I love this. Wow – the colors.
Wow, this brings back memories of junior high. Now that I’m a broke, semi-unemployed adult, may be time to bring these back out for Christmas presents! Is there a specific brand on thread you recommend?
this is such a fun and easy idea! You didn’t suggest ways to finish the ends though. Do you just tie them together?
you’ve got it! if you click on the word “trim” in the last paragraph, you’ll see that we just knotted the ends.
Your Friendship Necklace is an awesome inspiration! Many thanks for sharing. I would like to feature it at http://www.handmade-jewelry-club.com/
Contact me here if you have a concern.
Jane
http://diylessons.org/
These are fantastic! I actually had been trying to remember how we used to make these when I was a kid, b/c I’m about to get married and I thought something like this would make a really adorable personalized wedding favor. Thanks for jogging my memory with this tutorial! Whats great is my much younger soon to be sister in law isn’t old enough to remember the big trend that these were, so its something she can share with her friends and feel a little bit ‘schooled’ on retro teen trends.
I love it!!!!!
THis is so fantastic!!! VEry beaUTIful …….
This is fantastic…I love it so much, I will have a go at making these for sure!!
All your DIY projects are so good and really inspirational. I also do a few DIY projects on my blog about global fashion and have just done one called Every Cloud Has A Silver Lining. Feel free to check it out and follow if you like it!!
Cute. I love these little hair wraps, they are very colorful & pretty.
Love this! I want to make a chandelier out of them:)
I loved this DIY and made some for myself and friends. I changed it up and used it as a wrap bracelet. Check out my blog and let me know what you think!! I’ll definitely be making more in the future, really great idea.
Chickeydesigns.blogspot.com/2011/01/diy-project-wrap-bracelet
xox Chickey
i love this DIY.
http://libelle-lfl.blogspot.com/
Love Libelle
This is fantastic! I’ve been wanting to make something like this for a while. Great tutorial.
This completely inspired my decision to wrap a boring plant pot in twine and hardware:
http://constitutionallymoderndiy.tumblr.com/post/3330575488/wrapped-in-hardware-plant-pot
Great necklaces!!
this was such a perfectly easy way to get a creative fix during one of my last quarters of classes in my doctoral program! thank you!! I made several and hooked them all together into one necklace with a cap bead that I used as a crimp-clasp: check it out if you want!
http://pacificrain.blogspot.com/2011/02/bit-of-flare.html
now to get some girlfriends together and try that proenza schouler necklace next! When I stumbled upon some leopard-print cotton cording at my local fabric store, I knew I had to buy some and save it for this next DIY!
What should I do if I want more than 3 colors?
Also, it is just one rope or several ropes tied together?
This would be a wonderful project for my kids this summer. Thanks for this 😀
whoa, im going to make a million of these!
With all the doggone snow we have gotten recently I am stuck indoors, fortunately there is the internet, thanks for giving me something to do. 🙂
Great tutorial. I am addicted to making these now.
Omg these are lush…id love to buy them tho ha im not that creative 🙁
Wow, these necklaces rock! The tutorial is very detailed and easy to follow, I think I can do it and make one for myself, thanks a lot for this wonderful idea.
i just made one!!! but it took forever. they look good layered! these are similar to the Seventeen Magazine cover of August 2010 with Rihanna
I love these necklaces!.. hopefully they dont go out of style 🙂
What is the official name of that style bracelet anyway?… It’s nearly impossible to find online because no one knows the name.
muuy bueno me encanto 🙂
Thank you!!! I was looking for these many years!
Thank youuuuuuuuu!!
I’m totally addicted to your site…WAOUW WAOUW WAOUW!!!!!! Another great tuto! BUT pleaaaaaaaaase, can you dedicate a tuto to the wonderful pompom bracelet from Honorine jewels? http://www.shoplatitude.com/red-pompom-bracelet.html
They are so trendy and wonderful, perfect for this summer and I’m sure not very complicated to do (for you of course, for me….it’s another story!)
THANKS THANKS and see you soon, YEAH!
unfortunately i cant see the last image…=(
I love the post! I tried it my self and it turned out pretty good! I also used your tutorial in my blog and linked back to you! You have great ideas and tutorials!!!
Hi there!
Those are adorable!! Im busy doing them and I posted about tthem in my blog and linked back to you!
Check it out! http://shabbytricks.blogspot.com/
Thanks
i was looking for something different then the usual friendship bracelets and this is perfect thx 🙂
first time on this blog.. and im in love <3 making them as we speak!!!!!
These would also be amazing with variegated thread – saves you having two pieces of floss, and the colour changing could be more gentle(?) depending on the type used.
I can’t wait to make some, thanks! 😀
Love that you read a Canadian Fashion mag. Love the blog, just made the Bracelet with the bolts but need to know how to fasten the ends!!!!
I like this blog and have saved it. I’m going to turn to examine in particulars on my trip
Love it!
I’m working on one right now–it will be a very long piece of rope that I’ll treat as an infinity necklace. We’ll see how it goes! Going to try some bracelets in that same style as well. 🙂
Thanks so much for sharing– your site has been an awesome source of inspiration lately!
These are so awesome, ive got to do this! And i just got a whole bunch of embroidery thread =D
That’s a very nice editorial. I can see why you got inspired. 🙂
I love these…they’re beautiful. Thanks for the tutorial. 🙂
hey ladies, I thank yhu for the web post and this was really helpful to me so thanx. Cant wait to hear from yhu. Bye.
i love your projects! thank you!
LOVE! but is not that your pictures?? http://www.how-to-make-jewelry.com/friendship-necklace.html
Hey guys,
Thanks so much for sharing– I worked on one in October and the technique was so doable!
While browsing the web today, I noticed that some of *your* pictures were posted without credit here: http://www.how-to-make-jewelry.com/friendship-necklace.html
Thought you might like to know– I apologize if you’re aware of this and are collaborating!
K
made some bracelets but i have not thought of a necklace! now i am gonna make it for sure!!! check my blog if you like! http://acloudandamoon.blogspot.com/
I will attempting this very soon!!
http://www.etsy.com/shop/DivaClubChic
wow! i’ve always wondered how to make some of the bracelets you diy i didn’t know they where so easy.. making one now:)
easy, fun and very chic! <3
you have such great lovely ideas. you will be one of my favorite site
My favorite dyi 🙂
thats kind of like a tramp why wold you want to make that TRAMPS!!
I love it , where I by this??? Pleaseee
I whant so much!
How to you string those beads into the necklace like ones in the photo? This is such an awesome tutorial, looking forward to trying it out!!!!!!
So colorful bracelets, I want to braid one for myself now.
might be a stupid question.. but where in NY can i purchase cotton rope?
HOW DO YOU FINISH THEM? A square knot seems like it would be BIG and not very attractive… how do you hide, glue or whatever the ends???? Thanxs
Love this! I used to make these when I was a kid but nothing quite so elaborate; must do this again! Thanks: )
Love these! I keep meaning to give one (or 2 or 3!) a go :o) Thanks!
I really love hair braids because they look very elegant and classic. I used to do some herringbone hair braids a couple of months ago. ,;::.
My favorite blog
http://www.prettygoddess.com
Dude, right on there brother.
How are the fastened? Clasps???? A knot? Please let me know!
@Caroline They are fastened with a double knot.
Great idea, never heard about friendship bracelets.
Check my blog on bracelets out!
I used to do that in my little sister’s hair! Instead of the cotton rope, I’d use a strand of her hair. It was really pretty.
Before it was even proven that curcumin has the ability to cure diseases, people had
already been using it as a remedy for digestive and bladder disorders.
Curcumin, demethoxycurcumin and bisdemethoxycurcumin differentially inhibit cancer cell invasion through
the down-regulation of MMPs and u – PA. This type of clay has a high concentration of iron,
as well as other minerals.
A braid (also called plait) is a complex structure or pattern formed by intertwining three or more strands of flexible material such as textile fibres, wire, or human hair. Compared to the process of weaving a wide sheet of cloth from two separate, perpendicular groups of strands (warp and weft), a braid is usually long and narrow, with each component strand functionally equivalent in zigzagging forward through the overlapping mass of the others.”
Our favorite website
<.http://www.caramoantourpackage.com/caramoan-hotels/
Thanks so much! Most importantly, thank you for sharing links for where to purchase the materials!
http://www.daobella.com
gerat tutorial
thnx
love love love! Love being inspired like this, so perfect for those lazy days with your girls on the beach x.
it`s so beautiful and easy. thank you
great diy,i likd this idea,i want to make one by my self,thank you
that is an awesome necklace
I didn’t have cotton cord, so I’m making a tiny bracelet by wrapping around hemp, and it’s turning out!
I love your tutorials–I’ve seen so many and they’re all, honestly, amazing!
I didn’t have cotton cord, so I’m making a tiny necklace by wrapping around hemp, and it’s turning out so far!
I love your tutorials–I’ve seen so many and they’re all, honestly, amazing!
What i do not realize is in truth how you are now not
really much more smartly-appreciated than you may be right now.
You’re very intelligent. You already know therefore considerably relating to
this matter, produced me in my view believe it from
so many numerous angles. Its like women and men aren’t interested except it is one thing to do with Woman gaga!
Your own stuffs outstanding. All the time take care
of it up!
Look at my web blog – tefal shop
This piece of writing will assist the internet users for setting up new website or even a
blog from start to end.
Thanks for this — it’s a classic! Instead of knotting, I glued sterling end caps on two lengths of cord, then added a few inches of silver chain to each end cap and gathered the chains in a toggle fastener. Easy, not too expensive, and it gives a more finished look.
great diy. Thanks so much! Most importantly, thank you for sharing links for where to purchase the materials! My jewellery blog and e-commerce Nakkase. http://nakkase.com
My daughter makes something like this that she weaves around earbuds. It helps keep them from tangling and your know which one is yours! I have 3 teenagers, so it is nice for us. Thanks for the updated ideas!
Great necklaces. I’ll try to do one for myself
Ideally you described it all, as I thought!
http://www.mayfair-escorts.net
amazing… I have to try. thanks!,
They’re gorgeous and loves those colours combinations. Thank you for sharing.
I have no problem with it
Loved all. I think I missed how to make these. Step by step. What kind of string did you use to make this and what size is the thread used. Thank you.
I’m from Argentina, I like this one, is more creative!!
Te pasaste, precioso tu trabajo
These friendship bracelets are a whole new kick ass level!! Love em!!!!
Please do not sell my email to any other vendors… Thank you
simply beautiful