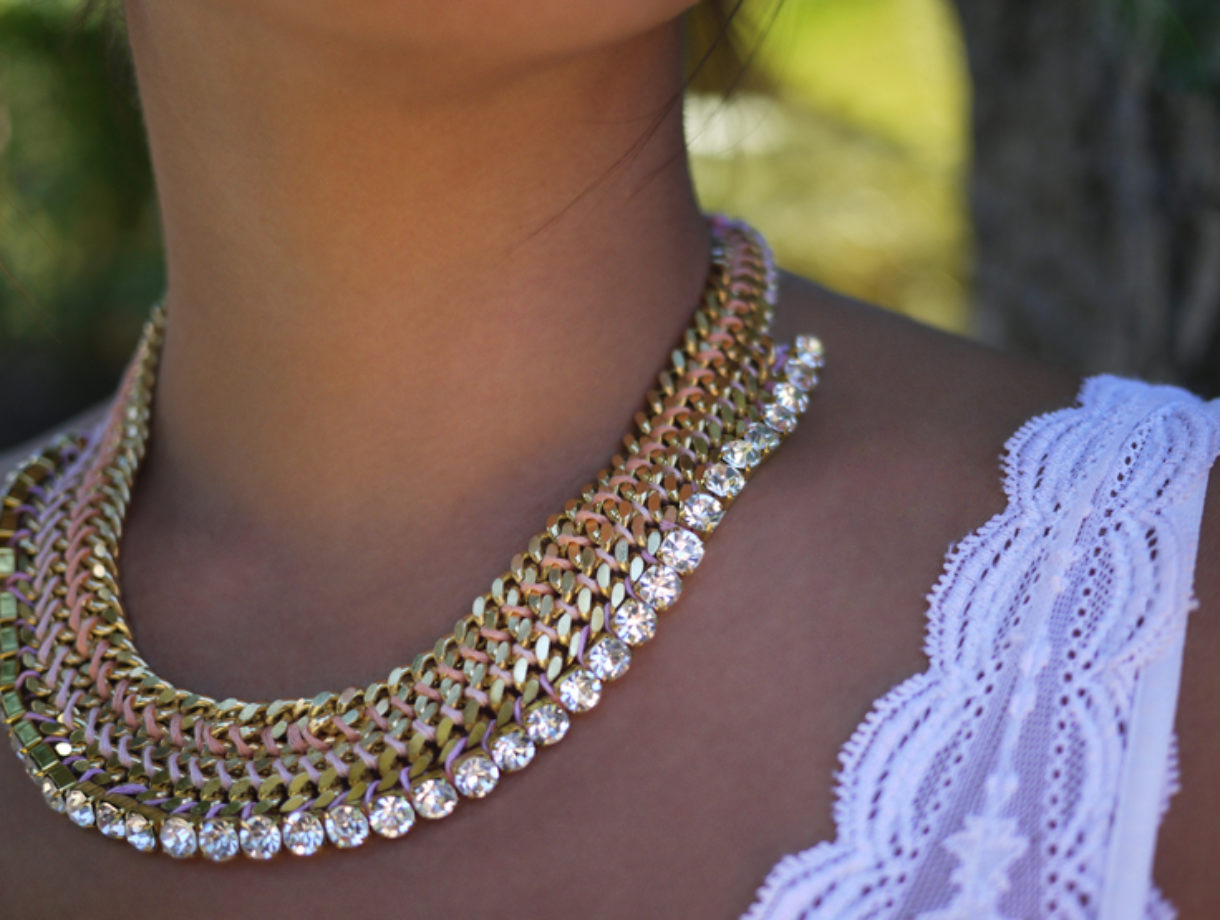
Earlier this month Lauren and I escaped city life with our dear friend Grace, of The Stripe, for a weekend chock-full of sun and DIY. With an abundant supply of rhinestone and brass curb chain, we decided to try weaving the components together to make our own collar necklaces. It was fun to see how wonderfully different the pieces turned out – each so fabulous in their own unique way! Honestly, isn’t that the best part about DIYing with friends?

You’ll need:
- 1 foot of large rhinestone chain
- 3 feet of curb chain cut into 3 pieces (I used two 12″ pieces and one 10″ piece)
- 3 skeins of embroidery floss
- scissors

Start by laying two pieces of curb chain side by side. Tie on 4 feet of embroidery floss into a double knot to the end of the left chain, leaving at least a foot of extra slack. Thread the floss through the top of the first link of the right chain.

Thread the floss under the first link on the left side and through the top of the 2nd link on the right side.

Continue this weaving pattern. I find it easy to hold the chains up together while threading the floss back and forth.

Tie a knot at the end. Alight a third piece of chain against the 2 woven chains. I chose to add a smaller piece here.

Using a different color flow, weave the floss around the first few links – again leaving about a foot of extra slack. Weave the chain into the necklace using the same technique.

Continue weaving and tie a knot at the end. Now align the rhinestone chain along the necklace.

Tie a knot onto the chain. Start wrapping the rhinestones onto the chain but going under the first joint of the rhinestone chain and over the top of the first curb chain link.

Keep the necklace curved while attaching the rhinestone chain. This will prevent the necklace from buckling. Depending on the size of the rhinestone chain compared to the chain, a few links may have to be skipped in order to maintain the shape of the necklace. Tie a knot at the end.

Cut several 2 feet strands of floss and thread them through the ends of the necklace. Tie a single knot. Repeat on the other side.

Your necklace is now adjustable and finished!!

Be sure to check out how Grace made a bolder version, using thick and coloful yarn, right this way!

(tutorial in collaboration with The Stripe; all images by HonestlyWTF)
what a great DIY! can’t wait to try it!
~ http://www.tinaciousme~
I read your instructions on how to make a chain and rhinestone neclace. I’m new to jewelry making, do you have a video to watch instead?
This is BEAUTIFUL!! So have to try it!
I am so doing this!! Looks amazing and is really easy to make
New post on SEARCH IN FASHION – DIY Slave bracelet
this is gorgeous! cant wait to try it out!
http://wtfwhatthefashion.blogspot.com
It’s perfection, you guys are freaking awesome!
xoxo
Fashion Agony blog
So cool and easy! I just have to find the material :/
xoxo
http://www.sparklyfashion.com/
this is so pretty.. i have DIY skills but i always get caught up on the details!
pretty necklace!!!
kisses
http://blogcashmeremafia.blogspot.com
Just gorgeous! Love the idea of customizing colors & playing with different stitch lay outs– hmm…I sense a Christmas present project!
http://aclosetintellectual.blogspot.com/
That necklace is amazing!! thanks for the tutorial 🙂
http://stayinspiredblog.blogspot.com
i love it!!!! i’ll try
http://thestelstyle.com
This is stunning, I love the colours you have used. I really want to give this a go.
Lotts x
http://lottsandlots.blogspot.co.uk/
I really want to make this one! What a great idea!!
http://curls-and-bags.blogspot.com
OMG love it!! It’s amazing!
Tarifa in http://cravingforbarneys.com
I love it! I have been wondering for a long time how to do it! Thanks a lot for the inspo!!!
http://blog.miamarionette.com/
O M Gosh. This is the most expensive looking DIY you’ve made by far! I truly do love this!!!
xoxo
Candy
http://www.tayloranddemolish.com
Enter my Lock Hardware Necklace GIVEAWAY!!!
This DIY looks similar to this one
http://www.stumbleupon.com/su/2logPs/:1KOt8W$SL:bjIKKoqr/www.missomnimedia.com/2009/12/shes-crafty-diy-multi-chain-ribbon-necklace/
Love this DIY, cause I’ve been looking for something like this for ages! Now all I need to do is find the chains and rhinestones.. and that may be hard to find in Belgium.
Fingers crossed!
http://lovethefashionlife.wordpress.com
This is soooo pretty and perfect for the Fall! Will try 🙂
My jewelry blog: joliejouel.blogspot.com
That’s amazing. Going on my list of must-do’s :-D.
Thank you!!!
Can you please write the length of each chain? it will make it much easier for me to make this beautiful necklace.
Thanks!
Love this one! I never make jewelry but rather clothes so when I get your post it makes me want to try because you make it looks so easy.
I looked at both of the DIY’s and I really love how rugged you’ve kept yours with the strings at the back http://beautyjamaica.blogspot.com/
I’m in love with this necklace !!! Definitely on my TO DO list :o))
Oooo, so cute! On my to-do list thank you.
You girls are Ah-mazing!!!!!!! I just go BANANAS everytime I browse your website! Keep it Rocking!:-)
I loved it!!!
I’m posting looks from Los Angeles and fall accessories:
http://www.thegavlaks.com
LOVE this. Trying soon.
http://nomadic-d.blogspot.com/
Wow! LOVE THIS!!!!!! I don’t have an abundance of chains lying around, but if I did this is most definitely what I would be doing with them now!!!
x
http://www.iloveublank.blogspot.com
So gorgeous!
Naturally, I love this diy just like all previous ones. I need to promise myself that I WILL do this one. Must. =)
Satisfy Your Cravings For Celebrity Style and All Things Stylish and Sweet
It’s amazing how you make everything look possible and easy. thank you!
This is so pretty. I wish I was this crafty : )
xoxo aley
http://a-hearts.blogspot.com/
stunning piece!
Bises,
monkeyshines
http://monkeyshines-monkeyshines.blogspot.com/
Ah so beautiful.
Ax
LOve it! So chic 😉
Easily one of the best DIYs. So creative. Love it. Have a look at some of my DIY on my blog
http://seasoncheck.blogspot.in/
Taking inspiration everyday.
N
http://seasoncheck.blogspot.in/
Great idea! Love the necklace
Wow! Excellent! Great DIY project!
From http://www.xeanafashion.com
That looks great! I love the gold with the yarn, perfect for the summer! http://www.shopperstherapy.blogspot.com
YES YES YES. this is happening soon.
http://www.prettydinos.com
It looks so cute! Amazing DIY
XOXO,
Comemoda
This is so beautiful and so my style! Ahh!
Love it!
This is so beautiful! I actually really want to do it. I love the peach and purple hints, with the gold, and the clasp. I’ve made a bracelet like this, not as pretty though.
wow . . beautiful! great DIY…. especially when you’re in desperate need for a nice chic, chunky necklace. I know I have these materials hanging around my house!
Very feminine and pretty!
akong did a collab with anthropologie this spring that included necklaces like this – I DIYed one with brass jump rings this summer, something I wouldn’t actually recommend. It was difficult and fiddly and took forever – yours looks easier and more fun to do. However, I did love the results. Check it out here, if you’re interested:
http://pacificrain.blogspot.com/2012/06/diy-akongesque.html
Arrrrrghhhh I NEEEED to try this! xx
Beautiful! As usual 🙂
Collections
Such a great DIY – love the mix of textures with the chains. thread and rhinestones! I’ll definitely be trying it out myself 🙂
http://www.etsy.com/shop/ebBracelets
this is so great! quite simple but STATEMENT. I can’t wait to try it xxxxx
Looks gorgeous. Love it!
I love it! Might have to try this!
go for the glam
Bonjour et Bravo ! Grand merci . Superbe. J’adhère totalement à la note de Maxime (Compatriote ! J’irai sur ton site), en Belgique nous éprouvons d’énormes difficultés pour trouver ce type de chaînes et, bien d’autres produits pour les “Loisirs Créatifs”.
“…Croisons les doigts…” Maxime
Sympathie
Vi
turns out great! Really can make a look!
Naty Ponders Style Blog
This is beautiful. Thanks so much for sharing!
I need to make this right away. Its beautiful.
Vintagehoneybee.blogspot.com
OMG! what a great DIY! looks so awesome!
http://www.violetfleur.com
Amazing DIY. I have to try that one!!! It´s so beautiful 😀
glamDevils
Very pretty! I love this DIY!
Super cool the result! Amazing DIY! Thank you for sharing!
Kisses from Spain!
This post reminds me I have so much crafting to do… Tons of your DIYs I haven’t tried yet!
Love,
Juliana
Great tutorial as usual~ i really want to make this but so hard to find good affordable curb chain in NZ 🙁 http://www.linhbitesbeauty.com
This is amazing, as are all of your DIY’s! Discovering the site has definitely made my summer more fun and chic! Question though, do you buy your chain online? I’m noticing that my local craft stores either don’t have it or it’s cheap and turns in a few weeks. Any suggestions?
What a great idea! I will absolutely be making this, thanks for sharing!
really nice idea 🙂
Great DYI – Just did it and it looks fab! Thank you for this indian-jewelry inspiration! One things that helps is put a little bit of glue on a couple of rhinestone to help the rhinestone chain to be properly positioned instead of looking towards one’s feet.
Where did you get the chain?
wow … How cool is that! 🙂
Definitely will try it!!! You guys are amazing!
xo
Carla
This is on my “to do” list…absolutely AWESOME!!!!
Love how this turned out. Very pretty.
absolutely love this tutorial — I will post a link to the outcome of my attempt. Thanks for this! Joy
stylemecrafty.com
Love this. Have a look at my DIY on
http://seasoncheck.blogspot.in
N
http://seasoncheck.blogspot.in
Oh waauw! That’s freaking awesome ♥ I love it
Love the necklace. I have to make this. What size curb chain did you get?
Love it! I looked everywhere for the rhinestone chain though and couldnt find one like this. Where did you get this from?
This is amazing!
I’m a crafter and a DIYer too!, check out my blog (:
SHOP UPDATE| GALAXY TOPS & TEES, EMBELLISHED SHOES & MORE on: I Have A Deer (CLICK HERE)
Can you tell me the size curb chain you used and also the size of the rhinestones. It is very hard to determine be the photo. Thanks!
I just love this! Where did you find your curb chain? I started to attempt this project and my curb chain was not flat.. did not look very good at all.. Any information would be awesome! Thanks!
I can’t find a 12mm curb chain or a 10mm one… Can you help me? I would really like to try this DIY!
This is a great DIY – I have rhinestones but couldn’t think of a great idea yet but this is fantastic!
This is a very pretty DIY necklace!!! I try to do it 😉
What is the exactly size of the chain at your link?? Thank you so much!!
I’m completely in love with this!! I started making it, but when adding the rhinestones chain, they are facing down instead of facing ‘forward’. Does anyone know how to make them face forward?
Thank you! 🙂
What does the WTF stand for?
Omfg, this is sooooooo cute! I just found this website from another blog, & I’m totally freakin excited to try it .
Thanks!
http://voguevegan.typepad.com/my-blog/
This is really awesome! The necklace looks great! I definitely have to try this DIY!
This is really awesome! The necklace looks great! I definitely have to try this DIY!
http://JenaiDominique.com
Hi! I love this and I want to make it! What are the size of the curb chains?
Absolutely love this. Thanks for the tutorial – excited to try it!
>> http://www.ArcticSummer.se <<
Art & Fashion
LOVE IT !!!
I made it and it’s beautiful! Thanks!
has anyone been able to find the chain? what is the chains width?
wowo, what a beatiful necklace, I love it so much, and we produce all kinds of chains, but I never thoungt our chains would be like this, so amazing
Oh my, this is beautiful! I am definitely trying this. Thanks!
xo
i saw something just like this at club monaco. So awesome
Hi,
What width of curb chain did you use to make this awesome neacklace?
Thanks x
Love this…looks like a traditional gold necklace..buy DIYed
That is just beautiful.
I can’t seem to get it right because every time I tie up the two chains, they always end up being intertwined together.
What size curb chain did you use???
@Samantha, I used a curb chain that measured between 3-4mm wide.
Thank you. It is awesome and I intend to make it for myself now that all my Xmas projects are done!
The necklace is simply gorgeous. Thanks for sharing step by step of this DIY project.
in the link to curb chain you put above? which one is the one you chose?? can someone give me a link to a curb chain that would work to this? thanks!!!
ok…you’re a GENIUS!!!!!
love it!
xoxo
Syriously in Fashion
Official Facebook Page
Its really fantastic! thanks for sharing
Awesome idea. I’m pretty sure my gf will love this when I show it to her. She’ll begin working on something similar right away 🙂
I like your version better! Love the colors.
Sorry, didn’t finish my comment. I like your version better than commercially available necklaces!
Which one of the curb chains did you use on the site metalliferous? Brass Curb Chain – 0.129″? Or? thanks!
anyone knows the EXACT sizes of the chain? 10″ 12″ aren’t making much sense to me :-/
Just finished making one and added a beaded pendant from the bottom row. Instead of rhinestones, I used pearls that had a bit of sparkle incorporated into each bead.
Luv this, thank you for all your fun DIY projects.
Oh God! What a great idea!! Can’t wait to try
I loved this DIY! I adapted this to show off some howlite cabochons instead of the rhinestone chai though and used hemp cord for durability and braided the three strands. You can view it on my website http://www.sphinxfalcondesigns.com as the design called Scarabesque. 🙂 Thanks for posting such a versatile design!
Thanks so much for the DIY! I tried it with thin rick-rack and it looks fantastic!
om my God!.. thats very beauty.. How much their price, that must be very expensive i think. right?
This is so clever and so pretty, i am definitely going to make one of these.
Thank you
Violet x
this DIY is perfect!
Very clever!
Style Doctors®
that is wonderful
Kind of love this…
This is beautiful! I am going to go home and make this!
Melanysguydlines.com
Does anyone know where I can get the materials for this? I am kinda dying to make this.
Which size of rhinestones did you use?
Hi, I saw these pictures on another blog, got inspired and made something similar. I just today found out that this is the original post so I’m now referring to this post on my blog, hope that’s ok :))
http://ticklishfingers.blogspot.com/2013/05/golden-chain-necklace-with-minty-accents.html
Omg I bought a similar one… When I could have made it!! dammit!!
Loving your DIY
It is an awesome DIY. Simple and beautiful 🙂
loveeeeeeeeeeeeeeeeeeeeeeeeeeeee
This is so beautiful.I would love to make this.This is so simple and easy and beautiful.
Has anyone figured out the size/ where the chain came from??
great idea! the result is very pretty!
so pretty design i will elect this design on my sis wedding i copy this design thanks a lot for share here 🙂
Can you please please tell me what exact chain this is?
Seriously this is amazing 🙂 Gonna try it soon 🙂
Traditional and well crafted at the same time.
You make it look so easy! Love the necklace!
http://www.lelivingandco.blogspot.ca
Pretty necklace but i like originals…
Gorgeous! I am definitely going to try this!
Beautiful necklace to gift and to wear
Love it! xx
http://aakinal.com
I’ve done this DIY and I love the result it’s an amazing necklace!
Thank you for very detailed instructions!
Looks good :).
Brilliant tutorial and very easy to learn. I will put this into practice 🙂
Consiee Group -the world leader in luxury yarns
Largest cashmere yarn exporter in China; professional luxury yarn manufacturer
Consinee Group- Top Line, largest mohair yarn production base in Asia even in the world; professional manufacturer of various fancy yarns such as loop yarn, brushed yarns, tape yarns.
visit our website http://www.cashmere-yarn.com to know more.
Does anyone know how to make the necklace lie flat? Mine keeps on buckling.
WOW.
it seems we will never buy necklaces if we learned to do these ourselves, I am just astounded.
http://www.naughtygalshoes.com
wowwww
Necklace looks wonderful. Very very good idea:D
What a fab idea!! Gorgeous!
very nice handicrafts. At my place also in Indonesia, many jeweler but I have never come across such that there is in this picture, very nice.
very nice tutorial lot of things to learn.Thanks
awesome!
This is Really Amazing Game!!Thanks for sharing this post and i like to check your posts.
Ori and the Blind Forest PC Game Free Download
wowww very nice man <3
nice artigle .
Great jewellery ideas! Unique stuff!
Amazing the jewellery on offer these days and how you can ad your own unique twist to them!
This is SO adorable and seems fairly simple, thanks for all of the photos I can’t wait to try it =]
Thanks for sharing, this is beautiful! I agree, the photo steps really make it seem more simple.
http://www.mingleandmansome.com
Very cool!! Thanks for sharing.
wew, they are very interesting to buy. i like it.
Wow im totaly making it
There’s certainly a lot to find out about this subject. I really like all of the points you’ve made.|
What size Rhinestone was used anyone know?
nice article
how interesting can be
大都市不動産市場購入できる株式指数に戻って、10年前につれて、一般的な投資ルート近くに陥れてつまらなくて局、収蔵市場でだけであった少数のプレイヤー愛顧の時計を得た意図投資最近部分を資金ヘッジ甚だしきに至っては付加価値の市民愛顧。ロレックス スーパーコピー時計は自家用体現できる個人品位のほか、その投資の価値は侮れない。でも業界関係者は注意して、投資の時計の時とは思わないでくださいは徹底的に解決する過程のために、時計ヘッジ後続定期的なメンテナンスも1筆の支出節約できない、今時計(簡単機能)の平均メンテナンスの試算30年保養投入するが約6万元。また、別の時計サービスセンターの価格、メンテナンスプロジェクトも違うが、投資家はもっと気をつけ。 http://www.okakaku.com/Super-Copy-195.html
バセロンコンスタンチン(Vacheron Constantin)「花たゆう時光」時計芸術テーマ展が上海ヴァシュロン・コンスタンタンの家の開幕。バセロンコンスタンチンからジュネーヴ博物館の花卉芸術骨董表、金や最新の花の神殿シリーズの腕時計、Cartier時計コピー完璧な融合タブ工芸と花卉芸術表現タブ大師の好プレーとアイデアの夢。有名な時計収蔵下僕にさんも現場へ。 http://www.ooobrand.com/aq/index.html
中国に進出して50年余りの日本シチズン会社、50歳の年に「ネット」、中国で控えめ起動時計ネット直販。1月24日、本紙記者からシチズン時計(中国)有限公司(略称シチズン」)によると、2007年の試運転の1段の時間後、IWC スーパーコピーシチズン中国でネット直販公式サイトが開通し、2008年には一層の発展。 http://www.ooobrand.com/ordermethod/index.html
私は、私が私がどれくらいのスポーツ好きの言うことができるかどうかわからない。スポーツと腕時計:それらの2つのブラケットは、私がこれまでに持っていたと思いますあらゆる趣味を含みます。とマンチェスターの中心から20分で育ちました。パネライスーパーコピーサッカーの重要な歯のエスケープホイールにとって重要であると言っているように私に言います。しかし、私は、ブローヴァマンチェスターユナイテッドクラブウォッチについて聞いたとき、私は興奮よりも神経質でした。私はしばしば私の2つの大好きな分野の融合について疑問にふけっていました、私がどのようにアリゾナ・カージナルスロゴは、贅沢な腕時計のダイヤルの上で高級に見えさせる、というトロントメープルリーフスのバッジの可能性を考えてクラウンに愛国的な見えないのか不思議と国民の巻き毛の「w」またはkiddishにクールに見えますストラップにエンボス加工したならば?私は唯一の失敗は、大胆な生意気なスポーツのしるしとの組み合わせを待ち受けていたと推測しました、そして洗練された文化的な腕時計のデザインとした。しかし、ブローバ私が間違っていますか? http://www.eevance.com/tokei/zenith
は、コンスタンチンchaykinコンプトゥスの復活祭の時計のケースを模倣するサンクトペテルブルク、ロシアの聖イサク大聖堂のように、全体的な形状は、ドーム、柱廊、鐘塔とすべてのこの記念碑の大聖堂にマッチする色を選んであった。トップの上のギョーシェとゴールドエナメルで飾られたドームは、キリスト教徒のための復活のシンボルと一致するように卵の形状に成形する。4つのミニチュアの鐘塔、24柱構造の側の上のモザイク装飾とすべての他の小さいデザイン要素を考えて、元の建物に合わせて作られている。 http://www.newkakaku.com/cxb1.htm
Great jewellery ideas. very interesting article, great list…
Good jewellery ideas.
nice very nice article and photos <3 i like admin
hi,
Thanks for such a relevant blog… this is a great blog, which provide the relevent info.
Laundry Service in Gurgaon | Dry Cleaners in Gurgaon
This villa is appropriate for younger kids.
Nice pics.
Nice Necklece.
I was very much looking forward to seeing ‘how Grace made a bolder version of the collar necklace (pictured above) using thick and colorful yarn’!! However, the ‘right this way’ link that I clicked on brought me to a page informing me that what I wanted to see was no longer available!! I thought subscribing and joining this website would allow me access to pages, articles, pictures, etc., that would be more or less current with its directions to click this or that to see the continuation with the subject I had just finished reading!
And, I would like to know if this is something that will be happening often as I read through other articles that are contained within this website?
Thank you very much for your help with the above-mentioned situation!!!
11/27/2018
wonder full created & idea of neck chain .
Oh my gosh, This necklace is so wonderful!
Thanks for the great post.
That’s amazing. Going on my list of must-do’s :-D.
https://ilovestyle.nl/ https://ilovestyle.nl/personal-shopper/
nice blog you have great DIY
a great one I also want to try it https://thedesigncart.com/blogs/news/tagged/diy
Absolutely love this DIY idea! The woven chain collar necklace looks so chic and unique. Can’t wait to try making one myself!
Wow, this necklace looks amazing! I love how the woven chain design adds such a unique twist. Definitely going to try this DIY!