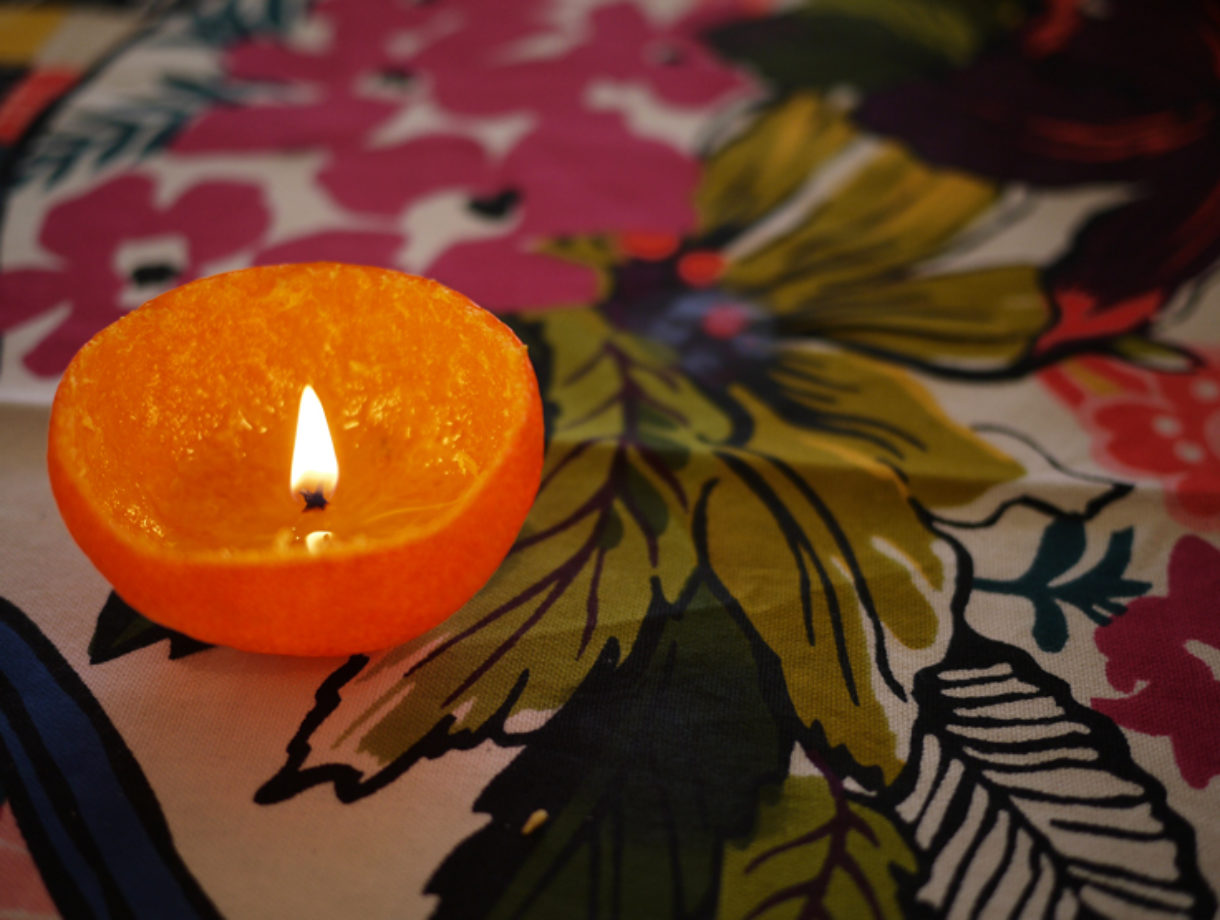
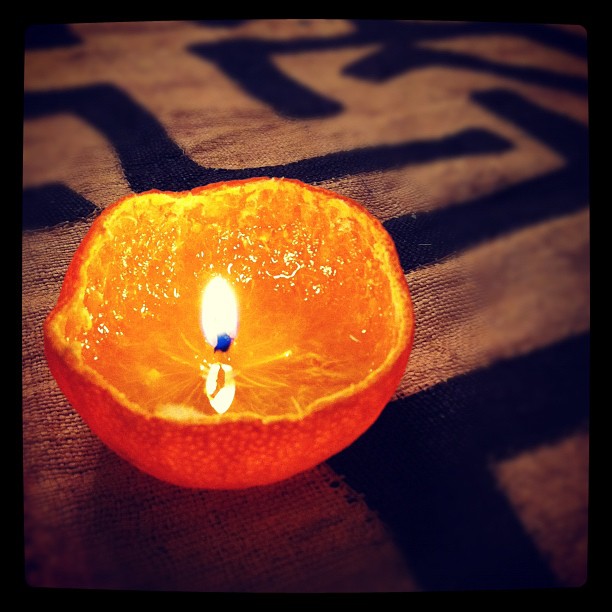
A friend of mine DIYed her own candles, made from the peels of Satsuma oranges, for a recent dinner party. I was so excited by this simple yet clever idea, I had to share the tutorial on HonestlyWTF. My only regret is not discovering this sooner when Satsumas were at their absolute peak in December. Hopefully, you’ll still be able to snatch up a few at your local grocery store or farmer’s market and impress your guests at your next dinner party!

You’ll need:
- Satsuma oranges with stems attached
- olive or vegetable oil
- a serrated knife
- a spoon
- matches

The stem side of the Satsuma will be the bottom and base of the candle. Lightly score a ring around the top 1/3 portion of the orange. Peel off the top.

Because Satsumas are known for their loosely attached peels, the orange should easily be removed. Gently separate the orange from of the peel with the help of a spoon. Slowly work the spoon towards the bottom and pry the orange out from the sides, making sure not to break through the middle.

Once the flesh of the orange is taken out, the pith connecting the outer stem should remain. The pith will be the wick of the candle. Snip the outer stem off with a pair of scissors so the candle can sit flat.

Pour a few glugs of olive oil into the orange, leaving just the very tip of the pith exposed. Use the spoon to submerge the top of the pith into the oil for just a few seconds. It’s now ready to be lit! *** Tip: if you’re having trouble lighting the pith, it’s probably because it has too much moisture. Try letting the peel dry overnight (without oil) and don’t forget to submerge the tip into oil for a few seconds before lighting.

Depending on the length of the pith, the candle should burn for at least a couple of hours. Remember, never leave candles unattended while burning! xx

Oooh, I saw this on Instructables the other day but I never thought that a specific orange would work better!
I haven’t tried this yet but I’m excited to! The aroma must smell wonderful!
I really love this idea ladies. xxx
wow. simple, pretty, perfect.
SUCH a good idea!! Love all the DIYs you post!
http://www.fashionifancy.com
AWESOME idea! A must try :}
http://www.edgycuts.blogspot.com
How cool is that! Such a nice, organic and simple way to decorate… – Aliya
http://marantphiles.com
Is this an orange or a mandarin? Either way I want to try this out!
http://www.annesanchorage.blogspot.com/
I might have a few mandarines lying around actually. Also, never heard mandarines called Satsuma Oranges before, will be calling them that from now on!
http://dottyspeckles.wordpress.com/
Very cool idea. Who knew that an orange would burn like a candle?
This is so cool, what a great idea.
Collections
i can smell this already. can’t wait to try it out 🙂
So creative! Love this post!
Oh I bet other oils are also great to use! This is such a unique idea! Can’t wait to try it, just pinned
http://www.chevronsandeclairs.com
Omg, beautiful!! I can’t wait to do this at a party I’m hosting next week!
you’ve made my day!! Love it- thank you!!
This is FANTASTIC!!! I bet it smells AMAZING too!!
xo
http://cestclassique.blogspot.com/
what a beautiful idea! great for a dinner party
http://www.wangsfactory.blogspot.com
I love citrus fragrances so this is right up my alley. Thanks for sharing!!
What the heck!! This is awesome. I love that there’s no melting of wax, etc to make these.
xoxo
http://www.thewrittenrunway.com
LOVE THE IDEA!!!!!!!!!!!!!!!!!!!!!! I can believe you find this idea;) So nice
ilovedoityourself.blogspot.com
What a cute idea!! xoxo
http://www.hellohellofriday.com/
Fantastic, I was waiting for this DIY (as I saw it on Instagrm a while back)
Thanks a million for sharing
xx
TFC
what a pretty candle! i want to make this for my apartment.
xx, http://wordbyjessie.com/
This is such a simple, clever idea – they must smell amazing, especially in the festive season combined with the smell of mulled wine and Christmas trees!
Thank you for sharing this!
xx
http://deeperdazzle.com
omg I saw you instagramed this weeks ago and showed all my friends! haha this is awesome thank you xo
http://www.dragonnfruit.com
I tried doing this a few weeks back, but its actually really hard to get the ‘wick’ lit. After about 30 mins, i gave up….
If anyone has persevered through it, or knows the trick, share, please!
Love this! Definitely going to try and snatch up some satsumas this week!
– Sara @ Gameday Stylist
Works with a navel orange, too, as long as a little stem is on the end! So beautiful and smells wonderful! Thanks for posting!
wooow, co cool!! amazing idea 🙂
http://www.rockingpowder.blogspot.com
this is such a great idea!!
Such a beautiful idea!! I will totally post about it!
It didn’t work with my mandarine… :´(
I’ve never had a satsuma before. Are they like mandarins?
oh wow. that is nice!
xx, k
These are beautiful! I LOVE.
What a great idea!
Hey, first of all, I want to say you’ve got a lovely blog, I’m a blogger based in México who’s just starting in this whole blogging world, so I wanted to invite you to check out my blog and maybe follow it if you like it! Thanks and greetings from México!
xx
E
http://byebye-blondie.blogspot.com/
Wonderful idea!
I would add some essential oil as well, as I LoVe my candles to smell good!!
http://dc2nyconfessions.com
So neat! I have seen tutorials for this online…guess this is a sign that I actually need to try it!
http://thelittletexan.blogspot.com/
I’ve seen this DIY before and forgot all about it! Definitely adding it to my to do now though!
GREAT! GREAT! GREAT!
http://traveloguewithlove.blogspot.com/
Another cool idea is to use the other half as a top, and cut out the shape of a star in the part where it attaches to the tree. the hole is needed, because otherwise it would burn, but it also looks so pretty! the whole mandarin will light up like a lantern 😀
What an amazing idea! I’m definitely using this when we have friends round for dinner on Sunday. Thanks!
Aaaaaah, it works!!! Of course I had to try it since I go by satsumabug and my website is satsumabug.com 🙂
Photo: http://www.flickr.com/photos/satsumabug/6723323559/in/photostream
So simple and yet so beautiful. I have the nostalgia of a time where people was making a lot of things with their own hands. I think that the modern life makes us loose our individual creativity . (Sorry English is not my first language).
…………………………………..
http://virtual-makeup-artist.com/
…………………………………..
This is wonderful! Would look beautiful on a table! I saw this used as placecards as well, the two together would be so impressive!
great idea
They’re also known as clementines, or are very similar to them. Most markets in the Northeastern US should have crates of clementines stacked up right now… but not for long!
aaaw this is remembering my childhood, at xmas time my mum made them as well.
it was excithing when they were working.;-D
And beautiful and lovely smelling, thank you for making me smile;-D
Have a great fun weekend as well;-D
Where did you find that tablecloth? So cute!
I got it to light right away using a “cutie clementine” mandarin orange and plain old olive oil. I let the orange dry overnight. My other trick was to just pour the oil directly over the wick when adding to the orange, instead of pushing the wick into the oil after it is added. Worked like a charm! And it burned for a delightfully long time!
so cool, did not have that orange but Clementines are in here in Texas.
I made a bunch of them and have one in bathroom in window in bedroom ON A CERAMIC DISH for safety thanks
I did some ith a lit for christmas, so you keep the top and cut a hole shaped as a heart, star or whatever you like…
But go to my blog to see how http://blog.peekaboodesign.dk/lys-i-morket/
It is a wonderful idea, tangerine is my little daugther´s favorite fruit and now I´ll have a double reason to buy them!!! 🙂 Thanks.
Thank you for sharing! it is a great idea 🙂
this is soooo coooool!!
STYLE DECORUM
Awesome idea but it didn’t work for me. I tried on the oranges listed in the directions and on a normal orange. Both lit for 10 seconds then died. So then I dried them out over night and tried again but it still didn’t work 🙁
Do you think this works with other oranges as well? I tried it with clementines but they burned out very quickly, though maybe I didn’t add enough oil.
This is a great idea. I can smell the aroma just from looking at the pictures. This would great for my studio while I’m creating my jewelry.
WOW!!! Amazing!!! =)
hi , i am a handmade artist . i made many jewelry , cuff bracelet, necklace ,cell phone cases with leather ,ropes ,alloy ,stone ,plastic .etc.
I provide the world with my beautiful bracelet necklace jewelry that improves your day with warmth, love.
if you want a lot .i can give you a discount or send out a bracelet gift for free . Thank you for your visit ..
my etsy shop: http://www.etsy.com/shop/jewelrybraceletcuff
Cool … never would have thought of that 🙂 !!
I made this tonight and I’m loving it!!
Thanks for the beautiful idea <3
This is an amazing ideaa!
I’m going to used it for Mother’s day
This makes an awesome candle.
although i didnt have any oranges i made 2 using a maderin and a grape fruit and it still worked perfectly.
Ps. does anyone know how long it burns for??
Very cool and really simple to do.
Jewelry Rage
We did it! But we used a regular orange and cut off just half of it. Its so nice! and looks great in a dark room!! Thanks for the awesome idear! 😀 😀 😀
I did it with a pink grapefruit and sunflower oil and it turned out amazing! I love the grapefruit smell and then I added a little cinnamon too! Yes, HANG IN THERE! I used almost an entire book of matches and then I realized I should have put a little oil on the wick! But, either way, it did light and kept burning….is still burning! Give it a try!
Greetings,
For all of you that like this idea, you can use clemintines they work just as well. Oh they have a 3-5 hr. life after they are lit then POOF and I am not joking..they get toasty. lol
This is so cute!! I want to make this soon!
So cute! Reminds me of this gigantic pomelo flower candle I used to make as a little kid (thanks mum!). It was really cool but it was too big to remain as a bowl (to hard to cut too) so my mother just sliced the peel nearly all the way down to the bottom and removed the pomelo fruit inside. Stuck a pretty little candle inside. But I’ll definitely be trying these ones. Maybe for Halloween. LOL. I’ll just have to wait then. ; )
This is a brilliant idea. I love making wax candles, but this is so much cleaner, simpler and I bet smells great. Thank you for sharing
Orange is one of my favorite fruit and your tutorial surprised me 🙂
Really it was nicely done I will try at home for sure.
Thanks 🙂
I want to try this out! I tried to share it on facebook, but no luck!
Fabulous idea – will definitely be trying it for the garden in summer
Dee at the Carlton
Hey ladies, I just tried this and it didn’t work at all 🙁 maybe I did it wrong but I followed the instructions exactly…
I just tried this out and it worked amazingly! 😀 xxx
Very innovative idea,will definitely love to try it..
An elegant touch. Very romantic.
10 Girls Who Won the Selfie War
http://bit.ly/1Ffg7Rj
Ooh, so cool. :))
Oh wow simply great beautiful 🙂 http://www.quickcourseworkhelp.co.uk/
Beautiful and romantic idea 🙂 http://diyspecial.com/
What a great idea, never thought of it. I really like your DIY section.
I can’t wait to do this at a party
ohhh myyyy gawwwwwdd that’s so amazing
this is awesome. the diy satsuma candle making procedure is so easy and it looks so gorgeous. thanks for sharing this idea..