Climbing rope? Bracelets? Count us in. Inspired by Miansai‘s colorful, stackable and adjustable rope bracelets, we were determined to add another do-it-yourself bracelet to our growing collection. With some colorful rope and an S hook from the hardware store, making this bracelet is as simple as mastering the versatile sliding knot. We must warn you though, this project is extremely easy and addicting! 

Before you begin, seal the tips of the cord by burning them with a lighter. This will prevent the cord from fraying as you work. With a pair of flat nose pliers, squeeze one side of the S hook until it is completely closed. Do the same to the other side but leave just enough room for the cord to slip through. Thread 6 inches of cord through the closed side of the hook. Fold 3 inches of cord back on itself, creating a zig zag. Bend the last 2 inches of the cord over the zig zag. (Click images to enlarge)

Coil the cord twice around towards the left loop. Push the tip through the opening of the left loop. While pinching the tip with your left fingers, use your right fingers and push the coil to the left until the loop is closed and the knot is tight. Test the adjustable knot by sliding it towards the base of the S hook.

Repeat the same steps on the other side. This time, coiling towards the right side and pushing the coil in the same direction.

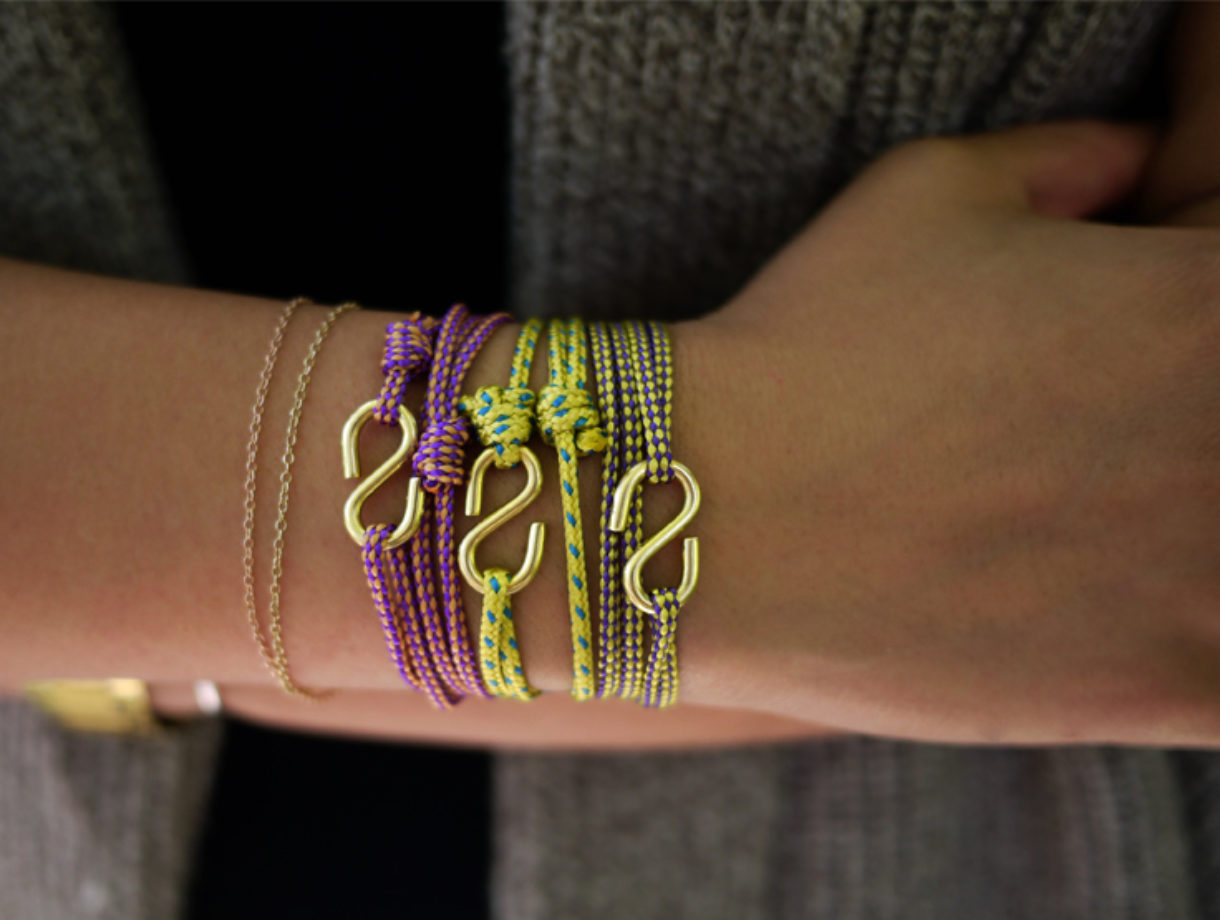
Trim and re-burn the tips if necessary. Your wrap bracelet is finished! It can be wrapped around the wrist 2-3 times and adjusted with the sliding knots.

Try making the bracelets with leather cord too. Have fun!

(top image from here; rest of images from Honestly…WTF)
I personally like your version so much better! Plus, it’s a lot safer! That jagged edge on theirs looks so dangerous! Thanks for the tutorial 🙂
LOVE THIS!!!
Your DIY’s are the best!!
Must try this next! My hex-nut bracelets turned out great!
xo
http://cestclassique.blogspot.com/
this looks so easy!!
january, x
jessicajanuary.com
That is genius! I’m definitely giving that a crack in leather! Thanks
That is genius! I’m definitely giving that a crack in leather!
aww I used to do bracelets like these with my dad when I was younguer 🙂
fun DIY. i love bracelets like this. it is hard to have enough! thanks for sharing this. i’ll definitely be doing it soon 🙂
xx, http://wordbyjessie.com
Thanx…
http://brillenmode.blogspot.com/
I love it! will be trying it out!
Aw, this brings me back to my youth, to days at summer camp, only it’s way cooler!
Just a Silhouette
yay! i love this!…I like yours so much better tooo!
love this.. definitely will be trying this out.
theArtofbeingFashionable
Will you make me one?! I love these.
*Very cool and so easy, thanx for shring!!!*
http://www.LIVINGandFASHION.blogspot.com
GREAT!!!
This is freaking awesome, thanks for sharing! 🙂
xoxo
http://fashionagony.blogspot.com/
This is a really fun DYI project. I’ll definitely be trying it.
I was just going to ask you if you could show us how we can make friendship bracelets ! Thanks ! xoxo
http://blogmoodeuse.blogspot.com
loving dyi
http://www.herpersona.blogspot.com
i am in love with your DIYs. they are always easy to execute and still manage to look good.
love these bracelets!
what a cool tutorial thank you for posting!
http://www.ohmydior.org/
these are wonderful!
nd there are so many ways to customize them (use pearls, different kinds of hooks and cords..), lovely. my favourite diy so far!
btw, thanx from germany, i<3your blog
LOVE THIS!!!!! Off to the hardware store (again) this weekend : )
x
Michelle
http://www.michellesstylefile.blogspot.com
Amazing! You guys rock. I am going to repost this on my blog:)
I often look at things and say ” I could do that” but you guys do it and show us how! Thanks.
i’ve been seeing photos everywhere of the miansai bracelets- i can’t wait to make some. i love the pop of color and i like your clasp better; it looks more delicate.
thank you!
Like as always, fantastic diy!
Also I like like your version better.
x
Marija
http://11daily.blogspot.com
Your DIYs are so addicting, it’s dangerous! This one is too quick and easy not to make a batch ASAP; I guess I know what I’ll be doing this weekend!
love it! ill def be making some of these for summer.
http://www.solifestyle.com
These are so adorable, I can’t wait to grab the material and give them a try. Thanks for the post.
awesome! These totally remind me of the friendship bracelets I had in the 90s! much cuter tho
SOO original and AWESOME! I LOVE them! Making your own jewelry is the best thing ever.
-Lindsay
Delighted Momma
Another brilliant DIY. Can’t get enough of your jewelry posts! Will be featuring and linking again for sure! Pearl
Anyone know who carries this type of utility cord used in their example? Like is it sold in craft stores (hobby lobby michael’s, etc) or like hardware stores (Lowes or Home Depot) If anyone could tell me where they got theirs that’d be awesome!!
@Shelly, the cord used in the tutorial was from REI. REI stores sell accessory cord by the yard in their climbing sections though not all the stores carry the same colors. You can always either go to another climbing store or Google “2mm accessory cord”. Good luck!
Shelly- I was wondering the same thing! The websites that were linked usually only have one color option, so I’m wondering where the cord for this tutorial came from!
@Erica, Thanks so much!
i like it very much!
Love this DIY! 🙂 Where did you get the gold chain bracelet from (far left)?? I’ve been looking for a simple one like this!
where can you buy the accessory cord from. we dont have an REI
@kaitlyn, try here or here. You can always search “2mm accessory cord” online. Good luck!
These utility cord bracelets feature in my daughter’s craft book (although a ‘D’ link was used). And that was published in 2004. Nice to see that “designers” such as Miansai are getting ideas from kids’ books and onselling them for $95 each!
im having such a hard time making the knot, someone please help!!!!
Yes – I was just wondering if there is a video tutorial anywhere for this – I can usually follow the photos and written instructions really well, but for some reason, this is eluding me!
Thanks for any suggestions.
Tania – I think this video is helpful – I figured it out from this.
http://youtu.be/J33eTNJszmQ
Sorry – hit send too soon!!
Where did you find your fish hooks? My bf loves to fish so they would be an awesome clasp for him! Thanks so much for sharing!
Where do you get this cord??
this is pretty cool. i have a friend who makes bracelets out of para-cord and they are very similar
This is really awesome! I’m glad I found this blog. Thanks for sharing your DIY tricks 🙂
anyone have any luck finding accessory cord? I googled it and see a bunch of stuff but it’s like $30-$50. I want to make a bunch of different colors so was hoping to find something fairly inexpensive so I can buy a bunch. Any help would be greatly appreciated!!
Where did you get the 7/8″ Size Brass “S” Hook?
hi Rafeal- I found some at Ace Hardware. But guessing any hardware store will carry them
I love this DIY project! How cute and easy….I am going to try mine in leather…deerskin and suede lace…I think it will look awesome and silver S hooks! WOW! Can’t wait to try this one…thanks for the inspiration….
Shannon, try the dollar store or look for clothes line….look in the craft department…you can find some of this stuff in the oddest places and it shouldn’t cost very much! Hope this helps….
Beautiful! I’ll have to try and make them. 🙂
Everyone who is looking for the cord, just google “paracord” its military cord. A military store online should carry it and runs about $3 dollars for 25 feet.
where did you get the fish hooks?
Thank you for all those merveilleux DIYs, from Paris France
can you do a diy tutorial on woven leather bracelet? thanks!
Hi, I’m trying to find the purple color cord as shown in the pictures but can’t seem to find it anywhere online. Anyone manage to find a similar one? Thanks.
Worst instructions ever could not figure out a thing. This is so stupid
The ropes are colorful and seems quite strong, just like those being used in survival bracelet.
Ok so i just made one using Paracord and it turned out really well!! I found the Paracord at Hobby Lobby.What they say is true.It was very easy and fun!!
does anyone know a good link to where i can buy the rope?
Cool jewelry! My teenage daughter loves wearing bracelets, and these look like something she’d really like. 🙂
What a beauty! Certainly will do!
This bracelet so AWESOME that I had to make some!!!!!! =)
These instructions are hard to follow I wish it was a video. My rope seemed thicker where do you get the thinner rope?
Great idea thanks for sharing
Is there a video on how to do the bracelets? Thanks