As the month of love approaches, we thought we’d combine friendship and hearts into one Valentine’s Day themed tutorial: a heart patterned friendship bracelet! Using some candy-colored embroidery floss and your familiarity with the chevron friendship bracelet, you’ll be able to whip up one of these tokens of love in a heartbeat.

You’ll need:
- 2 colors of embroidery floss
- scissors
- tape or clipboard

[linktopost slug=”diy-friendship-bracelet”]
Creating a heart pattern involves just a simple modification to the chevron patterned friendship bracelet. Start by cutting 4 strands of each color, at about 24 inches each, for a total of 8 strands. Alternate the thread colors before tying them together in a knot. Remember to leave at least 3 inches of slack. Tape the knot to a flat working surface or clip onto a clipboard.

Separate the threads into 2 sets, 2 of each color on each side. Arrange the strands in an alternating, mirror-image pattern with the outside threads matching and so on moving inwards.

Start on the left side with the outermost strand (shown here in red) and make a forward knot by creating a 4-shape over the 2nd strand (shown here in blue), loop it under and back through the opening.

Pull up and to the right to tighten. Make the same knot twice everytime.

Continue knotting over each color, towards the right, until the outermost color has carried over to the middle. This is one half of the chevron pattern.

Pick up the outermost strand on the right side (show here in red) and make a backward knot, creating a reverse 4-shape over the 2nd to last strand (shown here in blue), loop it under and back through the opening. Pull up and to the left to tighten. Don’t forget to knot twice!

Continue knotting towards the left until the outermost strand reaches the middle. Tie a backwards knot with the two middle strands to connect the two halves. Don’t forget to always knot twice!

Continue onto a second row using the same method. Two normal, chevron rows are complete. Now, it’s time for a “special” row: take the 2nd outermost strand (shown here in blue) and make a backwards knot over the outermost strand (shown here in red). Knot twice.

Repeat on the other side: take the 2nd to last strand (shown here in blue) and make a forward knot over the outermost strand (showin here in red). Knot twice.


Mirror the steps on the other side and connect the middle strands. The heart cleavage has been created and the third row is finished.

Now repeat this special row again for the 4th row, taking the 2nd outermost strand and reversing the knot over the outermost strand.

Mirror the step on the other side. This forms the outer edge of the heart. Now fill in the heart by finishing the row with 2nd outermost strand (shown here in blue) and making forward knots over each strand until it reaches the middle.

Mirror the steps on the other side and connect the middle strands. Now, it’s back to a normal row again to close the heart. Make forward knots with the outermost strands, moving inwards towards the middle. Connect the middle strands.

Knot another normal row and then 2 special rows to form another heart. Do you see the pattern? 2 normal, 2 special, 2 normal, 2 special . . . keep going until the bracelet is long enough to fit around the wrist.

Finish the bracelet with a big knot and trim the ends.

Voila! Heart patterned friendship bracelets done.

Happy heart day!

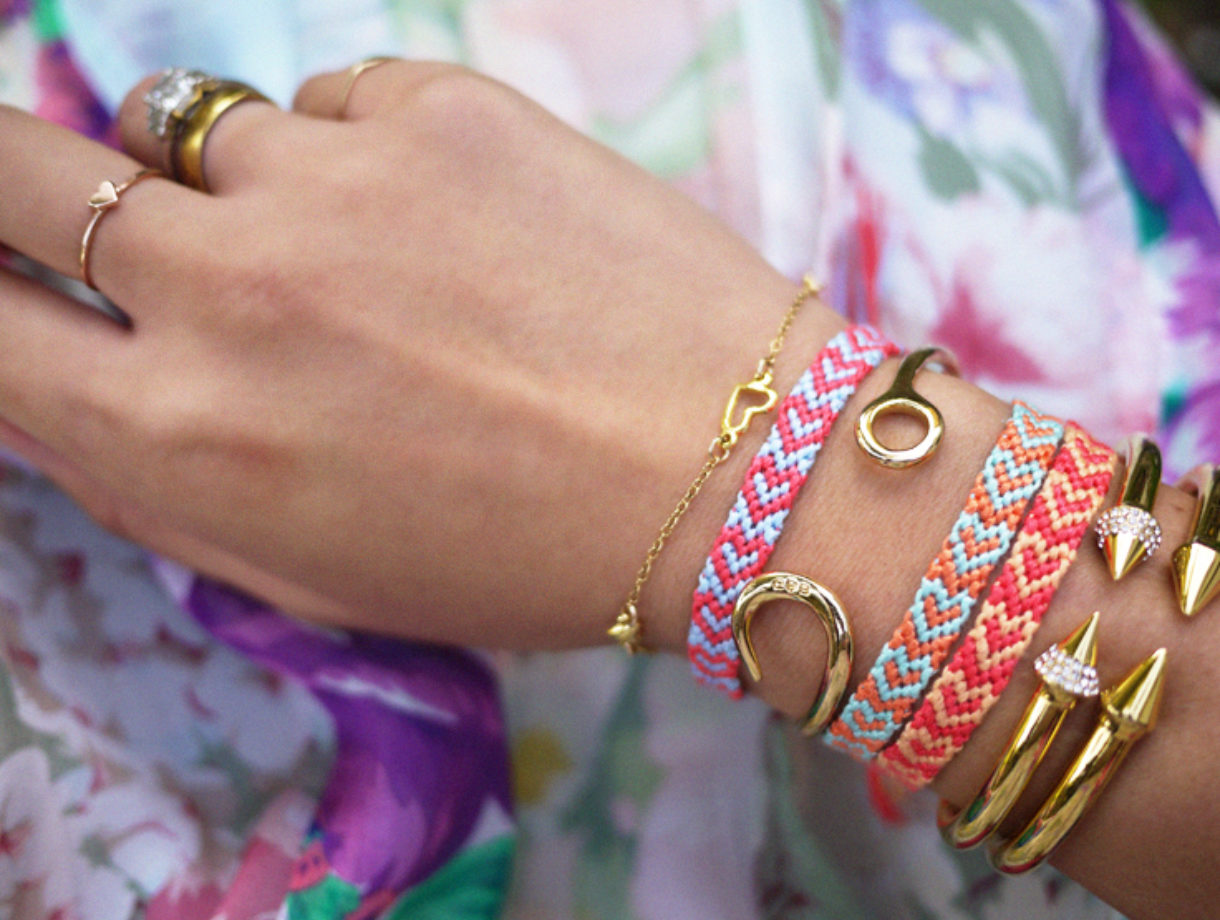
(bracelets by Vita Fede, Giles & Brother, & Gorjana, ring by Catbird, dress by Zimmermann; all images by HonestlyWTF)
Awesome work! 🙂
xoxo
Fashion Agony blog
cute !!! thanks for sharing <3
Hermoso trabajo de pulseras,sin palabras.gracias
this is nice! love all your bracelets! xo, Alma
http://www.soulofashopper.com
So cute! I’ll try this ♥
So cute! I am tempted to try this…despite my attempt at making friendship bracelets a couple years ago went down very poorly 🙂
Kate
http://www.thrillofthechaise,com
So cute!!!
PLAYA DEL CARMEN IN http://cravingforbarneys.com
So cute!!
http://www.bonnieclydemarni.com/
I’m blown away– who knew you could make cute patterns beyond chevron?
Love these bracelets ! so cute !
New post up on my blog: http://www.thestilettoholic.com/
These are so cute! Surely my boss would be okay if I made these instead of worked ;P
I actually have one of these half-done hanging from a nail in my room! Only the colors aren’t as lovely and Valentine-themed (my selection of thread is limited). But they’re so easy and so cute!
http://lasaloperie.blogspot.com
You are amazing!! I remember friendship bracelets being all the rage back in the 90s…your post made me want to get back into the whole craze again! You’re like, suuuuuuper talented 🙂 Hehehe.
I love it!!!! cool Diy!!!
http://www.thestelstyle.com
OMG how cute!!! definitely have to make one for my girls 🙂 THANK YOU SO MUCH
http://www.violetfleur.com
omigoodness, this is the most adorable thing ever! and it seems totally doable. i love this idea and will want to make them for a couple friends. fabulous post!
http://www.insparisian.com
Loving all the wrist wear!
http://www.gbofashion.com
These are awesome! I need to dust off my middle school friendship bracelet skills and get on these. Thank you for sharing!!
I love so inspiring posts. I made it before few years budt I forgot. How. So I will do it. Have a great day.
http://www.fashiondenis.com/
What!! These are SO cute. Hmm, I need to get on this.
xoxo
http://www.thewrittenrunway.com
Awesome DIY!
Love it 🙂
Today I’ve also Diyed.. a tartan scarf!
http://9lla.it/
fashion & DIYs
Are these meant to be worn 24/7? or can you knot it in a way that it can be removed?
OMG stop. Amazing.
oh this is super
http://lejlatravels.blogspot.com/
So nice! I make bracelets too! 🙂
http://www.facebook.com/yarnmemo
adorable!
Bises,
monkeyshines
http://monkeyshines-monkeyshines.blogspot.com/
Love your posts, keep up the wonderful work! Would love your suggestions for a clasp or other fastener for friendship bracelets too!
Tnx for sharing! I wanted to do friendship bracelet for a while but had no idea how to do it! This will be very helpful!
Keep on good blogging!
Wink 😉
Anika
aww! i need to do this!
xx
wow. that is some impressive friendship skills!
YAY ! I used to make those when I was a child!
the tutorial is great, makes me want to try my hand at it again:)
http://jolicassoulet.wordpress.com/
They’re so cute! I love a good Valentine’s Day inspired DIY.
Satisfy Your Cravings For Celebrity Style and All Things Stylish and Sweet
Amei!!!!
Mas teria preguiça de fazer. kkkk
Beijão, Evylin
http://www.pitadadecriatividade.blogspot.com
These are brilliant! I can’t make one. Thanks so much for sharing.
Great idea !!!
Check my blog 🙂 :
http://www.thefashiontale.com
It seems to be quite difficult, but I’ll try …
Kisses …
http://www.gostofashion.blogspot.com.br
too darn cute and easy….thanks!
great bracelets!
xo
Carolina
http://carolinakrews.blogspot.com/
Funny! 🙂 I’ve made similar bracelets in the past days.
http://vanrolt.blogspot.de/2013/01/van-rolt-neue-armbander-neues-blog.html#comment-form
I’m a huge fan of this website! and these bracelets are such a cute valentine’s accessorize.
Just a quick question: does anyone know where the cute heart ring (and bracelet) are from?
So beautiful!
Makes me wanne go on a holiday!
http://www.momsandmojitos.com
awesom bracelets! nice work, you rock! VISIT me at: http://www.styleinlimablog.com/2013/01/as-simple-as-that.html
Totally doing this & giving them away to friends for vday 🙂
http://indicastance.blogspot.ca
You always have the best and most inspiring DIYs. Whether they are for fun or for nice jewelry, you make the best directions, so clear and easy for everyone to understand. Thank you so much!!
Wowzers, found your blog via pinterest and LOVE IT! Thanks so much, what a beautiful place to come explore.
So cute!! I need to maked these now!!
GREAT TUTORIAL! I LOVED IT!
http://therunwayoflife.blogspot.mx/
Did anyone not see the hearts at first? Just me? Haha
Omgosh, love this!! Will have to try it asap;)
blurbs-blog.blogspot.com
So cutee!! 🙂
That is so cute a creative… http://www.shopperstherapy.blogspot.com
Yes! So cute and totally brings back memories of Summer camp 🙂
xo,
Jamie
http://www.inspirationlush.com
D.Y.I.N.G.
I love making friendship bracelets but this is such an awesome twist on an old favorite. I’m definitely picking up some embroidery floss and making one of these before valentine’s day. Time to pin this to my crafts board on Pinterest.
TheseTwoLanes.com
woooow i really love this DIY <333
i'll make this now!!!! tks <3
Another wonderful tutorial and love the colors. Thank you for sharing.
These are so wonderful, and perfect for Valentines Day since I don’t have money to spend on presents. Thank you so much!
OK, that’s really cool, but I do not have the nerves to make it myself! If somebody would like to send me one as a present, let me know and I give you the address 😉
http://streetlounge.blogspot.de/
super cute! do you have other tutorials with different patterns? not a fan of hearts but love them tho!!
http://www.twosipsafter.wordpress.com
Love this! I’ll try it immediately! =)
Love, idil,
MY JUNKY BOX
I like it !!! 😀
Adding this to my Friday Faves blog post!! 🙂
http://myhandmadehappies.blogspot.com/2013/02/friday-faves-2113.html
thanks for share beautiful webpage
Whaa! Thank u so much! I tried to find this pattern but i couldnt find good one. I’m so happyy now!
Whaa! Thank u so much! I tried to find this pattern but i couldnt find good one. I’m so happyy now! ♥
Woow ! Love this !!
Xo
http://www.blowmefashion.blogspot.com
how cute this is! I will definitely try this on weekend.
Awesome, love it! I’m going to do it this afternoon for some of my best friends. Thank you!
Hi Barbara! If you are seeking for best presents or gifts for your friends, you can visit my site
How are you getting them so smooth! Mine keep turning out bumpy on the sides? And how did you get them so thick? ugh!
erika, I think it depends on the quality of the embroidery floss. Practice is necessary as well: I have done many of these bracelets (not always with hearts) so now I can make quite good ones! (A tip: don’t tie too tight)
I’ve used to do these bracelets as a child…I totally forgot about it. Thanks for reminding me!
Oh.My.God. SO CUte!!!!!
With all the respect the instructions are not all that correct – or something’s wrong with my understanding.
In any case many thanks for the tutorial (I only had to improvise to get the frame-shaped hearts instead of full somethings that looked like hearts and double the size of the strands).
this is so cute! love it!
http://www.miouprincesslovespink.blogspot.gr
Thank you so much!! I created a bracelet, it didn’t come out like yours, I mean some of the hearts weren’t perfect but I guess I have to practice more!!! Thanks again for the instructions and the pictures!!
Okay, so I tried this because it is SUPER cute, and it looked NOTHING like the pics…even the first two rows and I was really careful to place all the pieces in the correct place. They all looked like each of the photos. Am I just losing it on this one? I really want to be able to do this with my daughter.
Thanks so much for the tutorial. I am sure that my novice D.I.Y. skills are shining through! LOL.
@Traci are you sure you are knotting each knot twice?? if you email us a picture of what the bracelet looks like as you’ve made it, we can probably solve the issue for you!
Thanks for idea ! 😀
I like it! Is so beuty! 😀 😀 😀
Nice work..kan i copy that description
Thanks for this! I’m making one now. Easy to follow. Awesome!
I haven’t made a friendship bracelet since I was a kid! These look fun though, and such an easy guide to follow!
Cute!!
I am old and slow…after I make the knot and tie off the ends, I am left with something resembling a bookmark. How do you connect the ends to actually make it a bracelet that will slide on and off your wrist? Thanks for any help.
awesome tutorial *-* I made it and it looked freaking amazing *-*
OMG its great! And soo hard!
thank u know i know!
I love this tutorial thank you so much its so clear and well explained im off to give it a go!
Spot on with this write-up, I truly think this website needs much more consideration. I
I just love this tutorial! Thank you 😀
xo
Just started to make these for my friends LOVE” EM!!!!!
They are super easy and fast!!!!
It is wonderful
It’s been asked before but I didn’t see an answer — how do you finish the bracelet so you can take it on and off your wrist without having to tie it in a knot and keep it on? I’d be keen to know since I love this tutorial :3
@Yukari the only way I’ve done it is by tying it into a knot. you can probably try sewing on a clasp and a jump ring to each knot if you want a closure.
wow..gelangku!!
wow…gelangku
I’m sooo glad i found this blog !! Keep the good work up :DDD
um… what happens if you use 3 colours? So like, 2 of one, 2 of another and 4 of the last?
Uhm hey, i had a question. Is the pattern 2 normal, 2 special or 1 normal 2 special? there was some confusion in the method :/
i love it <3
so cuteee! I’ll try it :3
i always love ur creativity but this one is really awesome. u r at the top
I think the string length is way too small. Maybe add another foot so instead of 24 inches each strand, you have about 36 inches.
(Unless of course you were going for a longer braid)
Another thing. I have been taught to tie the knot as tightly as possible when making friendship bracelets. But in this case. that won’t work out.
For the first knot, tie it tightly. Then, for the SECOND knot tie it loosely. That is how you can get it nice and BIG and stretched out. (The downside is that you are going to have more gaps in between each knot- but this is part of the design.)
Big hearts – one tight knot, one loose knot.
Small hearts – two tight knots.
Hope this helped anyone.
Definately going to try this!
♥ So nice and inspiring. It’s the first time that I see the heart pattern! Such a cool idea. I’ve seen all other patterns but not this one!
Where is the hook bracelet from?? I love it!!
mersi
After you do the one normal row to close the heart do you do another 2 normal rows or does that normal row that closes the heart count as the first normal row to continue on ? I would really like to get an answer ASAP. Thanks 🙂
I love your colors, please share where you got them??
These directions honestly sucked and i still cant make this bracelet. After two very frustrating attempts. So thankyou for a waste of time. Please try and be more clear. That would be nice
not like my predecessor, thanks for a clear description, maybe it’s that that i’ve done some similar bracelets before, but it made no problem to me;) such a sweet bracelet!♥ (i also think it’s better to take longer strands;) )
Thank you sooooo friggin much!!!!!!!!!!
xoxo Luv yas!!
Thanks so much! Really helped
please make this more clear
Out of my understanding its too hard according to me but I think its a nice type of friedship band/bracelet
this really isnt clear at all. i put the strands in the correct order, got to the 2 normal chevron rows, then when i did the special knot, i just got another blue chevron row. am i losing my mind? or do i just suck at making bracelets? please help.
not the best tutorial- a bit confusing!
thanx soo much loved all of your 15 summer camp bracelets keep it up 🙂
i love these! Look at my store on etsy to see similar bracelets for cheap affordable prices!!
Love this design I’m going to try making it. Thanks for the directions
omg thank u so so so much for posting friendship bracelet diys. can u post more?
I am just totally agree in a person thatdesigner mens bracelets as well anklet bracelets can be found most of these days in various designs, dimensions along with supplies. But every institution is not proves to end up being the best. Hope so ones facilities would be the best.
My use this to make gastroparesis awareness bracelets!
http://www.green-feathers.weebly.com
awesome of course,
my idea.
í tolditr to her!!!!!!!!!!!!!!!!!!!!!!!!!!!!!!!!
Ok so i tried this pattern for the first time and i dont no where i messed up. the left side looked perfect but the right side turned into a jumbled mess. If you have any tips let me know.
These are amazing… I can’t wait to make these for my besties!!
Yours are so perfect! I guess I’m trying to rush too much before knowing how to really do them. I think I’m going to make these for the girls on my swim team!
I cant wait to make these for all my cousions
I did it! And it got beautiful, thanks. I’m from Brazil and I was looking for a tutorial like this for a long time!
I love your wee heart ring, where is it from?
What a beautiful color!!
I want to make that,too.
Would you tell me the number of the color??
(pink and skyblue)
Cool! but is heard.
Has anyone else tried these? I can’t get mine to look like the pictures lol. Maybe I’m tightening the knots too much? but it doesn’t look completely symmetrical lol. Anyone have any advice?
Very good tutorial, very useful, very detailed inside.
cuteeeeeee
Ugly and time consuming useless item , but tutorial is very well done
Dear Erica, I just tried to make one of those beautiful bracelets…unfortunately I couldn’t finish it because the strands of 24 inches each are too short !!! Lilia stated this problem in a comment above but I didn’t see it until now. It would be great if you could change the length in the tutorial. Merci 🙂
Nina (from Germany)
this is rubbish it tells you to cut 4 of each no you cut 2 of each. stupid website
Thanks!!! i tried this….it was so BEAUTIFUL!! <3 i love ittt 😀
Awesome!
I don’t understand what is meant by Continue knotting over each color, towards the right, until the outermost color has carried over to the middle. This is one half of the chevron pattern.
I love this design…. but I may bracelet was way too short…. I think I would need way more string…. and the colours I picked kind of blended into eachother…. but I love this design!
Beautiful picture illlustration….thnx a lot !!
Oh gosh, this diy friendship bracelet is so cute, but it took me very long to put together. It still worth more than purchasing from a store, mine is made with love. Thanks for sharing =)
How do you get the knots to look so perfect?
THANYOU SOOO MUCH THIS SITE HAS BEEN SO CLEAR AND HELPFUL!!! THANK YOU!!!
The first 2 rows or the bracelet when starting are normal. On the left side you’ll do forward facing knots. (Shaped like a 4) until you get to the center. Stop. Go to the right side. These will be backwards facing knots. (A 4 shape backwards) Do a backwards facing knot to join the 2 sides together. That is for the very first 2 rows. Now this is where it gets tricky. For the first knot on the left side, take the second string and backwards knot twice onto the first one. . Then move that string and take the one you made the knots ON TO and forward knot the remaining strings until you get to the center. Now go to the right side and forward knot the string next to the last one. Don’t forget to make two knots. Make sure that one goes to the outside. Then backward knot the remaining strings until you get to the center. The two center knots should be the same color. Backward knot them together. Repeat those steps again. After you’ve done two normal rows and two special rows you should see the heart pattern. Just keep repeating, 2 special, 2 normal.
Thank you for this comment, it really helped me understand better. My bracelet is looking much nicer now. I was stuck on backwards knot, because the book I learned from taught left facing and right facing knots, not frontwards and backwards.
I just tried this and am halfway there and it looks like a blob. 🙁 You can see the hearts if you look closely, but from regular distance it doesn’t look good at all! After you close the heart, how many times are you supposed to do the normal pattern? I only did it once and I think that may be the issue.
Thanks, yours look so good!
awesome:)
awesome
es maravilloso ver las maravillas q hacen
OMG my twin sisters bday is on December 29th and I was thinking of making a whole set of bracelets for her u r so awesome idk if she will wear all of them but Ik I would I am turning 12 and they r the perfect gift for someone my age I have made a chevron and my friends were Downing over it my sis Karen she has this think called a forever bracecelt and she makes a cute bracelet and wears it 24/7 but at school this kid hunter (total hottie) cut it off just joking around we three r all good friends thanks bye kinda got off subject
Did tons of friendship bands as a kid but never a heart shaped one 🙂
AHHH MAAA GAAAD!!!!!!!
Even though I haven’t done this yet they make it look soooooo easy I will definitely try this after many searches for steps to do a heart bracelet this one stood out!!!!
Omg!!!!!!! This is SO AWESOME!!!!!! I am go ing to do it now!!!!!!
These are cute!!! I have made all designs!!!!!!!!!!
These are really bringing great memories flooding back to the early 1980’s , when i was hitch hiking across France and was taught to make various designs by a American guy travelling across Europe
He was selling them all over Europe and making enough to spend the winters on the beaches of Blali .
I earned enough to supply myself with a living whilst hitch hiking around France
just made this for my “little” sister… ignore the fact that we are in our late twenties, please 🙂 SO cute! i know it will brighten her not so awesome week
I love this bracelet !!! is so cute and adorable !!! Also, I want to say to this website congratulations because I don’t speak a lot of english and I have been searching a lot for different types of friendship bracelets but I never understood the directions because they usually don’t have pictures or step by step instructions etc. But, this specific website haves it and step by step, picture by picture it explains exactly how to do their bracelets !!!! So congrats and thank you a lot !!!! I will try to do this bracelet with my BFF right now !!!
So, I love this and wanted to send it to my 13 year old who does loads of these all the time. Sad about the rather uncool “WTF” in the name. Not ideal for her to hear it from me, although I know she knows what it means … Honestly.
I don’t understand u should make a video
I’m surprised that so many people are saying the instructions are confusing or not good enough? When I was a kid, I always tried to make these at summer camp, but I could never understand how, no matter how many times counselors or other kids tried to teach me. I assumed that when I tried to make this, I’d get the directions wrong and end up having it look like a tangled mess, but I thought these directions were really easy to follow, and while my bracelet doesn’t look quite as nice as these pictures, it still came out pretty cute!
I’m actually making another one and adding 3 normal chevron rows instead of two, so the hearts alternate in color.
I’ve been making these for years but they always look horrible! There’s holes and gapes and they twist up! I’ve googled it I’ve looked up tons of how tos but nothing changes! Help!!
@Taylor if it is twisting then it means you aren’t double knotting each time. they key is to double knot every single time! your bracelet should stay flat and as long as you pay attention to the pattern, you shouldn’t end up with any holes. good luck and let me know how it goes!
Amei, é lindo.
Eu tentarei fazer isso.
Obrigada!
This is so cute. Thanks for such a cute blog.
Hhhmm….I like it, and I’ll try it..!!!
great blog , loving the friendship bracelets
My wrist is 8 inches … should i also use threads of 24 inches ???
these type bracelets were popular back in the late 80’s. I made them all
The time in high school. They are super fun to make!
I recommend a beautiful bracelet http://ali.pub/6gl57
…Am going to try make my own version of this for my girl, never done anything like this before am going to fail :’)
I know this site gives quality dependent articles and other data,
is there any other website which offers these kinds of information in quality?
Wasn’t as complicated as I thought yet can come up with a great result
Did anyone think there were too many steps? Either way the bracelets came out GREAT!
I have a question about the pattern you are saying to tie two knots do you mean tie two forward knots on each strand?
i love your every craft……..they’re awwweesssoome
you guys are really trying…Thanks for sharing
I love this!!!!!!!!
Great tutorial, tnx for sharing :))) These bracelets will never get old i think ^^
Your bracelet are really nice ones. But please how do you end it and join it together?
I just fell in love with this pattern!
I will show it on my own blog, later this week. Hope this will not be a problem 🙂
This is so cute!! I make friendship bracelets constantly and I’ve never seen this one!!!!!
Hel, that’s amazing!!! I want to start and do my first bracelet, can you tell me which is the easiest one? http://gallerybro.com/friendship-bands-pattern.html
Very easy pattern to follow. Thank you very much for sharing.
Thiss post is in fact a good one it helps new internet users, who are
wishinmg in favor of blogging.
Where does the second bracelet from your hand on your right arm come from? The gold one with the circle and the loop?
🙂 We used your bracelet tutorial to weave a fleece chevron heart dog tug toy. Thanks for the easy to follow instructions – I had fun and the dogs are loving their new toy. We shared a photo at the end of our related post http://dalmatiandiy.blogspot.com/2016/02/diy-celtic-heart-knot-rope-dog-toys.html along with the link to your instructions if anyone is keen to make one of their own toy (or bracelet of course!).
Very poor instructions, Doesn’t show in detail. -rep
Good way of telling, and nice piece of writing to take facts concerning my presentation focus,
which i am going to present in university.
Uhm it says: repeat this special row for the 4th row…but in the same sentence I structure you to involve the outermost strand, which is not done in the “special” row instructions…to me this is a paradox…how can I repeat something by doing something else? Please help…I’m a broke incompetent boyfriend
Instruct not “in structure” f***in phones
Ignore all the people who are saying they can’t follow it. I’ve never made these before and I just made one which took me 5 minutes. Instructions are so easy to follow and clear. I would like to say it’s idiot-proof… but I guess not. Going to make loads more of these. Turning them into collars for my cats 😀
Wow, that’s what I was seeking for, what a data! existing here
at this weblog, thanks admin of this website.
So I started making it but the hearts didn’t come out extremely well, so I just ended up doing the normal one without the hearts 🙁
amazing!!it worked for me
Hi, would this work with 6 colours? I’d like to do one in Pride colours for my niece and her partner.
hi,
Thanks for such a relevant blog… this is a great blog, which provide the relevent info.
Laundry Service in Gurgaon | Dry Cleaners in Gurgaon
This is freaking awesome!!!!!!!:O
Can we do this with two strands of each color???????
Disfunzione di erettile amex visa mastercard online generici base a erbe sildenafilo lieve-moderata cialis
these are soo cool and amazing.
but hard to do.
I think and prefer u do a video about that.
Couldn’t follow the instructions! (second row didn’t work out to be the same layout). not precise enough
Thank you for the instructions on making this bracelet. I love it!
Make Ringlet Resin Pendant, New Style and New Design
http://www.instructables.com/id/How-to-Make-Ringlet-Resin-Pendant/
Very easy pattern to follow. Thank you very much for sharing. I am also a fashion blogger and writes about fashion jewelry. Read out about our handmade semiprecious gemstone jewelry here.
In playing blackjack you must bear in mind the straightforward rules with the game to
be able to get hold from the right process to use. Domestic Bliss: If game meat is
a bit exotic for you that’s okay too, the very best various traditional beef are veal,
pork or lean beef, if under consideration a lean cut, they may be still good to suit your needs, and extremely tasty.
The closer you’re to the green the more you’ll have to think of different finesse shots
to accommodate the distances and shot requirements.
I tried it and it didn’t work. Can you be a little more specific on the actual heart shape? It was confusing.
Stunning beautiful diy bracelet. So beautiful. Haven’t tried knotting work before. Add to my gift list.
Hello! Could you help me, please? I can’t find those fabulous DIY white thread earings ((( I only remember There was a girl with denim shirt on the photo. I need the how to so much! please help! )
This is the coolest bracelet I’ve ever made. And the step by step instructions really helped.
can you make this smaller and use only 6 strands?
Truly beautiful!
Hello i am gabriel i love armbandjes
Sterling silver chain bracelets
Awesome work! Very nice and cute! Love all your bracelets! xo, Jerry’s Apparel
https://amazing-galaxy.com
bellísimo, bien explicado
I want to make them for my Louis V de Griffon (9 months ) Griffon Bruxellious a small dog build more like a pussy cat. They would be used for his collar. Do you think I should you use a crochet yarn for more strength?? Thank you in advance.
You can use crochet yarn but embroidery floss would definitely be strong enough as it is!
Tried it and they turn out wonderful! I’m in a rehab nursing facility at the moment and we are on lockdown due to corona virus. This was so helpful to pass the time. Thank you.
I love these things!
it so cooool
The steps were a bit difficult to understand in my opinion, but it was fun and looks amazing! Totally worth it!
What if I want to make a design with one color for the background, and two alternating colors for the hearts (pink background, purple heart-green heart-purple heart-green heart)? How would I do this? Cute design 🙂
Thank you for showing me how to make this! I had a fallout with one of my friends and I needed a sorry present. She absolutely loved it!
these are adorable!!!!!
This is sooo cute! I can’t wait to get started thank you for the pattern!!!
I love your friendship bracelet designs! I’m showing all your posts to my almost 10 year old daughter in hopes of her wanting to create some of these with friends at her upcoming birthday party. Do you have a way to create a closure that’s better than a knot? Do you use jump rings or tie them in a way that they are easy to get off/on? Thanks so much!
love it
Wow so cute I love them
Another wonderful tutorial and love the colors. Thank you for sharing.
Thank you it works great!!
Thank you it works great!! My friends love it.
Wow! You can be cured from hsv-1 with herbal drugs..it worked for me__________________ Rob insonbuc kler [[ yahoo….com]]…………………….
[Arthritis.
[Herpes.
[Love spell to get ex lover back.
[The Opioid Epidemic.
[Obesity.
[Infertility/Impotency.
[Eye Problem.
[Fibroid Tumor.
[Enlarge Prostate.
[Erectile Dysfunction..
Codes can be digital or physical cards that you purchase from Microsoft or a trusted retailer.
From a web browser, go to redeem.microsoft.com or
microsoft.com/redeem Enter the 25-character code, select Next, that’s it.
I was wondering if you could send me a copy of the Heart DIY pattern friendship bracelet, Iam having a hard time making the bracelet
My address is 151 Farnsworth Rd N Rochester Ny, 14623
Cool stuff you have and you keep overhaul every one of us
You have done a amazing job with you website https://www.betmantoto.org
wow such helpful writing ✍️ .
loved your content about DIY bracelet charms.
They are so cute
this bracelet was so easy! I tried it a theneon tea party but I was super hard 🙁 found this and wow so easy!!!!!!!!!!!!!!!!!!!!!!!
love this is my new fave bracelet