After 5 years of conceptualizing jewelry, home decor and accessory tutorials on HonestlyWTF, I’m beyond thrilled to announce that I’m finally launching our first series of DIY kits with MakersKit. Today! Hooray!!! What took so long, you ask? I’m an absolute stickler when it comes to quality – which is why I search tirelessly to find you guys the right supplies so that you can create something that is beautiful, functional and long lasting. Crafty doesn’t equate with cheap in my book. So when the amazing masterminds behind MakersKit understood my biggest concern with packaging tutorials on a mass scale, I knew I found the right collaborators for this obvious, and exciting, next chapter!
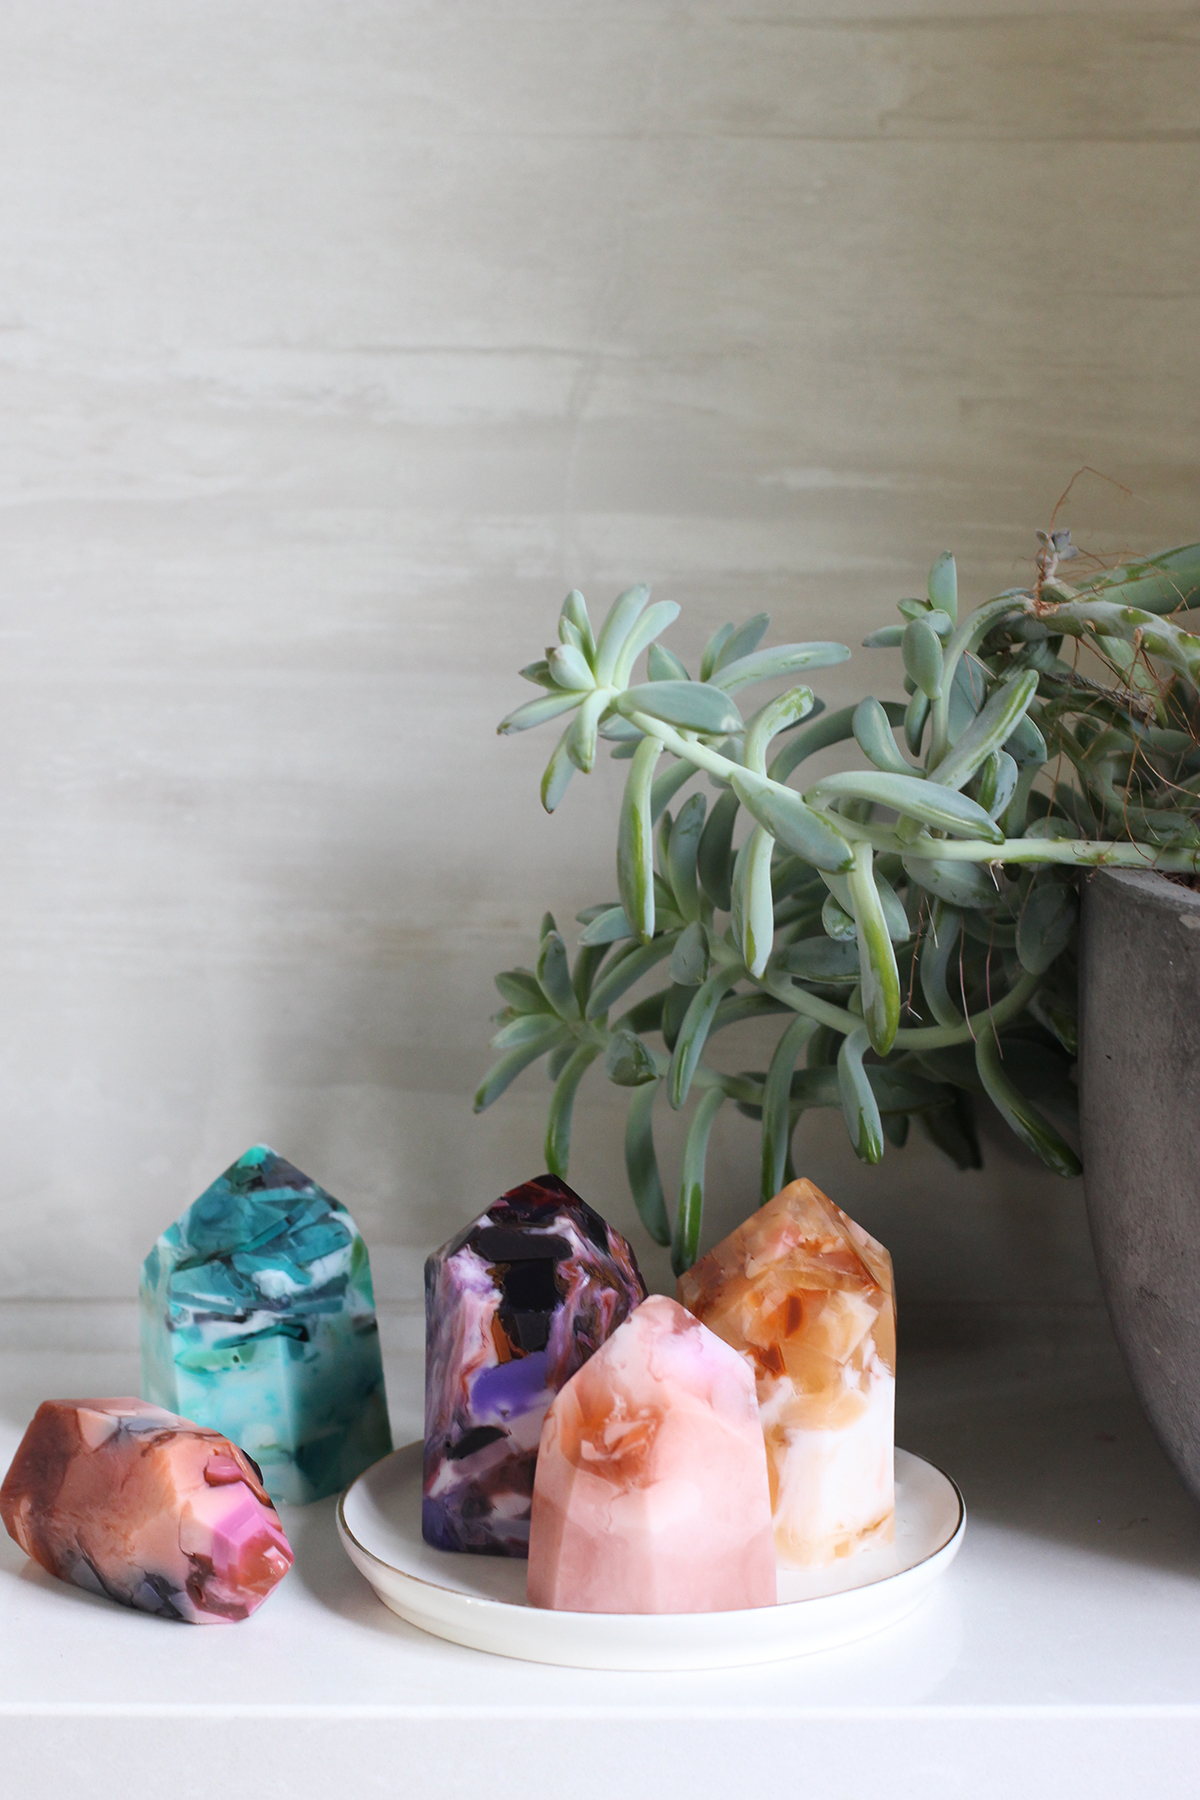
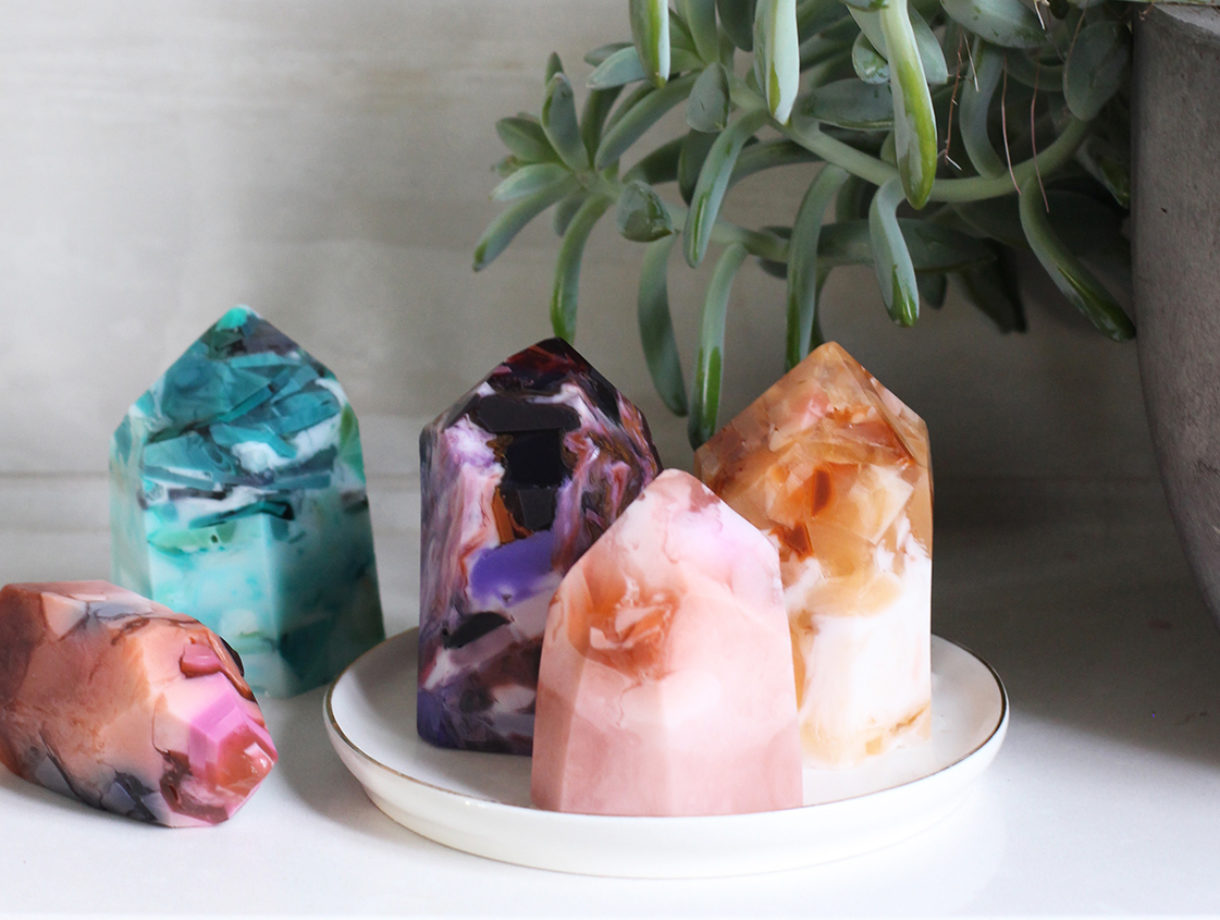
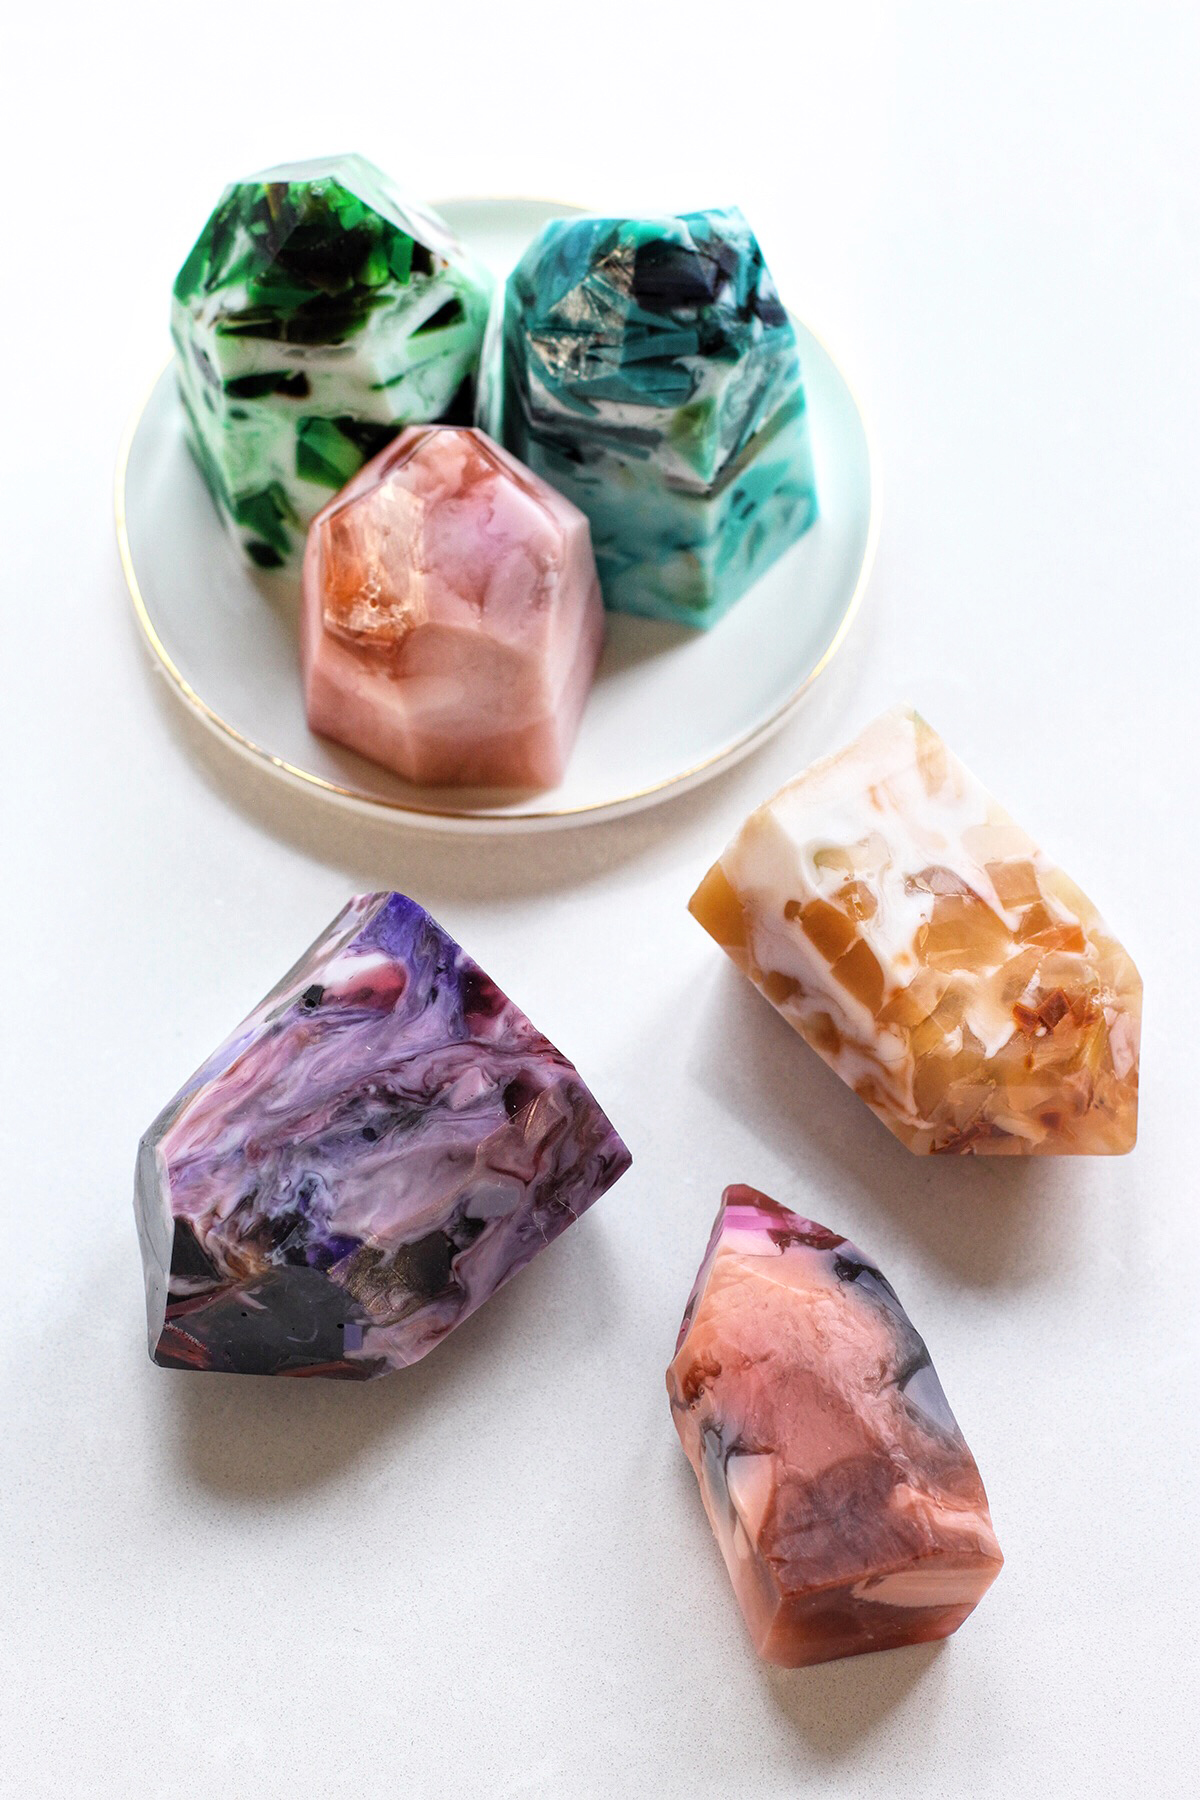
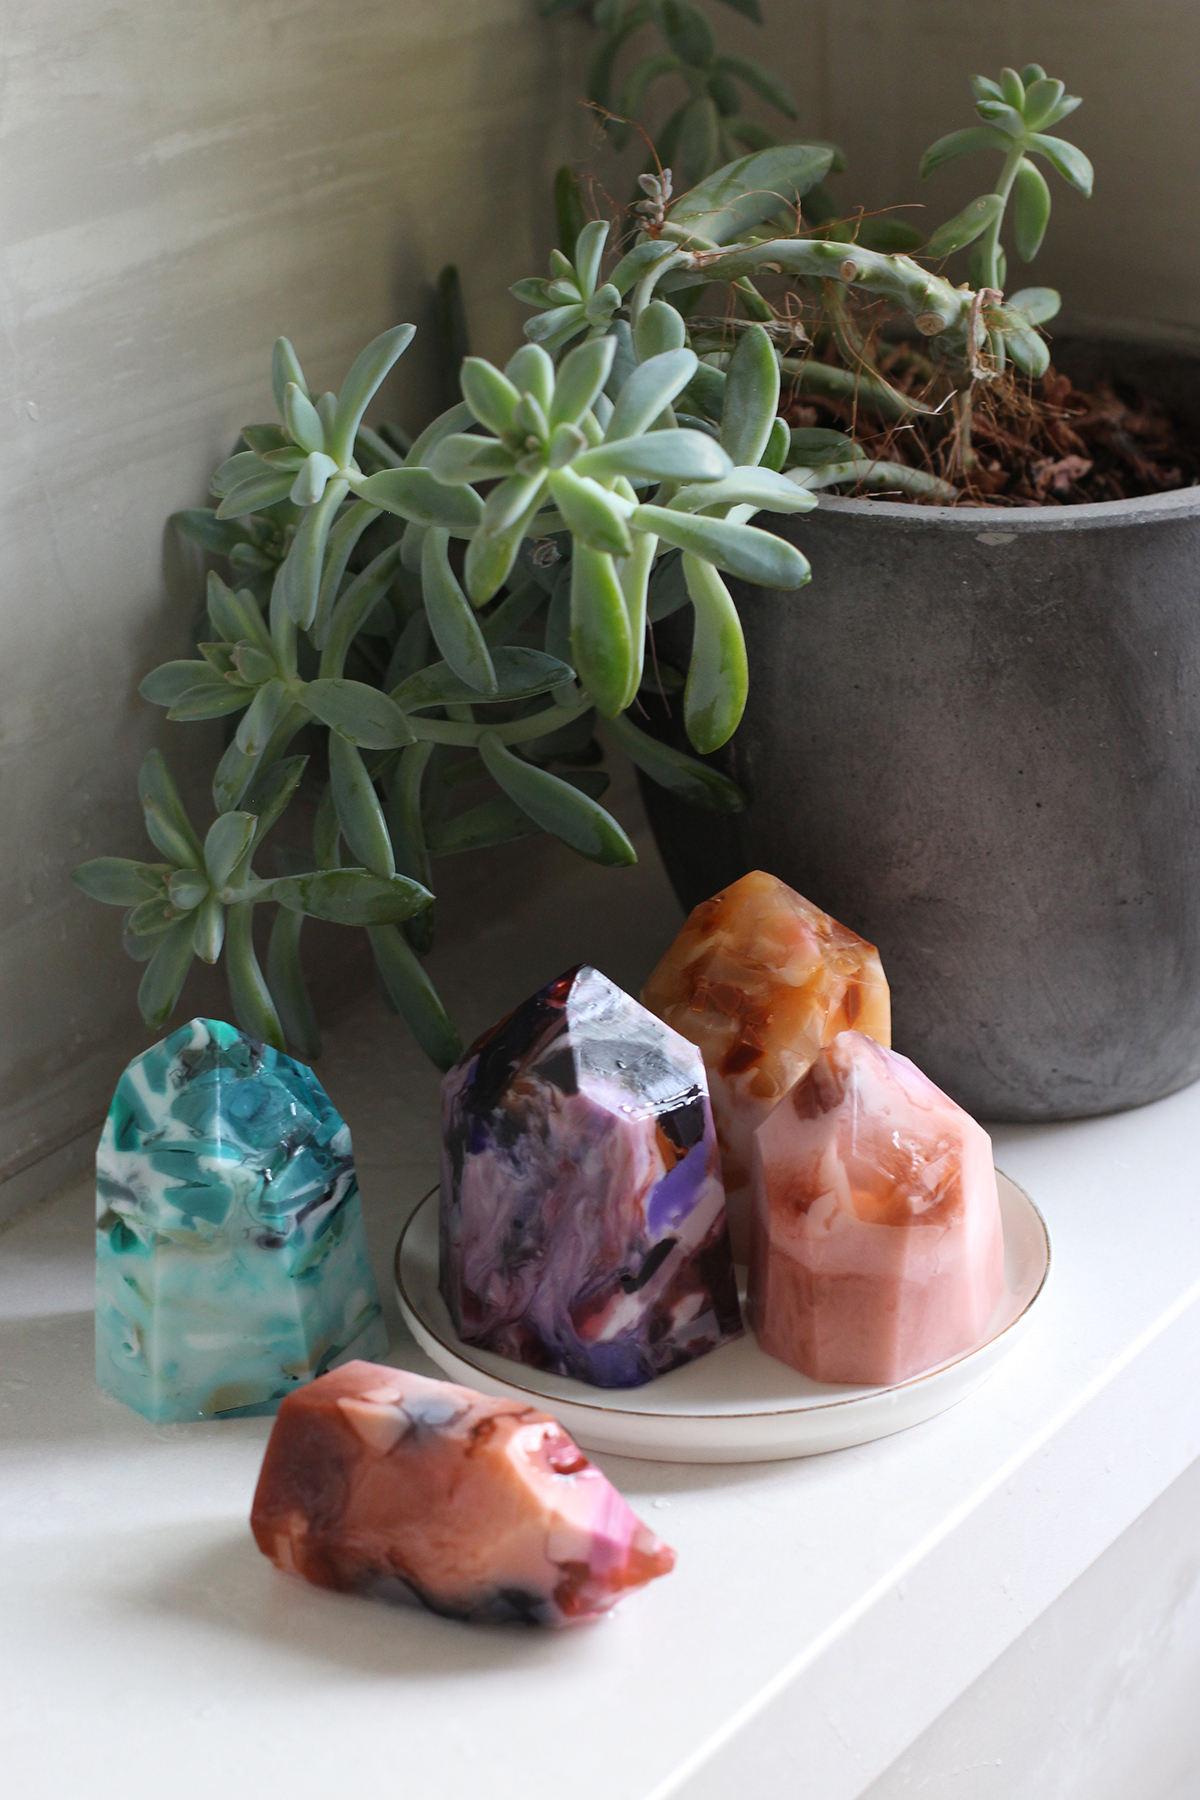
After months of planning, testing, and sourcing, our year long collaboration with MakersKit launches today with this soap kit. That’s right, these beautiful gemstones and crystals are actually soaps! They are ridiculously fun to create and make for impressive gifts.
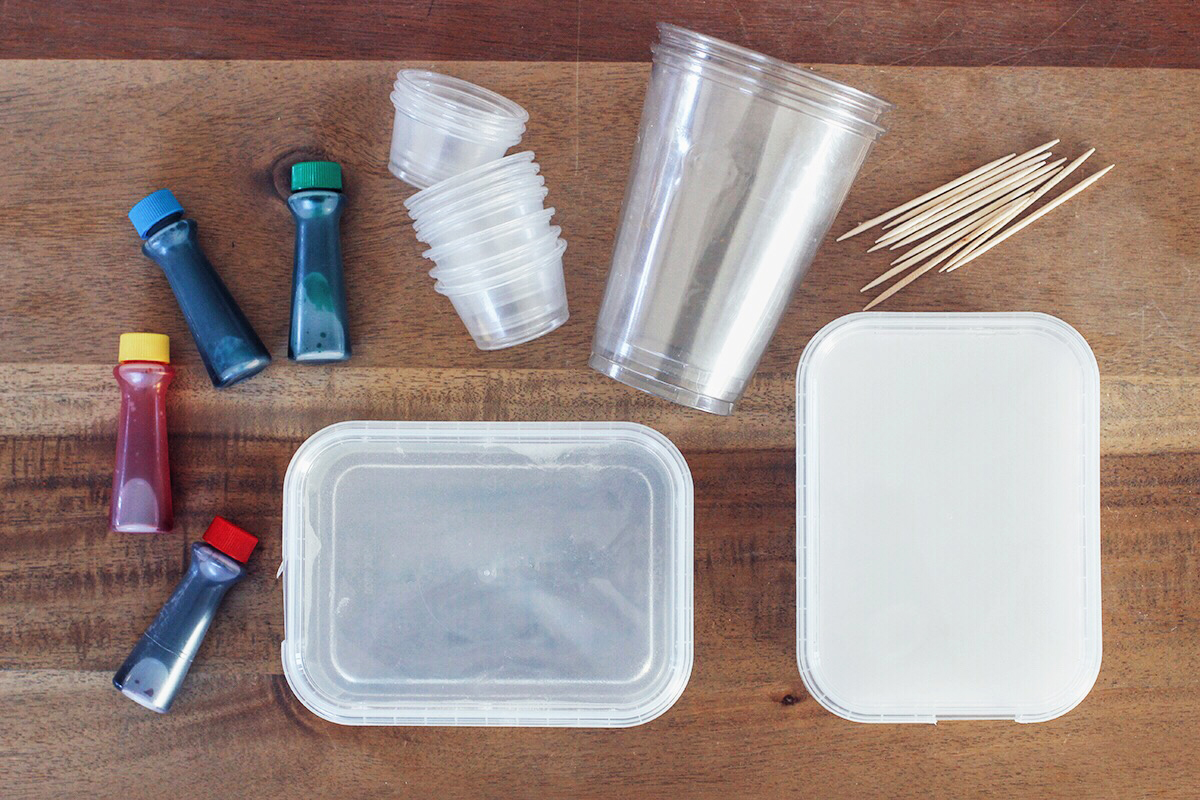
Each kit includes (makes a minimum of 2 soaps):
- 1/2lb each of vegetable based clear and opaque white soap bases
- red, yellow, green and blue food coloring
- 10 small, reusable mixing cups
- 2 soap molds
- toothpicks
You’ll need:
- a microwavable glass or measuring cup
- paring knife
- cutting board
- scissors
- fragrance oil (optional)
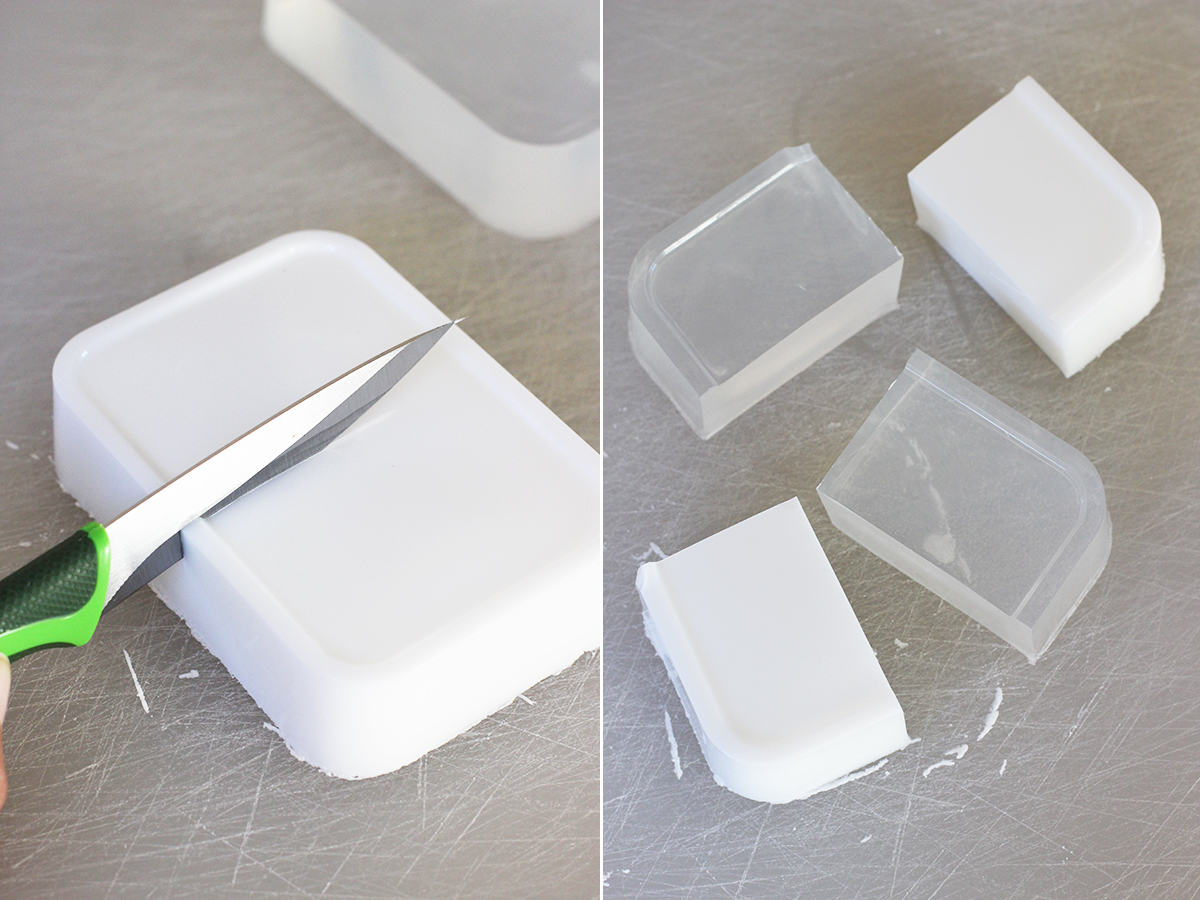
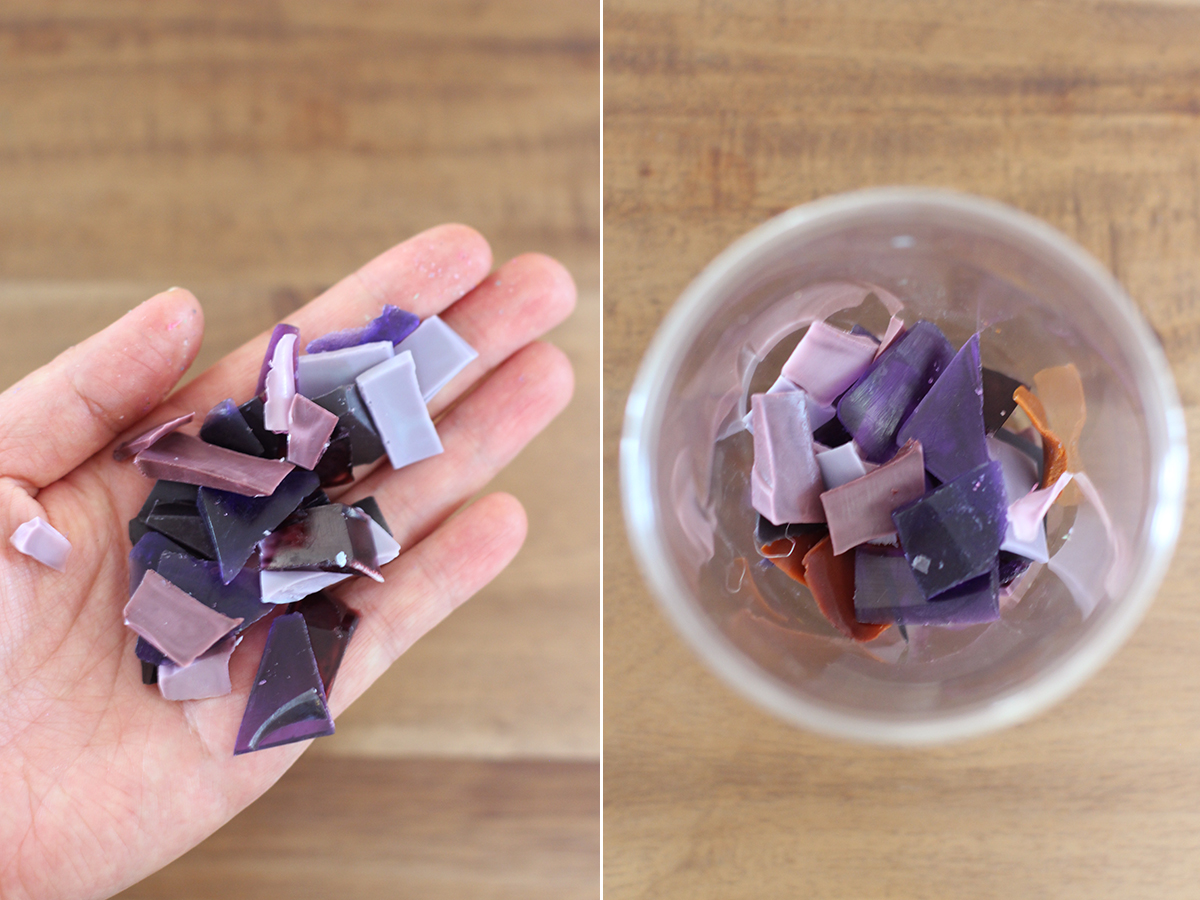
Start by cutting each of your soap bases in half. Reserve the clear and opaque halves for your 2nd gemstone soap – the kit will allow you to make a minimum of 2 soaps in 2 color ways. Cut the halves in half again. One quarter piece of the clear and opaque soap will be used mix colors. The other quarters pieces will be reserved for the final mold.
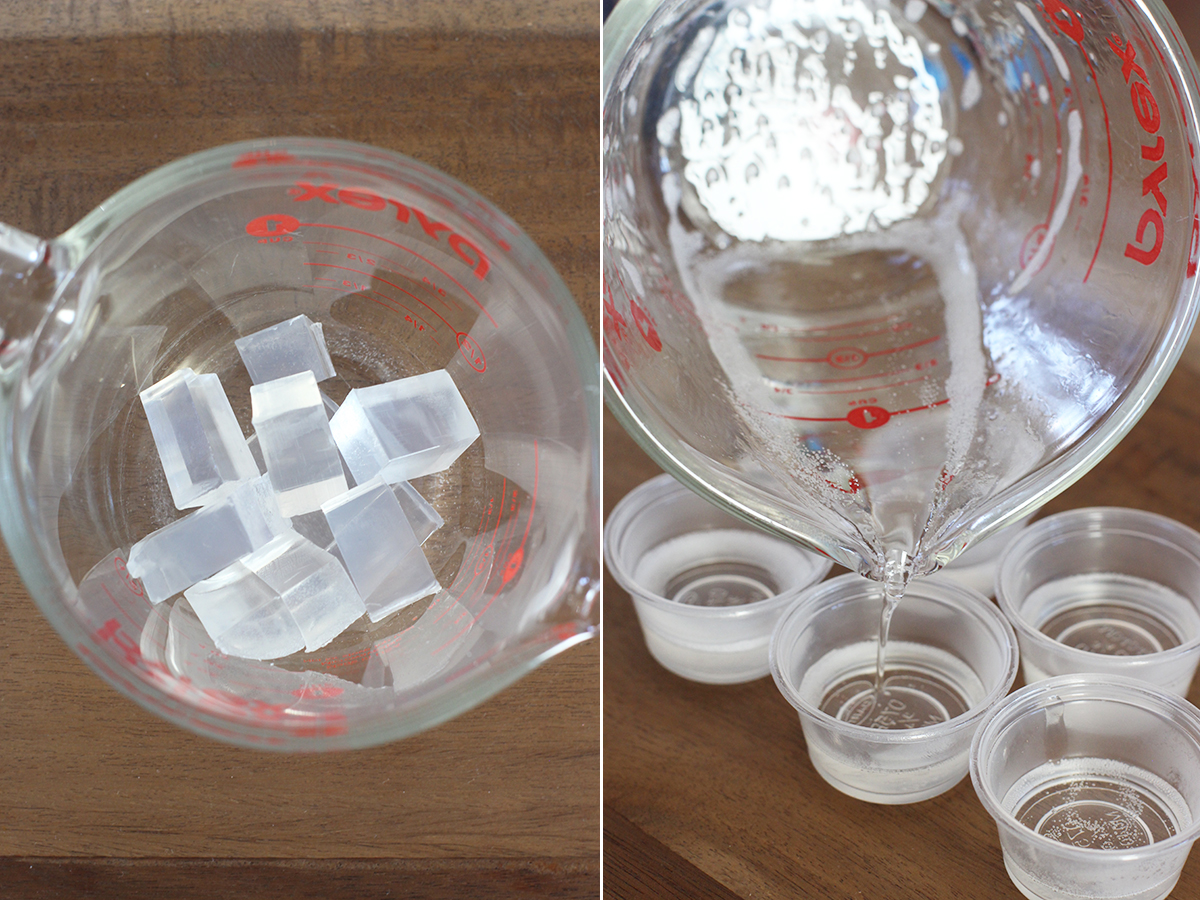
Cut the clear soap into small chunks and place into a microwavable glass. Microwave for 40-60 seconds until completely melted. If you want to add fragrance, this is when you’d add your oil. A little goes a long way so don’t overdo it! Divide the melted soap evenly into 5 small mixing cups.
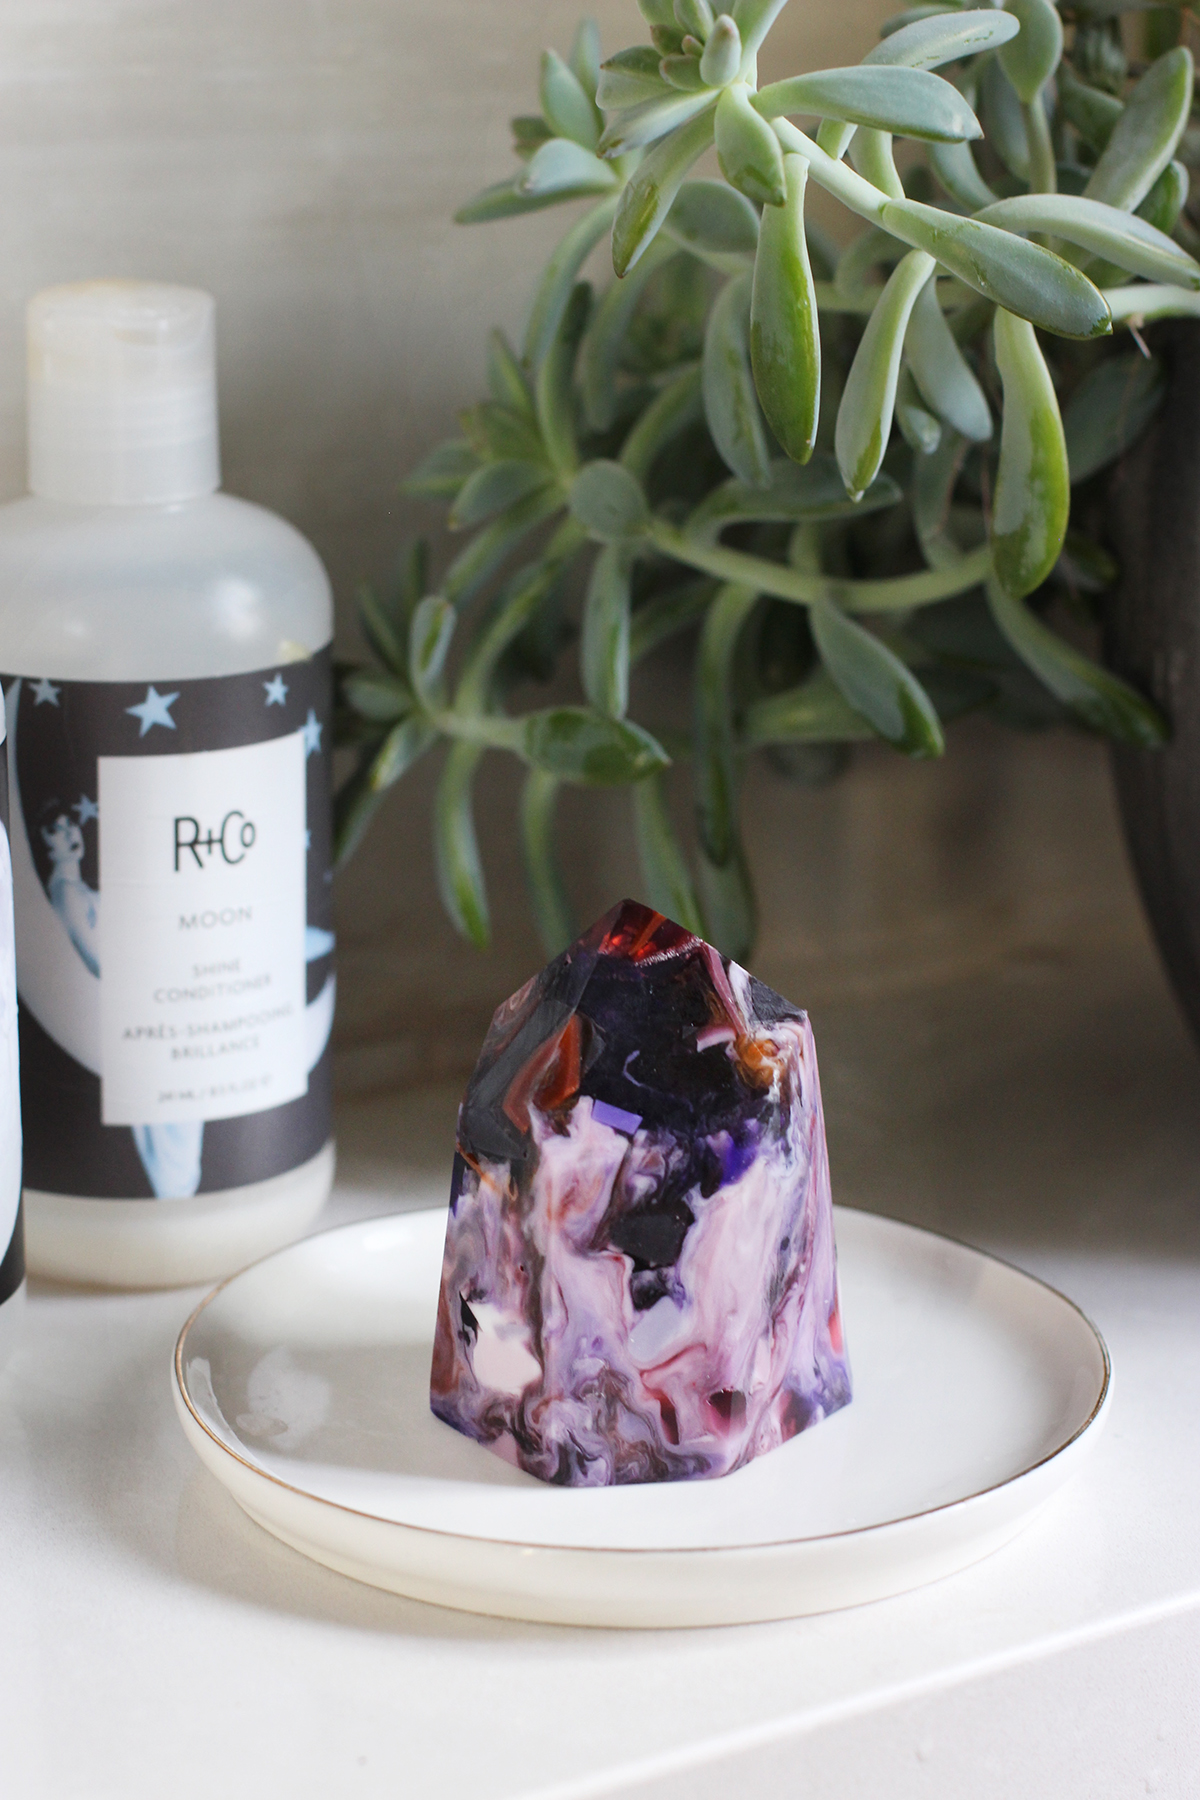
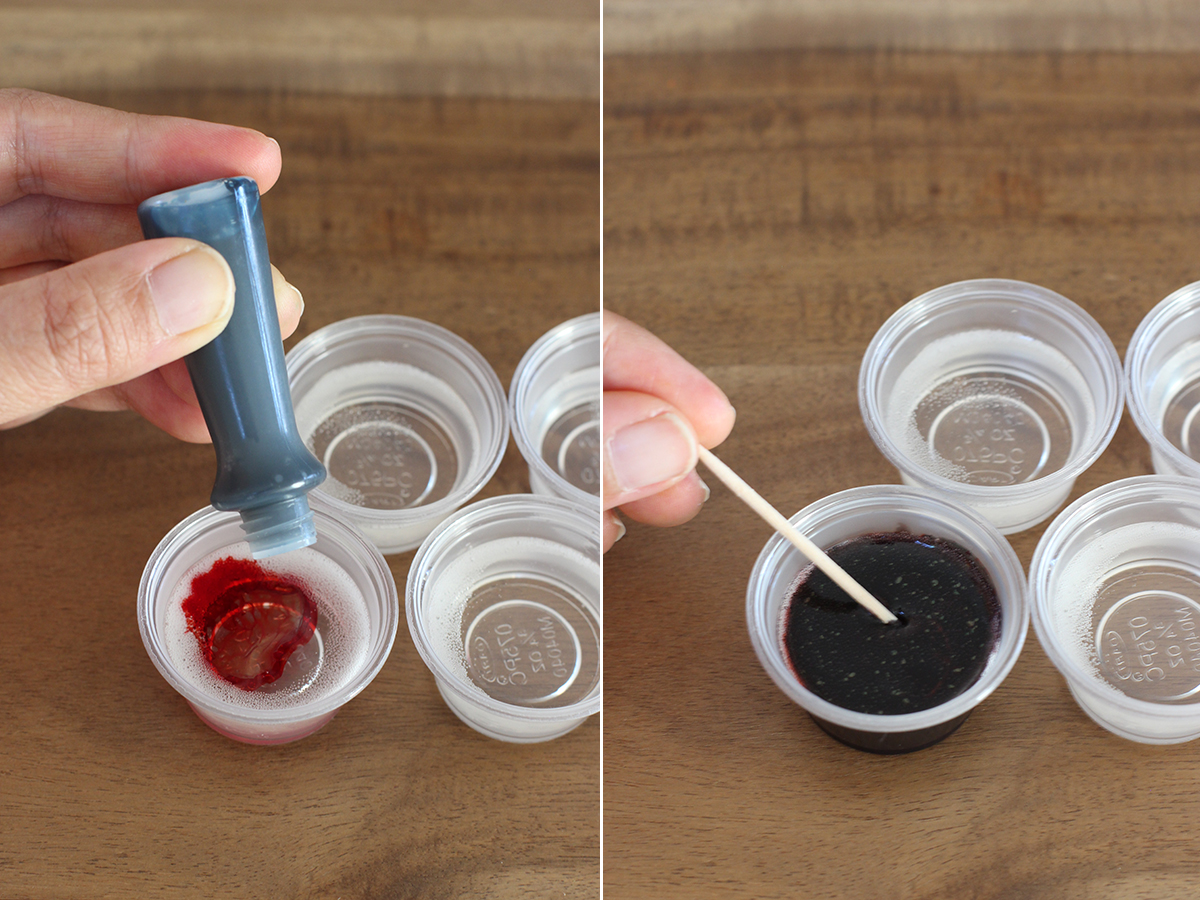
I’ll be making purple here which means I’ll need to mix blue and red. Start with the darkest shades first. One drop of each color should really be as dark as you’ll need to go. Slowly reduce the amount of food coloring after each subsequent mixing cup. Use the toothpick to extract the smallest amount of color from the bottle. Again, a little goes a long way! Mix each color thoroughly with a toothpick. If the soap starts to set, then pop them mini cups into the microwave for 4-5 seconds and mix again.
Color combination tips:
- red + blue = purple
- red + yellow = orange
- blue + green = cyan
- green + yellow + red = brown
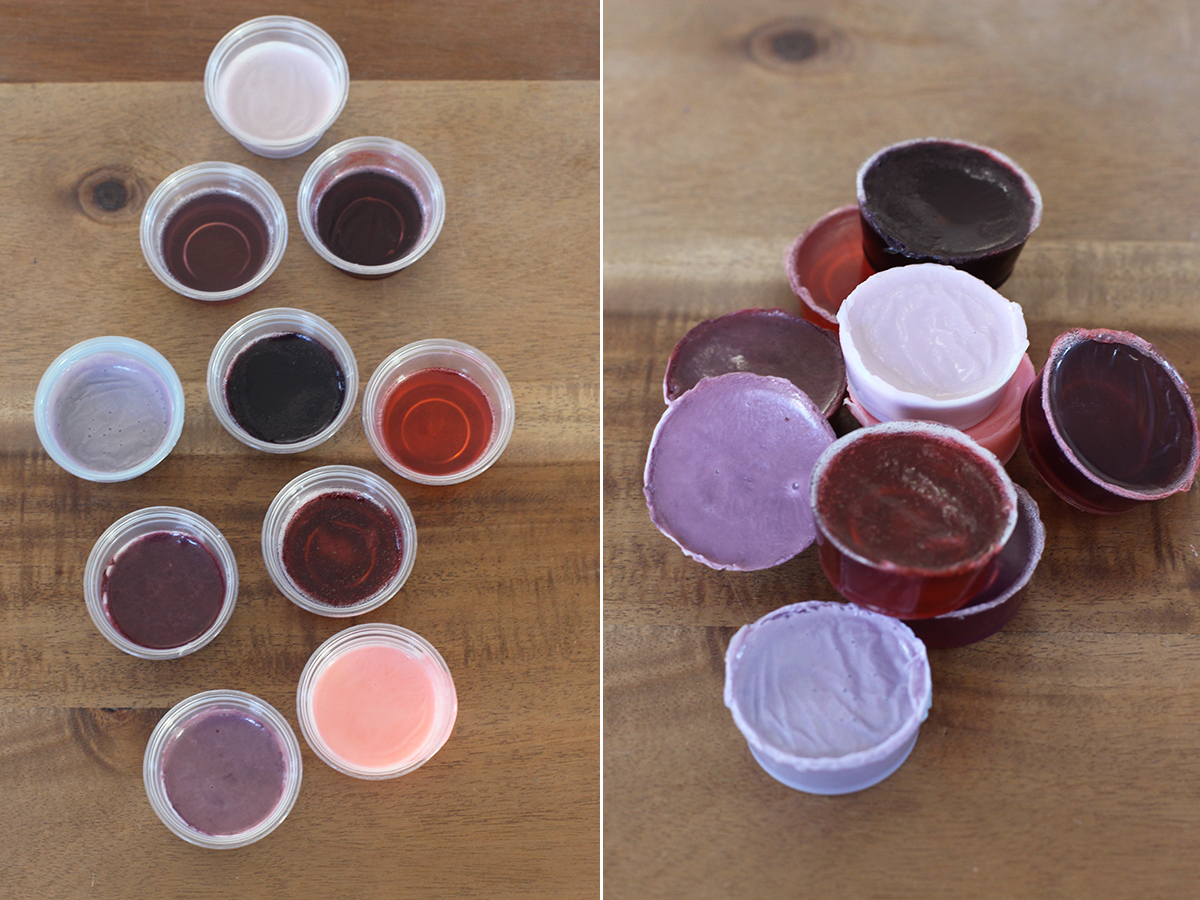
Repeat the same step with the quarter pound of opaque soap base. Allow to set for at least an hour or so. Once they’ve cooled and hardened, turn them over, use your thumbs to push the bottom and they should pop out easily. Save the mini mixing cups as you’ll be able to reuse them over and over again.
Slice the colors into thin slices and small shards. Mix the colors randomly and drop them into the soap mold. The looser and more random, the better. I like to place the darker colors on the bottom and lighter colors on top but again, don’t try to get it too uniform!
Melt the quarter piece of clear soap and pour into the soap mold. Then melt the quarter piece of opaque soap and pour into the soap mold.
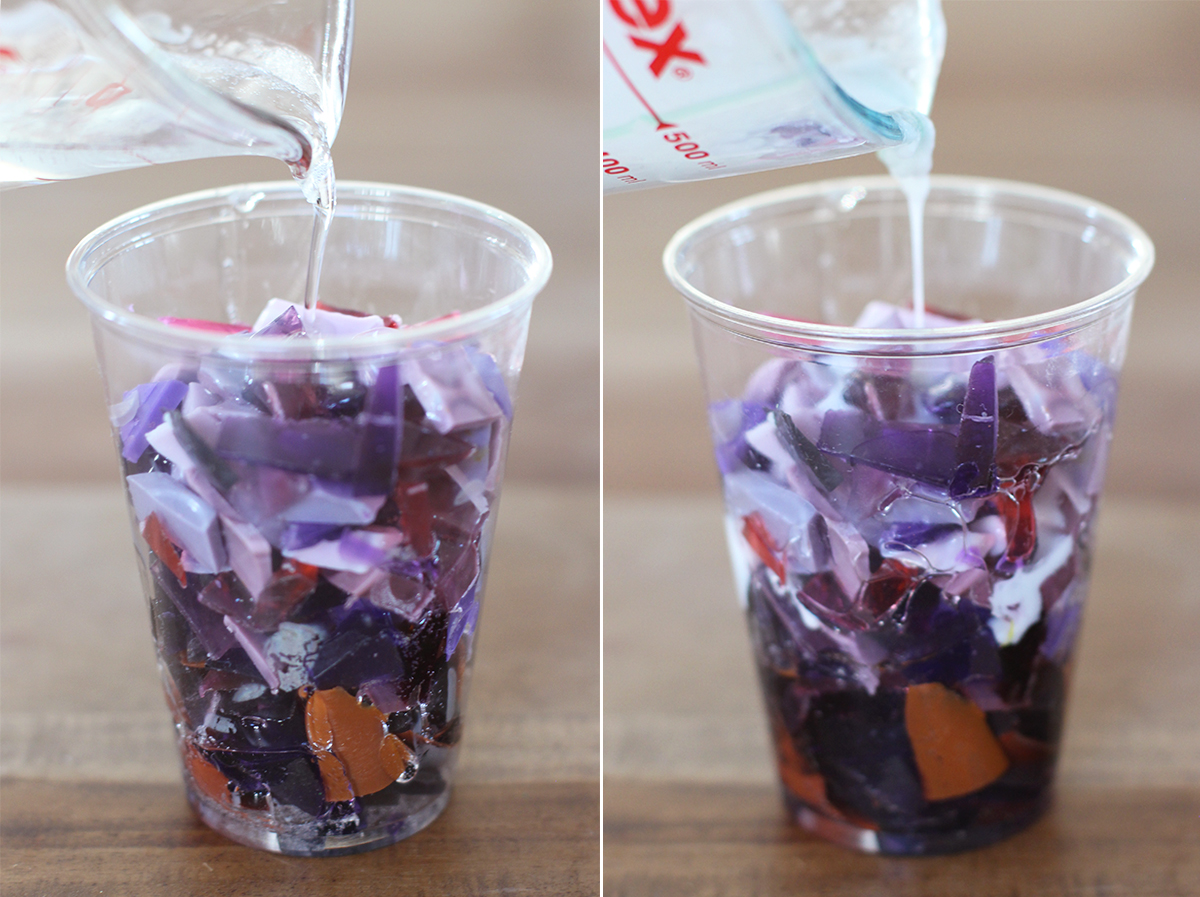
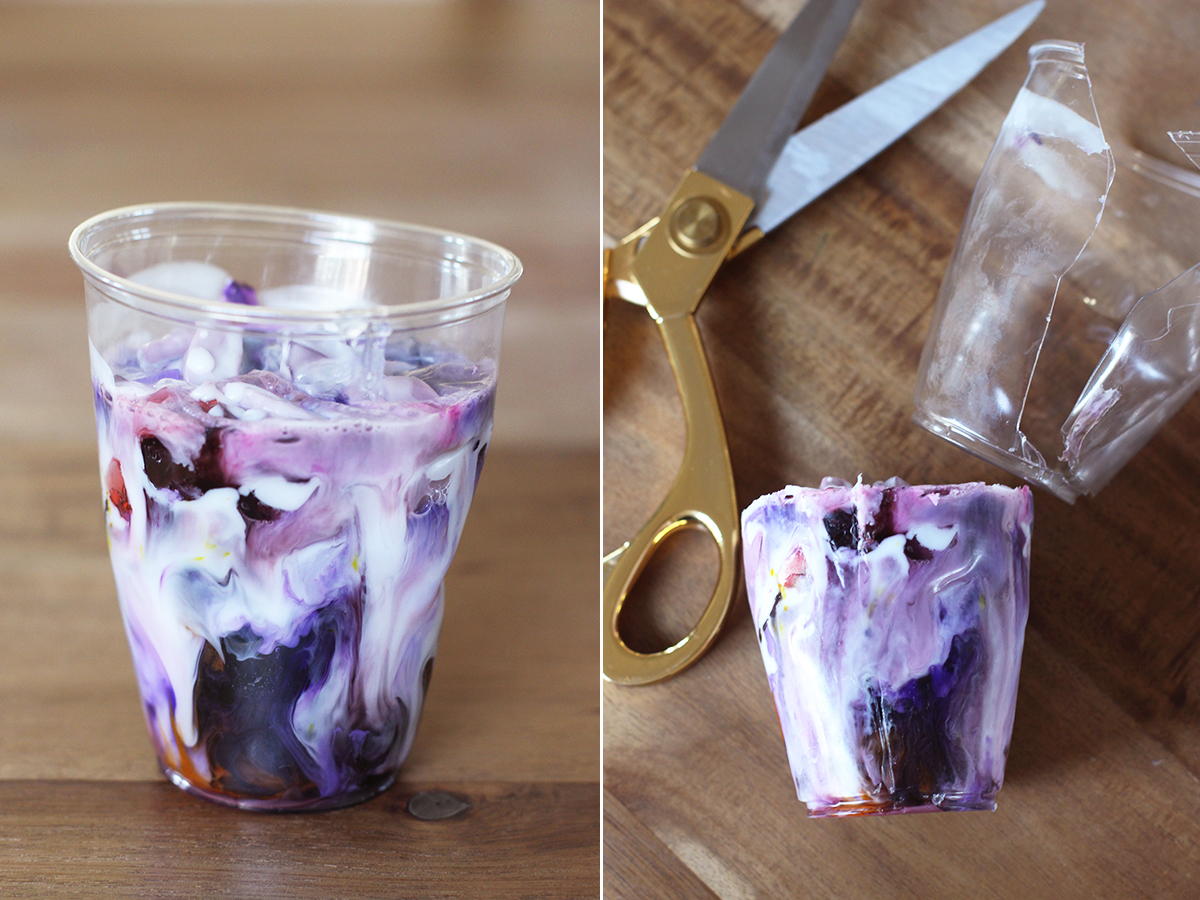
At this point, you can even pop the entire cup into the microwave for 5 seconds – just so the colors melt together more naturally. Or you can leave it as it is. The cup might warp from the hot soap – it’s okay. Just keep an eye on it if you do decide to put it in the microwave – you don’t want to melt a hole in your mold! Allow to set for a couple of hours – you can even pop it in the refrigerator if you, like me, don’t have the patience to wait. Once the soap has totally cooled and hardened, carefully cut the mold open with a pair of scissors.
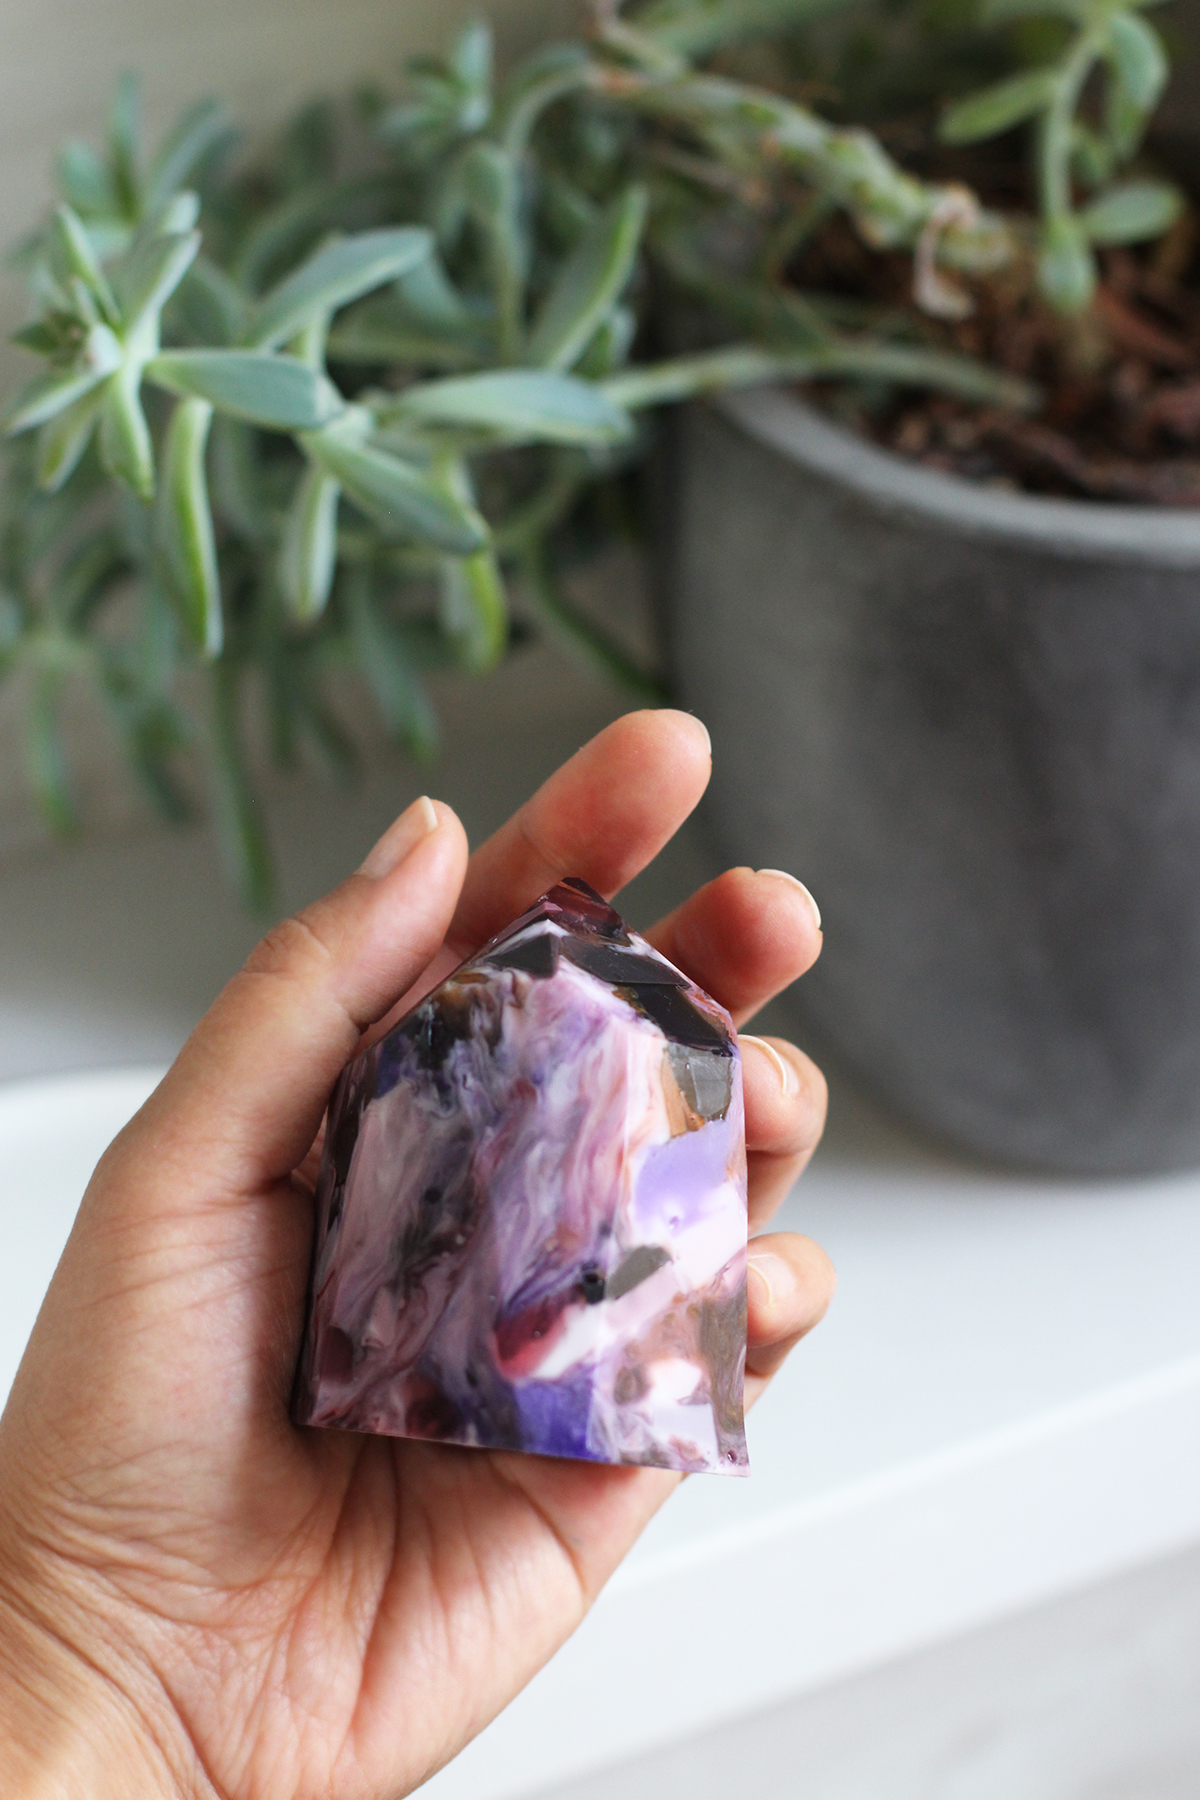
Place the wider end on a cutting board and use a paring knife to cut 5-6 vertical edges at a slight angle. Then cut the top into a point at 5-6 more exaggerated angles.

And voila, that’s it!
A few more tips:
- Save all of your scraps. You can cut them up and reuse them to make more soap!
- If you want to give them as gifts, wrap them in tissue paper or cellophane.
- You can make 2 soaps per mold if you cut the molds in half vertically – you’ll just end up with narrower gemstones
- And most importantly, have fun!
This gemstone soap kit is just one out of 4 kits to be launched every few months in 2016. Head over here if you’re interested in subscribing for an entire year of HonestlyWTF DIY kits! I should mention that a 1 year, pre-paid subscription saves you $, plus a $10 MakersKit gift card. I promise you’ll love the rest of the kits to come!
We’re also giving away a year long subscription for those of you who wanna test your luck. Head over here to enter!
(images by HonestlyWTF)
They are amazing. Honestly, they are too beautiful to even use!
https://www.makeandmess.com/
I’m dying a little inside! Love these sooooooo much! Thank you for sharing!
Love, Yas
yasminas.se
You are so talented. I’m so excited for this!!
I LOVE this!! So pretty!
si es muy bonito pero no puedo
Really unique and beautiful soap that look like precious jewels! They will make amazing gifts for sure!
Prudence
http://www.prudencepetitestyle.com
Those soaps area absolutely beautiful and a huge congrats on the collaboration, how awesome!
xo
styleontheside.com
SO in love with these!!! <3
This method looks SO much easier compared to soap making when starting from scratch.
Thanks for sharing, and great collaboration!
XO http://www.maybebycatalfo.com
Contemporary bridal fashion
Wow, these look beautiful! At first glance, you’d never think they were soaps…Would love to try this!
Christina ♥ https://caliope.name
Thank you so much for sharing, I LOVE this DIY, so beautiful! I really wanna try it!
xo, Esther
http://bubblesther.com
Oh wow this is so exciting! These soaps look incredible – almost too good to use?? 🙂
Hannah x
http://crafternooncabaretclub.com
Wow! I am in Love, perfect gift idea
http://crownedondrea.com
Very cute 🙂 I honestly didn’t think they were soaps at first!
OMG! This is the most beautiful soap i have ever seen…Really! Thank you for sharing the steps, I am now intrigued to try my own 🙂
Eugenia
http://www.diamondsandspikes.com/
fashion / lifestyle / beauty / moscow-budapest
Hey, I love everything you ever post, but wont these soap dye?, I mean, food colorings tend to dye your hands when you use them and it’s not that simple to take them out. I know this is soap, but still I wonder…
@Germanita good question! They won’t dye your skin or your soap dish, shower or bathtub (as long as it’s not non-porous). So little dye is used in each bar of soap that it’s not nearly as concentrated as dye straight out of the bottle. Just think of it like colored frosting!!
So in love with this DIY!
x
I love this DIY! These soap gems are so cute!
Love this idea!
Hi, stupid question… I tried this at home, as I had the materials… But, how do you manage for the food colouring to not dye your hands? The color, even when the soap is created, dyes everything!!!
Thanksss
Put on some gloves
These are so cool!! Thank you for sharing your genius with us!
Wow that’s amazing! So pretty. I want these for my home and they would make really cute gifts. 🙂
Sally x
http://asprinkleofsally.blogspot.com.au/
Wao!!!! great work like the previous ones….We are in natural gemstone and understand the value of gemstones. These are so cool stuff. Thanks for sharing such a beautiful creation with us
Gaga Milanoスーパーコピー時計販売、 はガガミラノスーパーコピー通販専門店です . 0.267826628 レプリカGaga Milanoのクラスプ: 展開 . 製品はされています高品質ガガミラノと低価格で提供,、コピーぜひ一度当店の商品をお試しください。宜しくお願いします(^_^)。 . スーパーコピーガガミラノ時計Blog: http://www.ooobag.com/wallet/louisvuitton/index_7.html
そしてシンガポールから上場グループ高登(Cortina)は4月以来台北101でMALL咲いHarry Winstonなど8大ブランドの大きい後、2か月近くには、宝のプラチナ表大きい登場しない于新宇グループを時計メーカーが直営大きいルート、高登時計を表展経営モデル開発大きい、所耗费コストが高い、相対的に回収も遅い。 http://www.newkakaku.com/gb1.htm
スイス梅表(Titoni)跨界とドイツ出身の中国芸術家张奇開協力発行アーティスト腕時計。今回のテーマは「アーティスト腕時計が大気圏に再突入するNo . 1」は、1、超現実し単身空間の中の可愛いパンダは、未来を地球へ伝達式、気候変化による生態の危機。梅表を表現する特別テーマ、環境及び地球の関心。ジェイコブ時計スーパーコピー梅表表示につき1本の腕時計は、透過時報文教基金会の植樹を育てる計画は、お客様の名の愛を育てる株苗にこたえて、緑生き、地球を愛する善尽企業の社会的責任。 http://www.bagkakaku.com/vuitton_bag/2/N48180.html
確かに気まぐれなエマニュエル・ブーシェの合併症についての1つの時計のように膨大な量があります。今でも、エマニュエル・ブーシェの合併症の2つの作品であるので、私は我々がブーシェ氏の心から期待したいことがたくさんあると思います。 http://www.newkakaku.com/lb1.htm
Gaga Milanoスーパーコピー時計販売、 はガガミラノコピー時計販売・通販店です . 0.316883211 レプリカGaga Milanoのマーカー: ローズ ゴールドのアプライド インデックス ガガミラノOTコピー、SS品、N品、価格、品質の保証,2015人気偽物,歓迎光臨楽天★送料無料(日本全国) . レプリカガガミラノ時計Blog: http://www.bestevance.com/rolex/daytona/index.htm
フランス語で「舷窓」を意味するブランド名通り、ウブロスーパーコピーはビス留めのベゼルをシンボルとする時計界の風雲児的なブランドです。1980年創業の新しいブランドで、デビュー早々ゴールドケースにラバーストラップを組み合わせるという当時としては”常識破り”の「スポーツ1520」を発表し、一大センセーションを巻き起こしました。その最初の顧客が軍事クーデターで国を追われた元ギリシャ国王コンスタティノス2世であったことも、伝説的な語り草です。キッチュとも言える組み合わせの妙は、正当的な高級時計に飽きた王族などの上流階級に大人気となり、ウブロ時計コピーは”王の時計”とも呼ばれました。 フュージョン=融合をコンセプトとするウブロは、その後も伝統的な時計作りと革新的な発送を融合させて”常識破り”のウォッチを発表し続けています。ゴールドとラバーの組み合わせが他社に追随されると、今度はタンタリウムのケースにチタンのビス、タングステンの自動巻ローターといった仕掛けを施し、さらには文字盤も目盛りも針も真っ黒という「オールブラック」モデルで意表をつくなど、常にスーパーコピー腕時計の世界に新風を吹き込んでいます。 http://www.newkakaku.com/xinb1.htm
Gaga Milanoスーパーコピー時計販売、 はガガミラノコピー時計販売・通販店です . 0.316883211 レプリカGaga Milanoのマーカー: ローズ ゴールドのアプライド インデックス ガガミラノOTコピー、SS品、N品、価格、品質の保証,2015人気偽物,歓迎光臨楽天★送料無料(日本全国) . レプリカガガミラノ時計Blog: http://www.fujisanbrand.com/pack/shf/index.html
Thanks you
These are stunning! Any way you could make this kit into a DIY candle-making kit? I LOVE the look of the stone colors but I would love to keep them as a candle. Any thoughts?
-Kate
@Kate YES! You can definitely do this with candles. I would just mimic the same process with wax. Except you’ll want to insert a wick into the middle of your cup with the mixed pieces of wax. Hold the end of the wick out of the cup while you pour your clear and opaque white wax into the cup – and make sure it stays out while the wax sets. Then you can peel open the cup after it’s fully set and carve it into a gemstone. FUN!
Brightest Blessings!
I just received my DIY Honestly WTF (Way Too Fun) Soap Stone Kit and really excited to try … can I add essential oils for scenting these baubles? If so, at what step? And THANK YOU for the cute airplant! 😉 courtland
NVM … LOLOL…saw my answer …however, do I have to use Perfume oils or can I use essential? Thanks so much again!! courtland. <3
Doesn’t the food colouring dye your skin???
Depends on the die
Can you use any type of soap or only the vegetable soap? Will it still work?
Dear friends,
Ole Soaps Manufacturing is the name of our company and we are based in Dubai, UAE.
We have just open a new factory and we are looking for 2 professional soap makers to come and work for our company.
We pay for the following:
1: Flight ticket
2: Your accommodation is paid by us
3: We pay for your train/Metro card
4: Medical insurance
5: Residence & Work Visa
6: Good Salary
The day your can start work is 1st November 2016.
Who interesting please text to our mail olesoapsdubai@gmail.com
Many Thanks
I love, love, LOVE this idea! These soaps are so pretty and so easy to make!
xoxo,Biene
http://lettersandbeads.de
How do I order a kit? It’s not working for me
Where can I find the soap base? Can someone send me a link to it on Amazon possibly?
if you don’t have food coloring, what else do you suggest using?
Hi there I was wondering do you think that this could also work with wax?
Nice Article
https://fematta.com/
Just came across these on Pinterest and they look so fun and beautiful. I can’t wait to give them a try. Thanks for the creations!
I can’t find the website that takes me to the gemstone kit.
It says the website can not be reached.
Please help!
ok get wifi
If you have wifi then you can
Really random question…I love these and have never made my own soap. This looks beautiful and super simple. Stoopid question but how does the food dye go when you wash with the soap? Does it form colourful pretty suds which wash down the plug hole no problem? I worry it might colour the shower water really well and splash everywhere…but I’ve no experience at all so I’d love to hear what you guys thing 🙂
how simple and is it easy never made soap and its for a fair of kids and my kids want to do it, some help people.
Very nice! Love this recipe!
We just launched a brand of biodegradable glitter, we used them in soap recipe, it’s so beautiful and ecological! If you’d like to try you can contact us !
Give me your contact I am making soaps and my need glitter
I love it!
so good
Po prostu piękne
Dziękuję bardzo