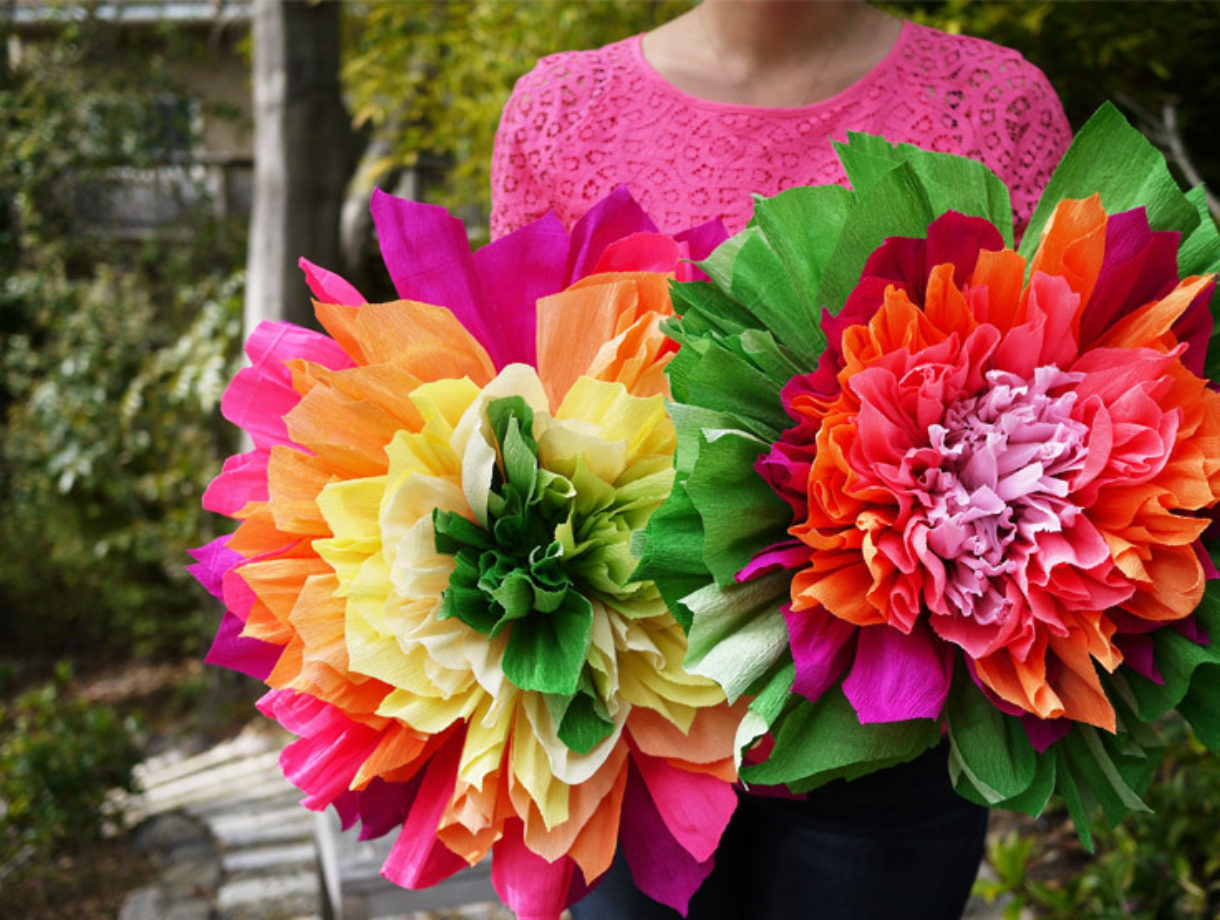
I recently spotted a sensational bouquet of paper flowers inside my favorite (and the ultimate) boutique for creative inspiration, Castles In The Air. A combination of Mexican paper flowers and those ever so popular tissue paper pom poms, these vibrant and cheerful flowers make perfect ornaments for any celebration. Plus, they’re incredibly easy to make!

You’ll need:
- 6 – 7 pieces of 180 gram florist crepe paper cut into 20″ x 30″ sheets (it’s important to use heavyweight crepe paper for it’s stretchiness and strength)
- 6 – 7 small binder clips or large paper clips
- 16 gauge floral wire (last seen here)
- heavy duty scissors

First, lay out the sheets of crepe paper and fold each one into an accordion. The folds should measure about 2-3 inches thick and should be creased along the natural, horizontal lines of the crepe paper. Don’t worry about the folds being absolutely perfect! (Click on images to enlarge)

Keep each bundle bound together by a small binder clip or large paper clip.

Working with the outer color first, gradually trim down the length of each sheet in 1-2 inch increments. This will ultimately give the flower its depth.

With scissors, trim the ends into rounded and pointy shapes. Again, don’t worry about being too precise – irregularity will make the flower look more natural! Realign the binder clips to the center of each bundle.

Cut along the folds of each bundle . . .

. . . until the scissors hit the edge of the binder clip, leaving the center uncut. Repeat the same steps on all four sides.

Unbind each bundle. Lay the sheets on top of each other with the largest, outer color on the very bottom and the smallest, innermost color on top. Be sure to center the sheets as best as possible. Then, start folding all the layers into an accordion.

Roll the bunch inwards and tie a piece of floral wire around the middle.

Secure the wire by giving it a few twists. Fan out the folds, exposing the strips of the first layer.

Gently peel forward one strip at a time and using both hands, stretch the paper open.

I suggest peeling forward every other or every two strips to give the flower a more organic look. And remember to constantly fan out the bundle since some strips may be tucked away between other layers. Once the first layer is done, move onto the next layer and color.

Slowly and gently peel forward all the strips from each layer. Though you might have to adjust some of the petals, the flower will naturally take it’s own shape.

Continue peeling the layers. If a strip is too big or out of place, feel free to use scissors to trim or shape it.

Soon enough, your crepe paper flower will be finished. And I dare you to make just one!

Tie a few into a tree . . .

. . . or hang them from a chandelier! But most importantly, HAVE FUN!

(lace blouse by JCrew; all images by HonestlyWTF)
These are so fantastic! I just had a great idea for my cousin’s bridal shower. This could be a game, give the girls these papers and the DIY instructions, and have the come up with the best paper bouquet, and the bride picks her favourite one! The winners get a prize. Donezo! We’re doing this!
xoxo
http://www.natashafatah.blogspot.com
Amazing DIY! I definitely have to try this!
xoxo
http://fashionagony.blogspot.com/
I did such great diys yesterday! But i Did flowers from newspaper and they are pretty amazing!
These beauties are also great! Great spring diy!!
nice idea, but I am afraid it is not so easy to do it 🙂
http://style-xyz.blogspot.com/
Haha, that is so cute! Gotta try this some time! 🙂
http:/notesdujour.dk
These are too cute! Thank you so much for sharing. I am featuring you on my blog today!
Michele P
http://sewinspirations.blogspot.com/
Thank you for sharing! I LOVE these and am featuring them on my blog today.
http://sewinspirations.blogspot.com/
Michele P
love it!!!!
http://bonnieclydemarni.blogspot.com/
Goodness your DIYs have that soooooothing effect, just scrolling through how you do it and all that… and that last photo just makes the day. AWEEESUUM.
Beautiful, colorful, and the perfect post just in time for Spring! Love…
xo,
Eva
http://www.evabstyle.blogspot.com
Gorgeous. What a great/ fun idea.
Collections
omg this is so awesome !! thanks !
http://arttyfacts.blogspot.com/
wooooow
such a good idea!! Going to try this this weekend!
http://www.fashionifancy.com
These are incredible! Thanks for sharing!
http://aurelieandangelo.com
This would have been an amazing contribution to the Mother’s day party! Maybe make some for summer 🙂
http://lilylovelock.blogspot.co.uk/
x
auqnue las prefiero naturales, están muy col!!*
big kissss
from BCN
OMG these are beautiful ! What a beautiful post for the 1st day of Spring : ) Going to make mine NOW.
Lovely. PS- where is that pink lace shirt from? xoxo
What a great idea!! I love it!! xoxo
http://www.hellohellofriday.com/
Fantastici!! Grazie
Totally making these. I wonder how my bf will feel about me hanging them all over the house…
I just made one of these last weekend for a baby shower turned out great ! Love your idea i will be trying this soon!!
whoooooa those are way prettier than the version i’ve ever made, i’ll have to try your tips!
in dramatic fashion
Oh wow, colorful but ordinary paper makes such extraordinary bouquets!
Wonderful creation!
DC2NYConfessions Blog
I think i’m going to try this, and use the flowers to spruce up my dorm room….
This is so cool!!!!!!!!!!!!!!!!!!!!!!!! congrats very nice project perfect for the spring day!
http://ilovedoityourself.blogspot.fr
This DIY is so much fun! I’ve actually seen quite a few folks rocking these homemade flowers in their weddings. I love how bright and festive they are!
http://www.cositabella.com
You make this seem easy, but I may be too uncoordinated to do this! I love the idea though: it means that your flowers will never die.
xoxo,
mon amy
This is amazing. So pretty!
xoxo
http://www.thewrittenrunway.com
Absolutely stunning!
Ahh this is great, i tried a similar version of this with fabric but got it completely wrong this is so much more helpful!
http://girlwiththeskullscarf.blogspot.com/
Love these awesome flowers.
ahh Summer do !! love !
x
http://hippiefruitandsalad.blogspot.com
Lovely!!!
i will for sure be making these!!
xo
http://www.stylegod7.blogspot.com
I am doing this project with my girls. Looks like fun.
Vintagehoneybee.blogspot.din
stunning project
nice DIY!!! it’s so funny!!!
http://thestelstyle.com/
These are gorgeous! Great idea for a party decoration!
It’s official, Spring has begun!
I loved this post so much that I shared it on my facebook page 🙂
Mesmerisingly beautiful!
C.
You guys are too good! I loved this!!
Oh my…this totally reminds me of a princess costume my mom made for me out of crepe paper when I was 6!! It was so pretty, but extremely flammable 🙂 totally making these for my birthday brunch!,
<3 Kate
http://www.theforgetfulwife.com
Gorgeous! I love these, totally going to try.
http://theautumnissue.com
wow, these are so fun and beautfiul!
january, x
jessicajanuary.com
How pretty i love them on the ceiling!
Pretty! They remind me of the big paper flowers that I used to get at the gift shop in the amusement park I went to as a kid!
These are so beautiful up on the light fixture!! What a great idea!!!
This is so going in my apartment somewhere for this summer! Loves!
So pretty!!! I always tried making these without any success while growing up.
Love from South Africa
http://www.arumlilea.blogspot.com
great idea! thank you so much!!!
xxxxxxxxxxxxxxxxxxxxxxxxxxxx
greetings
http://3maigloeckchen.blogspot.de/
I thought at first they were real
AMAZING….I need it for my “DEAD” Orange TRY =)
You can check my Alexander McQUENN outfit in:
http://laviequo.blogspot.de/2012/03/queue.html
XOXO from Munich
La Vie Quotidienne
http://www.laviequo.com
What a cool DIY idea! Thank you so much for sharing!
XoXo
Plami
http://www.fashionthrill.com/
what the what??? those are amazing! but are they any easier to make than martha stewart’s damn pom poms??? i just about lost 3 fingers while making those things… (fyi-i don’t have a crafty bone in my body…i’m more into outsourcing someone to make it for me….)
http://mybabykins.com
OH my word, these are incredible! I would have a springtime party just to be able to make these.
such a cool idea. love how colorful they are
X, Annie
anniewear.de
Can I use 160 weight paper instead of 180 weight paper? Do you know?
Thanks, these are so gorgeous!
Melaine
@Melanie, I haven’t tried it with 160g weight paper. I believe it should be fine, especially if you’re going to hang them upside down. However, I assume the 180g weight paper will give it more stiffness and allow the petals to stay upright. Hope that helps. Good luck!
Defenetly going to try this 🙂
If you like DIYs check out Made by: sara
Check out the flowers we added to our window last year at Velvet Lounge in Frederick, MD – https://www.facebook.com/pages/Velvet-Lounge/58968239440#!/photo.php?fbid=10150707630749441&set=a.453895109440.213210.58968239440&type=1&theater
This and the yarn pom-poms will be decorating my wedding. Thanks for all of your wonderful ideas!
I’m wondering how this will work with wrapping tissue paper…..
These are just lovely! I will be using a smaller version of this (one that fits a scrapbooking page) for my next project!
Creative Photo Albums
Beautiful post! Could you tell me which colors you bought from Castle in the Air? I absolutely love the color combination!
Thanks so much!
I absolutely LOVE these!
I love this so much! I’ve done a crepe paper flower for my friends bday.
You can see my diy paper flower post here: http://thefashionwayfarer.blogspot.de/2012/04/diy-crepe-paper-flower.html
THANKS for all the inspirations! Love your blog! XOXO
Keep up the great work ;**
Oooh, these are amazingly gorgeous and I really must make some.
Thank you for the lovely and vibrating smile that came along with this beautiful post of yours.
Keep up the loveliness! :**
Beatrice
http://www.ladleful-of-fashion.blogspot.com
I love these! Someone told me they were easy, now I see it!!! THANKS!!! kimi.
Beautiful! 3 of these are now attached to my living room wall above the fireplace as DIY art – they look amazing x
LOVE! LOVE! LOVE the colors! Gorgeous! Great party decoration!
<3 Melissa
http://www.deloom.com
Aaaah I love these!! 😀
http://mustbebeautiful.blog.com
Thank you ever so much for sharing this tutorial. The flowers are beautiful. Kindest regards
your so awesome!
Fantastic……..
those flowers r really colourful……..
‘m definitely gonna try dis out
These are beautiful! I’ll certainly be using them at my next party!
IT IS AWESOME….. I DON’T HAVE WORDS TO SAY…
These are going to add a theme to a kiddy pool party! Love the colors..
its is very artistic way to make paper flower, i liked a lot
Great!!! I love this idea 🙂
Yes, they are beautiful. We used to make them in the 60’s
we made them as kids but small ones they look like carnations i like the big bright colors .. back they didnt have all the bright color tissue paper they have now..
I made them and used the flower as faerie wings for my daughter !!! very easy – if you have a good pair of scissors !!! i used basic crepe paper !
Perfeita! Maravilhosa! Linda! Obrigada… beijos…
Beautiful post! Thanks.
I made little flower like these and gave them to my mom. Now I can give her bigger ones!!!! =)
Thanks for the idea! Got to do one last week! But yours are waaaayyy better LOL! Had fun! =)
I was just wondering where you got your crepe paper from, more specifically the two toned green/yellow ones.
is each color only one sheet of crepe paper?
it,s good~~~~~~~~~~~~!! i want to make it, l will try that!
a vErY InTeReStInG IdEa 🙂
My daughter wants to be the Marigold Girl from the movie Epic for Halloween. I think you just saved my life! Not to mention lots of money! Thank you!!
Ooh love these! I just posted a DIY tutorial on coffee filter flowers if you want to take a peek!
http://www.MorningKawa.blogspot.com
What an amazing craft! I would love to do this for a spring event I have coming up. So easy to just use tissue paper
Gracias !!!!hermoso ramo de flores, y muy buena la combinación de colores!!!…saludos!
Thanks for this project as I think it is something I can do And I have a stash of crepe paper waiting to be transformed
Sue x
I could not refrain from commenting. Exceptionally
well written!
Lisää aiheesta: http://preview.tinyurl.com/e-tupakka59937
Awesome…and sooooo simple.
Thanks so much for the tutorial – really pleased with the results following your directions. My flowers look amazing.
Great work and thank you for these explanations
Thank you very much for your explanations
This also could be a great present – beautiful, unusual and most importantly – it’s handmade! I made like three bouquets for my friend on her birthday and she totally loved it!
I normally love making origami flowers but now am hooked on crepe paper flowers with many festive colors. I love this flower tutorial. Thank you. Karen
The Calla Lily represents purity & magnificent beauty. If you’re looking for a huge bunch of flowers in various different styles, take a look at our calla lily silk flower collection! These artificial calla lily flower collection Greek for the word beauty, silk calla lilies make a beautiful addition to your wedding as a representation of all things beautiful.
good idea!! I will try.
good idea!! I want get it.
http://girlsprom.blogspot.com/
Wow that is impressive. Thanks for putting such a great post that is easy to understand together. Now to try and do it myself.
First time I tried this out it was gorgeous! 2nd time not so lucky…turns out there’s different qualities of crepe paper. I found it easier to work with the softer kind…
My nan used to make these in the 70s !
Amazing DIY! These are so fantastic. This would have been an amazing contribution to my daughter’s Birthday party. I will definitely try this. Thanks for sharing.
Wow! Thank you so much for sharing the tutorial for making a beautiful flower from crepe paper. These flowers are very helpful for decorations. Keep sharing more tutorial with us.
Really pretty
Wow
Great Post! You are sharing a wonderful post. Thanks and keep sharing.
These ideas will work in Spring as well as for parties as well.
Wow, beautiful flowers.
I created something similar. But I recently discovered these flowers:
https://creative-vector-studio.com/product-category/paper-flowers/
I liked some and I already managed to make them)
These flowers are beautiful!
We also have some great fake flowers:
https://artificialmerch.com/