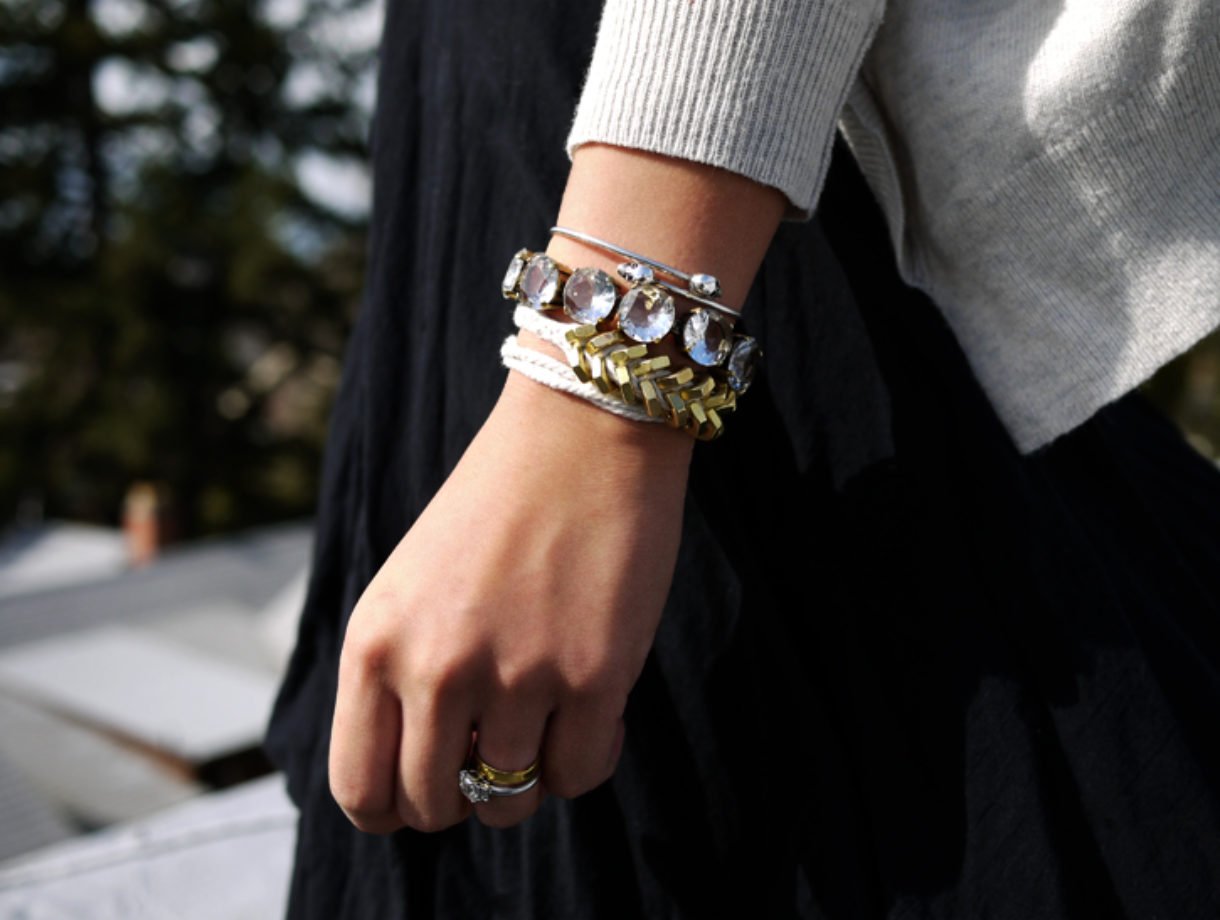
We’re nuts for nuts. Is there a more versatile and inexpensive DIY component than a hex nut from the hardware store? You can imagine our excitement when we first discovered Philip Crangi’s Giles & Brother Hex Collection. Honestly, nuts braided into jewelry is WTF genius! With a few items that we always seem to have lying around, we tackled the technique and made our own spine-like braided hex nut wrap bracelet.

You’ll need:
- 3 strands of cotton butcher’s twine cut into one yard pieces
- 18 small brass hex nuts
- a bit of dexterity!

Gather the 3 strands of twine and tie a knot at the top, leaving about 2 inches of slack. Start braiding. At about an inch of the way down, you’ll begin braiding in the nuts. Before you braid the far left strand over the middle strand, thread on a nut, push it against the base of the braid, and crossover. Depending on the thickness of the twine, you can wrap tape around the bottom tips to prevent the twine from fraying. (Click images to enlarge)

Keep your thumb at the base of the braid, holding the nut in its place. Before you braid the far right strand over the middle, thread on another nut, push it against the base of the braid and crossover. Again, hold your thumb tightly against the base of the braid, keeping the nuts in place. Thread another nut onto the far left piece and crossover.

Repeat the steps, by threading the rest of the nuts to the outer pieces of twine before they are crossed over. Thread, cross, thread, cross. Finish the bracelet with another inch of braided twine and a knot.

The bracelet should wrap around your wrist at least two or three times. Trim it to your liking.

Good luck!!

(top image from here, rest of images by Honestly…WTF)
wonderful!!! looks so chic!
Culturally Unique!!!!. I like YOUR STYLE
Thanks fot your amazing DIYs! can’t wait to try this one!
Wow…that´s really cool! Thanx for sharing!!
http://www.LIVINGandFASHION.blogspot.com
Great bracelets, + great pictures.
Fantastic!
xoxo
http://www.fashionagony.blogspot.com/
what a great bracelet. does not seem like a hard task to make either!
http://www.wordbyjessie.com
http://www.bloglovin.com/en/blog/2039498/word-by-jessie
xxjj
LOVVEEEEEE. so amazing! xxxx
GREAT diy! thanks!
http://www.SHINYUPSIDEDOWNCROSSES.BLOGSPOT.com
lovely post!!!!
http://prisonerofashion.blogspot.com/
LOVE this!!!
I love Philip Crangi’s collections! They are great!!
xo
http://cestclassique.blogspot.com/
Woow! This is amazing! I found this via A Pair and A Spare blog and def in love!
Dita
Absolutely love this idea. Will definitely be doing it soon!
http://www.fashionablecollections.blogspot.com
LOVE LOVE LOVE this. Thanks for sharing.
woah this is pretty ingenious. i’ll try it out this weekend!
Love all the hardware turned into jewelry DIYs. Including you bracelet. Very cute!
i want to try this ASAP!! thanks for sharing.
Another amazing diy from you ladies!! I’m about to start the friendship bracelet diy.
Yes!! I too am obsessed with using hardware bits (I just posted a DIY using bits to decorate my plant pot). This bracelet is perfect. Perfect!!!
This is genius! LOVE the use of an unusual material with the serious hardware.
I recently posted a braided DIY chain necklace tutorial, not the same, but a similar idea for anyone who may be interested, click on the link.
http://huntgatherfashion.com/2011/02/16/diy-braided-chain-necklace.
SO FAB!!! I love it!
SO cute! I can’t wait to make these!
http://rebellefleur713.blogspot.com/
Very cool. Now I must go raid the boyfriend’s tool box!
Oh this is great – I think I could do this. Especially that you have instructions via illustrations! It would go great with the winter military look.
GENIUS!
I’m thinking….go giant = belt!
So glad you guys like it! And Vanessa, a belt would be FANTASTIC!!! 😉
Wow, it´s so gorgeous! I´m going to try this once.
blog.PSbyDila.com
Wonderful!!! I’m going to try this as soon as I can! Thanks!
SOOOO COOL! I know what I’m doing this weekend… 🙂
wow! that’s pretty awesome. I guess I should get my butt to the hardware store 🙂
SOOOO COOL! I know what I’m doing this weekend…
You’ve made me SO happy with this DIY! I’ve been wanting to figure out a way to make one of these myself, but you’ve done the legwork for me. I have a batch of small hex nuts that have been waiting and dreaming of becoming part of this bracelet; now their dreams will come true 😉
Thank you thank you thank you!
I love this project! Thanks so much for sharing. Now, to go look for stray nuts lying around the house 😀
i just made this :]
its not quite as pretty or neat as yours but i love it!
thanks so much for the idea & tutorial!
So beautiful! I’m already headed to the hardware store, why not pick up one more thing? 🙂
Awesome! Can’t wait to get my hands on some hex nuts!
What an awesome DIY! I’ve been looking for a fun craft for a girl’s night and this is perfect!
I am pretty obsessed with these tutorials. They’re the best!!!
Really nice. I’d like to make the original necklace version now. Looks like you could even reproduce the chain part at the end with some pull chain from the same hardware store and a larger jewelry clasp.
great idea, thank you, I shared it (with link to your original post) on my blog at http://1129designorecchinigioielli.blogspot.com/2011/02/hardware-times-tutorial-braccialetto.html
if you mind the sharing please let me know and I’ll cancel it asap
best
nicoletta
great idea…it looks so beautiful!
Oh my, this tutorial / diy is the best I have seen in my life. Have to make it for summer. With coral or mint.
And I also shared it with slovenian readers on my blog http://cvetlicnilonec.blogspot.com/ (and also – if you mind, I can delete it, though I did put a link of your page on my blog and atributed the photos, hope it is ok).
i have got to try this. it looks really great.
Love this! I’ll definitely have to try this!
-Samantha
http://thisfashionista.blogspot.com
Holy Crap this is amazing! I am running out to the hardware store now for the materials!
I love this. I am terrible at arts and crafts but I actually think I could do this.
oh la la….me likely! I’m going to try this this weekend as the bf is away! weeeeeeeeee
awesome diy, I am def gonna try this soon.
http://lavie-amonavis.blogspot.com
So cool! Thanks~
I’M excited to try this out! Love it 😀
This rocks, I can’t wait to make these with my friends. I re posted on my blog this week! Thank you! http://www.mintagehome.blogspot.com
Ah, zo leuk! ik ga dat ook een keertje maken.
This is frickin’ fantastic. Thank you for sharing.
x
Michelle
http://www.michellesstylefile.blogspot.com
How amazingly clever! And I can’t believe all you need is a few bolts and and rope! Definitely comparable to Philip Crangi’s one 🙂
Awesome posts! Keep up the good work
http://www.thefinishing-school.com
Saw this post this morning and I went on a mission this afternoon to look for all the materials! I JUST finished making mine and it’s adorable! My sister was so impressed and loved it, so my next task is to make her one as well. I’ll show you how it came out on my blog! Thanks so much for showing me how to do it step by step. You’re amazing!
-Suzy
http://www.suzyful.com
Amazingly beautiful! I went to get some today 🙂 Thank you for sharing!
Can’t wait to try this! But how did you end it? Tie a knot?
Thanks for the inspiration!
Hey Jackie, yes, tie a knot to finish like you did to start!
This is pure freaking genius!
Hi there, thanks for sharing this tutorial. We loved it so much we’ve put a link to it on our blog http://www.polkadotlighthouseuk.blogspot.com/ along with a few other rope-related tutorials. Thanks again! Carla and Olga
What a FAB Idea I want to tryyyy it so bad!!!!!
This is gorgeous! What a fun craft project.
I’m si glad I found this post through I blog I follow… this bracelet looks gorgeous, and still, it’s so easy to make (even for someone like me with 2 left hands :D)! Thanks! 🙂
The result! I’m in love. Thanks again =)
http://suzyful.com/2011/02/28/diy-hex-nut-leather-bracelet/
So effective and so simple, i’ll be showing mine off around and about London town for sure!
So cool!
Absolutely brillant- will definitely be trying this!
FABULOUS !!!!
Fantastic! Definitely going to raid the garage and try to make one for myself!
Thanks for this amazing DIY! Just made mine and it turned out great!!
Love this tutorial! What type of twine did you use? All I have was jute twine. What specific type of twine did you use to make this?
Rachel, I used cotton butcher’s twine. Good luck!
Seems to be a trend… http://www.vonkottwitz.com/industry/if081.html
I tryed your DIY and postet my result! Thanks for the Idea!
http://firstfashioncat.blogspot.com/2011/03/diy-armband.html
I tried this out as a necklace! It turned out really cool and my sister loved it as a birthday present 🙂
http://ofcatsandcrafts.blogspot.com/2011/03/braided-hex-nut-necklace.html
Neat!! I like the first one featured looks so pretty! :))))
this is pure, unadulterated genius. thank you for such a wonderful idea, i’m off to the hardware store first chance i get. 🙂
LOVE IT!!!!
Saw this post through a Braziliam blog that I follow.
Loved the creativity! I will give it a try!
Thank you so much for sharing.
Mila.
Just made it, and absolutely love it!!! , thanks for the most , top notch!!
I`m really inspired:)
Made the bracelet today! Had to go back to hardware store to get more nuts for more bracelets for friends! Guys at store saw my bracelet and were amazed! Offered to sell them at the hardware store if I make them! Keep up the great diy projects! Love em!!!!
Just made this! Best DIY ever! So easy and it looks amazing! I used black hemp cording with brass nuts and it looks badass!
Great idea! Posted here
I love this bracelet and just finished making one! I did find it a little tricky at first but once you get the feel of it, it gets easier. One tweak I would make to the directions is the measurements. I have really small wrists and following the directions exactly as they are given above, I couldn’t even close the bracelet around my wrist once. So I upped the initial braiding part to two inches, added all 18 of the hex nuts and then (because I did want it to wrap around my wrist twice) I just continued braiding almost all the way down the rest of the string until I reached the length that I wanted. I think its also useful to add that the size of hex nuts really does matter. I used a size 6 and I think anything over a 10 might be too loose. Thanks for the idea! 🙂
Loved! Loved! this idea. Made it this weekend. My husband thinks it is totally cool. P.S. He usually doesn’t particularly comment about my craft project. Thanks!
i really really want to make this! 😀 its SOOO cool!
I will never look at hex nuts the same way again! Thanks for the tutorial – I will feature/link to it in a future blog post so others can come visit! Pearl
Can you tell us where the silver and crystal bracelet is from. The one next to todays diy project. I bought a bracelet yesterday that is so similar but I don’t know anything about it – I bought it at a consignment shop! would love to know more about it. ethel
Ethel, the crystal bracelet is from JCrew and the skull cuff is Rue22
i love this so much. think the string i have is too thin. or the nuts are too big.
What size are these hex nuts?
Brittany, the hex nuts we used #6-32 brass hex nuts a 1mm diameter twine. You can also use a size up #8-32, depending on the thickness of your twine/string.
i loved the original so much that i am dying the twine to match (still in the process, so we’ll see how it goes)!
one question: how do you fasten it? just tie the two ends together?
Hello!! This is fantastic idea!! Is beutiful, original and elegant! 🙂
Thank you!!! I made mine with leather and a hook and it looks amazing!! I’ve already made one for my friend and she loved it. Wish I could post a pic of it…You girls rock!!!
Thanks so much for this amazing DIY! I made one and posted about mine on my blog, amandasphotogarden.blogspot.com. I also referenced your blog in my post. Check it out! http://amandasphotogarden.blogspot.com/2011/03/diy-hex-nut-bracelet.html
thanks again!
-Amanda
amandasphotogarden.blogspot.com
I love itt!! I’m so trying it today 🙂 thanks 4 sharing
http://glitteringsecrets.blogspot.com/
I absolutely love this DIY! Thank you so much for sharing. I made my own with a few adjustments and added some charms. http://fashion-edit.tumblr.com/post/4026025000/diy-braided-hex-nut-bracelet
So going to the hardware store today! 🙂 ♥
I’ve been trying to figure out a way to make a DIY jewelry holder…thinking mesh/wire, picture frame, etc would work but I need some tips!!
Now i look at things and think “That looks like a WTF DIY waiting to happen!”. You ladies have definitely raised the bar on making your own fashions. Saw this and thought of you guys…
http://www.jcrew.com/womens_feature/NewArrivals/accessories/PRDOVR~48363/48363.jsp?srcCode=AFFI00001&siteId=J84DHJLQkR4-xS*dXnZ5KNdV2SRkCwpjIw
Figured you guys could make a version just like it if not better!
Barret
Love, love , love, I have mines in two tones of brown
Thanks a lot, beautiful diy
can you tell me, how you close it? There is a normal bend, isn’t it?
Theda, you can close it the same way you started it: with a braid and a knot. Good luck!
I tried this. It came out wonderfully, but I have one suggestion: use small hex nuts. The ones I used were kind of medium-sized and it turned out loose. I’m not sure if it’s supposed to do that, but I like it anyways 🙂
Wow. That’s beautiful and unique.
My daughter found this DIY and sent it to me. My husband and I made a team project out of it. He was pretty helpful at the hardware store. I ended up using light weight Veneitan blind cord because the twine seemed too scratchy (before I saw the suggestion to use butcher string). The bracelet turned out VERY cool. Not sure how it fastens either, but I will keep watching this site for suggesions. THANKS!
Shannon, way to be resourceful with the Venetian blind cord! The bracelet fastens by just double knotting the ends together onto your wrist like a friendship bracelet. xx
Can the rope be switched out for ribbon?
Nicole, as long as its not too wide, I’m sure ribbon would work. It’s worth a try! xx
It’s awesome! But its really heavy–when you go to the hardware store, but the smallest nuts possible!
I want let you know that I made this DIY! THANK YOU SO MUCH for all your information about it!
here’s the link for see the final result : http://fashionsofa.blogspot.com/2011/04/diy-2-done.html#comments
hope to see your comments 😀 Thank you for do this awesome DIY , you rock Honestly.. WTF!
I tried it, I think it came out kinda cute…
For the closure I just looped in a circle clasp…
The post is here—->http://believe4lovebelieve4life.blogspot.com/2011/04/diy-hex-nut-bracelet.html
Thanks so much Honestly…Wtf! You Rock!
Thank you so much for this DIY tutorial. I am a rower and hex nuts are my life. Everything is held together with hex nuts. It is so cool to turn an ordinary piece of metal that I use everyday into a edgy bracelet. Thank you so much for the idea and keep on creating amazing DIY ideas.
This is so silly, but I keep struggling with this. Has anybody done a quick video of them braiding a few in, that they’d be willing to share? I figure you keep just passing over the outsides, without a twist in between, but somehow I keep messing it up.
Thanks WTF-DIY, this looks like such a cool project…I’m loving all your tutorials! Can’t wait to see what you do next.
Never mind guys, figured it out! I think my twine was just too thin for the size nuts I had, though I had chosen the smallest at my hardware store. But I just had to be extra careful to keep things tight, so the nuts didn’t flip over under loose strands.
My place didn’t have the nicely finished brass nuts, they have a slight coppery sheen to them. But they look nice and a little rough against the twine. I’d like it to be longer, or to use thicker twine, like the awesome pictures in the tutorial. But I think it turned out pretty good!
http://img860.imageshack.us/i/photoon20110414at1500.jpg/
I just crossed the knots under after doubling up…I played with slip knots, but this works better. Can’t wait to play with adding colored twine!
Thanks again!
sellam çok zarıf olmuş
I just did it! AMMMMMMazing.
I’m in love,
thank you
thank you.
Check out my post:
http://lovelyuglydesign.blogspot.com/2011/04/no-058-diy-honestly-wtf-genius.html
xo Jessica Rae
http://www.lovelyuglydesign.blogspot.com
This is awesome! Thank you so much for sharing. I’m definitely going to make one or 2 for myself. 🙂
xoxo
Leah
mommy this is so cool thankyou for sending me this attachment i will try to do this later.:-) LOVE U
LOVE the DIY!
Will this work?
http://www.joann.com/joann/catalog/productdetail.jsp?pageName=search&flag=true&PRODID=xprd78409
Fantastic tutorial! I now have a pretty baracelet to wear on my Birthday!
I blogged about my experience making the bracelet here…
http://burnt-feather.blogspot.com/2011/04/brass-hex-nut-bracelet-diy.html
With a few more tips as well 🙂
what a marvelous tutorial! can’t wait to try it out now that summer break is here 😉
Cool, what a great idea.
Ooh. 🙂 Made this today! Super easy and it looks SO rad.
I’m about to start this one now!
I am going to the hardware store today! Can’t wait to make a few of these
Just made my first. So simple! I have a feeling I’ll be making loads more…
Washer bracelet
Can anyone tell me where I can find the other bracelet in the photo, the one with oversized rhinestones??
@Lauren, the bracelet is from JCrew.
Hi! I’m just now trying this DIY! I need to start over again because the braid kept twisting! If only I had 3 hands! It’s a lovely project, though, thanks for posting it!
So i happened to be on kickstarter.com looking for cool projects to support and I came across a project for a jewelry line that looked so freaking familiar. And it hit me that I saw the diy on your site. Does HWTF have any affiliation with this? Check it out. http://www.kickstarter.com/projects/1706804268/swab-and-bearing-jewelry Love you blog by the way!
GENIUS!!!!!!!
Me and the girls are sitting here making the bracelet. We are having a hard time with finishing it! How do you tie it? We love the idea, but our ties are so bulky. Any ideas?
Great DIY! We love playing around with hardware!
http://fashionindie.com/
Thanks for the DIY! So amazing! Im definitely doing this!
Keep up the great work! Also, come visit my blog if you’d like!
Smiles,
Aina
This project is amazing, along with all of your DIYs.
I found this bracelet retailing for 125.00 dollars and i thought you might be interested in doing a DIY for it! it looks so simple!
http://www.gilesandbrother.com/collections/summer-2011/products/leather-rope-bracelet
I finally got around to making mine. Just wondering how you guys are making a closure? I closed mine by passing a knot through a loop. Any other ideas out there?
I love the bracelet; I’m going to make it and feature it on my blog. Thanks for the idea!
love this! it turned out so so well 🙂 just a suggestion, it’s a lot easier to make if you hold your threaded nut steady and tight with a bobby pin, while you thread your next nut. solves the lack-of-three-hand conundrum.
I made one! i wish i had seen tess’s comment about using a bobby pin to hold the nut on before i did… i tried using a clippy sort of thing but it was too large. i totally underestimated the “dexterity” you mentioned needing, haha.
my hardware store didn’t have bronze nuts, only silver and this weird greenish gold color, so i bought the silver ones and spray painted them gold. worked like a charm! i wish i had bought more so I could have made a necklace.
Made a few of these yesterday. They turned out great. Thanks!
Jordana
That’s really really cool, thanks for sharing! Had to make my own 🙂
http://www.flcty.com/2011/07/13/hex-nut-bracelet-diy-armband-aus-schraubenmuttern/
I love this!!!
Thanks so much for this tutorial, made an amazing anniversary gift for my boyfriend and I to make for each other! Check out the finished results here if anyone is interested:
http://patterns4life.blogspot.com/2011/07/his-hers-hex-nut-bracelets.html
I had a really tough time closing it too, but i ended up just knotting it at the end and then used a tiny gold safety pin to hold the beginning and end knots together!
Here’s a link to mine: http://i294.photobucket.com/albums/mm111/trudijohnson/bracelet.jpg
Thanks so much for sharing your how to guide. I love this bracelet and it cost less than $4!!!!!
Awesome! I just did mine! I used 8-32 zinc hex nuts with 1.2mm hemp cording – turned out amazing! Sent them to a few friends for gifts!
-Erika
oops here is my finished product – I also continued the braid farther and then used spring findings on the ends and added a clasp!
Thanks for the tutorial!
What a great knock off! I’ve featured this post on Copy Cat Crafts today, you can view it here
http://www.copycatcrafts.com/giles-brother-inspired-braided-hex-nut-bracelet/
We’d love it if you’d like to display a featured button! You can grab your button on the right hand side of your post. Thanks!
Saw this on Copy Cat Crafts today! Awesome!!! Love this. Have pinned on Pinterest for future reference.
Nice use of Hardware. My little girl is going to make a few.
Thanks
Ron Yatteau
House Hasson Wholesale Hardware
https://plus.google.com/112935081106235485458/posts?hl=en
This is so tres chic!
I featuerd it on my blog:
http://blog.shopdirtylaundry.com/posts/2011/7/29/24-the-dirty.html
I hope you like it!
Gawd!! this is amazing
It’s done – I’ll put it up on my blog soon 🙂
I just made these with zinc hex nuts on black twine and brass nuts on ivory twine, they both look sooo cool! the hardware is amazing and i want to wear these all the time. thanks for posting this :3
Just made one and I already love it. It’s so simple that it’s genius. I can tell that I’m going to make a lot more of these =]
Look – I made it http://twitpic.com/64ayev WOO-HOO!
Beautiful bracelet that’s amazingly simple AND cheap to DIY
love the idea but can’t seem to execute the DIY. lol
any suggestions for materials?
i’ve tried this with twine and small hex nuts but found it kept twisting. and got as far as 3 rows of hex nuts.
This is AMAZING, I must try this. I think I’ve going to have a DIY Bracelet party this weekend 🙂
lovelovelove this. totally raiding the tool box tonite!
we mentioned this DIY at our blog:
http://oddsundays.blogspot.com/2011/04/builders-bracelet.html
I am so making one for each of my friends
how do you tie the ends so its practical enough to slip on and off? getting frustrated, other than that its lovely!
Hey, I am trying to buy brass hex nuts for this project online but I don’t know what all these numbers mean. Like 1/4-28 or 0-80. What size did you use for this bracelet?
Thanks! 🙂
Thank you for the inspiration! I used it today 😀 http://shesnappi.com/?p=356
totally just made this! i love it! Thanks for this inspiration
How did you make a clasp for this bracelet so you can remove it and wear it again and again? I’m having trouble finding a good solution.
This is so good! Going to make one now!
Thanks so much for the tutorial! I made one last night and love how it turned out. I plan on making another one with the nylon (white) hex nuts soon!
http://img.photobucket.com/albums/v624/diceimdice/lightbox-photoss3amazonawscom2Fphotos2FOHX4mqBHRPqciqdwUUhnKw_lrg.jpg
Sorry for the long URL 🙁
I’ve now made two different bracelets. I have been using yarn instead of twine because I think it would be softer on your skin. I use silver hex nuts and have made one with white yarn and one with red yarn. The one with red yarn is my favorite!! I’m still experimenting with the number of hex nuts on each bracelet. Thanks so much for this idea!!!!
I went out and bought hex nuts and twine yesterday and have been trying for countless hours, it’s a bit frustrating haha. I think the problem is the twine is a bit thin, hopefully it’ll work when i get thicker twine because they look amazing and i’m super excited 😀 Thank you for sharing this amazing idea.
Thank you so much for this DIY tutorial! I LOVE my hex nut bracelet. It’s crazy awesome.
I made this bracelet today! Love it. You ROCK and so do your tutorials.
Thank you for sharing! I made this over the weekend and shared it on my blog!
Just made this, and I love it! I safety-pinned the first/starting knot to my pants so it stayed in place and secure. Thanks so much for the idea!
Amazing tutorials..
where can i find the skull bracelet?
Thanks…
I like it!!!
this is really cool. as someone who has a huge stash of hardware items from my previous life as a theater technician, i find this very inspiring. maybe i can put some of my hardware to good use!
Great DIY!!
Where did you find the brass/hold nuts?! I have had such a hard time finding large quantities of them besides in packs of 3!
great tutorial – but I was really struggling until I figured out this HUGE tip. You can thread all of the nuts on at the very beginning: just divide them between the three strands and leave them at the bottom of each. Then, simply slide them up as you need them. This works since you’re only braiding, not knotting. hope this helps others who couldn’t manage to hold the nuts in place while threading on new ones!
hi omg this bracelet is gorgeous!!! i will definitely try it this weekend~ can you tell me what size hex nuts you used?
This would also make a good necklace. Thanks for the idea. 🙂
does anyone have any idea what material is used in the blue version of this bracelet at the top??? thanks!!!!!!
OMG
i love this soo much
going to make all my friends these for christmas!!
does anyone know if i can use leather cord instead of twine?
thanks<3
Instead of hex nuts we used brass ‘flat washers’ which can be found in the same aisle of home improvement stores. Also, we soaked our bracelets in chai tea over night to give the rope a nice worn tint. Looks really cute!
I loved this but definitely not as easy as it looked. lol Until you get the hang of it, for lack of an extra hand, I used a binder clip to attach it to the top of my laptop to hold as I braided. I also played around with embroidery thread for the range of colors and desired thickness…
Good Luck!
Hi, I wanted to know how big the hex nuts were that you used in this DIY?
I found it really hard to keep the nuts in place while continuing the braid. The solution I found was to tape the top end (the 1″ braid and 2″ of slack) to the table! That helped a lot. Mine turned out a bit sloppy because the smallest nuts I could find were 8-32’s.
May try embroidery thread as Nix said (I’ve got the hang of working with that through your DIY woven bracelet tutorial!) and also try leather cord and smaller hex nuts (maybe Lowe’s will have a better selection than my Home Depot).
@Justin, they answered that question a bit earlier in the comments. They used 6-32 size nuts.
SOOOOOO nice and realy easy! I Love it <3
Hello,
I featured this bracelet again on my blog ’cause I love it so much.
http://blog.shopdirtylaundry.com/posts/2011/12/30/39-the-dirty-2011-trends.html
HAPPY NEW YEAR!
This tutorial is amazing. I made my own (linked back you you) and tried a necklace as well! Love them both!!
http://tastybliss.blogspot.com/2011/12/some-crafts.html
Would embroidery thread not work? I tried using embroidery thread (I braided 15 strands with each other) because I wanted to a more luxurious look (I juxtapose silver hex nuts with a royal blue) but I think it’s not sturdy enough to hold the hex nut.
OMG wow those people were trying to sell stuff that are a dime a dozen for 300 dollars. that seems ridiculous to me
Love this tutorial. Linked to my own version on my blog here: http://ecb.edesignsfashion.com/2012/01/17/hex-nut-braided-bracelet.aspx I did the same thing Gloria did and used embroidery thread and silver hexes. I also added some more chain into the mix. I’ve been wearing mine since the summer with no problems with sturdiness!
Wow! The look of that bracelet is amazing. I’ll have to take a second look at my hardware store for DIY jewelry ideas.
My sister made it for me – check it!
http://keylimecat.blogspot.com/2012/01/bracelet.html
A group of us from work did it all together over our lunch break!
http://myfamilywall.blogspot.com/2012/01/craft-lunch-hex-nut-bracelet.html
The end product is sooo cute! I love the design and steps are just simple! Thanks much for sharing this!
Love this!!
Does anyone know/can anyone guess the size of the hex nuts that appear in the last picture??
I have to order mine online so I need exact-ish dimensions.
I love thissss! *w* I wanna make it!
Love u, D.
I enjoy this site.This site is more beneficial for how to create Mens Bracelets.I love this sort of Bracelets.This looks like a great resource.I’m very interesting to read your blog. Thanks for posting this.
i tried it too. love it. thanks for the tutorial 🙂
http://jaettecool.blogspot.com/2012/02/diy-armband.html
i just finished mine and it came out beautiful!
check it out here:
http://ketchembunnies.blogspot.com/2012/02/diy-braided-hex-nut-bracelet.html
i´m planning to do the same for a necklace!
Love this – I think like a lot of people on here maybe first attempt wasn’t brilliant but practise makes perfect right!
Going to make lots of these with more hex nuts and lots of colours!
this was a little difficult didnt get the same results.. made it in my home ec class
Thanks for sharing this amazing tutorial! I just made my own version, and linked to your blog:
http://lastdaysofspring.blogspot.com/2012/03/diy-hex-nut-bracelet.html
I didn’t ready through all the comments so this may have already been mentioned.
My husband says that the threads in a hex nut can be pretty sharp so, for a longer life of the bracelet, you may want to file/smooth them out a bit.
I put be slow b/c this is insanely hard & cannot get mine to look anything like this. I love this bracelet so I’m gonna keep trying :-/
LOVE IT. all of your diy’s are genius and very simple. cant wait to make a trip to the craft store and get started !
You should of been clear on what kind of rope to use. I was getting the supplies to make the bracelet and you have “twine” listed. However what you are using is not twine. Twine is a more slippery rope which makes this DIY impossible. Now I have all this slippery twine with nothing to do with it…also no bracelet until I go buy the correct rope to make this.
Cool idea though…
@Em, try butcher’s twine
this is awesome (which you already know). I saw this posted on Pinterest earlier today, went over to the hardware store on my lunch break (3 blocks down, 3 blocks over) picked up cotton twine $2.99 and 20 brass nuts .37 cents each and braided this sucker at my desk. I wish I could share a picture – it’s smashing.
Thanks!
wow!really great site here!
ohh you’re great =) I made those hex nut bracelets, check out mine =)
http://irem-just-a-dream.blogspot.com/2012/04/bracelet-week-day-5.html
Just a thought…about the need for three hands…I haven’t attempted this particular bracelet, but I have made braided bracelets and necklaces in the past, and I have found that a clipboard serves nicely to hold the beginning knot and keep the braid taut while working on it.
i love the idea but i cant get it to work. does the string have to be twine?
awesome! I found quite heavy but lovely! I couldn’t wear all night.
I’m going to try with different beads.
I made my very own braided hex nut bracelets and necklace! http://houseofbauble.tumblr.com/post/21602325425/inside-the-designers-studio-braided-hex-nut-baubles
these are sooo cool! I made mine with neon cord and tiny hex nuts,they are so cute!! did a pink and an orange one and I’m definitely making more!!!
http://miouprincesslovespink.blogspot.com/2012/04/arm-party-diy.html
forgot to mention that I did link back to you,of course! :))) thanks again for sharing this,it’s my favourite DIY bracelet!!!!
Love this bracelet looks amazing thanks for the tutorial.
Jewelry Rage
This is an awesome tutorial, thanks so much! Very cute!
I clearly suck cause this is so HARD hahah… cant get the bolts to stay put!
These are MUCH closer to the designs by Noise Girl. If you don’t feel like making, cop them here! http://www.zadenrow.com/blakescotland and http://www.zadenrow.com/greyera
Love this bracelet looks amazing thanks for the tutorial.
Clearly I’m missing something. Trying to do this right now and am incredibly frustrated! Can’t seem to get bolts to stay in position and I’m only only bolt 4.
I am honestly in love with your creations, not only they are creative, as a matter of fact, I don’t get to spend a lot of money. keep it up girl, and some time, I can feature this tutorial in my page too.
Really nice! The tutorial makes it look easy!!!
Any way of finding out what the size nuts is and the mm on the twine?
also would anyone know where I can get a squeeze lock that will finish the ends and where I can attach a clasp lock to??
where do you find the cotton butcher’s twine? or can it be any cotton twine? and where would i find that at?
Just finished doing this. Biggest tip I can give is to keep all three strands under tension the entire time while putting the nuts on, or else they’ll just turn into a mess.
Other than that, it turned out beautifully! Thank you so much!
[For materials, I used household twine (cotton/polyester) and machine screw nuts (#10-24), both from Home Depot.]
I’m a bit of a crafting newbie so forgive my ignorance. How do you get the finished bracelet to tie on so tightly? Is there a certain type of closure or knot? I absolutely love this project. I’m going to try it with leather, too.
@Laura, for this particular tutorial we’ve just fastened the bracelet by tying it into a double knot. because the string is so thick, it’s pretty easy to remove and tie again.
Hello,
I am taking a class that requires that i get people to fill out surveys would you mind helping me out?
https://docs.google.com/spreadsheet/viewform?fromEmail=true&formkey=dDdjWGMtb0lHZ0h2Z0pjMFVvUWw1d0E6MQ
Such a great DIY! I wanna try this out for a set of bracelet and necklace. I will start getting the materials pretty soon before my mom will learn about this post, LOL. I will be making the set for her. This is a unique gift idea. Thanks for sharing.
okay i made the bracelet. now what kind of clasp systems can i use to put it together and stay on my wrist? do i just tie the twine in another knot ?
@Valery, just tie it in a knot!
Looks a bit like a feather! Great idea!
Where did you get the hex nuts?
cool! I love it!!
I’m glad i came across honestlywtf.com
http://darling80m.tumblr.com
http://ofwhatdoyouspeak.tumblr.com
I did this yesterday with washers instead of hex nuts and added toggles for a closure. I love it!
Hi! I love this bracelet! How did you tie it on?
This is awesome! I made one with silver screws and black cording instead of twine and it looks gorgeous too 🙂
Brilliant! So original.
Hey! i loved the bracelet!, i will start to sell all those kind of bracelets, now i have a page were i sell jade bracelets and more! if you want to buy go to http://www.micsbracelets.com
here do u get all of these great ideas!!!
omg this is like the best butttttthollessssssss
$185.00–NO WAY. Thank you for the tutorial/pattern, will make my own (thanks to you)
OMG!! I just have to try this! I hope that i’ll find enough of these golden hex nuts at home. Thank you very much for this awesome tutorial!
I guess I’m the first guy to take a stab at this. Made this for a girl I am fond of.
Thanks for the idea!
Cheers.
Love the jewellery, so pretty and individual – love the creativity and attention to detail. Would love any feedback you might have on my engagement ring website http://www.perfectring.ie – Many thanks
o.m.g i love it 🙂 🙂 🙂 !!!♥
This article will assist the internet people for setting up new web site or even a
blog from start to end.
I made one of these and it looked amazing. I loved it!
This looks so much easier then I would ever had imagine. I love it ! Must try it soon ! Thanks for the tutorial !
Brilliant tutorial, am making a version with my guide group tomorrow evening, but with round beads instead.
Thank you!
I don’t even know how I ended up here, but I thought this post was good. I do not know who you are but definitely you’re going
to a famous blogger if you are not already 😉 Cheers!
I have just discovered your website and I already love it! Beautiful blog and good ideas!
I made it! I love it! I doesn’t look nice and neat like yours. It is sort of here and there, but it may have something to do with my string being too small???? It still looks very nice. Did you feel like you needed another set of hands? lol I used duct tape.
This will not work. I have tried for 2 HOURS AND I HAVE NOT GOTTEN ONE BOLT ON IT. I’M SORRY, BUT I AM NOT PERFECT ENOUGH TO MAKE THIS.
wonderful….looks so chic 🙂
That’s awsome! I will try it in this evening!
Incorporate this as shoulder braid for Steampunk costumes or part of cosplay ‘armor’…?
DIY is fun!
how do you fasten the bracelet together is there knot you tie or a closure you use I would like to make this for my granddaughter but not sure how to fasten it on her wrist.
Thanks Todd
Really like your DIY bracelets. They are beautiful !!
http://www.etsy.com/shop/mirrru
Thanks for sharing! Mine turned out great! I threaded all the nuts on first before braiding–that helped a lot!
Excellent beat ! I would like to apprentice while you amend your website, how could i
subscribe for a blog website? The account helped me a
acceptable deal. I had been a little bit acquainted of this your broadcast
provided bright clear idea
Feel free to surf to my web site is garcinia cambogia effective – Star,
Super idée.
Ce bracelet est magnifique et très original.
Merci pour ce tuto.
So sad someone complained about copy write and pulled this from pintrest. 🙁
Nikki F. I got the same email from Pinterest. Wonder why it was pulled due to copyright issues. Wish it could still be on my DIY board.
Great blog! Do you have any suggestions for aspiring writers?
I’m hoping to start my own website soon but
I’m a little lost on everything. Would you
advise starting with a free platform like WordPress
or go for a paid option? There are so many choices out there that I’m totally confused ..
Any suggestions? Many thanks!
i dont have any hex nuts laying around but i still wanted to try this out, so i used some simple crafting beads and yarn. it doesnt look as good as the hex nut bracelet here but its still pretty nice 😀
this is amazing.
http://tinygoldengirl.com/
I wanted to thank you for this wonderful read!! I absolutely enjoyed every bit of it.
I’ve got you saved as a favorite to check out new things you post…
My website … Garcinia Blast Supplements
Thanks for finally writing about > DIY Braided Hex Nut Bracelet < Liked it!
My website: red velvet antler
sehr schön danke …:)
Very innovative technologies here. I like the idea of remote control through a cell phone, especially when integrated to the level of remote locks, lighting, and plug adapters. The sprinkler system idea is also intriguing.
I have picked cheery a lot of useful clothes outdated of this amazing blog. I’d love to return greater than and over again. Thanks!
This is a great idea, and great-looking too! Just, PLEASE put a warning up saying that this is only for experienced crafters, because I’m not very experienced and I tried this several times and it NEVER worked.
Wonderful post. I appreciate your attention to this subject and I learned a good deal.
This was amazing tutorial.
Love this idea…… But am I missing the part about how you keep it on your wrist? Do you wrap it two to three times and then have to tie it with one hand? Just asking…..
Tɦis is mƴ fiгѕt time go to ssee at here ɑnd i aam іn fact happy to гead everthing at one place.
This is very nice one and gives indepth information. thanks for this nice article.
Love it! This is my favorite accessory!
http://www.thetravelingdyosa.com
It is not my first time to go to see this web page, i
am browsing this site dailly and take pleasant facts from
here daily.
For hottest news you have tto pay a visit the web and on the
web I found this web site as a best web page for hottest updates.
I do accept as true with all the concepts you’ve offered ffor ylur post.
They’re really convincing and will definitely work. Nonetheless, the
posts are very brief for starters. May just you please lengthen them
a bit from next time? Thanks for the post.
Love this!!! How big are the hex nuts? Want to make asap!
That’s awsome! I will try it in this evening!
Such a great DIY! I wanna try this out for a set of bracelet and necklace. I will start getting the materials pretty soon before my mom will learn about this post, LOL. I will be making the set for her. This is a unique gift idea. Thanks for sharing
facebook full site on mobile device
You should of been clear on what kind of rope to use. I was getting the supplies to make the bracelet and you have “twine” listed. However what you are using is not twine. Twine is a more slippery rope which makes this DIY impossible. Now I have all this slippery twine with nothing to do with it…also no bracelet until I go buy the correct rope to make this.
Cool idea though Best of Happy Birthday Wishes
Love this idea…… But am I missing the part about how you keep it on your wrist? Do you wrap it two to three times and then have to tie it with one hand? Just asking
nice.. thanks. just wanted to show that this is nice.. Birthday wishes and quotes
hahaha, it is so wonderful!!! Thanks!!!
So cool
I love it
Wow, it´s so gorgeous! I´m going to try this once i love it
thank you so much for your share ı like this.
Going to try and make one for the wife looks Kool
What a great approach to the subject, I was looking for. Thanks for these tips
http://www.3escorts.com
i love it
Awesome ideas … truly DIY ❤️….can’t wait to try a few!!!
Great ideas especially for school student learning to braid using things their father and mmothers may used in the house.
lovely
Wow! These are amazing!
Complimenti con materiali di consumo si realizzano gioielli
Hi. What size hex nuts did you use? I looked on Amazon and there are an overwhelming amount of different types. ♀️