I must admit when Grace, of The Stripe, suggested that we each try making our own Markus Lupfer-inspired sequined sweater, I was uncertain. Attempting to attach tons of tiny sequins onto a sweater seemed difficult and downright messy. But I’m known to never turn down a DIY challenge and after the first successful attempt, I’m happy to report that this tutorial isn’t nearly as difficult as it seems. Because I chose a design that covered a lot of surface area, using sequin trim was a huge time saver. Thank you, Grace, for motivating me to just go for it!

You’ll need:
- a sweater (I went two sizes up)
- 10 yards of assorted sequin trim
- pattern (downloadable here and here)
- fabric pen
- Jewel-It glue (last used here)
- scissors
- tweezers
- needle & thread (optional)

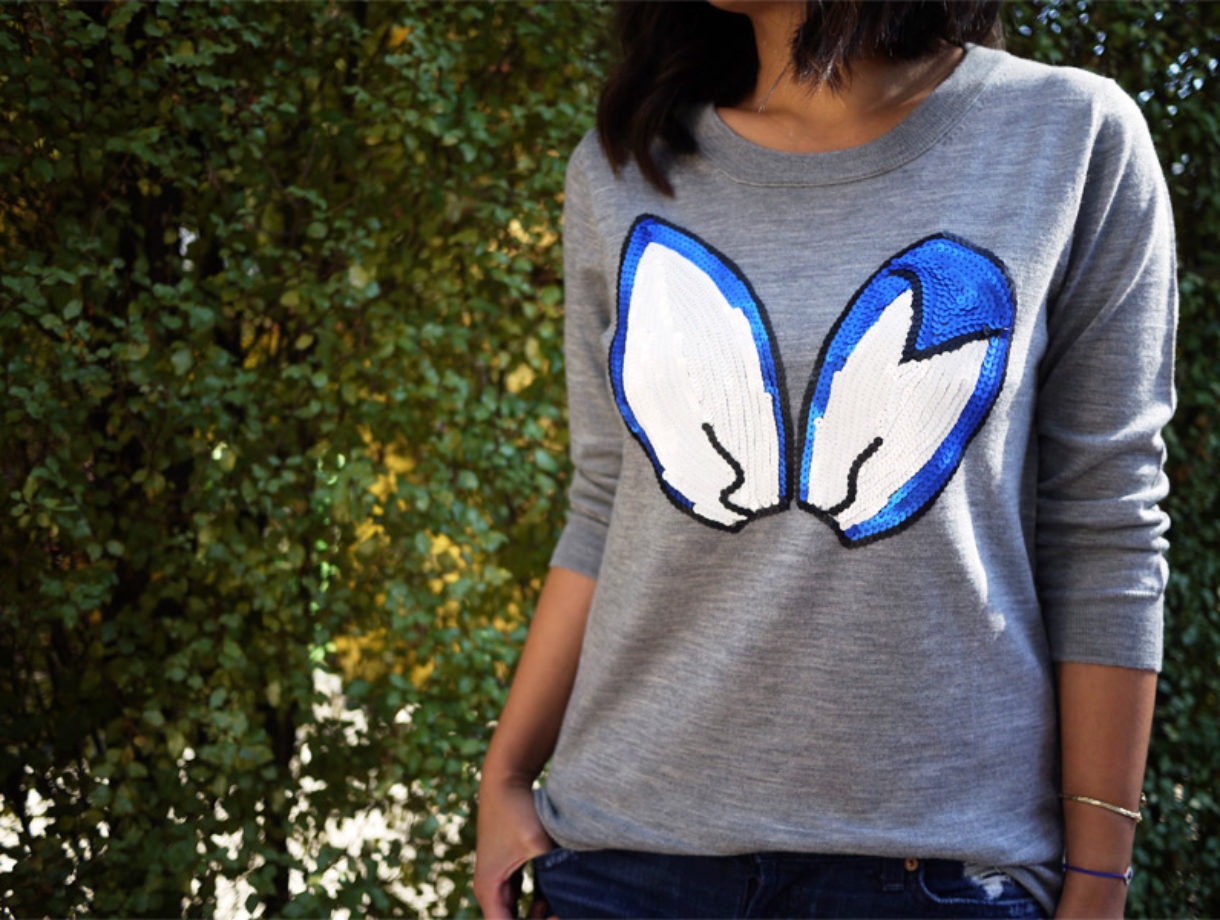
Print the pattern at 100% scale. Cut out the pattern and position the ears on the center of the sweater. Trace the outline with a fabric marker or pen.

Run a very thin line of glue along the inside of the outline. I like to work a few a inches at a time. Lay the black sequin trim over the glue and gently pat it down into the sweater. Continue adding glue and trim until the outline is complete. Cut the trim with scissors and glue the last sequin down with a small drop of glue.

Continue onto the next color. Run the next line of glue close to the previous row of sequins. Using the pattern as guideline, trim the sequins and glue down accordingly.

Fill in the rest of the empty space with white sequins. Don’t worry if some sequins fall off the ends of the trim as they can be fixed later.

Continue gluing and don’t forget to use the tweezers to help with tight areas.

Once both ears are filled in, add any additional accents with glue. If there are any bald spots or frayed ends, cover them up with loose sequins and glue.

Allow the glue to dry completely. An optional step is to reinforce the sequins by stitching sections of sequins onto the sweater from the backside.

And you’re finished! The sweater should be dry cleaned only.

Don’t forget to head over to The Stripe to see Grace’s purr-fect version!

(all images by HonestlyWTF)
This is so genius….the sequins actually dont seem like the are “too much” b/c of the coolness of the design!! I’m definitely going to be trying this over the weekend!!!
xoxo
Candy
taylor & DEMOLISH
Enter my ‘taylor & DEMOLISH + Amrita Singh’ Collaboration Jewelry GIVEAWAY!!!
So nice!!!
Lovely Idea
This is soooo cute!
Interesting idea– love the design!
http://aclosetintellectual.blogspot.com/
Love it!!! It looks easy do to!!
http://bonnieclydemarni.blogspot.gr/
Love the design!
http://cravingforbarmeys.com
I love this diy, it’s so cute!!!
http://thestelstyle.com/
Great style and east to make. I will try this on my t-shirts and hope will do better.
Another DIY fave. I love sequin sweaters. =)
Satisfy Your Cravings For Celebrity Style and All Things Stylish and Sweet
It doesn’t look like DIY 😀
New post on SEARCH IN FASHION – DIY Inspiration: Sweaters
Markus Lupfer style, how cool!
Simply awesome! x
Omg! This is so simple yet it looks so detailed! Can’t wait to try it!!
OMG how awesome! looks so stunning!! but still, your DIY looks like it takes long time. How long did it actually take you??? 3 hours? or longer?
http://www.violetfleur.com
This is amazing, love it!!
xx
http://thekirbybee.blogspot.com.au/
Wooow, so cute! Never thought about this idea, but very nice!
I like! 😀
http://www.fashionique.de/
Very nice!
Woooow! Cool!
I’m a fan of this KA-POW trend but also of printed sweaters and yesterday I DIYed one 🙂
http://www.9lla.it
fashion – trends – DIYs
Making this Thursday at my crafting party! Love! I feel like even if i suck at drawing it will still look good.
omg i need one of these. i would say that i should make one, but i know i would totally screw the pooch on this.
OMG – so CUTE, and so chic – I LOVE it!
XOXO
-Daisy Nguyen from PS BANANAS fashion blog:
http://psbananas.com
This is so cute. I love the giant ears and that it leaves your mind imagining the rest. Super cute and great color choice.
xoxo
http://www.thewrittenrunway.com
Thanks for sharing
http://kittengirlclub.blogspot.com/
You had me until “Reinforce the sequins by stitching them onto the sweater from the backside”. All of them!? Stitch them?! Ha! I’ll pass. Super impressed by those (ie: you) with the patience to actually do it though!
http://nomadic-d.blogspot.com/
Pretty and funny- love it!
So cool! Glad I found this site!!
Johnnybell
http://Www.nytrendymoms.com
Love, love, love how yours turned out!!! xoxo
adorable design!
Bises,
monkeyshines
http://monkeyshines-monkeyshines.blogspot.com/
the effect is amazing! but I think it is to hard for me to DIY 😉
Really beautiful !!
I’m posting accessories from Los Angeles on my blog!
Take a look!
http://www.thegavlaks.com
OMG! So cute!! Great idea!! Thanks for sharing this!! xoxo
http://www.hellohellofriday.com
Fantastic diy!
From http://www.xeanafashion.com
The sweater looks so awesome now!!!
xo
FRENCH CONNECTION AND DR. HAUSCHKA GIVEAWAY
glamDevils
Flipping awesome!
Very creative DIY! If I only thought of these ready made sequin strips earlier – I wouldn’t have stitched sequins on my clutches one by one!
Lubna
http://www.ellevox.blogspot.com
http://www.ellevox.blogspot.com
http://www.ellevox.blogspot.com
http://www.ellevox.blogspot.com
dashing awesome!!!!
Love it! Will definitely try this one. Your DIY designs are great!!
Candice
So creative, what a fab idea!
le fresne x
very well done!
http://www.suspironews.blogspot.com
OMG
I rather just pay for the sweater
that is so time consuming, not worth my time!
But what great do it yourself
This DIY is amazing! I need to do this!
http://thelittletexan.blogspot.com/
Now the markus lupfer sweater is $425. Going off of the site you provided to buy sequin trim, 1/4 of an inch is 25 cents. To get 10 yards of sequin trim like you suggest would end up costing $360 …. Sometimes you should just buy the damn sweater.
@Justine, the sequin trim is 25 cents a yard which makes the total cost of sequins $2.50. @Chrissy is correct – Sequins direct requires a minimum purchase of 36 yards ($9). However, you can probably find sequin trim at lower quantities on Etsy.
Very cool!!
Justine – it’s 25 cents for a yard of 1/4″ size sequins… for 10 yrds it would be $2.50 … but the minimum order is 36 yards which is $9.
OMG! It’s awesome! You have wonderful ideas !
So perfect! Easy to do and very stylish, love it!
That is a reallly DIY I want to try but I am hopeless 🙁 too clumsy for this
Cammi @ Cammilicious.com
Hey, you’re right, it doesn’t look so difficult as it seemed at first. Or you make it look easier! Turns out beautiful. Going to try it out!
Hands down my favorite DIY of yours. Absolutely genius.
Collections
Omg this is clever and cute!
Amazing!!
I have to try this for sure!
🙂
Allison
A’s Fashion Files
Shop Kawaii Kitsch by A on Etsy!
That is ah-dorable! Well done!
http://www.inherentstylela.com/
Great and so easy!!
kisses
My white idea
This is amazing- great job! I really love the bunny ears.
Lotts x
http://lottsandlots.blogspot.co.uk/
Wonderful ! I want to do the same …
thanks for this idea
OOOO! Such a rad DIY. Will definitely be giving this one a try… 🙂
xx Love & Aloha
http://elisharon.blogspot.com
**Swing by and enter for you chance to win a gorgeous metal collar necklace! 🙂
This is awesome and so cute, but I don’t know if I’d have the patience for this one. I’d love to know how long it took you in total!
http://www.whenwewander.blogspot.com
What a lovely sweater! Now I’m tempted to do one on my own 😀
startofadance.wordpress.com/
So cool, i love it…..Thanks for sharing the idea!!
Enjoy your day!! 😀
This looks amazing, so well made!
xx Tanya
http://aciddreamsandsugarhighs.blogspot.com/
It looks very cute, thank you for sharing:)
Find your favourite gifts here:
http://www.ccchinachic.com/products/5-coupon-gifts/c-161/
This is soooo inspirational!!
http://lovelittlelulu.blogspot.co.uk/?m=1
Thank you so much for this tutorial! I’ve been wanting to get my hands on a Markus Lupfer sweater for a bit now, but they’re simply not affordable for me. Now I can get creative and get a similar effect. Great job!
just awesome
Wow!! You have been wonderful! Last year I made a very similar! I leave the link for you to see
http://www.desdetenerifeconamor.com/2012/01/diy-t-shirt-ring-of-markus-lupfer.html
I made mine 🙂
I did my own little twist and personalizations
its super easy and fun
and in the end you get a super cute and unique shirt
i didnt think it was bunny ears it looked like something else
I love this! Definitely want to give it a go
that is an amazingly cute idea for DIY! 🙂
I tried this DIY and it turned out great! Thank you for the inspiration!
Check out how mine turned out here: highstreetwind.blogspot.com
So cool im going to try this
Wow, this is so pretty. You are increadibly creative.
http://istyled.blogspot.co.uk/
So cute! And still i cannot do it.
Fantastic idea!!! Thanks
So much creative tips and tricks you sharing in this beautiful tutorial. Thanking You
Thanks! Your ideas are literally admiring. Good Work, keep on posting.
Thanks for sharing some great ideas with us, it so easy to find what you need…