With Earth Day just around the corner, we’re turning to artist and environmentalist Chris Jordan for inspiration. In this large-zoom photograph he has captured 1.14 million brown paper supermarket bags, the number used in the US every hour. And did you know that 2.7 billion plastic bags are used every day worldwide? Floored by these staggering numbers we were motivated to do a quick and easy DIY, recycling an old t-shirt into a reusable fringed market bag. We hope that it will also inspire you to use less plastic and paper!

You’ll need:
– an old t-shirt (the larger the shirt, the larger the bag)
– a pair of scissors
– a safety pin

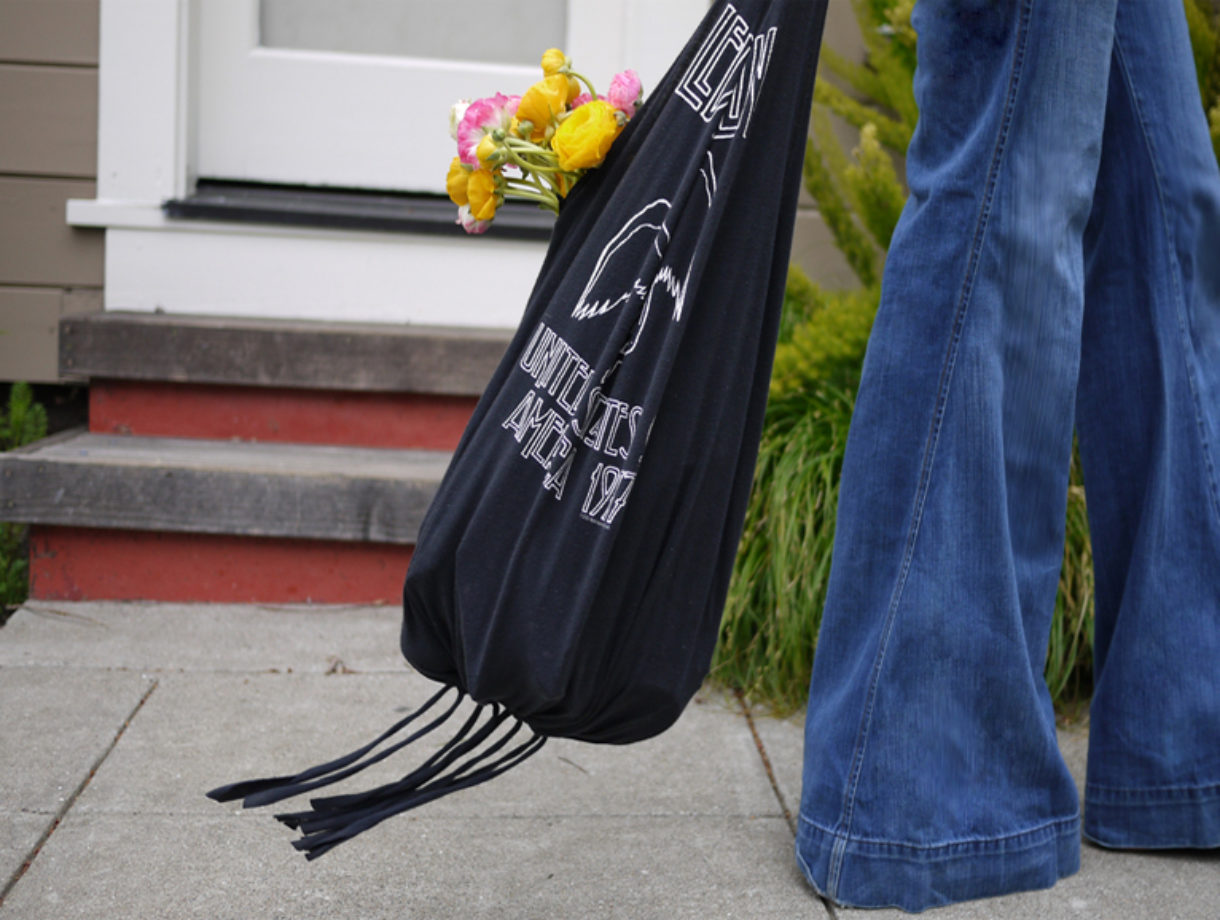
Lay the t-shirt on a flat surface. Start by cutting off the sleeves, using the seams as a guide. And using a round plate as a guide, cut out a half circle into the neck of the t-shirt. To create the ties that will cinch the bottom of the bag, cut 2 one inch strips from each of the sleeve scraps. Cut each circular strip open and pull at the ends to stretch them out, creating 4 strings total. (Click images to enlarge)

Snip 8 evenly spaced slits along the bottom hem of the t-shirt. We cut 3 in the front, 3 in the back, and one each side.

Attach a safety pin to the end of one of the strings. Starting at the left side of the shirt, thread the string through two sections so that both ends come out from the left hem of the shirt. Do the same to the right side of the shirt with the 2nd string. Starting at the middle slit, thread the 3rd string through the section closest to the left side, under and over the 1st string and through the opposing section. Repeat on the other side with the 4th string. Pull each section tightly, tying the strings into double knots.

You can trim the strings but we like leaving the fringe as is. And . . . your new recycled market bag is finished!

Aren’t you excited to BYOB (bring your own bag)?

Make one for a friend. It’ll make their day. Happy Earth Day!

(top image from here, rest of images by Honestly…WTF; thanks to Leethal & Lynn for the inspiration!)
This is freakin’ awesome! Love this DIY, will definitely try to make this bag!
xoxo
http://fashionagony.blogspot.com/
Excellent! So simple and so cool! And what a great way to make use of all those beloved t-shirts I can’t bear to part with but never wear anymore!
http://nomadic-d.blogspot.com/
Love your DIYS as usual.
xx, http://wordbyjessie.com/
Awesome! Simple yet BRILLIANT DIY : )
x
Michelle
Michelle’s Style File
I love this. You just made the t-shirt bag so much cooler with the fringe. I so want to do this today. Thanks for the DIY.
xo-http://AlbeeLucky.blogspot.com/
Wow, well done this market bag rocks!
THIS IS AWESOME!!!
This looks great! Love it paired with the bell bottom jeans. Definitely have to try this out.
Collections Shopbop Giveaway
Um, greatest diy ever!
Love it! Thanks!
Just a Silhouette
AMAZING!
LOVE This!!
I love the use of the rock n’ roll t-shirt!
xo
http://cestclassique.blogspot.com/
This is so freakin’ cool!! Can’t wait to make my own!
A no-sew DIY is always appreciated for those of us who, um, tend to hurt ourselves. Beautiful and so responsible! Now we WANT to grocery shop this week.
http://calypsoletters.tumblr.com/
love this! I’m going to hunt for a cheap vintage tee and try this out!:)
Just found your blog through Bloglovin’… love it!!!
-Jade
This bag literally just took me 15 minutes to make! Great DIY!
Oh! This looks great. Reminds me of those dresses I used to wear as a kid with the shredded t-shirt ends and beads. Can’t wait to give this a go!
how clever are you? Love the fringe! (and yipe! those numbers are a serious reminder that I need to get to WORK making reusable shopping bags; I’ve been meaning to do it for a long time)
I just finished the bag in no time at all and it turned out awesome. Great project!
Swoon!!! Trying to replicate this weekend for sure!!!
Patience
https://honestlywtf.com/
Great idea! Love all these diys you guys have. Xoxo
I love this bag, but am a little confused at the point of the gathering at the bottom. Can someone help me out, I am dying to try this!
@Linda, you basically run the 4 strings through a few sections at a time in order to cinch it closed. the reason why i’m so specific about the method and order in which to thread the strings is so that the fringe is evenly spaced. you can always just run one string through all the sections, creating one big cinch at the bottom of the bag. hope that helps!
this is amazing!! such a good idea, so inspiring.
january, x
jessicajanuary.com
LOVE THIS!! I have made the t-shirt tote but didn’t think to leave the strings to hang as fringe. BRILLIANT!
I just made this right now, really easy! And i love it! <3 Thanks for the idea!
Holler!
ok this is amazing!!! and I am doing this ASAP
Erica, that helps a great deal, thank you! On my way upstairs to find a t-shirt right now!!!
You’re some kind of genius. xxxx
I love this! I made one yesterday and it’s adorable x)
Love this! I just posted a DIY project myself, check it out!
http://www.thevoide.com
This is too cool. Ok, gotta go – going to raid my husband’s tshirt drawer now – he won’t mind.
Am I the only one that is bummed you cut up a perfectly worn Zeppelin tour shirt?? I love this DIY, but as a tour shirt enthusiast it breaks my heart. I am praying it is a replica from Target or something… Note to other T-shirt hackers: please please don’t hack up tour shirts. There are weird people like me that collect them and treat them as historical artifacts. One person’s trash…
PS- I love your blog and read it every day. This doesn’t change that. <3
I have this same shirt, but in gray, and I love that I have it but I NEVER wear it… I’m totally going home to make this back. right now.
Wow! These are amazing!! Will definitely try it!
forshoeswefall.blogspot.com
woo, i didnt imagine i can recycle our old t-shirt like that, actually my husband have many old t-shirt. it is a time to clean them up and have meaningful gift to friends !
i saw this today and thought it was so great that i ran home and did it right away. so easy! i can’t wait to try it on more t-shirts!
This is great, however the part at the bottom is really confusing! What are we threading the strings through? Do we sew a tunnel first? I re read this a few times and I am a sewer and I still do not understand. Please explain!!
@Aja, after you cut the sleeves off and the half circle in the neck, pick the shirt up by the shoulders (now the handles of the bag). the bottom of the bag (bottom hem of the shirt) is completely open. you’ll need to thread the strings through the bottom to cinch it closed. no sewing required! unless, you wanted to turn the shirt inside out and sew the bottom closed . . . hope this helps!
Ok I understand now! You cut the slits about an inch or two above the bottom hem so then the bottom still stays together! I’m going to try it now. Thanks!!
Well, this beats those expensive green market bags on sale on the supermarkets.
I made two this weekend! Totally awesome, and i LOVE not having to sew anything.
LED-ZEPPLINNNNN !!!!!!!!!!!
WHERE ARE YOUR FEET?
please help!!! i have nooo idea how to “thread” the bottom with the pin.. zoo extremely confused.. you attach 1 of the 4 strings to a safety pin and then what?
@KonfusedKid, the strings are used to cinch the bottom of the shirt closed. So first you will have cut slits into the bottom hem of the shirt, creating passageways for the strings. I suggested 4 pieces of string for a fringed look. The strings are then threaded through the hem of the shirt, passing through each slit that you have cut. Pull them closed and there you go! Feel free to email me if you have more questions!
Wow, this is amazing, love your diys.
Unbelievable soo cool!! Well Done
Awesome, will try this on my old jeans.
Love love love… however I just can’t seem to follow the threading order, perhaps it’s my dyslexia~ I’ve tried to enlarge the photo’s but still can’t figure out the order & what loops over what…. anyway, bag done & cute, but holes in bottom (so I obviously threaded wrong)… next attempt I think I’ll do more slits for more fringe. If anyone has a diagram for threading let me know. Love all the DIY projects you guys post ♥
@Kim, tread your strings through each slit without skipping any. the slits are only there to make the threading easier. essentially, you can take one string and thread it all the way around. the only reason we suggested using several strings was for the fringe effect. you’ll have tiny holes on the bottom but if overlaps the strings when threading each section and tie it super tight, the holes shouldn’t be a problem. hope that helps!
I just made this bag! It is really cute!
This is so easy! I did the bottem a little different because i didn’t understand the instructions, but it is super easy and takes 10 minutes!
Oh, I cannot wait to make this one! I’m about to move to a small island off the coast of Virginia and I have been looking for some easy-to-make bags I can beach comb with. This one fits the bill perfectly!
I’ve made these before, but just sewed the bottom. I love that you came up with a way to do it without sewing, it’s so cute! When I use them at the grocery store more often than not the bagger will hand them back to me and tell me I accidentally put a t-shirt in with my other bags. When I explain they either think it’s a great idea, or they think I’m totally weird. I also use these as gift bags. One time I even did a freezer paper stencil on the outside and gave it as a gift.
This is amazing!
http://lushluxelovely.blogspot.com/
i just made my bag from one of my sons old skull and crossbones t-shirts and it rocks!! it will make the perfect pool bag!!!
I just made a rockin’ bag for myself, and I am planning to make some as Christmas presents for all of my friends. I know they will love the quirky, yet chic style of the whole shebang!
I’ve made three of these already and they’re so wonderful! Thank you!
I’m still confused on how to do the bottom of the bag 🙁
I love this! I just made 2 “bags”. theyre so cute and easy to make!
i tried it… not as good as in the pic but still freein awesome!!!!!!!!!!!!!!
Has anybody come up with a clever way to make the top a little more finished looking? I tied a couple more strips of tshirt on the shoulders to gather it and make it a little better.
this is awesom — but yeah, i don’t get how to do the bottom, help!
Cool, i love it
I’m glad that someone posted about the Zep abomination! It does, however make an adorable bag. I would be just as excited to carry that bag than wear the shirt. This is really a great idea, i think we all could at least head down to our local thrift shop and save some paper and plastic. I am still confused as to how the top photo represents all the plastic and paper but I’ll keep staring at it until it makes sense.
Simple way to help the environment. And those numbers about plastic bags are really just awful.
This is too cute! Easy to do roo. I found it on Freshmade NYC on Facebook! http://myemail.constantcontact.com/Cooking-with-Freshmade-NYC—Upper-East-Side-Mini-Session.html?soid=1106634228612&aid=wqfyXPQVb9Y
i am really confused! i need a video!
This bag is SO EASY! As with so many others, I’ve got so many t-shirts I just don’t wear anymore. Because many have such sentimental value……this bag ROCKS! I look forward to going out today and using it for the first time! Thank you so very much for sharing such a wonderful idea!!!
Amazing! Took me longer than it probably should have haha. I was a bit confused about the string part and which holes to go through and skip. I ended up doing every other one with one string, and then going back through the skipped ones with another string. I’m sort of new to the whole DIY/crafting scene, still though, it turned out quite lovely. There are some tiny holes in the bottom of the bag, but I’m not too concerned with that. This was a great tutorial for me! Thanks Erica!
I lve led zeppelin so this bag is the best for me
wow!!……thse r so cool man im so gonna try ths out…thnxxx 🙂
Love this and especially the bell bottoms, where did you get them???
HELP!!!!!! I can’t ge thte hang of the weaving part. I cut the slits and everything… How is it threading? I mean its slits with the tshirt’s sides sewn up?! ould you maybe dumm it down for me or something? Thanks
LOL! Never mind…
What a great tutorial – it combines my loves of shopping, sewing, and being green! I like it so much, I included it on my blog… http://darlingadventures.com/?p=635
Thanks!
i had absolutely no trubel in makin dis bag. it’s soooo cool! xoxo
this is amazingly brilliant.
i just finished making mine! 😀
Made mine out of a tie-dye.. So adorbs :))
why would you cut up such a sweet shirt?!?!?!?! if you’re gonna do this, use a Prince shirt.
pretty cool. need to remember this for the future. 🙂 http://hotchocolate4sunshine.blogspot.de/
wow what a joke i suggest anyone that makes one of these “shirt bag” sends ten shirts to some homeless african children so they don’t get skin cancer….way to make a useless “bag” out of something that could be of way more importance…….way to go women i think you’re at an all time low.
Woah!! Don’t you think recycling a bag from an old t-shirt is better than going to any high street store to buy one considering that most mainstream brands & stores have dubious methods of manufacture.. Not to mention their participation in creating a world where their CEOs & stockholders have insultingly luxurious lifestyles whilst “homeless African children … get skin cancer”. 🙁
Sorry and also I found it very sweet that this post was made to inspire people to think about their effect on the environment 🙂
Great post, I love a good DIY project. I am getting a bit old for T-shirts but don’t want to get rid of them. This is a good way to recycle. Thanks 😀
Shopping online for branded shoes has lots of advantages over traditional way of shopping. On internet you can visit a range of stores offering shoes on the internet in a short span of time. This way you will be able to make comparison in terms of brand, looks and prices in order to get the best deal possible.
http://www.dukanee.com/shop/cl_2-c_1910-p_1897/kids/girls/girls-shoes/sandals.html
Did you use a man’s T-shirt? In which size?
Thanks =)
I loveeeeee making these bags, I kid you not. I’ve made around like, 10. 5 out of my shirts, and a few others for friends. I can’t stop making these xD
I have a fun little thing to add too: If you want to widen the bag a bit more, get something heavy, like a dumbbell weight ( i use 20lbs), put it inside the bag and lift the bag just so the weight pulls the bag down a bit to stretch it and makes it bigger by a bit 😉
Just made mine! Perfect for the beach and pool 🙂
LOVE this… Kind of confusing in the beginning, but I got through it and it turned out AMAZING 🙂 thanks
i just made one from an old Upper Playground t-shirt which took me no more than 10 minutes from start to finish.. however, since the holes at the base are annoying me, i am going to undo that portion and pin the fringe to the bottom (while t-shirt is inside out, of course) and then sew it all closed to assure that nothing falls out.
another idea is to cut a circle patch/liner to sew onto the base of the interior, so the hole becomes irrelevant…
that doesnt help the non-sewers though. bummer.
you have a wonderful blog with tons of awesome ideas. thumbs up on this diy.
Its really something which is meant for everyday life, really a stuff for everyone.
Just made 2 of these! Such a great way to hold on to my favorite shirts 🙂 Here’s a picture of the second one I made. Cut the fringe off of this one.
https://www.facebook.com/photo.php?fbid=10200318279590021&set=a.2136093852314.2121339.1545125857&type=1&theater
Thanks to a very well laid out.
very cute,but a LED ZEPPELIN SHIRT?? WHy! 🙁
Great tutorial! I just made one up using some other t-shirt sleeves I had from when I turned one into a tanktop. The fringe is a nice contrasting color and it looks great!
I confuse ’bout to slip the strings 🙁
This is awesome, but I was a little confused about the gathering at the bottom. I searched around a little and found another blogger who posted more pictures. When you cut the strings at the bottom DON’T CUT OVER THE STITCH. You will have to put the string through the holes like the strings in sweat pants.
Hello there! This is my first comment here so I just wanted
to give a quick shout out and say I truly enjoy reading
through your posts. Can you recommend any other blogs/websites/forums that go
over the same topics? Thanks for your time!
way to make a useless “bag” out 🙂
One of a kind purses
http://www.madkdesigns.etsy.com
https://www.etsy.com/listing/216901411/handmade-the-walking-dead-print-purse?
totally making this bag!!!!
There’s certainly a lot to find out about this subject. I really like all
of the points you made.
These subtitled look great, they are very much in my style
I really like the idea! The best part ist that it’s so usable!
Cool idea, but I’m the 11th person who can’t understand the lacing directions to finish the bottom. “Starting at the left side of the shirt, thread the string through two sections so that both ends come out from the left hem of the shirt.” So, the string loops back on itself? Has anyone done a diagram?
For my fellow visual learners, I have diagrams/modified directions for stringing the bottom hem:
http://callmest.blogspot.com/p/tutorials_19.html
It is not meant to offend this wonderful tutorial. I just want to help those who, like me, had cognitive trouble with the bottom the the bag 🙂
Again another great idea!
Biabet yeni adres, Biabet üyelik hesabı oluştur giriş yap ve ilk üyelik bahis bonusu kazan. Biabet yeni güncel giriş adresi ile giriş yaparak güvenilir para yatırma para çekme yöntemlerini kullanarak bahis casino oyunlarına para yatır. Biabet yeni adresi içerisinde en iyi bahis casino oyunlarını oynatmaktadır.
I really like the idea!
These subtitled look great, they are very much in my style
It must be very useful and relaxing. Thanks for the successful work
Danke, schön Post
Wonderful congratulations
Congratulations,
Wonderful
Cool, i love it
This is just a great idea! I love finding new DIY ideas!
great, i will try this, its amazing and easy DIY.. thanks
i really like it. Thanks you
Great ideas
Paykasa sistemi sayesinde artık insanlar çevrimiçi
ödemelerini güvenle tek kullanımlık kartlarıyla gerçekleştirebilmektedir.
Ön ödemeli güvenli sisteme sahip olan Paykasa,
kullanıcılarına sunduğu limitli seçenekleri ile hizmet vermektedir.
Paykasa kartları ile güvenle online işlemlerinizi tamamlayabilirsiniz.
https://www.paykasaguvenli.com/
Paykasa Türkiye, İnternet üzerinden alışveriş yapmanın popüler hale gelmesiyle birçok insan hangi ödeme seçeneği ile ödeme yapacağı konusunda bir çok seçenek ile karşılaşır. Kredi kartı, banka kartı ve farklı kart alternatifleri ekstra ücrete sebebiyet verdiğinden dolayı insanların güven problemi yaşaması söz konusu olabiliyor. Paykasa Kart ise tüm bu problemlerin üstesinden gelebilecek bir ödeme seçeneğidir. Ekstra ücret ödememesi, kişisel bilgi istemeden alışverişi tamamlaması güven ve ekonomik problemlerin ortadan kalkmasına sebebiyet vermektedir. Ödeme yöntemi olarak ön ödemeli kartın tercih edilmesinin en başlıca nedeni masrafları ortadan kaldırmasıdır
https://www.paykasaguvenli.com/
Biabet yeni adresi, canlı bahis casino oyunlarını oynatan Biabet en güvenilir bahis casino sitesidir. Biabet yeni adresi girişi buradan yaparak üye ol ve kayıt olduktan sonra kolay ve hızlı para yatırma çekme yöntemlerini görebilirsiniz. Biabet online casino oyunlarını oynatır.
süperbahis güncel adresinde sizlerle birlikte yola devam ediyor
http://www.superbahislogin.com/
Yüksek fırsatlar, ek bonus seçenekleri ve yüksek bonus seviyeleri, çeşitli oyun seçenekleri ile 1xbet fırsatları devam ediyor
http://www.xbet1login.com/
Günümüzün en değerli bahis sitelerinden birisi olarakta gördüğümüz pablobet güncel yeni giriş adresi ile hizmetinizdedir. Pablobet bahis sitesinin tek bir adres üzerinden giriş yapabileceksiniz.
Tinybet bahis sitesi iran merkezli olup ülkemizde de hizmetlerine devam eden bir bahis sitesidir. Yüksek oranları ve bonus kampanyaları ile bahis severlerin ilgisini çeken bir adrestir.
Takshoot bahsi İran’daki en eski sitelerden birisidir bahis sitesini incelemek için sizlere sunduğumuz giriş adresi ile hızlı ve güvenli bir şekilde bilgi alarak girişlerinizi yapabileceksiniz.
Chitabet Casino sitesine girmek için yeni adres sizlerle birlikte artık sizlere sunduğumuz kolay adres ile tek bir dokunuş ile cheetabet bahis adresine ulaşa bileceksiniz.
Tak Tik Bahis sitesi en iyi şekilde hizmetlerden faydalanmanız için sizler için sunduğumuz giriş adresi ile kesintisiz olarak bahislerinizi yapabileceksiniz.
Hot Bet sitesinde bahislerinizi yüksek oran ve güvenle yapabileceğiniz bir adrestir iran merkezli olan bu adres ülkemizdede yasal olmayan yolar ile hizmetlerine devam etmektedir.
Canlı Bahis Siteleri 7/24 bahis yapma imkânı sunan canlı bahis siteleri bulunmaktadır 2021 yılında güvenilir canlı bahis sunan adresler bulunmaktadır Sizler de Türkiye, bahis oynayan binlerce kişiye sahip yüksek potansiyelli bir ülke olması ile bahislerinizi yapabileceksiniz.
Ülkemizde oynanan ve avrupada oynana futbol müsabakalarını ücretsiz olarak izleye bileceğiniz en yeni ve güvenli canlı maç izleme platformu
Paparanın bahis sitelerinde yoğun şekilde tercih edildiği görülür. Bunun sebebi çok farklı sebeplerden ola bilmektedir. Papara ile bahis artık çok kolay
Bahis sitesi şikayet form merkezi ile kolaylıkla sorun yaşadığınız adresleri şikayet merkezimize ulaştıra bileceksiniz.
sizlere sunduğumuz adres ile radyo frekansları ve programlarını sorunsuz bir hizmetle almaya devam edebilirsiniz
Kapadokya tur bilgisi gezi bilgileri ve şehir hakkında daha bir çok bilgiye ulaşa bileceksiniz. Kapadokya hakkında daha bir çok bilgiye ulaşa bileceksiniz.
Hanımlar sizlere muhteşem bir haberim var iç giyim modellerinde yeni sezon giysileri kolayca erişebileceksiniz güzel bir adres ile sizlerle birlikteyiz.
Çeşitli oyun ve uygulamalara ulaşa bileceğiniz keyifli sayfamızda bir çok uygulamaya ücretsiz ulaşa bileceksiniz.
We hope that it will also inspire you to use less plastic and paper!
Dünya çapında güvenilirliğini ispatlamış ve yüksek kazançlılığı ile bilinen firmaların oyunlarını tercih etmenizde fayda vardır Bu adresler arasında yerini alan Biabet en iyi slot oyunları ile karşımıza çıkmaktadır. Sizlerde güvenle ve keyifle slot oyunlarınızı oynaya bilirsiniz.
Biabet güncel giriş linkini sizler için araştırarak güncel giriş adresini sunmaktayız sizlere en iyi hizmeti ve sunumu yapmaya çalışmaktayız. Biabet ülkemizde de giriş adreslerini açmakta ve keyifli bahis yapa bilmenize olanak sağlamaktadır. Yüksek oranları ve çeşitli casino oyunları ile en eğlenceli oyunlar sunmaktadır.
Yüksek oranlarla bahis yapmak isteyen pek çok kişi gibi sizlerde Biabet in nimetlerinden faydalana bileceksiniz. Yüksek oranları ve güvenli giriş adresi ile çok keyifli bahislerinizi yapabileceksiniz. En yeni casino oyunları ve bahis oyunlarına çok daha kolay bir şekilde ulaşa bileceksiniz.
Biabet sitesinin giriş adresini bulmak için sizler için sunduğumuz adres içerisinden hızlı ve kolay bir şekilde girişlerinizi yapabileceksiniz. En hızlı süre içerisinde Biabet giriş adresine ulaşa bileceksiniz. Yüksek oranları ve canlı casino oyunları sayesinde ülkemizde yeni giriş yapmasına rağmen en hızlı büyüyen adreslerin başında gelmektedir.
Biabet sitesinde kazanılacak ilk promosyon hoş geldin bonusu oluyor sadece bununlada kalmıyor site içerisinde farklı şekillerde üyelere bonuslar verilmektedir. Biabet bahis sitesi en yeni ve en güncel içeriklerle bahis severlerin karşısına çıkmaktadır en iyi hizmeti kullanıcılara sunmaktadır.
Biabet bahis adresi en iyi ve sorunsuz bahis yapmanıza ulaşa bileceğiniz güvenilir adreslerden birtanesidir. Biabet yeni giriş yolları ile en eğlenceli ve kazançlı adreslerin başında bulunan Biabet ile en iyi bahis deneyiminizi yaşayacaksınız.
Biabet sitesine en hızlı ve güvenle ulaşa bileceğiniz yeni giriş adresine sizlere sunduğumuz adres üzerinden en güvenli ve sorunsuz girişlerinizi yapabileceksiniz. Tek bir adres sizlere tüm yolları göstermekle birlikte eğlenceli yanlarını da sunmaktadır. Biabet yeni bir bahis sitesi ve bu sizleri endişeye düşürmemelidir.
Biabet casino güncel giriş adresinden biabet bonusları, biabet bahis oyunları gibi seçenekler ile biabet güncel 2021 adres linkini sizlere sunduğumu adres ile kolayca bulabilirsiniz. En yeni ve sorunsuz hızlı oyunun yeni adresi Biabet
Canlı kurpiyerler ile keyifli bahislerinizi yapa bileceğiniz gibi poker oyunlarınızı da çok iyi şekilde oynaya bileceksiniz. Biabet, en fazla kazandıran casino sitelerinden birisidir giriş adresine de çok daha kolay ve sorunsuz ulaşa bileceksiniz.
Casino oyunları ve bahis oyunları ile keyif dolu bahislerinizi en yeni adresler ve güven içinde yapabileceksiniz. Zengin olmanın türlü türlü yolları vardır sizlere sunduğumuz adresler arasında en güvenli bahis adresleri bulunmakla birlikte çeşitli casino oyunlarınızı da oynama fırsatı bulabileceksiniz.
Çok kolay ve sorunusuz gişlerinizi yapabileceğiniz güvenilir ve bir okadar da kazançlı bahislerinizi oynaya bileceğiniz en yeni ve hızlı bahis adresleri ile keyifli saatler geçirebileceksiniz. Sizlere sunduğumuz adresler sayesinde Ülkmemizde hizmet veren bahis sitelerinin giriş adreslerine ve casino oyunlarına ulaşa bileceksiniz.
Nakit bahis yeni giriş adresi sayesinde sizlere sunduğumu kolay ve sorunsuz bahis adresi sayesinde en iyi şekilde bahislerinizi oynaya bileceksiniz.
Matbet bahis adresi ülkemizde kesintisiz hizmet veren güvenilir adreslerden bir tanesidir. Çeşitli kalitede bir çok oyunada kolaylıkla ulaşa bileceksiniz.
Bonus veren bahis siteleri her zaman bir adım öndedir. Spor bahislerinde bonus almak her bahisçinin talep ettiği hizmetlerdendir. Yüksek oranlı bonuslar ve çeşitli adreslerin sunmuş olduğu hizmetlerden 18 yaş üstü tüm kullanıcılar faydalana bilir. Bonus veren bahis sitelerine bu yazımızdan da ulaşa bilirsiniz. https://www.ebonuslar.com/
en kolay eyeliner çekme yöntemleri
ketojenik diyet en hızlı kilo vermenizi sağlayacak diyettir.
Biabet bahis yeni güncel giriş adresi, Biabet TV canlı maç yayınlarını ücretsiz yayınlayan güvenilir bahis sitesidir. Biabet yeni adresi içerisinde güncel Biabet Twitter adresi yer almaktadır. Biabet canlı bahis casino oyunlarını oynatarak para kazandırmaktadır.
Biabet güncel giriş, Türkiye’de online casino bahis oyunlarını güvenle oynayıp para kazanmak istiyorsanız mutlaka Biabet bahis şirketini tercih etmelisiniz. Çünkü Biabet hızlı ve kolay para yatırma çekme yöntemleri sunmaktadır. Biabet çeşitli ödeme yöntemleriyle hizmet vermektedir.
Biabet online casino bahis sitesi Türkiye’nin en güvenilir bonus veren bahis şirketidir. Biabet online casino, rulet, tombala, slot ve poker oyunlarını canlı olarak oynatmaktadır. Sanal bahisler, spor bahisleri ve çeşitli online bahis oyunlarını oynayabilirsiniz. Biabet yeni güncel giriş adresine giriş yaparak güncel Twitter bağlantısından güncel bahis sitesi bilgilerini takip edebilirsiniz.
Biabet bahis, Biabet online yeni güncel giriş adresine giriş yaparak üye ol kayıt işlemleri sonrası online casino bahis bonusu kazan. Biabet çeşitli bonuslar kazandıran en güvenilir ve en güncel bahis casino sitesidir. Biabet yeni güncel giriş adresine buradan giriş yaparak çeşitli bahis oyunlarını oynayabilirsiniz.
Biabet casino, Biabet online casino bahis sitesi yeni güncel giriş adresiyle buradan giriş yaparak para ve bonuslar kazanabilirsiniz. Biabet Türkiye’de en güncel bahis casino oyunlarını oynatır ve sanal bahisler, spor bahisleri, poker, rulet, slot, tombala ve blackjack gibi çeşitli bahis oyunlarını oynamanıza imkan tanır.