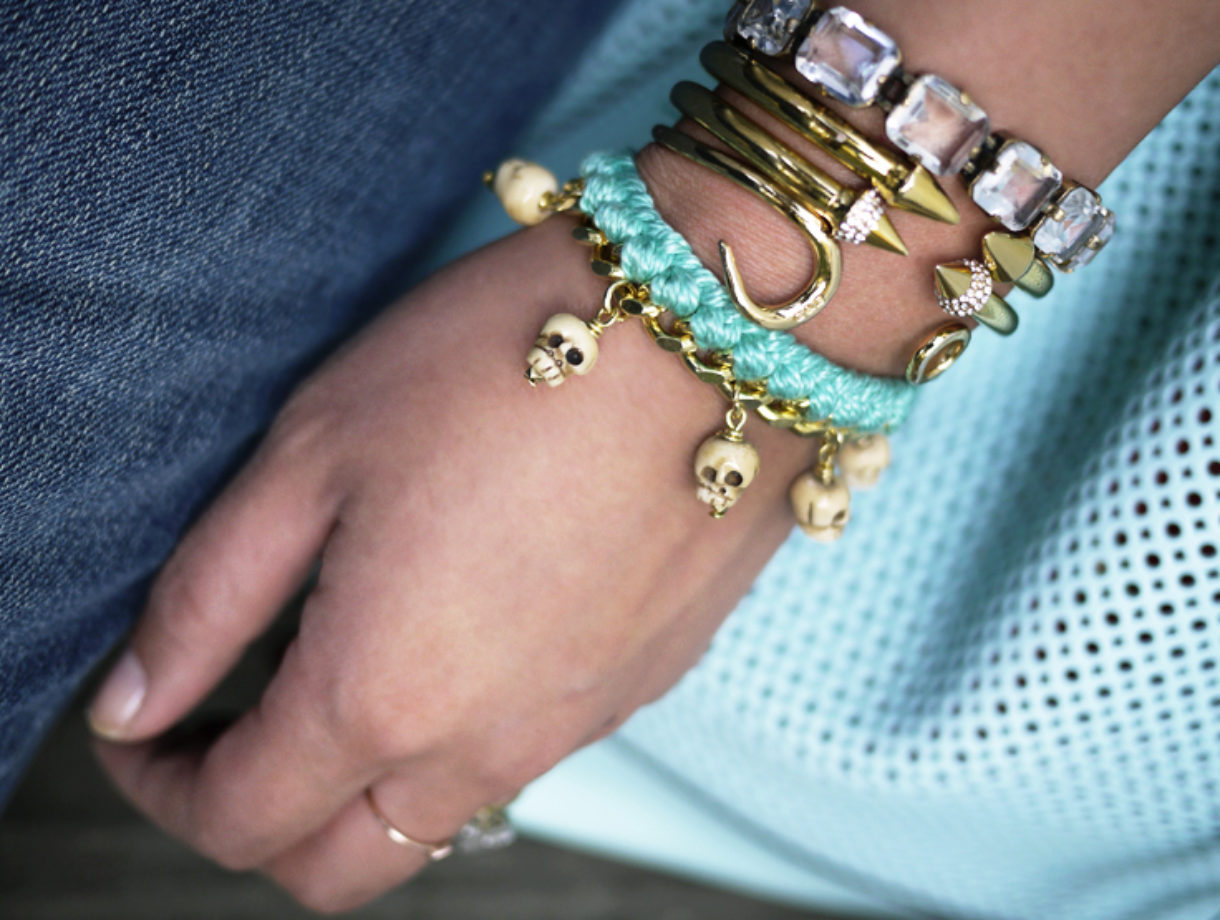
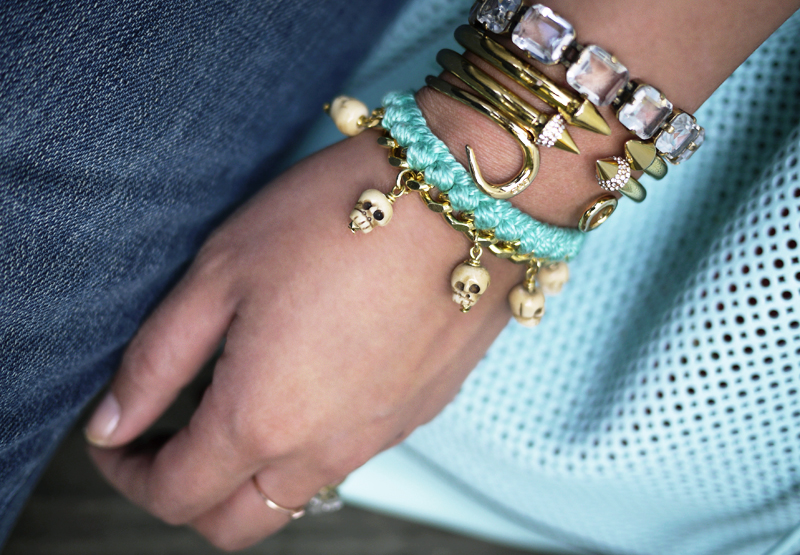
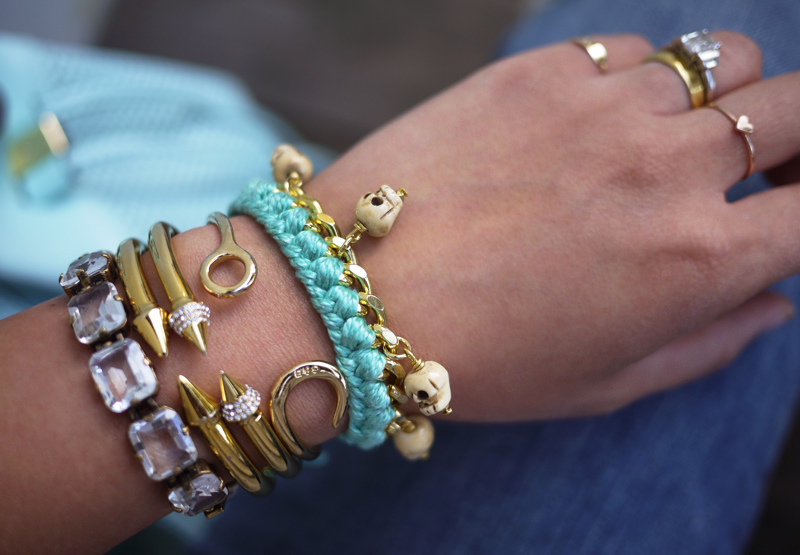
You might remember our woven chain bracelet tutorial, one of our favorite DIYs to date. As we’re starting to get a taste of spring, we’re revisiting this oldie but goodie with some minor adjustments – this time with delicate chain and the addition of mini skull charms. So grab some of that embroidery floss and let’s get weaving!
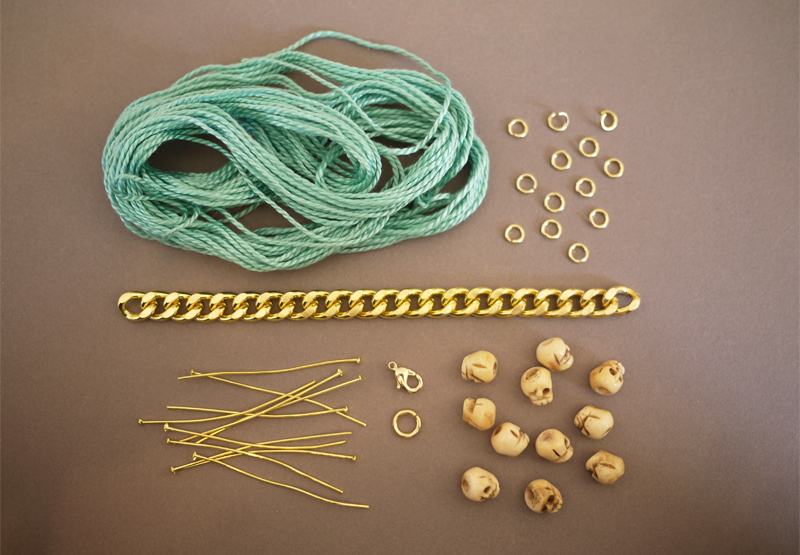
You’ll need:
- embroidery floss
- curb chain
- 7 skulls or charms
- 7 5mm jump rings
- 2 7mm jump rings
- 7 headpins
- 1 lobster clasp
- 2 bobby pins
- chain nose pliers and flat pliers
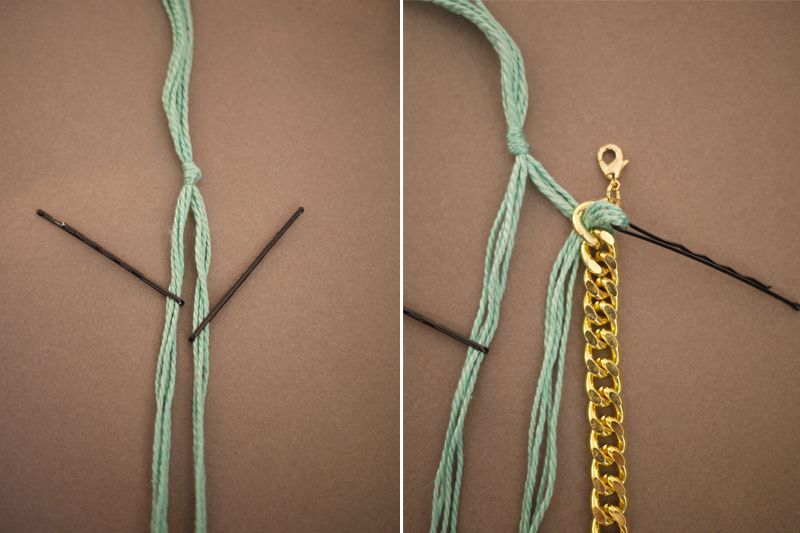
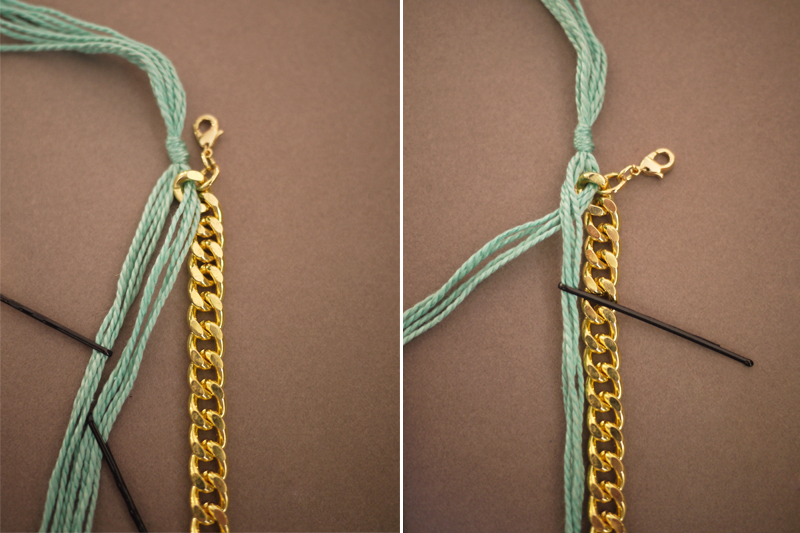
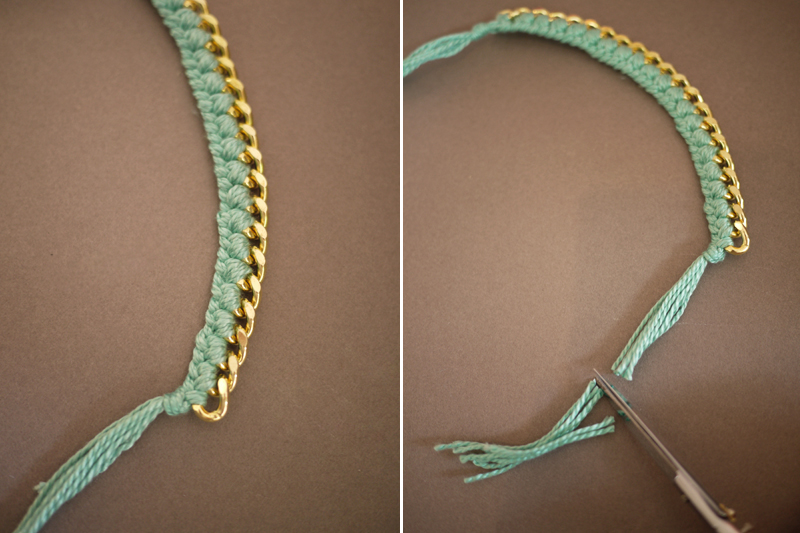
Start by cutting 8 strands of embroidery floss, with each strand measuring four times the length of the curb chain. Knot all the threads together, leaving about an inch and a half of slack. Separate the bunch into 2 groups of 4 strands. To easily weave the threads through the links of the chain, sandwich them between bobby pins. Clip the ends with a wire cutter if they are too big to go through the chain links. Lay the threads to the left of the bracelet and pull the right set from under the first link.
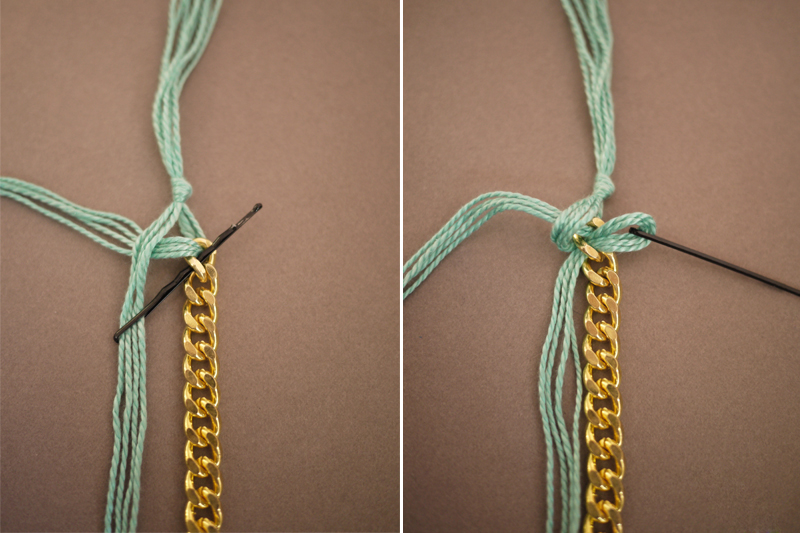
Pull the strands through the link and over the top of the left side. Lay the left set over the right set.
Pull it from under the same link and through.
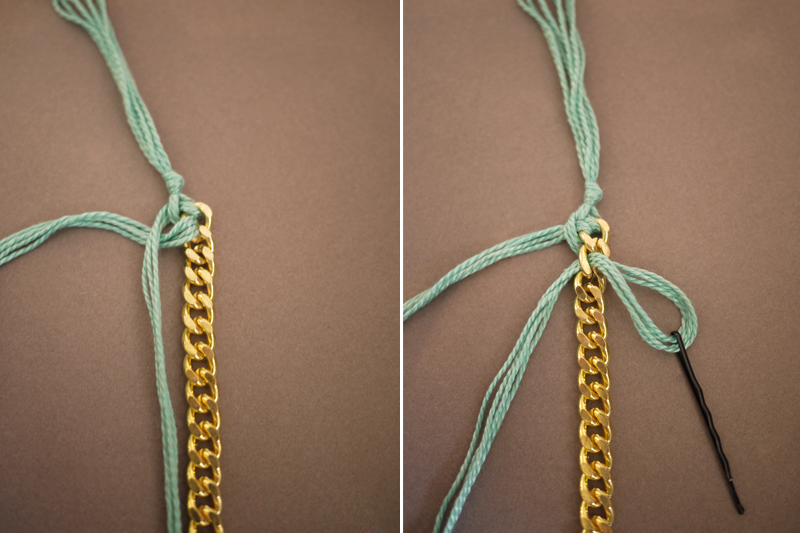
Drap the set over the top left and now lay the other set on top. Pull the top set from under the second link and through.
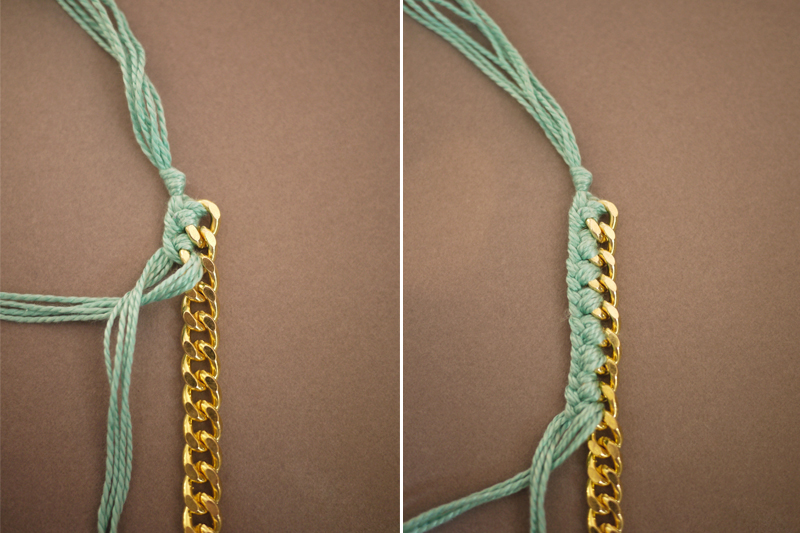
Once it’s pulled through the link, cross it over to the left and place the other set on top. Pull the top set from under the second link and through again. Notice each set goes through a link once – so twice total. Keep braiding.
Knot the strands together at the end and trim away any excess floss.
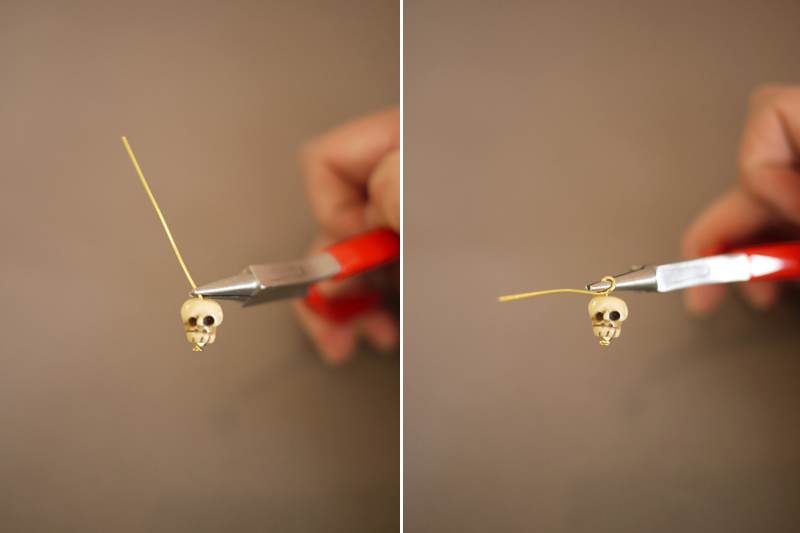
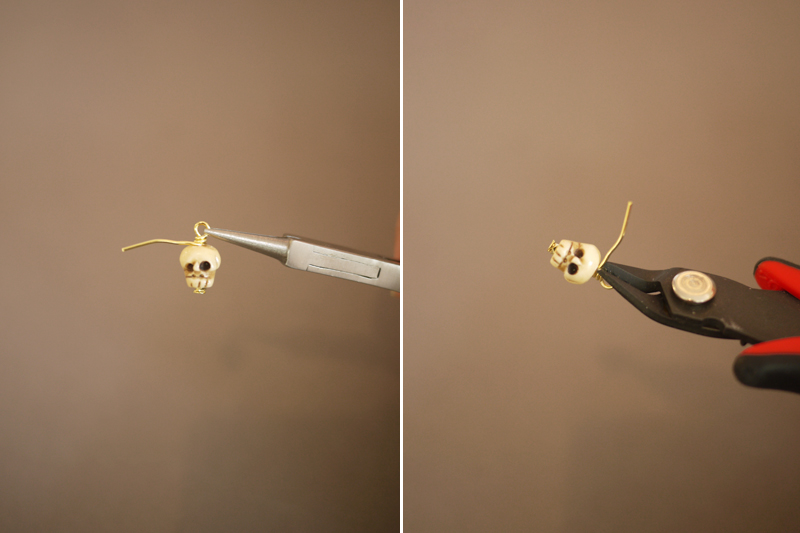
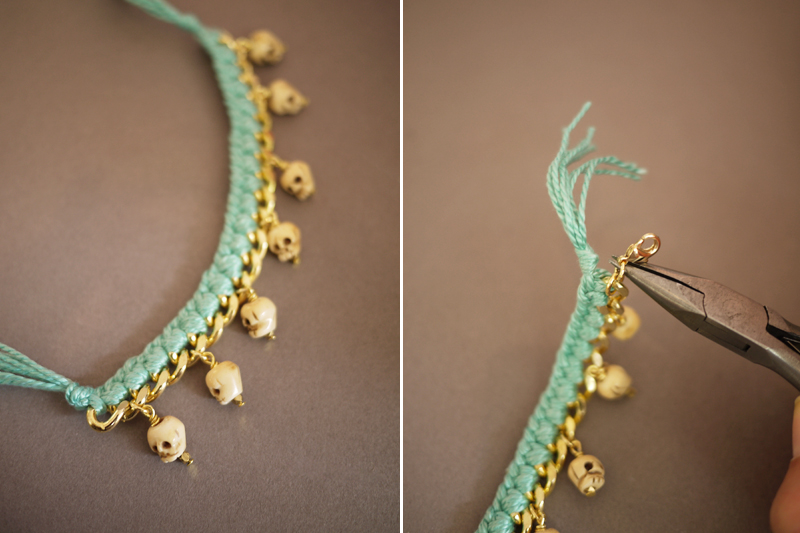
Thread a skull bead onto a headpin. I added a small gold bead because the opening of the skull bead was too large. Using chain nose pliers, fold the headpin 45 degrees to the left. While pinching the headpin, wrap the pin around the right side of the pliers.
Hold the loop tightly with the pliers and wrap the rest of the pin around the base of the loop 2-3 times. Trim away any excess wire.
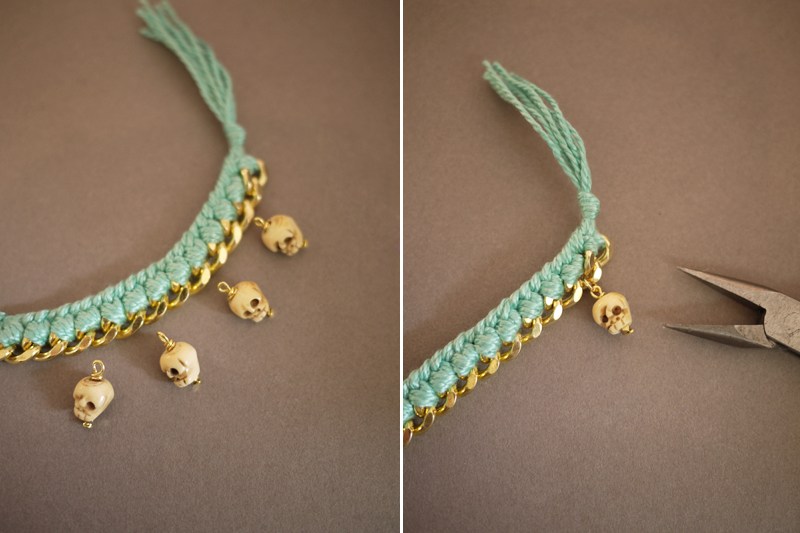
Space out the charms and attach them with to the opposite side of the chain part of the bracelet with jump rings.
Continue adding charms. Add a clasp to the end of the bracelet with a large jump ring. Add a large jump ring to the other side to complete the clasp.
Woven. Charmed. And done!
(images by HonestlyWTF)

That so cool. I love everything with skulls. I will definitely make my own. Thanks for sharing <3
xx
glamdevils
Wow it looks so cool with these charms…. thanks for sharing, I have to try!!!! 🙂
xoxo
http://www.sparklyfashion.com/
Sooooo in love with all your DIY!!! Need this bracelet <3
xoxo
LEATHER & ICE CREAM
So cool !
I have to try it 🙂
http://www.olastory.com/
OMG!! AMAZING!! The skulls just make the bracelet! I’m still obsessing over skulls!
Defs a must try!
XO
http://cestclassique.blogspot.com/
I TOTALLY LOVE YOUR DIY’S!!!
http://whatkrissydidnext.wordpress.com/
http://whatkrissydidnext.wordpress.com/
This DIY is so easy and cool!!! I will do it!!
http://www.thestelstyle.com
Thats a great idea. Makes me wish for spring.
Vintagehoneybee.blogspot.com
Cool! I want it!!!
http://www.standoutfashionblog.blogspot.it/
I love the addition of the charms. Your bracelet tutorials are my absolute fave.
Satisfy Your Cravings For Celebrity Style and All Things Stylish and Sweet
this is awesome and super customizable! i always love your DIYs! i’ve posted a fun DIY on my blog today about customizing your shoes: http://www.insparisian.com/2013/03/custom-design-by-me-gold-soles.html
http://www.insparisian.com
this is amazing!!
This such a great DIY!! Thanks for sharing!!
http://www.bonnieclydemarni.com/
I love love love the skulls!! This is the first DIY bracelet I’ve seen that I actually really want to make. Time to buy those skull beads!
I am really, really big fan of DIY things. I like that post. Have a nice day.
http://www.fashiondenis.com/
So….I’m way too old to pull of skulls, but I love the idea of this tutorial. And it looks so easy. I might have to find some other sort of charm that I can pull off, because I’d love to give this a try!
and of course by “of” I meant “off.” oops!
love this!!!! got to try! xo, Alma
http://www.soulofashopper.com
Sooo Cool!!
http://jessicafarrellpics.tumblr.com/
LOOOVE IT!!
http://jessicafarrellpics.tumblr.com/
So sick!
http://youngandimpressionablee.blogspot.com.au/
xx
Cute..
http://lejlatravels.blogspot.com/
I’ve made a bunch of these bracelets but never added in charms. I love the mini-skulls. Super cute idea.
xoxo
http://www.thewrittenrunway.com
Ilove it.
It seems very easy
amazing piece!
SUCH a cool DIY! I’ve been thinking of making a skull bracelet for a while now… now I have to!
xoxo
Juliette Laura
http://juliettelaura.blogspot.com
love this!
http://iamturquoise.com
Totally love it:) The turquoise thread is amazing for summery looks
http://www.emerjadesign.com
http://www.emerjadesign.com
These are awesome!! I would have never guessed they were DIY! Too much talent here;)
http://blurbs-blog.blogspot.com/
Love the DIY bracelet and also the gold “Hook” type bracelet…where can I find one of those?
beautiful!
wanderingsofalittlesoul.blogspot.de
so clever! xx
http://www.vicariousLA.com
This is so adorable! Such a great idea, especially since charm bracelets can get a little pricey 🙂
xo,
Jamie
http://inspirationlush.com/
Love, love, love!!! Nicely done!!!
Amazing idea – as always !!!
x
Hippie Fruit
http://hippiefruit.blogspot.com
So cute and lovely! Thank you for these lovely diy
love it!
xo
C.
http://carolinakrews.blogspot.com/
I will definitely try this!
Btw, I also have skulls and bracelets in my Etsy shop!
http://yarnmemomeadow.etsy.com/
Thanks for the tutorial!
Love it !!
http://www.thestilettoholic.com/
This is amazing and beautiful <3
So cool! Can’t wait to try this.
Mary
http://marymarysgarden.wordpress.com
So pretty, love the delicate mint with chunky gold.
Lauren
livinginaboxx
c’ est vraiment excellent j’ adore tu trouves ou tes petites têtes ? j’ adore bravo et merci pour le pas a pas
I love all your DIY bracelet tutorials however I’m based in London so can you or any of your readers recommend a good (cheap) online bead etc store like baublesandbeads.com in the UK please?
Phoebe
Adorable bracelet!
http://www.martasfashiondiary.com/
Ohh this looks really cute! I remember the previous woven bracelet DIY that was posted here and made a variation of it based off it!
Check it out if you would like to: http://samthebear.com/blog/2012/07/06/quarter-weave-variation-of-the-woven-curb-link-bracelet/
I am a big fan of golden bracelets. I think your collection is awesome. Thanks for sharing.
Greaaaaat!!! Thanks for share it with us!
Very Cool! Love this DIY
http://shopmystyleobsession.com/
Very clever idea, when I found the pic on pintrest I thought crochet, so I wonder if you tried it using a crochet hook instead of the bobby pins? Will definitely add it to my to do list, thanks.
THANKS SO MUCH FOR SHARE AND NO BE EGOIST.LOVE IT
hello!! it is reallly awesome!!!
can I download the picture? wanna share it with world :))
Thanks for sharing. I love this kind for bracelet!! 🙂
Awesome:)
http://www.ccchinachic.com/products/electronics/iphone-ipad-accessories/c-58/
beauty …. i love this bracelet………………….
http://www.winterfashions.net/kate-moss-with-stuart-weitzman-shoes-in-new-campaign-2013/
Everything you make is just perfect and I love them!!!! Where do you get the materials to make the bracelets from??????
You have the most thorough tutorials I have ever seen – they are so easy to follow with the step-by-step pictures. I can’t wait to get started making all of these – THANK YOU!!!!
it’s beautiful. i want it
I just love this it’s gorgeous! Thanks for the tutorial i love your DIYs! But how big were the links on the curb chain?
This is a great idea and my 13 year old and her friends love to make these. I did go one step further with the curb chain since they are gold or silver plated and seem to fade or on some people leave “green” on their arms due to the curb chain not being real gold. I took straight pins and tacked the chain to a piece of styrafoam (spelled wrong lol) I used a 2 inch strip so that once I pinned the curb chain all of the chain dangled down. I let the girls pick what color they wanted and i used spray paint and painted each chain. JoAnn fabrics has some great colors in the small spray can. Neons were the girls favorites, but they also have bright pastels, golds, antiques and silvers. Once I got the curb chains painted and dried I put 3 coats of clear fingernail polish on them so they wouldn’t peel, chip or cause any allergic reactions. Once they were completely dry the girls went to town! We also did some in rainbows of neon colors by making our strings shorter and working in the colors into the curb chain as we went. My daughter made her curb chain a neon green and she chose neon yellow, neon pink, neon green and neon orange as her embroidery floss colors. As we weaved down the chain we added the different colors. GREAT DIY project and like I said all the girls LOVE LOVE LOVE them!!!! thanks a bunch and keep those ideas coming!!!
Gorgeous! I love everything skulls – haha Your DIY’s are amazing.
https://www.facebook.com/fifthand
Love it!!
Thanks for sharing!
Daphne
Love it!!
THANKS!
Daphne
This is so cool. I will try to do this on.
WOOOOOOOOOOOOW I CAME HERE AND I THOUGHT WOOOOOOOOOW BEAUTIFULLL 😀 I’m DEFINITLY going to make one myself WOOW Really suprised, looks so professional but so cool to make 😀
THIS IS FUCKING AWESOME
hello, what brand of floss do you advise for these bracelets?
I made this bracelet for my friend. It wasn’t that difficult and it looks really cool. I did mine with silver and purple thread. The hardest part was cutting the chain to the correct size. Other than that its a really awesome idea.
Thats a great idea. Love it.
Thanks for sharing. This looks really cute!
I will definitely try this!
Btw, I have similar beaded bracelets on my etsy site!
I will definitely try this!
Btw, I have similar beaded bracelets on my etsy site
Love the aqua thread woven with the gold chain!
Love skull DIYs 🙂 Just posted a tutorial of an Alexander McQueen inspired piece on my blog. If you’re interested, the link is http://hapinesswherever.wordpress.com/2014/10/21/day-1-of-365-days-of-designer-inspired-diys-alexander-mcqueen-inspired-skull-bracelet/ 🙂
It is great tutorial to show audience a process of DIY customized charm bracelets. If you interested on more ideas of charm bracelets for wrist fashion, here is my collection: https://www.trinketsea.com/product-category/bracelets
I like it
what size curb chain do you use in the woven chain bracelet tutorial?