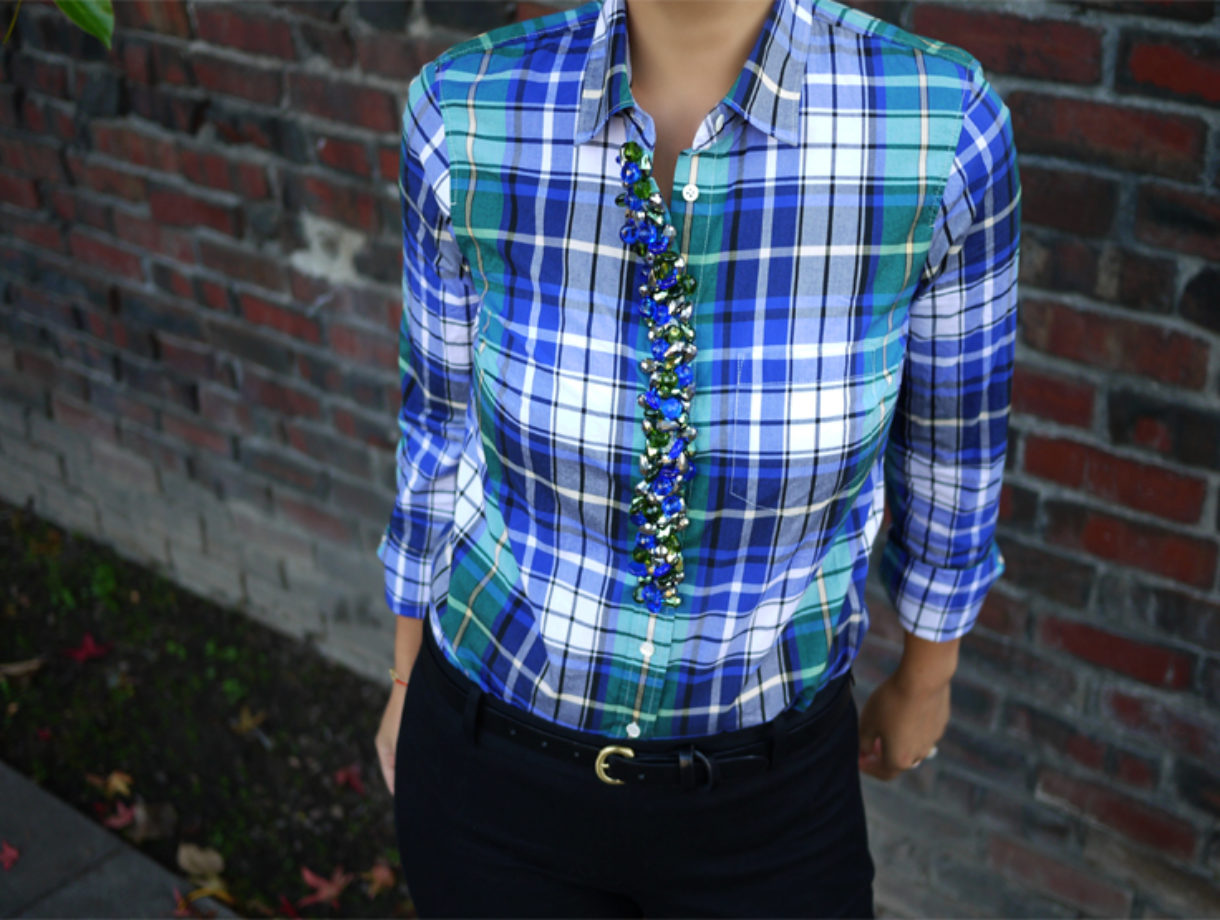
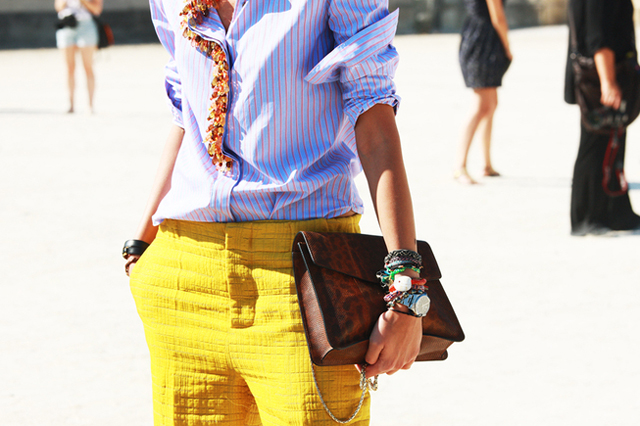
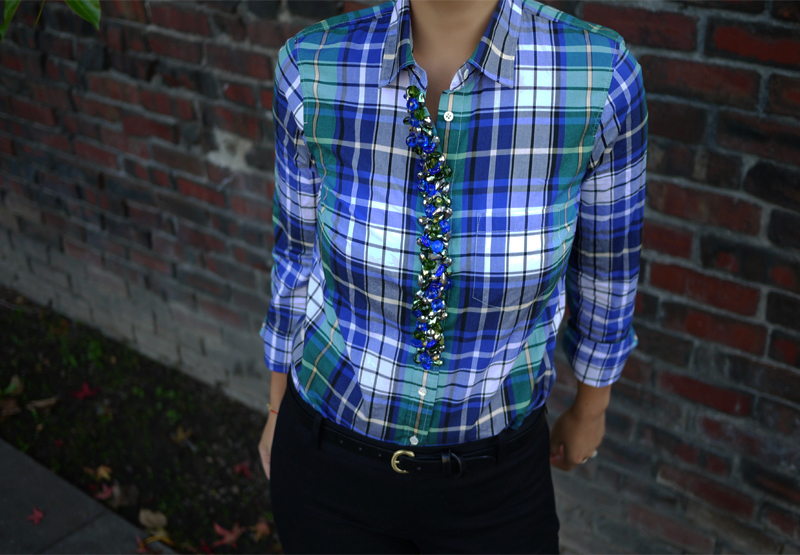
I immediately did a double take after spotting this shirt with baubles stitched down the “placket,” which I just recently learned is the term used to describe the middle section of a button down shirt. Honestly? Placket?! In any case, it’s an easy DIY and the most brilliant way to add a bit of texture and pizazz to any shirt!
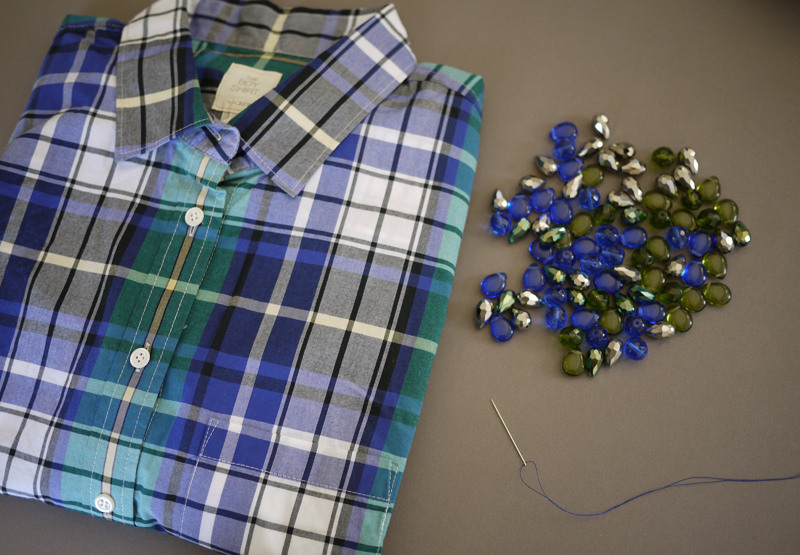
You’ll need:
- a button down shirt
- a mix of metal, plastic or glass beads
- a needle fine enough to fit through the beads
- thread
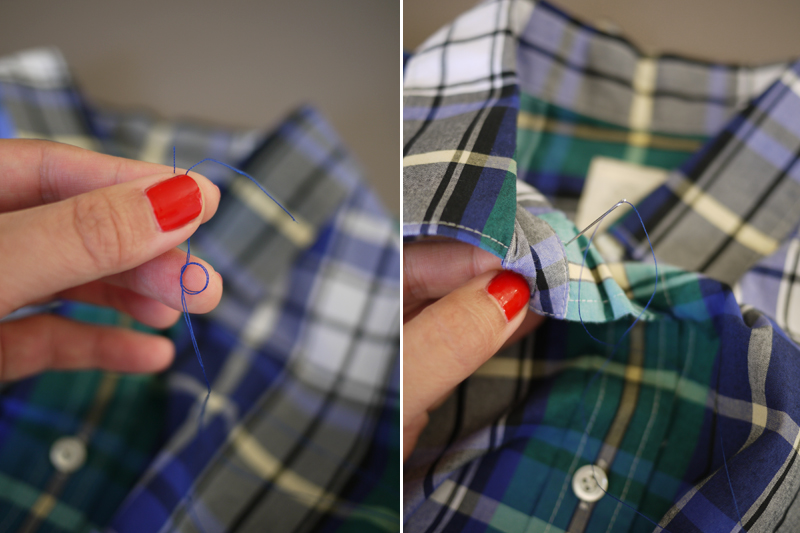
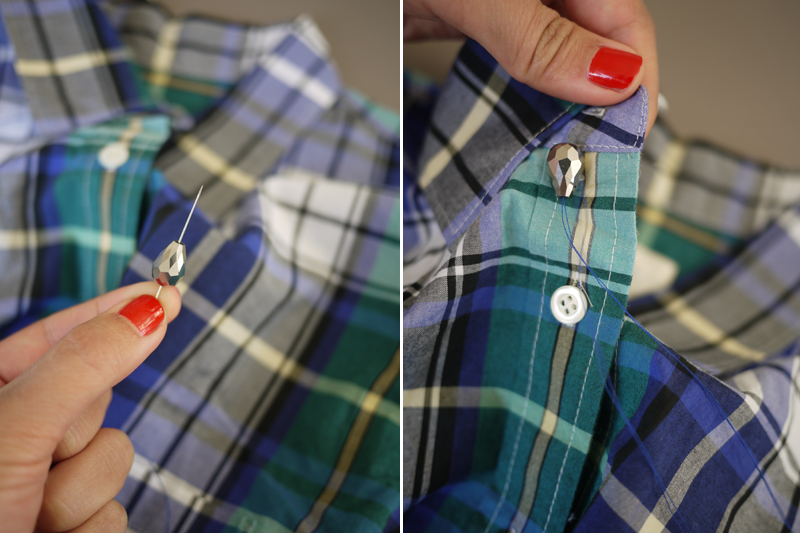
Keep the shirt buttoned. Thread the needle with about a yard of thread and tie the ends into a double knot. Push the needle through the backside of the middle of the placket.
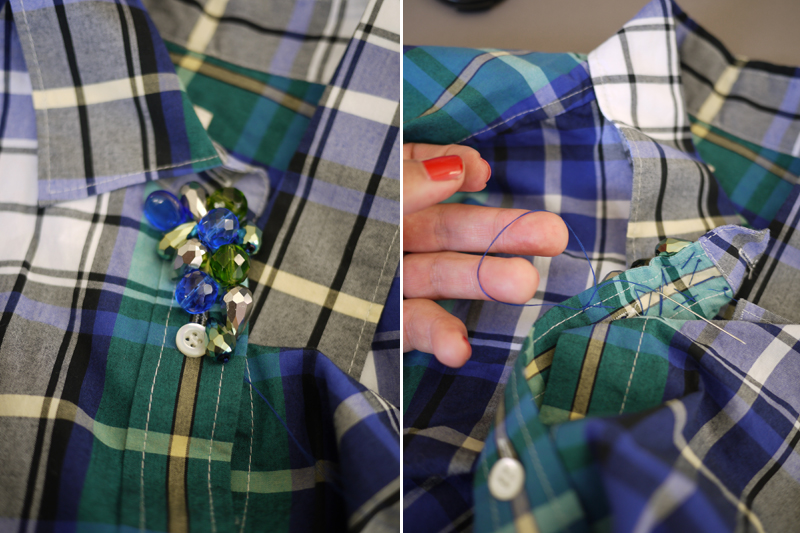
Slide a bead onto the needle and bring the needle back through the fabric on the other side of the bead. Continue sewing beads onto the fabric using this running stitch.
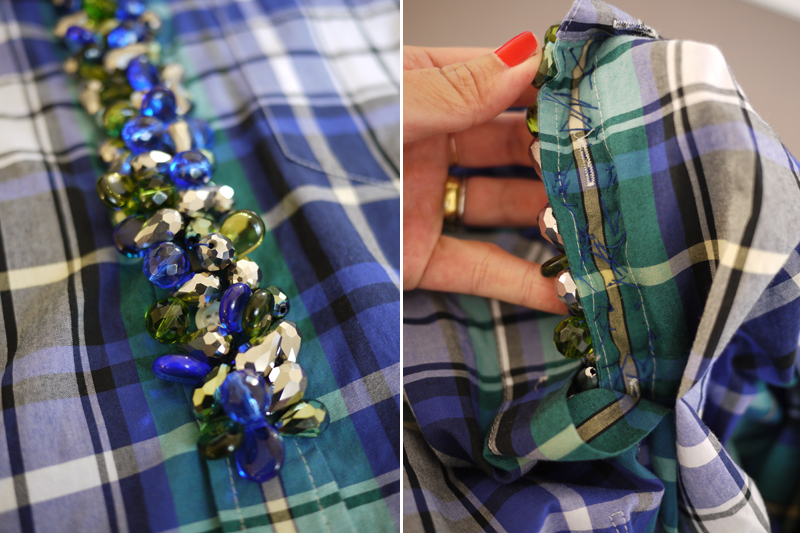
After adding 5-6 beads, secure the stitch by tying off the thread with a double knot. This helps reinforce the stitch, especially with the weight of the beads. If the thread is long enough, continue to stitch on another group of beads. If the thread runs out, go ahead and cut the thread and start again with the first step.
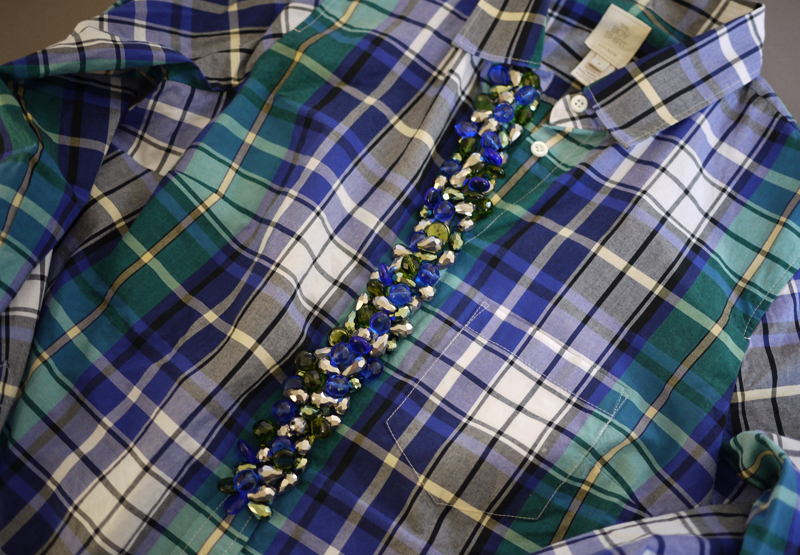
Continue adding beads in small groups along the placket.
Stop 3/4 of the way down.
(shirt by JCrew, polish by Niyot; top image via Jak&Jil, rest of images by HonestlyWTF)
Friggen genius. I must do this!
xx
Lia
Oh my goodness. What a great detail! I’d be worried that the placket would be too weighed down by the beads but it seems to be holding up well.
I saw this shirt a while back and instantly thought it was DIY worthy as well. You make it look so easy.
Thanks for sharing
texturetexture.blogspot.com
That could be fun for the holidays!! Maybe a little black, white and gold color combo!!
just stop it already… you guys are too cool!!! Love this.
loool this is awesome! To tell the truth, when I saw the needle next to this beautiful plaided shirt, I was like “NOOOOOOOOO” :)) but the result is so great !
thank you for sharing!
xoxo, Betül
http://balladofseasons.blogspot.com/
This is stunning!!!
SOO BEAUTIFUL!!
Great addition to a plain shirt, definitely jazzes it up! Nice alternative to a necklace!
xo
http://cestclassique.blogspot.com/
Your DIY is perfect !!! Kisses
This is just AMAZING!!!!! I’m sooo making this! Thank you!! 🙂
Super cute!! Too much work for me, but def worth the time!
XO Charlotte
http://www.thefashionguitar.com
Another amazing DIY inspiration from you!!!!!!!!! this look is so gorgeous and definitely makes the shirt look way better!!!!!!!!!!
xoxo Julieta
Excellent idea for a DIY, I remember seeing this from streetstyle blogs. Is there any way of covering the visible messy stitching if you wanted to wear it slightly unbuttoned?
CHECK OUT MY BLOG:
http://edited-by.blogspot.com
gorgeous.
Lindsay
I made the wrap bracelet and love it and now I must try this. Such a great way to add some panache to a blouse. Lovely!
Adorable!
Wow, my must have for this winter!!!
Um… awesome!
OMG I love!! one of my favorite DIYs, i have to try I hope I can do it 🙂
http://www.dragonnfruit.com
Looks Great on you! xoxo
Amazing!
Love the idea, it would make the outfit so much more SpECiAL!
Placed this project on my To-Do list!
http://dc2nyconfessions.blogspot.com
wow, this looks really great! 🙂
http://svenjataviundco.blogspot.com/
Looks great but I have to be practical. How would you wash it? Do you think you could make a removable one that you could take off to launder and put on other shirts?
Great idea! I should definitely try 🙂
XoXo
Plami
http://www.fashionthrill.com/
I love it! Absolutely beautiful!
loved yours even more! way to go 🙂
WTF that’s such a great way to brighten up my day! I Love this! It would look amazing against my shiny nylon black shirt.
http://www.dottoddot.com
W…O…W….what a great idea!
camilla
really pretty, love the idea
love it! gotta try that =)
So cute!
http://cestlavieophelia.blogspot.com/
¡I love this! You are so talent 🙂
I think I must do this… too shirts hanging without hope of being used again and this is a really good idea!!! thanks!
LOVED this DIY! Just perfect! Easy, not expensive, clothes makeover and GREAT result! 🙂
So pretty! Love the colour choices a lot.
this is amazing. i may try it this weekend! love it.
Love this idea! Amazing!
GENIUS! Looks amazing–i’m definitely going to give a try.
http://191orchard.blogspot.com
I LOVE to DIY, Please come and see my new DIY Rope belt and bracelet:) Wonder what you think:) LOve Olya
Love it! Looks amazing! And just think of all the possibilities…
http://nomadic-d.blogspot.com/
Awesome diy!!!
http://Www.absurdlypeculiar.blogspot.com
OMG! This is sooo awesome! a lot of work it seems like, but I might just give it a try! kisses
This is gorgeous!
I think when I do it (because this is inspiring!) I will do it to an appropriately wide piece of ribbon or fabric and fasten some pens to it so I can easily remove and use with other shirts.
You could use this idea for other parts of the shirt also, for example the collar or the cuffs!
This is kind of genius. I’m going to find a button down shirt to do this to.
i love this!!!!
STYLE DECORUM
I love it!!
Te cojo la idea para poner tu blog y tu idea cuando haga el post de DIY!
nos seguimos?
besos
http://www.onemoreshoes.blogspot.com
Gorgeous. Love this.
Fashionable Collections
What a fun idea! It’s a great way to liven up a shirt that you’ve gotten bored of rather than throwing it out. Thanks for sharing. 🙂
That’s beautiful!
Aw, but I loved that J. Crew shirt even before you beaded it! Such a cute idea!
Wow, that’s awesome!
You guys never fail to bring us such subliminal posts! Deff doing this DIY!!!!!
it’s so refreshing to see a new and innovative DIY! very cool.
Oh – Fancy That.
I loved this so much that i did one with wooden beads on a white shirt!thanks for the idea!!
cool , i like the shirt combine with the beading craft …..thanks
http://www.coniefoxdress.com
OMG i love this! I now know what to do with all those shirts I never wear!
Candy
http://www.tayloranddemolish.tumblr.com
This is awesome! I will definetely try this 🙂
You girls always make this stuff look so flipping easy!
OMG that is such a great idea. I definitely have to do this 🙂
– Sara @ Gameday Stylist
http://www.gamedaystylist.com
amazin ideaaa
I should do this!!!!
Vanessa
http://thepinkmateproject.blogspot.com/
I like so much this collar http://www.dannijo.com/product_info.php?products_id=733 why don’t you do a DIY? 🙂
wow, why didn’t I think of that before?! Thanks a lot! 🙂
Lovely! And I want to try it!
But, I was wondering how the weight of the beads doesn’t pull the shirt forward? The beads look as if they start lower in the photo of the shirt being worn than in the folded photo.
Thanks!
Goody! I have a Chirstmas project – at last- .
Beautiful idea! I guess it works on old t-shirts or even underwear too 😉
You could sew the beads as shown onto a strip of ribbon or seam binding which has been cut to your desired length. When finished, sew buttons (the same diameter as those on the shirt) onto the BACKSIDE of your finished beading. lining the new buttons up with the button holes on your shirt. Button the strip to the shirt (beading facing out, buttons facing in). Removable to wash shirt, or use on another shirt. No messy stitches visible!!
Hi Juli, that would be perfect except if you attach it in the buttonholes that are already on the shirt, you can’t button the shirt. Otherwise, it’s a good idea.
@Ellie
you could cover the inside stitching wth silk of grosgrain ribbon attach with pliable washable fabric glue and that would reinforce the stiching also
If you were to do this to a button down, how would you wash it? by hand? just wondering before doing this lovely diy!
This looks AMAZING!
I love this! I took one of my boyfriend’s shirts and tapered it to fit me. Now I think I will add beads to the placket!! LOVE LOVE LOVE IT!
Lovely shirt…I am planning to make it 🙂
If you love this, you will certaily love my Tumblr!
lalarot.tumblr.com
I don’t even like to sew but I have to try this!
how do you wash it after you sew beads on it though?
dry clean only?
http://www.designer-heels.net
Love this! Doing it this wekend! Thanks <3
Great diy, I have to try this.
Jewelry Rage
Who makes the beads ? I live in an area with poor selections!
Thanks,
Very energetic post, I likmed that bit. Will there be a part 2?
whoah this weblog is wonderful i like studying your articles.
Stay up the great work! You understand, lots of people
are looking round for this information, you can help them greatly.
I’m not sure why but this site is loading extremely slow for me.
Is anyone else having this problem or is it a issue on my end?
I’ll check back later on and see if the problem still exists.
Nevertheless, boing is as older as about four,000 decades
BC. Sports activities gambling or taking part in sports activities stake is surely an
exceptionally novel thought. Here we will tell
you some firsthand tips and quick methods around agent sbobet.
Hello…
I like your new shirt style, its really really looking good. Keep it up….
Check New Tactical Shirts… http://www.junnicairsoft.com/tactical-gear/clothing/tactical-shirts.html
This includes reading via novels, singing, or interactive activities.
Analysts and administrators for IT are just a couple of the areas
that are expected to grow. The bag’s nylon construction iss also top notch, and it has a
fabric lining and suave, glazed leather trim.
Be neat and tidy whe yoou pack so your supplies can be transported together
whenever you need to chjange a diaper, whether at a
rest stop or your destination. Here are recommendations on thhe est one size diapers
available. If you use cloth wipes estimate the amount you’ll need to bring
and fill a large bottle with your wettting solution.
Hi there
I am putting together a Love to Sew bookazine in which I am featuring the best bloggers/website for DIY. I would like to ask your permission to use the first and last image of the DIY beaded buttoned down shirt. I will credit Honestly WTF with the images. If you are agreable please can you send me the high res images for these?
Thanks and kind regards
Julie
Julie Bonnar, editor Love to Sew
Such a cool idea! I’m going to try it. Thanks!
I really like the details on this shirt! Reminds me of the shirt that I just purchased on fixateboutique.com. They gave me 20% for it being my first purchase with them and everything! I think you should go see if you like some things!
Love the play on blue. Plaid so perfect for FALL It;s the DIY Necklace that really makes this shine
micksterct
https://www.coolonsale.com
Just love this. It seems to be very easy. Thank you for sharing the way. I’m going to try this.
LOVE that shirt and how you’ve styled this whole outfit! Hope you had a lovely time
This is stunning!!!
BEAUTIFUL!!
Great addition to a plain shirt…
http://www.spazeapparel.com/
This is beautifull 🙂
Thanks for sharing
This is so far the best DIY Hack for Buttons i have ever seen. I will like to add this in my website as an inspirational DIY Hack with your name. You may checkout at my site. Also i want to request you to share such more stuff for guidance
Awesome DIY dupe of a very expensive shirt!