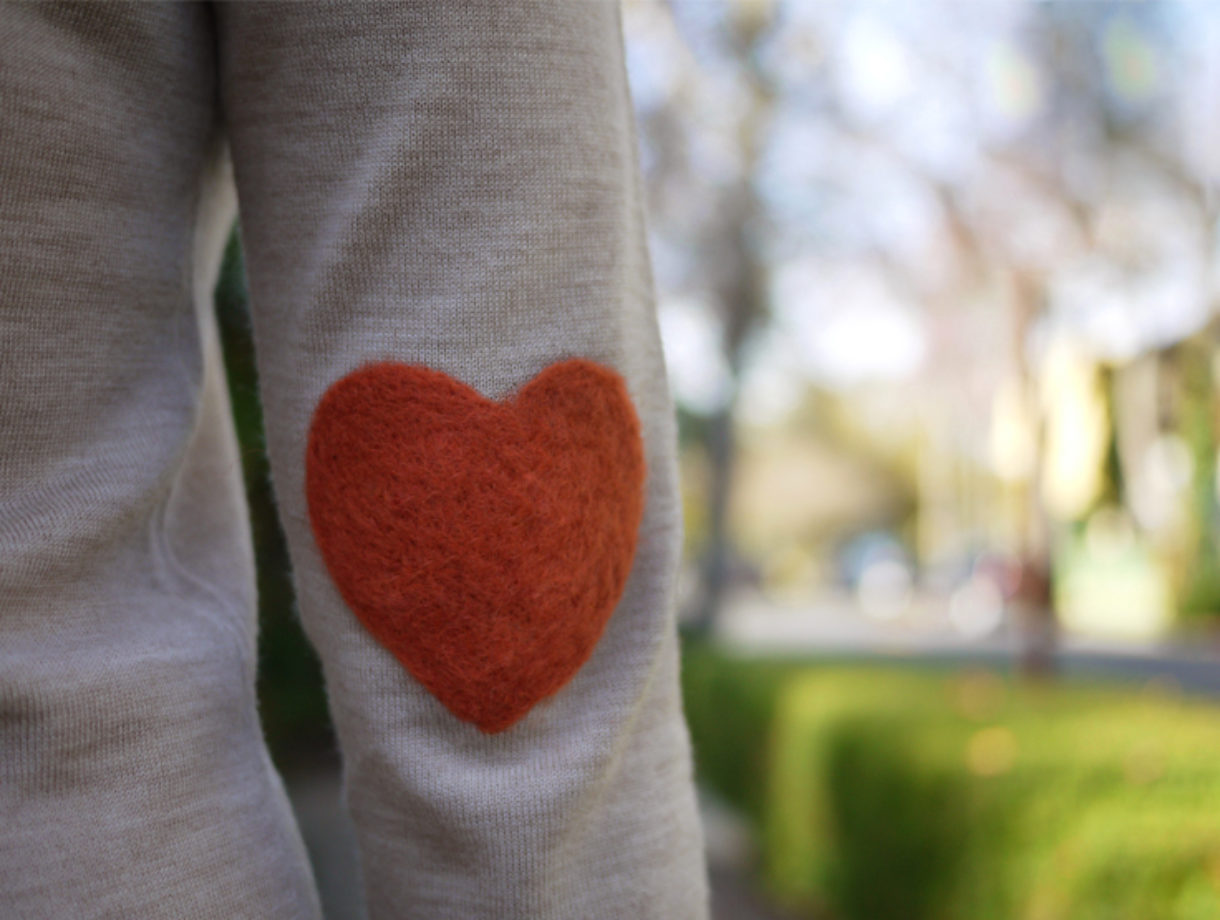
While perusing Pinterest one evening, I came across an intriguing tutorial on the wonderful art of needle felting. I had to learn more – especially after realizing it entailed repeatedly stabbing a needle up and down into a piece of fabric or sweater. A satisfying stress reliever that results in something wearable? Sign me up. And now that I can officially call myself a needle felting maven (and nerd), trust me when I say that you’re going to have a blast with this technique. So grab your supplies and let’s get started on a pair of heart shaped elbow patches!

You’ll need:
- a wool sweater
- a 36 gauge felting needle
- a piece of dense foam cut to size or needle mat
- some wool roving
- a 3″ heart cookie cutter
- an iron

With the sweater on, place a piece of tape about half an inch below the elbow. Do the same with the opposite elbow. Remove the sweater and insert the foam block into one of the sleeves.

Align and center the bottom of the cookie cutter along the top of the tape. Pinch off a few tufts of wool roving.

Fill the cutter, spreading out the wool fibers evenly.

At the base of all felting needles are tiny, sharp burrs, which grab and interlock the wool fibers. While holding the needle vertically, repeatedly stab it into the wool roving and through the sweater. I found it easier to work around the outer perimeter of the cutter first and then work my way inwards. Important tip: To prevent breaking the needle, always keep the needle upright and never at an angle. And don’t forget to pay careful attention to your fingers while felting as the needle is extremely sharp. Honestly.

Continue stabbing away until the surface is flat and even. Fun, right?!

Remove the cutter and use the tip of the needle to reign in any stray fibers, if necessary. Don’t worry about the holes as they will be mended later.

Patch up any bare or uneven spots by adding more wool roving where needed.

Carefully peel the sweater away from the foam. Notice that the fibers have transferred through to the backside of the sweater.

To smooth and set the patch, spritz with water and press with an iron on the wool setting.

Repeat the same steps the other sleeve.

Ta da! Your heart shaped elbow patches are finished!

(all images by HonestlyWTF)


I love this, I saw this as well, and wanted to learn more.. this is fantastic!!
Wow!!
I like this!
xoxo
http://detrasdellabial.blogspot.com
Wow this is definately a diy, this trend with elbows is really nice, but all elbows in all stores have the same oval shape! Well that’s is different and so cute! Love it!
(New blog needing some love and support: http://inwhirlofinspiration.blogspot.com)
Such a great idea! I like 🙂
How cute and simple!
http://edited-by.blogspot.com
this looks like it can relieve my inner rage!! haha, amazing
january, x
jessicajanuary.com
this is soo cute
http://supernettan.blogspot.com/
i really love your ideas and your blog…!
I can’t wait to try this out
http://insidethebelljar.blogspot.com/
I am soooo doing this now! I can’t wait!
xoxo, Jjanga
http://www.sayhelloandsmile.blogspot.com
thank you! lovely as it has to be 🙂
So doing it this week-end!
Could u also just use felt sheets?
WOOOW; this is soo cool!! i have never even heard about this!!
Had a elbow patch day at my blog too a few weeks back, but this is taking it to a new level!
I love it!!! thanks for sharing!!
love K
Wow, this is precious! And it looks fun to make with all the stabbing– a therapeutic activity with an adorable end-result!
Such a lovely idea! Thank you so much for sharing!
I am giving away a scrapbooking software, so check out my blog if you like 🙂
XoXo
Plami
http://www.fashionthrill.com/
really interesting!
http://youngandimpressionablee.blogspot.com.au/
xx
This is by far the most awesome DIY. Thanks for the great idea. xoxo
http://www.hellohellofriday.com/
This is too cute. Absolutely love it.
Collections
Omfg!!!!!!
Yay.., I LOVE elbow pads! Such a little detail that makes a big statement. I’ve been wanting to DIY my own elbows pads for ages.. But you’ve reminded me to finally do it..
Keep an eye on my blog..
http://annesanchorage.blogspot.com/
LOVE this twist on the usual oval-shaped elbow patch!!
I’m BEYOND obsessed with elbow patches!! SO CUTE!!
xo
http://cestclassique.blogspot.com/
Very cute and very easy!
A jewelry blog.
http://www.houseofavandan.blogspot.com
Dear, I have one question about this DIY. Do the sweater needs to be 100% wool or just 20% or less or more percentages?
Hmm this is so interesting. I couldn’t have thought to do the transfer of the wool. These patches are super cute.
xoxo
http://www.thewrittenrunway.com
Sooooo doing this tomorrow! 🙂
omg sooooo cute
Who knew!? That’s adorable! Thanks for this tutorial, it’s very inspiring!
wow.thats so cool.:)
We enjoy needle felting in our house and this is a fun idea for warmth and love:)
How cute! And not to mention easy…I gotta get on this felting train.
Hy!
This technique is cool, but do you know if it remains in place after washing the sweater?
Thanks for sharing!
Fabia JPS
To make this a bit easier, you can purchase wool felt, and it must be 100% wool felt, cut it into a heart shape, place on your sweater and jab away. The felt will incorporate itself into the fabric of the sweater in the same way the roving does.
For wool felt Etsy is a great resource.
Too cute – absolutely LOVE!!
This is so amazing!!
Great idea, now I gotta go and find the supplies, thanks for sharing.
notjustanotherfnblog.blogspot.com
I love it! I didn’t know that this can be done! Great idea..
Omg Amazing!! i’d never known needle felting was this easy!!!
Fantastic.
Seriously adorable.
Love this! Cute VDay idea 🙂
Love it!
Have been needle felting years ago with and for the kids but THESE adorable hearts are CRAZY CUTE!
This is really cute! Great idea!!
HauteStandards
I’ve saw this technique before and it looks fantastic. I am totally sold on the heart elbows, thanks for sharing!
http://lilylovelock.blogspot.com/
x
I’ve never seen this! How cool!!!
sooo cute! what do u recommend for care when washing this type of material???
thats so cute! i’m def trying that <3
Rory
http://www.WearAboutsBlog.com
CHICTOPIA
Really cute idea! I’ll have to try it! 🙂
http://thelittletexan.blogspot.com/
Love this idea. Great blog. Check out my site for “chique” tips. xo
http://www.urbanchiqueness.com
oh my gosh. that’s so sweet! i have been meaning to do heart shaped elbow patched on my jacket forever but i was just gonna use a denim fabric or something. but this is WAY cooler!!!
Love this, love this, gotta try it!
Rebecca (hearts)…
Oh so sweet ! No problem to wash it ? And must the sweater be in whool absolutely ?
sorry for the english, french fan 😉
I’ve known about kneedle felting for a while (my mother was a project craze when I was growing up and taught me all sorts of fun and ussless skills. But this is really clever!
Uh that’s like magic right there…. I’m gonna try this and if it works I’m gonna call myself a magician
OMG that is soooo cute! I will try it…. xoxo
http://giamportones.blogspot.com/
This is awesome!!!!!
Wow, that looks amazing and like something even I could try 🙂
xx, Susann
http://fashioninpepperland.blogspot.com
Gorgeous! Such a brilliant idea!
http://www.styleisalwaysfashionable.blogspot.com
i’ve been wanting to do the oval ones out of leather for a while! love this alternative.
http://www.absurdlypeculiar.blogspot.com
This is a great idea! I will try this out too :)… Thank you 🙂
I just pinned this on Pinterest. I love this idea, and I’m definitely stealing it!
Love it !
I just posted a diy heart sweater necklace today
http://pineconeplace.blogspot.com/2012/01/diy-heart-sweater-necklace-guest-post.html
xo
Ashlyn
that is so cute and seems so easy!
love it
http://bubblemylicorice.blogspot.com/
Felting is SO much fun! And roving is so beautiful! Love this post and am totally adding this to my DIY-do list.
xoxo,
Mackenzie
Really good idea!! I would like to do it myself aswell, but do you know if you’re able to do your sweater in the washing machine, or will the felt come off again? Would love to hear from you xxx
oh my god this is SO creative, as always.. but wow. love
http://www.dragonnfruit.com
genius! I freaking LOVE this – and I think I have most of the materials already. how cute will this be for Valentine’s? =)
PS – Emma, if you are using a 100% wool sweater, you probably don’t want to wash it in the first place – it’ll shrink like the dickens, even if you don’t put it in the dryer (and you need to felt onto 100% wool as the felting needle is designed to help tangle the wool fibers around other wool fibers; I’m not sure you’ll be as successful if you are not using 100% wool). And I don’t think the needle felting would come off, but it DEFINITELY would shrink and warp if you put it in the wash. Hand washing SHOULD be okay, but you’ve got to use really cool water, and woolite (or ecover) and not let it soak longer than 3 minutes before rinsing and drying, and you’ll still probably notice that the wool will gradually shrink/contract over time, with repeated hand-launderings, which may cause the elbow of the sweater to pucker and/or the heart shapes to warp into something less adorable. (Still, it’s what I plan to do, honestly; I hand wash most of my wool sweaters cos I simply can’t afford to pay for dry cleaning)
elbow patches are so great! i love love love this idea! where can i find wool roving?
http://le-lovin.blogspot.com
adorable!
Bises,
monkeyshines
http://monkeyshines-monkeyshines.blogspot.com/
Wonderfull!!! i’ll try!!
http://poptale.blogspot.com/
this is such a cute idea! I am a little bit obsessed. but I have a quick question, do both the sweater and the roving need to be wool or can the sweater be some other material? I am slightly allergic to wool so an entire sweater of it would send me over the edge but if it were just the elbows I could totally handle it. let me know! I would love to try this if I could 🙂
@Whitney, I’m sure felting on woven cotton would work – I don’t see why you shouldn’t try! Good luck!
Hi darling, I know your blog from today, and I’m voting for you…Ilove your blog!I hope you’ll be winner!
Very good idea !! Well done
http://houseofspring.blogspot.com/
OMG this is too cute! I love the idea and especially the hearts.
xoxo, Ally
http://www.confessionsoftheglitterati.com/
Sweetness!!!!! so cute!
✿✿✿✿✿✿✿✿✿✿✿✿✿
Thumbprints That ♥ To Look Cute
rioandjane.blogspot.com
✿✿✿✿✿✿✿✿✿✿✿✿✿
WHOA! I never even knew such a thing existed. So cool and so easy! Must try. thank youuuu!
I’ve been looking for something to spruce up my wardrobe. Look at some of my outfits and give suggestions, would you?? I would so appreciate it!
http://www.audreamy.blogspot.com
awesome trick for awesome fashion.
This is such a sweet idea! I love elbow patches and this looks easy enough for even me to do! Thanks!!
This is such a great idea!!
We’d loved it!
xox
http://vitavie-w.blogspot.com
Wow! Amazing tutorial! I’ve never seen this before and it’s great! Thanks for sharing!
Beautiful idea, i actually have a cahsmere sweater i have to fix so it could be perfect!
Your blog is in my FASHIONABLE CROSSWORD, come have a look and see if you can find it!
Xx
http://www.pretpenser.com
http://www.pretpenser.com
Love this!!!! I’m going to do this myself!!! Super cute!!!!
AMAZING IDEA ! ! ! <3 GREETINGS FROM POLAND, PLEASE CHECK OUT OUR FIRST BLOG :
ONELOVEONEDNA.BLOGSPOT.COM
ONELOVEONEDNA.BLOGSPOT.COM
ONELOVEONEDNA.BLOGSPOT.COM
LOve the idea:) I made one inspired from Zadigue and Voltaire! Come have a look …
ilovedoityourself.blogspot.com
Oh I am SO excited to do this! I’m going to be extra cheesy and wear it on Vaneltines day 😉 x
Great idea!!!! Thank you!
Lovely blog!
xx
http://hotspotemily.blogspot.com
love this!!
http://jas-tidbits.blogspot.com.au/
Absolutely amazing and cute! Thank you for this instruction!!
too cute!
http://whattheshoe.blogspot.com/
http://www.facebook.com/pages/Queen-Juku/316419191736142?sk=wall
Totally cute, totally wearable.
OMG, I had no idea about such incredible craft as needle felting! Girls, thank you so much for ShARinG this diy, <3<3<3
I'm going to do it for sure!!!
Btw, I voted for you on Bloglovin' and hope you win!!!
DC2NYConfessions Blog
Woah. Ok I want to try. The possibilities are endless with the amount of cookie cutters I have thanks to a random baking kick I went through a few years ago.
http://themarcystop.blogspot.com/
IT LOOKS AMAZING !
GREETINGS FROM POLAND 🙂
PLEASE CHECK OUT OUR BLOG :
http://oneloveonedna.blogspot.com/
http://oneloveonedna.blogspot.com/
http://oneloveonedna.blogspot.com/
http://oneloveonedna.blogspot.com/
cute! i want to try it with these dinosaur cookie cutters i have.
so doing this today! another amazing DIY
really great idea! thanks for the inspiration!
xoxo, peppermintia
Thanks for sharing, I will be having a go at this!
Just perfect little patches, i’m definitely trying this out!
Where did you learn about this!? That is incredible! No sewing at all.
Is it removable? Like if I wanted to change out patterns?
-Jillian
http://www.GlitzGM.com
would the patch come off if you wash it?
@Ran @Jillian no, the patch will not come off and is not removable. And wool should always be dry cleaned or carefully hand washed. @Beindolwen yes, you can make patches in any shape. I like using cookie cutters which obviously come in all shapes and sizes, including stars!
Wow i love this DIY!
This is such a great way to add a personal touch to my old cardigan! I have never heard of needle felting until now, and it looks so much better than a cut-out and sewn-on patch of craft felt would. Thanks for sharing this project!
Would it work on a thermal shirt? Would the texture affect the felting?
inspirational as always!!!! thanks for the great tutorial!!!
I LOVE THIS! do you think it could be done in a star?
sorry to ask again, but would it work on any type of fabric?
@S I haven’t tried needle felting on anything else other than wool but I’m sure it should work on loosely knitted cotton. It’s worth a try! Good luck!!
this is very cute and easy! thanks for the post 😉
check out mine + follow if you like.
Adorable!!
http://dirtysexylaundry.blogspot.com/
What a cute DIY idea… very suitable for upcoming Valentine’s day. Thanks for sharing it.
lovee your blog (;
This is so adorable, I really would love to try this! 🙂 -Lo
Omg! Haleluiah!!!!!! This is so awesome!! I love doing projects like this. Thank you so much for sharing!!!!!!
Oh, and by the way can you do this on any fabric though?
So cute I love this project.
http://www.rivington-behindthescenes.blogspot.com
So, I’ve gotta know…how long did this actually take?
@Brandi, not long at all! From beginning to end about 20-30 minutes!
Thank you for sharing this. I love a good elbow patch.
absolutely lovely
This looks fab – love the choice or orange on grey too. Going to give it a go x
You must be joking. This is my favorite DIY to date, amazing!!!
Not sure if you mentioned it somewhere, and I missed it…but did you use wool roving from the website that you linked to? If so, what color? I want to recreate this exactly since it is to die for 🙂
Erica this is totally what I had been searching for — as soon as sweater season hit I knew I needed to do something about elbow patches. This felting thing is bomb-ass.
Gorgeous!!!!!!!!!! Loved this DIY. 🙂 <3
i love elbow patches!!
Very nice and creative!
xx Astrid
I love the idea, but what about washing the sweater? the woll roving will cretainly leave colorful stains all around the patches…
Holy shit – a lot of people read your blog.
Omg so wonderful, so unique and awesome!
check out my blog: www-le.courage.dk, and leave a comment:)
Love from denmark <3
Thanks for this DIY! I spent the week gathering supplies and did it this afternoon. I LOVE the results. The first time I put too much wool roving in the cookie cutter, but it was easy to peel off and try again once I had it down.
I found your blog through pinterest and am a convert!
Seriously the cutest idea ever!
Best DIY ever! so easy and so pretty! I loved it! greetings from Portugal 🙂
ohh good idea! this is great!
I love it!!!
http://www.facebook.com/pages/Corte-y-Confecci%C3%B3n-nuestras-creaciones/115898091060?ref=tn_tnmn
Wow – this is amazing! I’ll definitely want to try it out one day! 🙂
This is fantastic. Now if only I was that crafty.
Unbelievable. But if I had to do something like this, I’d be a little worried 😀
That looks ridiculously fun. Word of warning to the sweaters in my closet – there’s a needle coming your way!
http://nomadic-d.blogspot.com/
genius!
It looks so sweet!
Seriously one of the most adorable DIY’s I have ever seen!
What a great idea this is… Did a few myself recently however I did the stick technique but your idea is great too!!
Please check out my blog too 🙂
http://www.stylishlymebytaryn.blogspot.com
So cool! I’ve seen needle felting mentioned elsewhere but never really knew what went into it. Great idea for a beginner project. I think I have hand and star-shaped cookie cutters which would be equally neato for a patch.
Hi Gina,
Wow that’s Great! You know I never knew you could do this by hand…..i’ve only ever seen the felting machines! (like sewing machines) x
Love. Will this also work on cotton or acrylic sweaters, or must they be wool?
Thanks!
LOVE it! looks so easy and really cute. Thanks for this, going to try it one day. Hope you don’t mind me linking it on my blog 🙂
i die! this is sooo cute! and one of the best DIY projects i’ve seen recently! LOVE your creativity!
http://www.theshinylife.com
WHOA! So cute!! It’s easy and it lokks great! I think I will try this on an old sweater 🙂 Thank you so much!
Btw visit my blog, I have posted a few fun DIYs too 🙂
Made by: sara
So brilliant idea! Simple love it! <3
Nice post. I need to put this on my blog! I am going to buy these materials and try to make it. Whoever came up with those red hearts is a pure genius.
Nice!!!
Très jolie idée
About how much wool roving did you use? I just want to be sure I get enough. Thank you so much! Can’t wait to try this!
You are the queen! I’d seen this popping around Pinterest and finally took a moment to track down the original post. Huzzah huzzah! And now… I go snoop around your blog. 😀
My trial didn’t even turn out half as cool or professionally put together yours, but what a great concept! Plus with a deserving mention on my heart-y collection for the season.
http://sssourabh.wordpress.com/2012/02/13/a-heart-attack/
wonderful idea, I have all the materials necessary to try something similar. I am interested in the question of washing? wash your hands in cold water, perhaps? or not to wash? you certainly have the experience, please share
…. and greetings from Moscow 🙂
http://tantratapok.blogspot.com/
I love this idea! Will try to make something similr 🙂
Very beautiful and original !! I LOVE it !!!!
How well does it stand up against washing?
This looks fun! Can this only be done on wool? Do you know if this works on socks (like darning socks)?
Just an update, I purchased wool roving @ Hobby Lobby, a great big bag of various colors! I did my first trial on a very nice 100% wool sweater (mens actually for a good price on evilbay), turned out well! I was actually surprised at how easy it really was. I had LOTS of roving left over. THEN, while I was at Walmart…yeah, I know…..they had little girls sweaters on clearance for $7. They were acrylic and cotton (I believe more acrylic than cotton…the cheap ones! LOL) So I purchased one to try it out, and if it worked, my niece would get a cute sweater out of the deal! I followed all these instructions, BUT I made sure to really get a good amount of the roving through to the other side. THEN, I even washed it! *gasp!* I washed on gentle, in cold water, and then I did the unthinkable….I tumble dryed on ‘cool’ for about 10 minutes. It turned out PERFECT! The wool felted just enough to really keep it in place, but not enough to shrink horribly and distort the shape or wrinkle the sweater sleeves. I wouldn’t do the same if I was planning on a large design, as it would be too noticable, but for a little girls sweater, it turned out fine!
Thank you for this, I have shared this on my blog because it is inspirational. We are just starting to experience the first signs of Autumn here in Melbourne and the other day I pulled out a boring black merino wool top and give it a new look..which I am sure my friends will ask about. Please check out my blog if you have the time.
Cheeers from Melbourne, Australia
This is awesome, definitely gonna go get supplies and do this to my cardigan tonight. What are the care instructions afterwards though?
Aww, so adorable!
<3
Thank you for sharing this tutorial. I love it!
I had a go at it on a cardigan for my daughter which she loves!!!
here’s the result, if you want to see it:
http://playdohandperfume.blogspot.com/2012/03/shes-crafty-felted-elbow-patches.html
This is awesome! I was wondering though if you could do it on a regular tee shirt though I was thinking of doing diff designs on some shirts I got since it’s a bit warmer now. Thanks in advance!
I see this
http://luckypony.co.za/d-i-y-heart-shaped-elbow-patches-swoon/
This is an easier take on elbow patches! I used to sew them on with printed swatches I collected from work. I will definitely have to try this!
Such a great post interesting and fun. I totally agree anything to take out a little aggression that in the end creates something cute. Sign me up!!
Finally, a clothing revamp that doesn’t require sewing skills……count this talentless soul in!
toni xo
So cute….hope it’s easy to do! Going to try it on my daughter’s shirt:)
It is amazing, so nice and simple to do!
I was wondering, how much fibre do you need?
Love this DIY! It’s a little bit unclear to me though.. Do you have to put the sweater inside out?
‘Cause I don’t really get it after the step ‘take out the foam’ it looks to me as if you put the sweater inside out..?
Xo
It is so cute! I’m going to try this as soon as I can!
One question: has the felting needle a special function or is it also possible to just use a regular needle like one you use for stitching?
<3
what’s the best way to launder this?
really inspiring!! cannot wait to try this!!!
Loveee itt it’s greatt :X
How do you launder the sweater or sweatshirt after adding felting
Awesome! Love this! Look so chic!
xx
biskvittka.blogspot.com
I’m about to go on uni holidays for 6 weeks but I won’t have a minute to spare with all these awesome projects! I will be little miss felting heart elbow patch just you wait. You’re my new favourite imaginary friend 🙂
I love these! ive never needle felted before but im going to give it a try. You post didnt inspire me to but little leather heart elbow patches on a jumper of mine pics here http://abimakes.blogspot.co.uk/2012/05/heart-elbow-patches.html
thanks for the inspiration!
I love these! ive never needle felted before but im going to give it a try. You post did inspire me to put little leather heart elbow patches on a jumper of mine pics here http://abimakes.blogspot.co.uk/2012/05/heart-elbow-patches.html
thanks for the inspiration!
OMG this is awesome!!!
u make me happy
I LOVE this. So sweet. So fun. So cool. So easy!!
I love this, I’m going to use the same technique for cushions!
Does anyone know if this ONLY works on wool sweaters? 🙁
Amazing!!! So want to try this!! x
Adorable 🙂 does anybody know if you can use polyester??
Adorable 🙂 does anybody know if you can use polyester fabric?
sorry if you already answered this, but does it have to be a wool sweater? and can it be other fabrics? i would love to do this to a hoodie that is mainly cotton with some polyester.
Absolutely love this! Such a great way to change up your old sweaters. I featured this bit in my latest blog post http://thoughtsbyrozi.com/post/28853702700/so-in-love
Rozi
Cute!
Just wondering about how long you have to be doing this before you see it start to flatten and look like that photo? I tried this and was at it for nearly 3 hours and was getting no where. My craft store only sold one type of felting needle, so I’m wondering if that’s the case? 🙁 🙁 :(.
Hey, this is so cool, i just did it by myself! I hope it’s no problem that I translated it to German and posted it on my blog 🙂
حرفية تمتع القلوب
عمل رائع
If you are looking for a partner based on lifestyle and physical chemistry as well as personal beliefs and common interests, you may try ** –Cougarloving/CoM–** Good Luck:)
I saw this on pinterest and I had to repin it!! I plan on doing this project soon, and I was wondering if the sweater has to be wool?
@Chernalyn yes, wool works best for this project. good luck!
so cute
does the sweater need to be turned inside out. this is confusing one photo all the felt is inside the next its all been pulled back out……i guess im dumb but this makes no sense 🙁 and i wanna try this but those last steps are drawing a zigzag instead of a straight line for me
Hello,
I am an Editor at Ladies Home Journal and would like to include your heart patch picture in a future issue of the magazine. Since this was a DIY project, I am assuming that this was an original photo taken by you? Would love to talk more, and fill you in on details of the story I’m working on. I hope to hear from you – rachel.shippy@meredith.com
This is so cute! One to try, definitely!
Such a great and creative idea! And a great gift idea – cant wait to get started on this with one of my plain old sweaters! Thank you!!! Cheers!
Hi Erica! I found this super cute tutorial via Pinterest, and I do hope that you don’t mind me sharing it over on my blog! I have done a blog post on cardigan make-overs, and have included this as one of my favourites, with a link back here. Tania ♥
Hi there! this is a bright idea. It’s super cute and lovely!!
So cute! I want to try it. Great way to wear your heart on your sleeve.
VERY GOOD IDEAR, I WOULD TRAY IT
can you use any sweater or does it have to be made out of wool???? i would love to do this for my friend but i can’t find any wool sweaters she would like. I would love to try it on a hoodie….. this is such an adorable idea. thank you so much for sharing how you did this!
@holly, I’ve only known this to work on wool. you can, however, do a test patch on cotton . . . maybe try it on an old cotton tee first.
How much roving do you need? Can’t wait to try this!
How strong is the join? Would they survive going through the washer and drier?
I love this, congrats !
Melo
http://theyellowbalconey.com/
Hi! Brilliant idea, but I don’t understand one thing: is that natural wool or some synthetic fiber? And how resistant are these patches?
indeed! brilliant !!!! it reminds me of cotton candy 🙂 !
this lovely blog in need of some love and support too ~ it has small list of friends 🙁 http://artbellafashion.blogspot.com/
nice tips …………
findopendeals.com/
Can I use felt instead of wool? I don’t know where to find wool.
Really appreciate if you answer me by email too, I barely have time to check the internet.
keiwan.0207@gmail.com
I bought an 82% merino wool sweater and no luck. I am not sure what my problem is. Is it the sweater? Could it be the needle? (The felting kit I bought does not say what gauge it is.) Can anyone help? Thanks!
Hi, I wanted to try this. I have a thicker knit sweater will it still work?
Gonna use this technique to make some creative tacky Christmas sweaters next year. I don’t knit so this will be a super easy and fun alternative that I can use to create fun sweaters for my kids and family members. Yay, so excited to be able to use my cookie cutters for something other than salt dough ornaments. The possibilities are endless.
My take on sweater patches…with sequins. Love the hearts idea though…I need to try it!
Cute idea! Any special washing instructions?
I’m crazy for this! I dabbled in needle felting a while back, so I have all the supplies on hand. Thanks for sharing!
What a DELIGHTFUL idea! Thank you for this tutorial!
Darcy from TheWildRoses.etsy.com
thanks, great tutorial. what a great feeling to stab something, was having so much fun my needle broke so im left with 1 1/2 elbow patch. Better order a new needle now!
These are so cute! My kids will love these and I do not even have to sew 🙂 Sewing is not at all my specialty (ok I am not at all good at it lol.) Thank you for showing us step by step, I will have some fun doing this project!
Saw this in Australia’s Yen Magazine! Nice to find the tutorial online!
I would love to try something like this…so much fun looking. To bad I’m allergic to wool 🙁
Pity this is so cute, and I’m severely allergic to wool!
I would like to know if there is a different blend that could be used?
I’m planning to try this out, but I’d like to know if it is a must to be using wool? Can I use a different material? Thanks in advance! 🙂
Wool roving?? What is that? Did you make it yourself??
Does anyone know if a cashmere sweater could be used instead of a wool sweater
?
SUCH a good tutorial!! I just had a go and your instructions were AMAZING!! Thanks so much! 🙂
This is such a cute project! I just bought some wool roving for a different project. I think I have to try this!
Great Post!
Best Wishes,
Crystal
I love this! I just started needle felting a few months ago, and really enjoy it; I am always looking at things wondering how it would look in felt. When people ask me just what it is, I tell them the closest thing I can think of is that it is like tattooing fabric with wool. 🙂 It would be great to see more of your projects!
Thanks, Melissa
I thought you should know that this lovely tutorial has been reproduced, in its entirety, here:
http://www.fashiondivadesign.com/17-interesting-and-popular-diy-ideas/
Every time I approach this person about crediting sources, he/she says “it’s a lot of work.”!! Ummmm.. yeah. I’m so tired of seeing great ideas published all over without ever crediting the creators.
I used your idea to patch one of my favourites sweaters from this Winter that suddenly had an “almost burned” circle
https://www.facebook.com/photo.php?fbid=10200558346754522&set=pcb.10200558355394738&type=1&theater
great idea! tks
this is absolutely adorable!
Do you have to use a special needle, or will a thicker sewing one work? And where can you but the roving wool?
me gusto mucho,gracias por compartirlo…
This idea is so cute… 🙂
Thank you so much for the tutorial.
ciao
Chiara
Hi,
This is so adorable!!
Living in Florida, it’s rare that a wool sweater is necessary.
Do you know if you can use a cotton sweater and felt wool into it that? I have an idea for an HP theme that I would like to try my hand at.
🙂
Thanks
I posted your tutorial on my blog! Check it out ♥
Very simple and cute idea.
Decided to try this weekend.
Thanks a lot for sharing.
You will find some diy tips at http://www.trendingfashions.com/
Love this idea!
what a fun project. I never knew how to use this material but now I can´t wait to try this.
Carla
http://www.thesweetestoneoverthemoon.com
I found your wonderful DIY on Polyvore. It was linked from someone who liked my set on an outfit to wear for a walk on Valentine’s.How round about is that? I am so glad that I came over. Your instructions are very clear and your idea is just tremendous. I don’t know if I will try this ( I am in hot Arizona, and don’t have any wool sweaters) , but I will be checking in often because you are very talented and generous with your hobby. Thank-you.
I need one of these for Winter
Fantastic web site. Plenty of helpful information here. I’m
sending it to some friends ans additionally sharing in delicious.
And of course, thank you to your effort!
What a brilliant idea,
Cant get better than stabbing away and getting a great result!
Mary
http://letsstrikeapose.co.uk
This is so great! Now every shirt of mine is going to have an elbow patch! If you’re looking for other ways to get the most out of your current wardrobe, check out my post here >> http://bit.ly/1hYoRxS
<3 Megan
This is seriously adorable<3
Oh gosh, absolutely adorable, this is def. a steal.
Absolutely amazing and cute! Thank you for this instruction
http://www.diyclothingideas.com/
Love this idea, Cute!!
Oh my gosh! I saw this at Pinterest too. It’s such an beautiful idea. Love the article. Thanks for being great!
I love this idea! This is such a fun and simple way to create elbow patches without and cutting or sewing. I love the look of the elbow patch but I’m not very good with sewing or anything so this DIY is perfect for me! It’s so creative that they are in the shape of a heart. I will definitely be trying this out.
This is not only awesome creative but funny too.
I’m late to this party, but I totally want to join in! I basically want to add heart shaped patches to everything I own now. Love it, thank you!!
Becky
I have fun with, result in I found exactly what I was having
a look for. You’ve ended my 4 day long hunt!
God Bless you man. Have a great day. Bye
This is so amazing!awesome!
Really like the final texture of that patch; it looks completely different from the first shots. How would it feel on a t-shirt for example?
will it get ruined if i wash it with the machine?
Amazing,we can learn a lot from here!
Really cute!
Wow !!!!! Thanks for the idea!!!!!
Amazing idea and tutorial. Really very unique and would love to try it soon.
Thank you for sharing a fabulous idea.
I have a non wool sweater that has tiny holes in the elbows. Would this technique work or does the sweater have to be wool and perfect elbows.
Amazing.I love this, I’m going to use the same technique for cushions!
Et les crèmes anti-âge que Cesam technology proposent sont également très
efficaces.
that is so nice work keep it up love you sir
love like heart and heart like love as well as heart news update on love i will download these pics but first i will download malwarebytes anti malware software free
This is so cool! Thanks for the detailed tutorial!
I’m usually to blogging and i actually appreciate your content. The article has genuinely peaks my interest. I’m going to bookmark your web page and maintain checking for new details. I am looking for some good blog sites for studying. I was searching over search engines and found your blog site. Well i like your high quality blog site design plus your posting abilities. Keep doing it.
I totally agree with you.
Nice article.
Keep sharing.
thanks to admin. I m sharing a good article. thanks…..
http://www.amirpc.com/corel-videostudio-pro-x10-crack/
waooo amazing great stuff shared here admin. my husband also like such a designs. admin i really thanks to you about this effort. so nice and so love to admin.
many thanks.
i really appreciate your work. you are gonna doing good job. share much more as such informative content.
NICE work.
Keep sharing.
Thanks for this How To, I’ve just repaired my wool cardigan which had holes in the elbows (I must have very abrasive elbows!). I wasn’t sure how much roving I’d need so I ordered 50g, this was PLENTY, I didn’t even use a quarter of that to do both elbows.
that’s amazing cool stuff shared here by admin. nice forum to stay connected with each other. love is life.
amazing website. cool design and stuff.
Total Network Inventory 3.5.0 Crack Latest Free Download
It’s really interesting to read your article.
AVG AntiVirus 18 Crack Latest Full Free Download
just love it, Well, thank u so much.
Any Video Converter Ultimate Crack Download
great stuff shared here by admin. goof job keep it up.
Fantastic website and most important your content. I like your way. Such amazing.
excelent description of how to make felt elbow patches. thenk you
Great Article. I am learning to be social on SM and learning to blog etc. So all your info helps.
Free software providing company all over the world http://www.crackedseries.com/spyhunter-crack-free-download/
me gustaron mucho los corazones!!!!!!!!!
What about a very loved sweater that has holes in both elbows? Is this technique still possible?
https://softwareconversiontools.com/